background image

Molding

Head Jamb

Sill

Jamb

Jamb

Outside Mount

Inside Mount

Molding

Head Jamb

Sill

Jamb

Jamb

Outside Mount

Inside Mount

Molding

Head Jamb

Sill

Jamb

Jamb

Thank you for purchasing LEVOLOR

®

 Natural Shades. With proper installation, operation, 

and care, your new natural shade will provide years of beauty and performance. Please 
thoroughly review this instruction booklet before beginning installation.

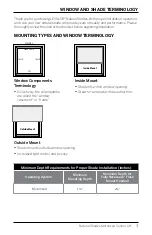
MOUNTING TYPES AND WINDOW TERMINOLOGY

Inside Mount

  Shade fits within window opening.

  Great for windows with beautiful trim.

Window Components  
Terminology

  Collectively, the sill and jambs  

are called the “window 
casement” or “frame”.

Outside Mount

  Shade mounts outside window opening.

  Increased light control and privacy.

Minimum Depth Requirements for Proper Shade Installation (inches)

Operating System

Minimum  

Mounting Depth

Minimum Depth for  

Fully Recessed / Flush 

Mount Headrail

Motorized

11/4"

21/4"

WINDOW AND SHADE TERMINOLOGY

3

Natural Shades Motorized Control Lift

Summary of Contents for Natural Shades Remote Control

Page 1: ......

Page 2: ......

Page 3: ......

Page 4: ......

Page 5: ......

Page 6: ......

Page 7: ......

Page 8: ......

Page 9: ......

Page 10: ......

Page 11: ......

Page 12: ......

Page 13: ......

Page 14: ......

Page 15: ......

Page 16: ......

Page 17: ......

Page 18: ......

Page 19: ......

Page 20: ......

Page 21: ......

Page 22: ......

Page 23: ......

Page 24: ......

Page 25: ......

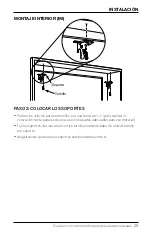
Page 26: ...Montaje exterior Montaje interior Jamba Jamba Alf izar Jamba principal Moldura...

Page 27: ......

Page 28: ......

Page 29: ......

Page 30: ......

Page 31: ......

Page 32: ......

Page 33: ......

Page 34: ......

Page 35: ......

Page 36: ......

Page 37: ......

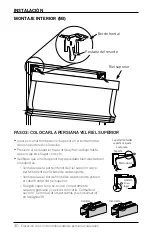
Page 38: ...Tiras de velcro Recodo de cenefa Clip del recodo Clip del recodo Cenefa...

Page 39: ......

Page 40: ......

Page 41: ......

Page 42: ......

Page 43: ......

Page 44: ......

Page 45: ......

Page 46: ......

Page 47: ......

Page 48: ......

Page 49: ......

Page 50: ......

Page 51: ......

Page 52: ......

Page 53: ......

Page 54: ......

Page 55: ......

Page 56: ......

Page 57: ......

Page 58: ......

Page 59: ......

Page 60: ......

Page 61: ......

Page 62: ......

Page 63: ......

Page 64: ......

Page 65: ......

Page 66: ......

Page 67: ......

Page 68: ......

Page 69: ......

Page 70: ......

Page 71: ......

Page 72: ......

Page 73: ......

Page 74: ......

Page 75: ......

Page 76: ......

Page 77: ......

Page 78: ......

Page 79: ......

Page 80: ......

Page 81: ......

Page 82: ......

Page 83: ......

Page 84: ......

Page 85: ......

Page 86: ......

Page 87: ......

Page 88: ......

Page 89: ......

Page 90: ......

Page 91: ......

Page 92: ......

Page 93: ......

Page 94: ......

Page 95: ......

Page 96: ......

Page 97: ......

Page 98: ......

Page 99: ......

Page 100: ......

Page 101: ......

Page 102: ......

Page 103: ......

Page 104: ......

Page 105: ......

Page 106: ......

Page 107: ......

Page 108: ......

Page 109: ......

Page 110: ......

Page 111: ......

Page 112: ......

Page 113: ......

Page 114: ......

Page 115: ......

Page 116: ......

Page 117: ......

Page 118: ......

Page 119: ......

Page 120: ......

Page 121: ...Motorized Control Lift Elevaci n con control motorizado Natural Shades Persianas natural INSTALLATION OPERATION CARE INSTALACI N FUNCIONAMIENTO CUIDADO...

Page 122: ...tery Charging 16 Removing the Shade 16 Additional Information and Support Troubleshooting 17 Cleaning Procedures 18 Warranty 19 Customer Service Support 19 WARNING Keep all small parts components and...

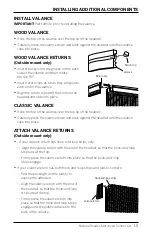
Page 123: ...NTING TYPES AND WINDOW TERMINOLOGY Inside Mount Shade fits within window opening Great for windows with beautiful trim Window Components Terminology Collectively the sill and jambs are called the wind...

Page 124: ...er Installation Brackets Bottom Rail Standard Bottom Up Shade Headrail Micro USB Charging Port Programming Button Hub optional Remote Control Kit optional AAA Battery 2 Pack Standard Remote Control Re...

Page 125: ...ws 2 per bracket 6 Flat Head Screw for Use with End Mounts provided Speed Nut and Screw two provided with each extension bracket Extension Side Mount Brackets optional Spacer Block optional Hold Down...

Page 126: ...ty Glasses Drill with Bits 3 32 drill bit 1 4 hex driver Ladder Screwdrivers both flat and Phillips head Drywall Anchors Level 1 4 Nutdriver Pencil Note Longer screws may be needed with extension brac...

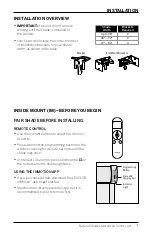
Page 127: ...d buttons to select the channel to pair to Press and hold the programming button on the window covering for about 2 seconds until the shade jogs once In the next 10 seconds press and hold the on the r...

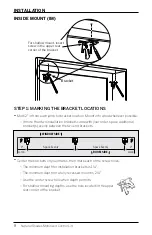
Page 128: ...racket s evenly between the two end brackets Center the brackets on your marks then mark each of the screw holes The minimum depth for installation brackets is 11 4 The minimum depth for a fully reces...

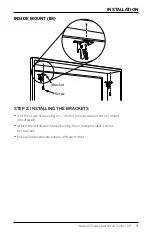
Page 129: ...crew holes using a 3 32 drill bit use drywall anchors to mount into drywall Attach the installation brackets using the screws provided 1 screw per bracket Ensure all brackets are square with each othe...

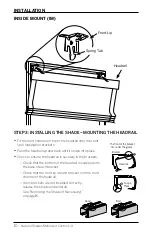
Page 130: ...headrail up and back until it snaps into place Check to ensure the headrail is securely in the brackets Check that the bottom of the headrail is snapped into the base of each bracket Check that the fr...

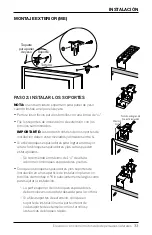
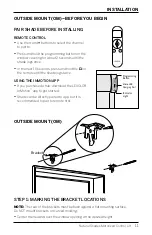
Page 131: ...b download the LEVOLOR InMotion app to get started Shade can be directly paired to app but it is recommended to pair to remote first OUTSIDE MOUNT OM BEFORE YOU BEGIN Micro USB Charging Port Indicator...

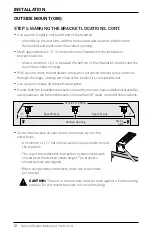
Page 132: ...e a pencil to lightly mark each end of the headrail Alternatively measure the width of the headrail and use that width to mark the headrail end points over the window opening Mark approximately 1 2 in...

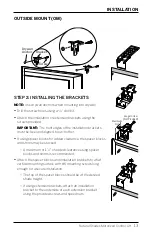
Page 133: ...ims may be stacked A maximum of 1 1 2 of added clearance using spacer blocks and shims is recommended Attach the spacer blocks and installation brackets to a flat vertical mounting surface with 6 moun...

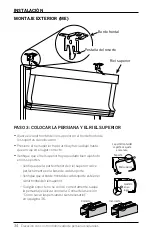
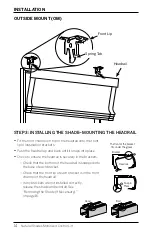
Page 134: ...s snapped into the base of each bracket Check that the front lip of each bracket is in the front channel of the headrail If any brackets are not installed correctly release the shade and reinstall See...

Page 135: ...ur valance return has hook and loop strips only Align the valance return with the end of the headrail so that the hook and loop strips are at the top Firmly press the valance return into place so that...

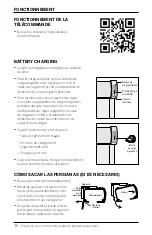
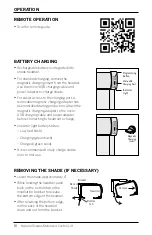
Page 136: ...d charging remove the magnetic charging insert from the headrail Use the micro USB charging cable and power adapter to charge shade For easier access to the charging port a removable magnetic charging...

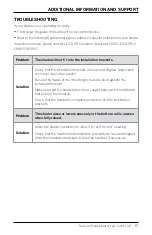
Page 137: ...s or lowers unevenly or the bottom rail is uneven when fully raised Solution Lower the shade completely to allow it to self correct skewing Check that the headrail and installation brackets are level...

Page 138: ...eeds are exactly the same making every shade truly unique Slight color grain and texture variations should be expected and cherished for their unique beauty Although we maintain strict standards to co...

Page 139: ...y have about your new shades you may reach us at 1 800 LEVOLOR 9 00 am 6 00 pm EST www LEVOLOR com ADDITIONAL PARTS AND SERVICES Additional or replacement parts can be ordered or shades can be repaire...

Page 140: ......

Page 141: ...Elevaci n con control motorizado Persianas natural INSTALACI N FUNCIONAMIENTO CUIDADO...

Page 142: ...la bater a 36 C mo quitar las cortinas 36 Informaci n adicional y asistencia Soluci n de problemas 37 Procedimientos de limpieza 38 Garant a 39 Servicio de atenci n alcliente 39 ADVERTENCIA Mantenga t...

Page 143: ...a Jamba principal Alf izar Jamba Jamba Gracias por comprar las persianas de fibras naturales LEVOLOR Con una colocaci n manejo y cuidado adecuados su nueva persiana de fibras naturales le brindar deco...

Page 144: ...cendente est ndar Riel inferior Soportes de colocaci n Riel superior Puerto de carga micro USB Bot n de programaci n Concentrador opcional Kit del control remoto opcional Bater as AAA paquete de 2 Con...

Page 145: ...xagonal 2 por soporte Tornillo de cabeza plana n 6 para usar en instalaciones finales incluidos Tuerca de bloqueo r pido y tornillo se incluyen dos con cada soporte de extensi n Soportes de instalaci...

Page 146: ...si n yseparadores No se muestran en la imagen Cinta m trica met lica Destornilladores tanto de punta plana como tipo Phillips Llave de tuerca de 1 4 Gafas de seguridad Escalera Taquetes para paneles d...

Page 147: ...r el canal para emparejar Mantenga presionado el bot n de programaci n en la decoraci n de ventanas durante aproximadamente 2 segundos hasta que la persiana se mueva una vez En los pr ximos 10 segundo...

Page 148: ...stalaci n de los soportes es de 3 17 cm La profundidad m nima para un montaje totalmente empotrado es de 5 71 cm Use el centro del orificio del tornillo cuando la profundidad lo permita Para colocacio...

Page 149: ...caci n sobre paneles de yeso use los taquetes adecuados para ese material Fije los soportes de colocaci n con los tornillos suministrados Se utiliza 1tornillo por soporte Aseg rese de que todos los so...

Page 150: ...parte inferior del riel superior calce perfectamente en la base de cada soporte Verifique que el borde frontal de cada soporte est en el canal frontal del riel superior Si alg n soporte no se coloc c...

Page 151: ...resionado el bot n de programaci n en la decoraci n de ventanas durante aproximadamente 2 segundos hasta que la persiana se mueva una vez En los pr ximos 10 segundos mantenga presionado en el control...

Page 152: ...ese ancho para marcarlos puntos finales de este sobre la abertura de la ventana Marque entre1 y2 desde cada extremo del riel superior para las posiciones del soporte de colocaci n Deje un m nimo de 1...

Page 153: ...espaciadores ylas cu as pueden estar apilados Se recomienda un m ximo de 11 2 de altura adicional con bloques espaciadores ycu as Coloque los bloques espaciadores ylos soportes de instalaci n en una...

Page 154: ...base de cada soporte Verifique que el borde frontal de cada soporte est en el canal frontal del riel superior Si alg n soporte no se coloc correctamente saque la persiana yvuelvaa colocarla Consulte...

Page 155: ...Si los recodos de la cenefa solamente tienen tiras de velcro siga estos pasos Alinee el recodo de la cenefa con el extremo del riel superior de modo que las tiras de velcro queden en la parte superior...

Page 156: ...Para la carga est ndar retire el inserto de carga magn tico del riel superior Use el cable de carga microUSB y el adaptador de alimentaci n para cargar la persiana Para facilitar el acceso al puerto d...

Page 157: ...a nivelar los soportes si es necesario Aseg rese de que las cabezas de los tornillos de montaje est n al ras del soporte de colocaci n Aseg rese de que la tela de la persiana no est apretada entre el...

Page 158: ...iana sea nica Las variaciones leves de color veta o textura son normales y se destacan por su belleza nica Si bien mantenemos est ndares estrictos para controlar estas variaciones no podemos garantiza...

Page 159: ...erca de su nueva persiana ll menos al 1 800 LEVOLOR de 9 00a m a 6 00p m EST www LEVOLOR com PIEZAS ADICIONALES Y SERVICIOS Puede solicitar piezas adicionales o de repuesto as mismo las persianas se p...

Page 160: ...2022 LEVOLOR Inc 5775 Glenridge Drive Building A Atlanta GA 30328 1029598 20 0048 081...

Page 161: ...Motorized Control Lift Elevaci n con control motorizado Natural Shades Persianas natural INSTALLATION OPERATION CARE INSTALACI N FUNCIONAMIENTO CUIDADO...

Page 162: ...tery Charging 16 Removing the Shade 16 Additional Information and Support Troubleshooting 17 Cleaning Procedures 18 Warranty 19 Customer Service Support 19 WARNING Keep all small parts components and...

Page 163: ...NTING TYPES AND WINDOW TERMINOLOGY Inside Mount Shade fits within window opening Great for windows with beautiful trim Window Components Terminology Collectively the sill and jambs are called the wind...

Page 164: ...er Installation Brackets Bottom Rail Standard Bottom Up Shade Headrail Micro USB Charging Port Programming Button Hub optional Remote Control Kit optional AAA Battery 2 Pack Standard Remote Control Re...

Page 165: ...ws 2 per bracket 6 Flat Head Screw for Use with End Mounts provided Speed Nut and Screw two provided with each extension bracket Extension Side Mount Brackets optional Spacer Block optional Hold Down...

Page 166: ...ty Glasses Drill with Bits 3 32 drill bit 1 4 hex driver Ladder Screwdrivers both flat and Phillips head Drywall Anchors Level 1 4 Nutdriver Pencil Note Longer screws may be needed with extension brac...

Page 167: ...d buttons to select the channel to pair to Press and hold the programming button on the window covering for about 2 seconds until the shade jogs once In the next 10 seconds press and hold the on the r...

Page 168: ...racket s evenly between the two end brackets Center the brackets on your marks then mark each of the screw holes The minimum depth for installation brackets is 11 4 The minimum depth for a fully reces...

Page 169: ...crew holes using a 3 32 drill bit use drywall anchors to mount into drywall Attach the installation brackets using the screws provided 1 screw per bracket Ensure all brackets are square with each othe...

Page 170: ...headrail up and back until it snaps into place Check to ensure the headrail is securely in the brackets Check that the bottom of the headrail is snapped into the base of each bracket Check that the fr...

Page 171: ...b download the LEVOLOR InMotion app to get started Shade can be directly paired to app but it is recommended to pair to remote first OUTSIDE MOUNT OM BEFORE YOU BEGIN Micro USB Charging Port Indicator...

Page 172: ...e a pencil to lightly mark each end of the headrail Alternatively measure the width of the headrail and use that width to mark the headrail end points over the window opening Mark approximately 1 2 in...

Page 173: ...ims may be stacked A maximum of 1 1 2 of added clearance using spacer blocks and shims is recommended Attach the spacer blocks and installation brackets to a flat vertical mounting surface with 6 moun...

Page 174: ...s snapped into the base of each bracket Check that the front lip of each bracket is in the front channel of the headrail If any brackets are not installed correctly release the shade and reinstall See...

Page 175: ...ur valance return has hook and loop strips only Align the valance return with the end of the headrail so that the hook and loop strips are at the top Firmly press the valance return into place so that...

Page 176: ...d charging remove the magnetic charging insert from the headrail Use the micro USB charging cable and power adapter to charge shade For easier access to the charging port a removable magnetic charging...

Page 177: ...s or lowers unevenly or the bottom rail is uneven when fully raised Solution Lower the shade completely to allow it to self correct skewing Check that the headrail and installation brackets are level...

Page 178: ...eeds are exactly the same making every shade truly unique Slight color grain and texture variations should be expected and cherished for their unique beauty Although we maintain strict standards to co...

Page 179: ...y have about your new shades you may reach us at 1 800 LEVOLOR 9 00 am 6 00 pm EST www LEVOLOR com ADDITIONAL PARTS AND SERVICES Additional or replacement parts can be ordered or shades can be repaire...

Page 180: ......

Page 181: ...Elevaci n con control motorizado Persianas natural INSTALACI N FUNCIONAMIENTO CUIDADO...

Page 182: ...la bater a 36 C mo quitar las cortinas 36 Informaci n adicional y asistencia Soluci n de problemas 37 Procedimientos de limpieza 38 Garant a 39 Servicio de atenci n alcliente 39 ADVERTENCIA Mantenga t...

Page 183: ...a Jamba principal Alf izar Jamba Jamba Gracias por comprar las persianas de fibras naturales LEVOLOR Con una colocaci n manejo y cuidado adecuados su nueva persiana de fibras naturales le brindar deco...

Page 184: ...cendente est ndar Riel inferior Soportes de colocaci n Riel superior Puerto de carga micro USB Bot n de programaci n Concentrador opcional Kit del control remoto opcional Bater as AAA paquete de 2 Con...

Page 185: ...xagonal 2 por soporte Tornillo de cabeza plana n 6 para usar en instalaciones finales incluidos Tuerca de bloqueo r pido y tornillo se incluyen dos con cada soporte de extensi n Soportes de instalaci...

Page 186: ...si n yseparadores No se muestran en la imagen Cinta m trica met lica Destornilladores tanto de punta plana como tipo Phillips Llave de tuerca de 1 4 Gafas de seguridad Escalera Taquetes para paneles d...

Page 187: ...r el canal para emparejar Mantenga presionado el bot n de programaci n en la decoraci n de ventanas durante aproximadamente 2 segundos hasta que la persiana se mueva una vez En los pr ximos 10 segundo...

Page 188: ...stalaci n de los soportes es de 3 17 cm La profundidad m nima para un montaje totalmente empotrado es de 5 71 cm Use el centro del orificio del tornillo cuando la profundidad lo permita Para colocacio...

Page 189: ...caci n sobre paneles de yeso use los taquetes adecuados para ese material Fije los soportes de colocaci n con los tornillos suministrados Se utiliza 1tornillo por soporte Aseg rese de que todos los so...

Page 190: ...parte inferior del riel superior calce perfectamente en la base de cada soporte Verifique que el borde frontal de cada soporte est en el canal frontal del riel superior Si alg n soporte no se coloc c...

Page 191: ...resionado el bot n de programaci n en la decoraci n de ventanas durante aproximadamente 2 segundos hasta que la persiana se mueva una vez En los pr ximos 10 segundos mantenga presionado en el control...

Page 192: ...ese ancho para marcarlos puntos finales de este sobre la abertura de la ventana Marque entre1 y2 desde cada extremo del riel superior para las posiciones del soporte de colocaci n Deje un m nimo de 1...

Page 193: ...espaciadores ylas cu as pueden estar apilados Se recomienda un m ximo de 11 2 de altura adicional con bloques espaciadores ycu as Coloque los bloques espaciadores ylos soportes de instalaci n en una...

Page 194: ...base de cada soporte Verifique que el borde frontal de cada soporte est en el canal frontal del riel superior Si alg n soporte no se coloc correctamente saque la persiana yvuelvaa colocarla Consulte...

Page 195: ...Si los recodos de la cenefa solamente tienen tiras de velcro siga estos pasos Alinee el recodo de la cenefa con el extremo del riel superior de modo que las tiras de velcro queden en la parte superior...

Page 196: ...Para la carga est ndar retire el inserto de carga magn tico del riel superior Use el cable de carga microUSB y el adaptador de alimentaci n para cargar la persiana Para facilitar el acceso al puerto d...

Page 197: ...a nivelar los soportes si es necesario Aseg rese de que las cabezas de los tornillos de montaje est n al ras del soporte de colocaci n Aseg rese de que la tela de la persiana no est apretada entre el...

Page 198: ...iana sea nica Las variaciones leves de color veta o textura son normales y se destacan por su belleza nica Si bien mantenemos est ndares estrictos para controlar estas variaciones no podemos garantiza...

Page 199: ...erca de su nueva persiana ll menos al 1 800 LEVOLOR de 9 00a m a 6 00p m EST www LEVOLOR com PIEZAS ADICIONALES Y SERVICIOS Puede solicitar piezas adicionales o de repuesto as mismo las persianas se p...

Page 200: ...2022 LEVOLOR Inc 5775 Glenridge Drive Building A Atlanta GA 30328 1029598 20 0048 081...

Page 201: ...Remote Control Guide LEVOLOR 2022...

Page 202: ...al Remote 13 Operation Operating Instructions 14 Additional Information Troubleshooting 15 Warranty 15 Customer Service 15 Specifications 16 Declarations 16 Remote Control Guide Thank you for choosing...

Page 203: ...installed in shade For easy charging attach the magnetic charging adapter to the micro USB charging cable and power adapter before connecting to the headrail to charge For standard charging remove the...

Page 204: ...ging attach the magnetic charging adapter to the micro USB charging cable and power adapter before connecting to the headrail to charge For standard charging remove the magnetic charging insert from t...

Page 205: ...ce Indicatorlightandchargingportarelocatedonthe bottomofthebattery Magneticcharginginsertcomesinstalled inbattery Foreasycharging attachthemagneticcharging adaptertothemicro USBchargingcableandpowerad...

Page 206: ...w and matches the length requested at time of order Favorite Position This is the preset position that is saved on the blind or shade and is set to the most popular position based on product category...

Page 207: ...hannel can control up to 20 shades at once This remote is designed to control bottom up shades and tilt only wood blinds LCDDisplay Up Stop Holdtosendto favoriteposition Down Higher Channel Lower Chan...

Page 208: ...ess down on cover and slide to remove Install 2 AAA batteries included Align batteries as shown below Program your remote replace the back cover and install closure screw 1 1 2 2 3 3 Install 2 AAA Bat...

Page 209: ...ou are mounting onto wood use a 3 32 drill bit to drill pilot hole If you are mounting onto drywall use the included drywall anchor Attach the wall plate to the wall using the screw provided ensure th...

Page 210: ...by pressing the programming button for 6 seconds until the motor jogs x 2 Wake shades by pressing the programming button for less than 1 second Select a Channel Use channel 0 to control all channels...

Page 211: ...orite position on all blinds and shades assigned to a channel Delete Favorite Position Use the and buttons to select the channel to delete the favorite from Press one P2 button in the battery compartm...

Page 212: ...ss and hold about 5 seconds the up and down buttons simultaneously until the motor jogs x 1 Press and hold about 2 seconds the stop button until the motor jogs x 2 and or beeps x 3 Intermittent Mode R...

Page 213: ...jogs x 1 and or beeps x 1 Press the up button until the motor jogs x 1 and or beeps x 1 Press the up button again until the motor jogs x 2 and or beeps x 1 Set to Slower Speed Press one P2 button in...

Page 214: ...uttons to select the appropriate channel Press and hold the up and stop buttons simultaneously for about 5 seconds until the motor jogs x 1 and or beeps x 1 Use the up and down buttons to raise the bl...

Page 215: ...U unlock 1 2 3 Add or Remove Additional Remote Channels can be copied to an additional remote as an exact duplicate of the current remote programming On the current remote select the channel to copy...

Page 216: ...ition Use channel 0 to operate all channels simultaneously Sheer Shades Once your shade has been paired with the remote use the up and down buttons to raise and lower the shade The vanes can be tilted...

Page 217: ...the programmingbuttononthe motorforabout10seconds untilthemotorjogsx3 and orbeepsx3 Cannotmake changestotravel limitsoroperating mode Remoteswitch islocked Unlockswitchinremote batterycompartment See...

Page 218: ...harmful interference in a residential installation This equipment generates uses and can radiate radio frequency energy and if not installed and used in accordance with the instructions may cause har...

Page 219: ...and 2 this device must accept any interference including interference that may cause undesired operation of the device Le pr sent appareil est conforme aux CNR d ISED applicables aux appareils radio...

Reviews: