background image

4

EXPLANATION OF FUNCTIONS

ALL

1

2

3

4

5

6

GROUP Buttons

Remote Control Guide

Once your remote is programmed, you will be able to 
operate and control the position and adjustment of  
your new window coverings with a touch of a button. 

By setting up GROUPS and FAVORITES you will be able to 
perform all functions.


GROUPS

Joining a window covering to a GROUP is what 
connects a window covering to an individual 
remote and allows the remote to communi-
cate with the window covering, so the window 
covering will follow the remote's commands. 

A window covering will not operate with the 
remote, unless it is assigned to a GROUP

Each LEVOLOR

®

 remote offers 6 GROUP 

assignments, designated by buttons numbered 
1, 2, 3, 4, 5, and 6 on the remote.

A GROUP can consist of a single window covering, or be 
comprised of multiple window coverings, assigned to that 
particular GROUP button. Window coverings assigned to the 
same GROUP, will operate at the same time, when functions 
are selected on the remote. There is no limit to the number  
of window coverings you can assign to a given GROUP.

If you want a window covering to operate independently of other 
window coverings, it must be added to a GROUP of its own.

A window covering can be added to more than one GROUP on 
the same remote (or separate remotes).

Once the window coverings have been joined to a GROUP, the 
remote will operate your window covering.

See page 8 "JOIN A WINDOW COVERING TO A GROUP".

FAVORITES

Setting FAVORITES stores a preferred position 
for each individual window covering, and recalls 
stored position when the FAVORITES button 
is selected. (FAVORITES button is designated 
by the heart 

♥ 

symbol.) Each window covering 

can have ONLY ONE FAVORITE position. Upon 
arrival, each of your window coverings will be set 
to the default FAVORITE position, which is half 
way down. You can re-program each shade to 
your FAVORITE position.

ALL

1

2

3

4

5

6

FAVORITES Button

Summary of Contents for PREMIUM 6-CHANNEL REMOTE

Page 1: ...Roller Shades Remote Control Guide Gu a del control remoto para persianas en rollo Guide de la t l commande pour stores enroulement automatique...

Page 2: ...Control Button 5 Standard Battery Pack 5 Satellite Battery Pack 5 Remote Reset Button 5 LEVOLOR App Overview 6 Getting Started 7 Battery Placement 7 Tools Needed to Mount Remote Holder 7 Mounting LEVO...

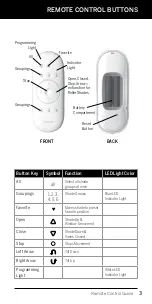
Page 3: ...r Light Button Key Symbol Function LED Light Color All all Select all shade groups at once Groupings 1 2 3 4 5 6 Shade Groups Blue LED Indicator Light Favorite Moves shade to preset favorite position...

Page 4: ...lar GROUP button Window coverings assigned to the same GROUP will operate at the same time when functions are selected on the remote There is no limit to the number of window coverings you can assign...

Page 5: ...ly power to the window covering allowing it to link and function with the remote SATELLITE BATTERY PACK An optional power source that allows the battery pack to be mounted on the top of a headrail nex...

Page 6: ...re The LEVOLOR App is compatible with Android version 5 1 or newer and Apple iOS version 11 0 or newer The app is powered by Bluetooth connectivity which allows your iOS and Android devices to control...

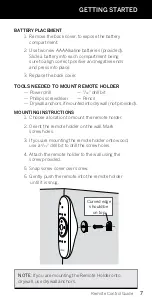
Page 7: ...hillips screwdriver Pencil Drywall anchors if mounted into drywall not provided MOUNTING INSTRUCTIONS 1 Choose a location to mount the remote holder 2 Orient the remote holder on the wall Mark screw h...

Page 8: ...n the remote until the window covering moves slightly to indicate it has been joined to the GROUP 5 Release both buttons 6 To exit program mode press and hold STOP until the lights stop flashing SET A...

Page 9: ...P The BLUE indicator light from the last GROUP S selected will be highlighted and active 2 Press ALL or GROUP 1 2 3 4 5 or 6 button s to select specific window covering s to operate The selected GROUP...

Page 10: ...STOP until the lights stop flashing CREATING A DUPLICATE OR SECOND REMOTE 1 Remove the back cover from the new remote 2 Using a paper clip press and hold the recessed reset button until the BLUE GROU...

Page 11: ...Continue to hold the manual control button until the window covering moves slightly up and down TWO times This indicates the window covering programming has been reset 2 Release the manual control bu...

Page 12: ...ove up down slightly 5 Remote will automatically set to desired stopping point after 30 seconds BATTERY REPLACEMENT Replacing the batteries in the remote will not cause the loss of any window covering...

Page 13: ...can still operate using the manual control button on the headrail If the window covering doesn t operate with the manual control button make sure it has power If the window covering does not have powe...

Page 14: ...frequency energy and if not installed and used in accord ance with the instructions may cause harmful interference to radio communications However there is no guarantee that interference will not occu...

Page 15: ...iated power e i r p is not more than that necessary for successful communication This device complies with Industry Canada license exempt RSS standard s Operation is subject to the following two condi...

Page 16: ...2019 LEVOLOR Inc 3 Glenlake Parkway NE Atlanta GA 30328 1003111 18 0053 025...

Reviews: