background image

66

67

DEUTSCH

PFLEGE

Um Brand- oder Stromschlaggefahr zu vermeiden, trennen Sie das Gerät von der 

AC-Stromquelle, wenn Sie es reinigen. Die Politur Ihres Gerätes kann mit einem 

Staubtuch gereinigt und wie andere Möbelstücke gepflegt werden. Reinigen Sie 

das  Äußere  des  Gerätes  mit  einem  weichen,  sauberen  Tuch,  das  mit  klarem, 

lauwarmen Wasser angefeuchtet ist. Seien Sie vorsichtig, wenn Sie die Plastikteile 

reinigen  und  abwischen.  Eine  milde  Seife  und  ein  feuchtes  Tuch  können  zum 

Reinigen der Vorderseite benutzt werden.

GARANTIE

2  Jahre  Garantie.  Die  gesetzlichen  Gewährleistungsrechte  bleiben  neben  der 

Garantie bestehen.

Bei  Beanstandungen,  die  unter  diese  Garantie  fallen  oder  sollten  Sie  den 

Kundendienst  benötigen,  wenden  Sie  sich  bitte  an  Ihren  Händler  und  legen 

Sie  einen  gültigen  Kaufbeleg  vor.  Unsere  Garantie  deckt  alle  Material-  und 

Verarbeitungsmängel ab,  mit Ausnahme jeglicher Verschleißerscheinungen, die 

aus der Nichtbeachtung der Bedienungsanleitung resultieren oder durch jedwede 

fahrlässige  Handlung  an  diesem  Produkt  verursacht  wurden  (wie  demontieren, 

Hitze oder Feuchtigkeit aussetzen, usw.). Es wird empfohlen, die Verpackung für 

etwaige zukünftige Bezugnahmen aufzubewahren.

In dem Bemühen unsere Leistungen kontinuierlich zu verbessern, könnte es sein, 

dass wir Veränderungen an den Farben oder der Produktausführung, wie auf der 

Verpackung abgebildet, vornehmen.

HINWEIS:  Bitte  bewahren  Sie  diese  Bedienungsanleitung  auf,  da  sie  wichtige 

Informationen enthält. 

Referenznummer: BT910series

Design und Entwicklung in Europa - Hergestellt in China

© LEXIBOOK®

Deutschland & Österreich

Für den Kundendienst wenden Sie sich bitte an unsere Teams:

 01805 010931 (0,14 Euro/Minute)

E-Mail: kundenservice@lexibook.com

www.lexibook.com

Hinweise zum Umweltschutz

Alt-Elektrogeräte sind Wertstoffe, sie gehören daher nicht in den Hausmüll! Wir möchten Sie daher bitten, uns 

mit Ihrem aktiven Beitrag bei der Ressourcenschonung und beim Umweltschutz zu unterstützen und dieses 

Gerät bei den (falls vorhanden) eingerichteten Rücknahmestellen abzugeben.

Dieses Produkt ist kein Spielzeug.

BT910seriesIM1176_101_V19.indd   67

28/4/16   6:32 pm

Summary of Contents for BT910 series

Page 1: ...Bluetooth Sound Tower BT910series BT910seriesIM1176_101_V19 indd 1 28 4 16 6 32 pm ...

Page 2: ...reil de l électricité la prise d alimentation doit être déconnectée de la prise électrique MESURES DE SECURITE BENZENE Solution nettoyante BENZENE Solution nettoyante MISE EN GARDE RISQUE D ÉLECTROCUTION NE PAS OUVRIR MISE EN GARDE AFIN DE RÉDUIRE LES RISQUES D ÉLECTROCUTION NE PAS ENLEVER LE COUVERCLE NI L ARRIÈRE NE CONTIENT AUCUNE PIÈCE POUVANT ÊTRE RÉPARÉE NI REMPLACÉE PAR L UTILISATEUR CONFIE...

Page 3: ... 11 Le câble d alimentation doit être placé de sorte à éviter qu on ne marche pas dessus ou qu il soit écrasé particulièrement à l endroit de la prise à l endroit où il est branché et à l endroit d où il sort de l appareil 12 Utilisez uniquement les pièces détachées accessoires spécifiés par le fabricant 13 Débranchez cet appareil durant les orages ou lorsqu il n est pas utilisé durant une longue ...

Page 4: ...rce de chaleur excessive par exemple la lumière du soleil ou un feu 21 Pour protéger l environnement jetez les piles accumulateurs et appareils électriques usés de manière appropriée 22 Utilisez l appareil uniquement lorsque les températures ambiantes sont modérées Températures de fonctionnement 0 C 40 C 23 La prise secteur doit être installée près de l appareil et rester facilement accessible 24 ...

Page 5: ...câble CA de la prise de courant puis rebranchez le La télécommande de votre tour de son Bluetooth fonctionne avec 1 pile de type CR2025 3V Lithium incluse Avant la première utilisation 1 Ouvrez le couvercle des piles situé à l arrière de l appareil 2 Insérez 1 pile de type x CR2025 3V Lithium incluse 3 Remettez le couvercle pour fermer le compartiment à pile Ne pas recharger les piles non recharge...

Page 6: ...urs Arrière 14 Panneau de commande arrière A Prise d entrée CC B Prise microphone 3 5mm C Bouton Marche Arrêt du micro et réglage du volume 15 Porte microphone Note Vérifiez que le bouton Marche Arrêt est en position Arrêt off en dehors des périodes d utilisation du microphone 2 1 5 4 3 7 8 6 9 10 11 12 13 14 15 13 A B C ATTENTION D importantes interférences électromagnétiques ou des décharges éle...

Page 7: ...irection du récepteur situé entre les haut parleurs de la tour MISE EN MARCHE ARRÊT DE L APPAREIL 1 Avant d allumer votre tour de son Bluetooth vérifiez qu elle soit branchée à une prise électrique Une fois branché le voyant POWER MODE s allume 2 Pour allumer l appareil appuyez sur le bouton POWER MODE du panneau de commande Vous pouvez aussi utiliser votre télécommande en appuyant sur le bouton d...

Page 8: ...nné le voyant correspondant s allumera 2 La tour lira automatiquement la musique à partir de la clé USB 3 Appuyez sur les boutons PRÉCÉDENT SUIVANT pour sélectionner la musique souhaitée ou composez le numéro de la piste grâce aux touches de votre télécommande 4 Appuyez sur LECTURE PAUSE pour lire ou mettre sur pause le fichier audio Port carte SD MMC pour lecture de fichiers audio 1 Mettez l appa...

Page 9: ...einte sélectionnez un autre mode sur le panneau de commande avant ou appuyez sur la touche de déconnexion de votre lecteur audio Une fois l appairage arrêté le voyant lumineux se met à clignoter Entrée auxiliaire IN Vous pouvez aussi écouter de la musique à partir de la tour de son grâce à l entrée AUX in lorsque celle ci est connectée à un lecteur audio externe 1 Mettez l appareil en marche et ap...

Page 10: ...e volume Vérifiez l association des appareils Vérifiez que le contrôle du volume N EST PAS réglé au minimum Vérifiez que la sourdine N EST PAS activée Assurez vous que le mode choisi est bien le bon Appuyez sur le bouton MODE jusqu à obtenir le mode voulu Ré appairage Lorsque la tour ou le mode Bluetooth est éteint e 1 Mettez en marche le Bluetooth sur votre lecteur audio Allumez la tour Bluetooth...

Page 11: ...5 2014 Par la présente nous déclarons que le produit désigné ci dessus est en conformité avec les directives de l Union européenne notamment à la directive CEM 2004 108 CE et aux directives Basse tension 2006 95 CE et RTTE 1999 5 CE Yiu Wai Man Directeur du développement du produit Hong Kong le 18 05 2016 2522 SPÉCIFICATIONS GÉNÉRAL Adaptateur secteur Entrée AC 100 240V 50 60 Hz Sortie 12V 1 2A Ha...

Page 12: ...rder ce mode d emploi il contient d importantes informations Le contenu de ce mode d emploi peut changer sans préavis Aucune partie de ce mode d emploi ne doit être reproduite sans le consentement écrit du fabricant Référence BT910series Conçu et développé en Europe Fabriqué en Chine LEXIBOOK LEXIBOOK S A 2 avenue de Scandinavie 91953 Courtabœuf Cedex France Pour vos demandes concernant un problèm...

Page 13: ...e apparatus shall not be exposed to dripping or splashing and that no objects filled with liquids such as vases shall be placed on the apparatus The mains plug is used as the disconnect device the disconnect device shall remain readily operable In order to disconnect the apparatus from the mains completely the mains plug should be disconnected from the mains socket outlet completely SAFETY PRECAUT...

Page 14: ...g type plug has two blades and a third grounding prong The wide blade or the third prong is provided for your safety If the provided plug does not fit into your outlet consult an electrician for replacement of the obsolete outlet 11 Protect the power cord from being walked on or pinched particularly at plugs convenience receptacles and the point where they exit from the apparatus 12 Only use attac...

Page 15: ...s the disconnecting part is the AC DC adaptor 26 The apparatus and AC DC adaptor shall not be exposed to dripping or splashing and no objects filled with liquids such as vases shall be placed near them 27 At full power listening to a music player for prolonged periods can damage the user s hearing UNPACKING THE DEVICE POWER SOURCES When unpacking ensure that the following elements are included 1 x...

Page 16: ...ply terminals are not to be short circuited Do not throw batteries into a fire Remove the batteries if you are not going to use the product for a long period of time Battery shall not be exposed to excessive heat such as sunshine fire or the like WARNING Malfunction or loss of memory may be caused by strong frequency interference or electrostatic discharge Should any abnormal function occur remove...

Page 17: ...9 POWER MODE button 10 PLAY PAUSE button 11 PREVIOUS VOL Volume Down button 12 NEXT VOL Volume Up button Front 13 Speaker units Back 14 Back panel A DC jack B 3 5mm Microphone jack C Microphone ON OFF and volume knob 15 Microphone holder Note Please ensure the ON OFF knob is on off position when the microphone is not used 2 1 5 4 3 7 8 6 9 10 11 12 13 14 15 13 A B C BT910seriesIM1176_101_V19 indd ...

Page 18: ... Once the mode selected the corresponding indicator will light up SPEAKER FUNCTIONS Remote control 1 POWER button 2 MODE button 3 MUTE button 4 PLAY PAUSE button 5 PREVIOUS button 6 NEXT button 7 EQ button only under the USB SD mode 8 VOL button to decrease the volume 9 VOL button to increase the volume 10 RPT button Press the repeat button to repeat the now playing song press again to repeat all ...

Page 19: ...ght up 2 The tower will automatically play music from the USB 3 Press on you remote control PREVIOUS and NEXT button to select the desired music or input the track number via the number keys of your remote control 4 Press PLAY PAUSE button to play or pause the music SD MMC card slot for playback 1 Power on the unit and insert a SD MMC card not supplied into the SD MMC card slot ensuring the plug i...

Page 20: ...nd volume level using the keys on your personal device or the volume buttons of the tower 5 To stop the connection with the speaker press another mode on the top panel or a button on your audio player Once the connection has been stopped the LED indicator will flash BLUETOOTH SET UP 1 Turn the unit on then press MODE button repeatedly until selecting the AUX in mode Once selected the AUX in indica...

Page 21: ...button to reduce the volume Ensure the volume is not too low or on mute Ensure the song is playing Ensure the Bluetooth device is correctly paired Re pairing When the Bluetooth mode of the Sound Tower or your device has been switched off 1 Switch on the Bluetooth of your audio player and press MODE button to select Bluetooth mode 2 The Sound Tower automatically finds the last device it was paired ...

Page 22: ...00328 V1 9 1 EN 62479 2010 EN 60065 2014 We hereby declare that the above mentioned product is in compliance with the EMC Directive 2004 108 EC with the Low Voltage Directive 2006 95 EC and with the R TTE Directive 1999 5 EC of the European Commission Yiu Wai Man Product Development Manager 18 05 2016 Hong Kong 2522 SPECIFICATIONS General AC DC Adaptor Input AC 100 240V 50 60 Hz Output 12V 1 2A Au...

Page 23: ...rmation Reference BT910series Designed and developed in Europe Made in China LEXIBOOK United Kingdom Ireland For after sales service please contact our teams 0808 1003015 www lexibook com Environmental Protection Unwanted electrical appliances can be recycled and should not be discarded along with regular household waste Please actively support the conservation of resources and help protect the en...

Page 24: ...rato de la red eléctrica debe desconectarse de la pared el enchufe de red PRECAUCIONES DE SEGURIDAD BENZENE Solution nettoyante BENZENE Solution nettoyante PRECAUCIÓN RIESGO DE DESCARGA ELÉCTRICA NO ABRIR PRECAUCIÓN PARA REDUCIR EL RIESGO DE DESCARGA ELÉCTRICA NO RETIRE LACUBIERTA O PARTE TRASERA NO HAY PIEZAS EN EL INTERIOR SUSCEPTIBLES DE SER MANIPULADAS POR EL USUARIO EN CASO DE AVERÍA SOLICITE...

Page 25: ... tercera borna se proporcionan para su seguridad Si el enchufe suministrado no encaja en su enchufe de red consulte con un electricista para que sustituya el enchufe de tipo obsoleto 11 Proteja el cable de alimentación para evitar que se pise o se pille particularmente en las zonas de los enchufes enchufes auxiliares y en el lugar por el que sale el cable del equipo 12 Utilice únicamente los compl...

Page 26: ...ión cualificado 19 Después de realizada cualquier revisión o reparación en este producto solicite al técnico que realice las comprobaciones de seguridad necesarias para asegurar que el producto funciona en condiciones correctas 20 Deberá evitarse exponer las pilas a temperaturas excesivamente elevadas tales como las generadas por la acción de los rayos del sol o de las llamas 21 Deberá prestarse a...

Page 27: ...as pilas ADVERTENCIA Las descargas electrostáticas o interferencias de una frecuencia suficientemente fuerte podrán provocar el funcionamiento anormal del aparato o la pérdida de los datos almacenados en su memoria En caso de observarse algún funcionamiento anormal bien retire y vuelva a instalar las pilas No intente nunca recargar pilas no recargables Para cargar las pilas recargables antes retír...

Page 28: ...ODUCIR PAUSAR 11 Botón ANTERIOR VOL Bajada de volumen 12 Botón SIGUIENTE VOL Subida de volumen Parte frontal 13 Unidades del altavoz Parte posterior 14 Panel posterior A Toma CC B Toma de 3 5 mm para micrófono C Micrófono ON OFF encendido apagado y botón de ajuste del volumen 15 Pinza de sujeción del micrófono Nota Compruebe que el botón de ON OFF encendido apagado está en posición de apagado cuan...

Page 29: ... que el mando a distancia apunta al receptor entre las unidades del altavoz ENCENDIDO Y APAGADO DEL APARATO 1 Antes de encender la Torre de sonido Bluetooth compruebe que tiene suministro energético Una vez que ha encendido el indicador POWER MODE se iluminará 2 Para encender el aparato presiona el botón MODE ubicado en el panel superior También puede encenderlo presionando el botón de ENCENDIDO e...

Page 30: ...iente se iluminará 2 La torre reproducirá automaticamente música desde el USB 3 Presione los botones ANTERIOR y SIGUIENTE en el mando a distancia para seleccionar la música deseada o introducir el número de pista pulsando los botones numéricos en el mando a distancia 4 Presione el botón REPRODUCIR PAUSAR para reproducir o pausar la música Ranura para reproducción desde tarjeta SD MMC 1 Encienda el...

Page 31: ...de volumen usando los botones de su dispositivo personal o los botones de volumen de la torre 5 Para detener la conexión con el altavoz presione otro modo en el panel superior o presione un botón en su reproductor de audio Una vez detenida la conexión el indicador LED parpadeará la entrada auxiliar conectando a ella un reproductor externo 1 Encienda el aparato y presione el botón MODE repetidament...

Page 32: ... Bluetooth RESOLUCIÓN DE PROBLEMAS SÍNTOMA No hay alimentación El dispositivo Bluetooth y el altavoz no se emparejan Se ha perdido el emparejamiento Sonido distorsionado No hay sonido SOLUCIÓN Compruebe la conexión del adaptador de alimentación entre el altavoz de torre y la toma de corriente Compruebe que la Torre de sonido Bluetooth está encendida Compruebe que la función Bluetooth está activada...

Page 33: ... producto mencionado anteriormente está en conformidad con la directiva sobre compatibilidad electromagnética EMC 2004 108 CE con la directiva sobre baja tensión 2006 95 CE y con la directiva sobre equipos de radio y terminales de telecomunicaciones R TTE 1999 5 CE de la Comisión Europea Yiu Wai Man Gerente de desarrollo de productos 18 05 2016 Hong Kong 2522 ESPECIFICACIONES General Adaptador CA ...

Page 34: ...de las instrucciones de este manual o de alguna acción imprudente realizada sobre la unidad como desmontarla exposición al calor o a la humedad etc Se recomienda conservar el embalaje para consultas en el futuro En nuestro compromiso por mejorar nuestros servicios podrían haberse realizado modificaciones en los colores y detalles del producto mostrado en el embalaje NOTA Conserve este manual de in...

Page 35: ...nto Para desligar completamente o aparelho da alimentação deverá retirar por completo a ficha da tomada PRECAUÇÕES DE SEGURANÇA BENZENE Solution nettoyante BENZENE Solution nettoyante CUIDADO RISCO DE CHOQUE ELÉCTRICO NÃO ABRIR CUIDADO PARA REDUZIR O RISCO DE CHOQUE ELÉCTRICO NÃO RETIRE A COBERTURA DIANTEIRA OU TRASEIRA NÃO EXISTEM PEÇAS QUE POSSAM SER REPARADAS PELO UTILIZADOR NO INTERIOR AREPARA...

Page 36: ... a segurança da ficha polarizada ou com ligação à terra Uma ficha polarizada tem dois dentes um maior do que o outro Uma ficha com ligação à terra tem dois dentes e um terceiro dente da ligação à terra O dente mais largo ou o terceiro dente existem para sua segurança Se a ficha fornecida não couber na sua tomada consulte um electricista especializado para proceder à substituição da tomada obsoleta...

Page 37: ...23 O adaptador AC DC não deve ficar obstruído E deve ser de fácil acesso durante a utilização 24 Para desligar completamente a energia eléctrica o adaptador AC DC deve ser desligado da tomada da parede já que o interruptor para desligar é o próprio adaptador AC DC 25 O aparelho e o adaptador AC DC não devem ser expostos a pingos ou salpicos nem se devem colocar objecto com líquidos como jarras jun...

Page 38: ...nquedo antes de serem recarregadas e só deverão ser recarregadas sob a supervisão de um adulto Não misture diferentes tipos de pilhas ou pilhas novas com pilhas usadas Só deverá utilizar pilhas do mesmo tipo ou de um tipo equivalente às recomendadas As pilhas deverão ser colocadas com a polaridade correcta Deverá retirar as pilhas gastas do brinquedo Não coloque os terminais em curto circuito Não ...

Page 39: ...lume Frente 13 Unidades do altifalante Painel traseiro 14 Painel de comando traseiro A Entrada para microfone de 3 5 mm B Botão de ON OFF ligar desligar C Microfone e botão do volume 15 Suporte do microfone AVISO O mau funcionamento ou perda de memória podem ser causados por fortes interferências ou descargas electrostáticas Caso ocorra algum funcionamento anormal retire e volte a colocar as pilha...

Page 40: ...icador acende Reprodução Pausa 1 Prima o botão PLAY PAUSE para começar a reproduzir ficheiros de áudio a partir do seu aparelho emparelhado Telecomando 1 Botão POWER energia 2 Botão MODE Modo 3 Botão MUTE silêncio 4 Botão de REPRODUÇÃO PAUSA 5 Botão de ANTERIOR 6 Botão de SEGUINTE 7 Botão EQ apenas no modo USB SD 8 Botão VOL para diminuir o volume 9 Botão VOL para aumentar o volume 10 Botão RPT pr...

Page 41: ...uz automaticamente música a partir do USB 3 Prima o botão ANTERIOR e SEGUINTE no seu telecomando para selecionar a música desejada ou inserir o número da faixa através dos botões dos números do seu telecomando 4 Prima o botão de REPRODUÇÃO PAUSA para reproduzir ou fazer uma pausa na música Ranhura do cartão SD para reprodução 1 Ligue a unidade e insira um cartão SD MMC não fornecido na ranhura par...

Page 42: ...juste o nível do volume do som com os botões do seu dispositivo pessoal ou os botões do volume da torre 5 Para parar a ligação com o altifalante prima outro modo no painel superior ou um botão no seu leitor de áudio Quando a ligação terminar o indicador LED começa a piscar Voltar a emparelhar Quando o modo Bluetooth da torre de som ou do seu dispositivo for desligado 1 Ligue a unidade depois prima...

Page 43: ...ique se de que está a reproduzir a música Certifique se de que o dispositivo Bluetooth está emparelhado corretamente Certifique se de que o o volume não está alto demais Carregue no botão VOL para baixar o som 1 Ligue o Bluetooth do seu leitor de áudio e prima o botão MODE para selecionar o modo Bluetooth 2 A Torre de Som encontra automaticamente o último dispositivo com que esteve emparelhada NOT...

Page 44: ...V1 9 1 EN 62479 2010 EN 60065 2014 Declaramos desta forma que o produto supra mencionado está em conformidade com a Diretiva CEM 2004 108 CE com a Diretiva Baixa Tensão 2006 95 CE e com a Diretiva ETRT 1995 5 CE da Comissão Europeia Yiu Wai Man Gerente de Desenvolvimento de Produto 18 05 2016 Hongkong 2522 ESPECIFICAÇÕES Gerais Adaptador AC DC Entrada AC 100 240V 50 60 Hz Saída DC 12V 1 2A Altifal...

Page 45: ...oração devido à não observância do manual de instruções ou de quaisquer acções sem cuidado implementadas neste aparelho como desmontar expor ao calor e à humidade etc Recomendamos que guarde a caixa para futuras referências Num esforço constante para melhorar os nossos serviços podemos implementar modificações nas cores e pormenores do produto apresentado na caixa NOTA Por favor guarde este manual...

Page 46: ... Per staccare completamente l apparecchio dalla rete elettrica staccare la spina dalla presa di corrente PRECAUZIONI DI SICUREZZA BENZENE Solution nettoyante BENZENE Solution nettoyante ATTENZION PERICOLO DI SCOSSA ELETTRICA NON APRIRE ATTENZIONE PER RIDURRE IL RISCHIO DI SCOSSA ELETTRICA NON RIMUOVERE IL COPERCHIO O LA PARTE POSTERIORE ALL INTERNO NON SONO PRESENTI PARTI SOSTITUIBILI DALL UTENTE ...

Page 47: ... la sicurezza fornita dalla spina polarizzata o con messa a terra La spina polarizzata ha due rebbi uno dei quali distanziato dall altro La spina con messa a terra ha due rebbi e un terzo per la messa a terra Il terzo rebbo è fornito per garantire la sicurezza Se la spina in dotazione non si adatta alla presa di corrente consultate un elettricista per sostituire la presa di corrente obsoleta 11 Pr...

Page 48: ...namento 0 C 40 C 23 La presa elettrica deve trovarsi vicino all apparecchio e deve essere facilmente accessibile 24 L adattatore AC DC non deve essere ostruito e deve essere facilmente accessibile durante l uso 25 Per scollegare completamente l alimentazione è necessario scollegare l adattatore AC DC poiché l elemento che collega l apparecchio alla rete è l adattatore AC DC 26 L apparecchio e l ad...

Page 49: ...vamente Il telecomando dell altoparlante a torre Bluetooth è alimentato da 1 batteria al litio CR2025 da 3V inclusa Al primo utilizzo del telecomando 1 Estrarre la linguetta trasparente dal vano batteria situato sulla parte inferiore del telecomando 2 Inserire 1 batteria al litio CR2025 da 3V inclusa 3 Chiudere il vano batteria Le batterie non ricaricabili non devono essere ricaricate Le batterie ...

Page 50: ... posteriore A Ingresso di alimentazione CC B Jack per microfono da 3 5 mm C Manopola ON OFF acceso spento e Volume del microfono 15 Porta microfono AVVERTENZA Il cattivo funzionamento o la perdita di memoria può essere causato da una forte interferenza di frequenza o scariche elettrostatiche In caso di qualsiasi funzionamento anormale rimuovere le batterie e inserirle di nuovo Nota assicurarsi che...

Page 51: ... che sia collegato a una presa di corrente Quando è collegato la spia POWER MODE lampeggerà 2 Per accendere l unità premere il pulsante POWER MODE sul pannello superiore È anche possibile usare il telecomando premendo il pulsante POWER 3 Per spegnerlo tieni premuto il pulsante MODE per due secondi circa Nota scollegare l adattatore CA CC dalla presa di corrente per spegnere l unità in previsione d...

Page 52: ...emere il pulsante PRECEDENTE o SUCCESSIVO sul telecomando per selezionare la traccia desiderata o inserire il numero della traccia con i pulsanti numerici sul telecomando 4 Premere il pulsante RIPRODUCI PAUSA per riprodurre o interrompere le tracce Riproduzione da schede SD MMC 1 Accendere l unità e inserire una scheda SD MMC non inclusa nella porta SD MMC assicurandosi che il connettore sia inser...

Page 53: ... sul dispositivo o sulla torre 5 Per interrompere il collegamento con l altoparlante selezionare un altra modalità con il pulsante sul pannello superiore o sul dispositivo Quando l abbinamento è disattivo la spia lampeggerà Nuovo appaiamento Quando la modalità Bluetooth dell altoparlante a torre o del dispositivo esterno 1 Accendere l unità e premere ripetutamente il pulsante MODE fino a seleziona...

Page 54: ...il volume del suono non sia troppo elevato Premere il pulsante VOL per ridurre il volume Assicurarsi che il volume non sia troppo basso o disattivo Assicurarsi che la traccia sia in riproduzione Assicurarsi che il dispositivo Bluetooth sia stato abbinato correttamente è stata spenta 1 Attivare la funzione Bluetooth sul dispositivo esterno e premere il pulsante MODE per selezionare la modalità Blue...

Page 55: ...V1 9 2 EN 301489 17 V2 2 1 EN 300328 V1 9 1 EN 62479 2010 EN 60065 2014 Con la presente dichiariamo che il prodotto qui descritto è conforme alla direttive europee EMC 2004 108 EC Basso voltaggio 2006 95 EC e R TTE 1999 5 EC Yiu Wai Man Manager Sviluppo prodotto 18 05 2016 Hong Kong 2522 SPECIFICHE Generali Adattatore AC Ingresso AC 100 240V 50 60 Hz Produzione DC 12V 1 2A Altoparlanti 10W x 2 Aud...

Page 56: ...entuali deterioramenti che derivano dalla non osservanza del manuale di istruzioni o dall uso poco attento del prodotto ad es smontaggio esposizione a calore e umidità ecc Si consiglia di conservare l imballo per eventuali riferimenti futuri Allo scopo di continuare a migliorare il nostro servizio potremmo implementare modifiche a colori e particolari del prodotto illustrato sull imballo NOTA Cons...

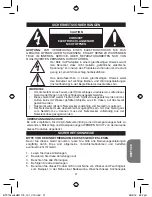
Page 57: ...ERHEITSVORKEHRUNGEN BENZENE Solution nettoyante BENZENE Solution nettoyante CAUTION VORSICHT ELEKTROSCHLAGGEFAHR NICHT ÖFFNEN ACHTUNG ZUR VERMEIDUNG EINES ELEKTROSCHOCKS NIE DAS GEHÄUSE ÖFFNEN ODER SCHLIESSEN ES GIBT KEINE ZU WARTENDEN TEILE IM INNEREN SERVICE ODER REPARATURARBEITEN NUR VON QUALIFIZIERTEN PERSONEN DURCHFÜHREN BENZENE Solution nettoyante BENZENE Solution nettoyante ÜBERSPANNUNGSSCH...

Page 58: ...r hat zwei Stifte und einen dritten Erdungsstift Der größere Stift oder der dritte Erdungsstift dient Ihrer Sicherheit Sollte der mitgelieferte Stecker nicht in Ihre Steckdose passen wenden Sie sich bitte an einen Elektriker um die technisch überholte Steckdose zu erneuern 11 Schützen Sie das Netzstromkabel vor dem Darauftreten und davor dass es besonders am Netzstecker an der Netzsteckdose und de...

Page 59: ...n aussetzen kann Wenden Sie sich für alle Reparatur und Wartungsarbeiten an qualifiziertes Fachpersonal 19 Die Batterien dürfen keinen übermäßigen Hitzequellen ausgesetzt werden zum Beispiel Sonnenschein oder Feuer 20 Die Bestimmungen für eine umweltfreundliche Entsorgung der Batterien sollten beachtet werden 21 DasGerätsollteineinemmoderatenKlimabenutztwerden Betriebstemperatur 0 C 40 C 22 Die Ne...

Page 60: ...Produkt wenn es für längere Zeit nicht benutzt wird Wenn der Sound schwächer wird oder das Spielzeug anfängt nicht mehr direkt zu reagieren deutet dieses ebenfalls darauf hin dass es Zeit wird neue Hinweis Benutze nur den mit dem Produkt mitgelieferten Adapter Verwende keinen anderen Adapter Die Netzsteckdose sollte in der Nähe der Anlage installiert und leicht zugänglich sein Nachdem Sie das Netz...

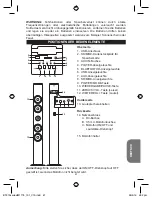
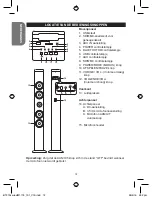
Page 61: ...MC Kartensteckplatz für Speicherkarte 3 AUX IN Buchse 4 POWER Anzeigeleuchte 5 BLUETOOTH Anzeigeleuchte 6 USB Anzeigeleuchte 7 AUX Anzeigeleuchte 8 SD MMC Anzeigeleuchte 9 POWER MODE Taste 10 WIEDERGABE PAUSE Taste 11 ZURÜCK VOL Taste Leiser 12 WEITER VOL Taste Lauter Vorderseite 13 Lautsprechereinheiten Rückseite 14 Netzanschluss A DC Buchse B 3 5 mm Mikrofonbuchse C Mikrofon ON OFF und Lautstärk...

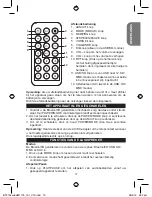
Page 62: ...k Weiter 1 Drücken Sie die ZURÜCK VOL Taste um zum vorherigen Titel zurückzugehen 2 Drücken Sie die WEITER VOL Taste um den nächsten Titel abzuspielen Fernbedienung 1 EIN AUS Taste 2 MODE Taste 3 STUMM Taste 4 WIEDERGABE PAUSE Taste 5 ZURÜCK Taste 6 WEITER Taste 7 EQ Taste nur im USB SD Modus 8 ZURÜCK VOL Taste zum Verringern der Lautstärke 9 WEITER VOL Taste zum Erhöhen der Lautstärke 10 RPT Tast...

Page 63: ...tet die entsprechende Anzeige auf 2 Der Turmlautsprecher spielt Musik von dem USB Speicher ab 3 Drücken Sie auf der Fernbedienung die ZURÜCK und WEITER Tasten um die gewünschte Musik auszuwählen oder geben Sie die Titelnummer über die Zahltentasten Ihrer Fernbedienung ein 4 Drücken Sie die WIEDERGABE PAUSE Taste um die Musik abzuspielen oder zu unterbrechen SD MMC Kartensteckplatz zur Wiedergabe 1...

Page 64: ...der Tasten an Ihrem Audiogerät oder den Lautstärke Tasten am Turmlautsprecher 5 Um die Verbindung zum Lautsprecher abzubrechen wählen Sie einen anderen Modus mit der MODE Taste an der Oberseite oder einer Taste an Ihrem Audio Player Sobald die Verbindung abgebrochen wurde blinkt die LED Anzeige Aux in Sie können auch Musik von einem externen mit der AUX in Buchse verbundenen Audio Player über den ...

Page 65: ...Lautstärke zu reduzieren Prüfen Sie ob die Lautstärke zu leise oder stummgeschaltet ist Prüfen Sie ob der Titel abgespielt wird Stellen Sie sicher dass das Bluetooth Gerät korrekt verbunden ist Erneuter Verbindungsaufbau Wenn der Bluetooth Modus des Sound Tower oder Ihres Gerätes deaktiviert wurde 1 Aktivieren Sie das Bluetooth Ihres Audio Players und drücken Sie die MODE Taste um den Bluetooth Mo...

Page 66: ...lären hiermit dass das oben erwähnte Produkt mit der EMC Richtlinie 2004 108 EC mit der Niederspannungsdirektive 2006 95 EC und der R TTE Richtlinie 1999 5 EC der Europäischen Kommission übereinstimmt Yiu Wai Man Produktentwicklungsleiter 18 05 2016 Hongkong KONFORMITÄTSERKLÄRUNG 2522 TECHNISCHE DATEN Allgemein AC DC Adapter Eingabe AC 100 240V 50 60 Hz Ausgang DC 12V 1 2A Lautsprechers 10W x 2 Au...

Page 67: ...g resultieren oder durch jedwede fahrlässige Handlung an diesem Produkt verursacht wurden wie demontieren Hitze oder Feuchtigkeit aussetzen usw Es wird empfohlen die Verpackung für etwaige zukünftige Bezugnahmen aufzubewahren In dem Bemühen unsere Leistungen kontinuierlich zu verbessern könnte es sein dass wir Veränderungen an den Farben oder der Produktausführung wie auf der Verpackung abgebildet...

Page 68: ...at volledig van het net los te koppelen dient u de netstekker van het apparaat volledig los te koppelen van het stopcontact VEILIGHEIDSMAATREGELEN BENZENE Solution nettoyante BENZENE Solution nettoyante CAUTION RISK OF ELECTRIC SHOCK DO NOT OPEN LET OP OM HET RISICO VAN EEN ELEKTRISCHE SCHOK TE VERMINDEREN VERWIJDER DE BEHUIZING ACHTERKANT NIET IN HET APPARAAT ZITTEN GEEN ONDERDELEN DIE DOOR DE GE...

Page 69: ...er niet Een gepolariseerde stekker heeft twee pennen waarvan de ene iets breder is dan de andere Een geaarde stekker heeft twee pennen en een derde aardklem De brede pen of de derde aardklem zijn voorzien voor uw veiligheid Als de voorziene stekker niet op uw stopcontact past dient u een elektricien te raadplegen voor het vervangen van het verouderde stopcontact 11 Plaats de voedingskabel en de st...

Page 70: ...lijke voltagepunten of kortsluitingonderdelen die vuur of een elektrische schok zouden kunnen veroorzaken Mors of verstuif nooit een soort vloeistof in het product 18 Probeer niet om zelf herstellingen aan dit product uit te voeren of de covers te openen of te verwijderen daar dit u zou kunnen blootstellen aan gevaarlijke spanning of andere gevaren Laat alle onderhoud over aan bevoegd personeel 19...

Page 71: ...in Niet heroplaadbare batterijen kunnen niet worden heropgeladen oplaadbare batterijen moeten uit het speelgoed worden verwijderd alvorens deze op te laden heroplaadbare batterijen mogen alleen onder toezicht van een volwassene worden opgeladen verschillende types batterijen of nieuwe en oude batterijen mogen niet onderling gebruikt worden gebruik alleen batterijen van hetzelfde of equivalente typ...

Page 72: ...MODE MODUS knop 10 AFSPELEN PAUZE knop 11 VORIGE VOL Volume omlaag knop 12 VOLGENDE VOL Volume omhoog knop Voorkant 13 Luidsprekers Achterpaneel 14 Achterpaneel A DC aansluiting B 3 5mm microfoonaansluiting C Microfoon AAN UIT volumeknop 15 Microfoonhouder Opmerking Zorg dat de AAN UIT knop zich in de stand OFF bevindt wanneer de microfoon niet wordt gebruikt 2 1 5 4 3 7 8 6 9 10 11 12 13 14 15 13...

Page 73: ...TSCHAKELEN 1 Voordat u de Bluetooth geluidstoren inschakelt zorg dat deze onder stroom staat Het POWER MODE controlelampje brandt eenmaal ingeschakeld 2 Om het toestel in te schakelen druk op de POWER MODE knop U kunt tevens de afstandsbediening gebruiken door op de AAN UIT knop te drukken 3 Om uit te schakelen druk en houd POWER MODE circa twee seconden ingedrukt Opmerking Haal de stekker van de ...

Page 74: ... automatisch met het afpelen van muziek van de USB 3 Druk op de VORIGE en VOLGENDE knop op de afstandsbediening om het gewenste liedje te selecteren of voer het nummer van het liedje in met behulp van de cijfertoetsen op uw afstandsbediening 4 Druk op de AFSPELEN PAUZE knop om muziek af te spelen of het afspelen te onderbreken SD MMC kaartsleuf om muziek af te spelen 1 Schakel het toestel in en br...

Page 75: ...jk apparaat of de volumeknoppen op de geluidstoren 5 Om de verbinding met de luidspreker te stoppen druk op een andere modus op het bovenpaneel of een knop op uw audiospeler Eenmaal de verbinding is gestopt knippert het LED controlelampje Aux in U kunt tevens van muziek vanaf de geluidstoren genieten met behulp van de AUX IN aansluiting wanneer op een externe audiospeler aangesloten 1 Schakel het ...

Page 76: ...et volume niet te laag is ingesteld of niet gedempt is Controleer of er een liedje wordt afgespeeld Controleer of het Bluetooth apparaat juist is gekoppeld Opnieuw koppelen Als de Bluetooth modus van de geluidstoren of uw apparaat is uitgeschakeld 1 Schakel Bluetooth van uw audiospeler in en druk op de MODE knop om de Bluetooth modus te selecteren 2 De geluidstoren vindt automatisch het apparaat w...

Page 77: ...62479 2010 EN 60065 2014 Wij verklaren bij deze dat de bovenvermelde producten in overeenstemming zijn met de EMC richtlijn 2004 108 EG met de Laagspanningsrichtlijn 2006 95 EG en met de R TTE richtlijn 1999 5 EG van de Europese Commissie Yiu Wai Man Manager Productontwikkeling 18 05 2016 Hong Kong 2522 SPECIFICATIES ALGEMEEN AC DC adapter Invoer AC 100 240V 50 60 Hz Uitgang DC 12V 1 2A Luidspreke...

Page 78: ...loeit uit de niet naleving van de handleiding of uit een nalatige actie zoals het uit mekaar halen blootstelling aan hitte en vochtigheid enz Het is aanbevolen dat u de verpakking bewaart voor het geval u ze later nog zou nodig hebben In een poging om onze diensten te verbeteren kan het gebeuren dat er wijzigingen doorgevoerd worden aan de kleuren en de details van het product zoals afgebeeld op d...

Page 79: ...n nettoyante BENZENE Solution nettoyante OSTROŻNIE RYZYKO PORAŻENIA PRĄDEM NIE OTWIERAĆ OSTROŻNIE ABY OGRANICZYĆ RYZYKO PORAŻENIA PRĄDEM NIE NALEŻY ZDEJMOWAĆ POKRYWY LUB ŚCIANKI TYLNEJ W ŚRODKU NIE MA CZĘŚCI KTÓRE MÓGŁBY NAPRAWIĆ UŻYTKOWNIK WSZELKIE NAPRAWY POWINNY BYĆ WYKONYWANE PRZEZ WYKWALIFIKOWANY PERSONEL BENZENE Solution nettoyante BENZENE Solution nettoyante OCHRONNIKI PRZEPIĘCIOWE Zaleca s...

Page 80: ... wtyczki z uziemieniem lub z polaryzowanym bolcami Wtyczka spolaryzowana ma dwa bolce z których jeden jest szerszy od drugiego Wtyczka z uziemieniem ma dwa bolce prądowe i trzeci uziemiający Trzeci bolec lub wtyk płaski jest elementem zabezpieczającym Jeżeli oryginalna wtyczka przewodu zasilającego nie pasuje do używanego gniazdka należy skonsultować się z elektrykiem i wymienić przestarzałe gniaz...

Page 81: ...eczne napięcie lub inne zagrożenia Wszystkie prace serwisowe należy zlecać wykwalifikowanemu personelowi serwisowemu 19 Po skończeniu naprawy produktu lub po zakończeniu czynności serwisowych technika serwisu należy poprosić o sprawdzenie produktu pod kątem bezpieczeństwa i ustalenie czy jest on w pełni sprawny 20 Baterie należy chronić przed nadmiernym nagrzaniem np promieniami słonecznymi ogniem...

Page 82: ...wać tylko pod nadzorem osoby dorosłej Nie należy mieszać ze sobą baterii różnych typów lub baterii nowych i używanych Należy używać wyłącznie baterii zalecanego typu lub równoważnych Baterie należy zakładać zgodnie z oznaczeniami biegunów Rozładowane baterie należy wyjąć z produktu Nie zwierać wyprowadzeń zasilania Nie wrzucać baterii do ognia Jeżeli urządzenie przez dłuższy czas nie będzie używan...

Page 83: ...rzycisk ODTWARZAJ PAUZA 11 Przycisk POPRZEDNI VOL GŁOŚNOŚĆ 12 Przycisk NASTĘPNY VOL GŁOŚNOŚĆ Część przednia 13 Głośniki Panel tylny 14 Panel tylny A Wtyk DC IN B Gniazdo mikrofonu 3 5 mm C Pokrętło ON OFF WŁĄCZ WYŁĄCZ i regulacja głośności mikrofonu 15 Uchwyt na mikrofon Uwaga Gdy mikrofon nie jest używany prosimy pilnować aby pokrętło ON OFF WŁĄCZ WYŁĄCZ było ustawione w pozycji OFF WYŁĄCZ 2 1 5 ...

Page 84: ...9 Przycisk VOL GŁOŚNOŚĆ zwiększanie głośności 10 Przycisk RPT POWTÓRZ jego naciśnięcie powtarza odtwarzany utwór a ponowne naciśnięcie powtarza wszystkie utwory 11 Przycisk USB SD do przełączania z trybu USB na tryb SD MMC gdy w panelu górnym włożone są obydwa nośniki 12 Klawisze numeryczne 0 9 działające w trybie USB SD MMC Uwaga Jeśli pilot zaczyna przerywać lub jeśli w celu sterowania urządzeni...

Page 85: ...ożony do portu prawidłowo i do końca Naciśnij przycisk ZASILANIE TRYB aby wybrać tryb USB Po dokonaniu wyboru zapali się odpowiednia kontrolka 2 Głośnik wieżowy będzie automatycznie odtwarzał utwory muzyczne zapisane na karcie USB 3 Aby wybrać żądany utwór muzyczny należy użyć przycisków sterujących POPRZEDNI i NASTĘPNY w pilocie lub wprowadzić numer utworu za pomocą klawiszy numerycznych pilota 4...

Page 86: ...wideo Poziom głośności można regulować bądź klawiszami na urządzeniu osobistym bądź przyciskami głośności w głośniku nacisnąć przycisk MODE TRYB i wybrać tryb USB lub tryb SD MMC Po dokonaniu wyboru na panelu górnym zapali się odpowiednia kontrolka LED Gniazdo Aux in Użytkownik może również słuchać muzyki odtwarzanej na zewnętrznym odtwarzaczu audio podłączonym do głośnika wieżowego przez gniazdo ...

Page 87: ...tooth jest prawidłowo sparowane Upewnić się że poziom głośności nie jest zbyt wysoki Aby zmniejszyć głośność wcisnąć przycisk VOL GŁOŚNOŚĆ 5 Aby przerwać połączenie z głośnikiem wystarczy przełączyć na inny tryb przyciskiem na panelu górnym lub nacisnąć odpowiedni przycisk w odtwarzaczu audio Po przerwaniu połączenia kontrolka LED będzie migać Ponowne parowanie Po wyłączeniu trybu Bluetooth głośni...

Page 88: ... że w w produkt spełnia wymagania następujących dyrektyw Komisji Europejskiej dyrektywa w sprawie kompatybilności elektromagnetycznej EMC 2004 108 WE 1999 5 EC dyrektywa niskonapięciowa 2006 95 WE oraz dyrektywa w sprawie urządzeń radiowych i końcowych urządzeń telekomunikacyjnych RTTE 1999 5 WE Yiu Wai Man Kierownik ds tworzenia produktów 18 05 2016 Hong Kong 2522 SPECYFIKACJA Zasilacz sieciowy A...

Page 89: ... obejmuje produkcyjne wady materiałowe i wykonawcze z wyjątkiem zużycia spowodowanego nieprzestrzeganiem zaleceń instrukcji oraz przypadków niedbałego lub nierozważnego postępowania np demontaż wystawienie na działanie wysokich temperatur lub wilgoci itp Zaleca się zachować opakowanie na przyszłość UWAGA Prosimy zachować niniejszą instrukcję podane są w niej ważne informacje W związku z nieustanny...

Page 90: ...TNI UKREPI BENZENE Solution nettoyante BENZENE Solution nettoyante POZOR NEVARNOST OD ELEKTRIČNEGA UDARA NE ODPIRAJ POZOR ZA ZMANJŠANJE NEVARNOSTI OD ELEKTRIČNEGA UDARA NE ODSTRANJUJTE POKROV ALI HRBET BREZ DELOV KATERE UPORABNIK LAHKO POPRAVI ZA SVA POPRAVILA SE OBRNITE IZKLJUČNO NA USPODOBLJENO SERVISNO OSEBLJE BENZENE Solution nettoyante BENZENE Solution nettoyante PRENAPETNOSZNA ZAŠČITA Pripor...

Page 91: ... določa proizvajalec 13 Med nevihto ali če dalj časa ne delajo te naprave izključite 14 Za vsa popravila se popravila se obrnite izključno na usposobljeno servisno osebje Servisiranje je potrebno ko je naprava bila kakorkoli poškodovana kot je napajalni kabel ali vtič poškodovan ko se po njemu ali v njega razlila tekočina in ali je naprava bila izpostavljena dežju ali vlagi in ne deluje normalno a...

Page 92: ...ih podnebjih Delovna temperatura 0 C 40 C 23 Vtičnica naj bo nameščena blizu opreme in mora biti lahko dostopna 24 AC DC adapter ne sme biti oviran ali treba biti zlahka dostopen med predvideno uporabo 25 Za popolno ločitev vhodne moči AC DC napajalnik odklopite iz električnega omrežja saj je odklop del AC DC adapterja 26 AC DC adapter ne sme biti izpostavljen kapljanju in brizganju in se na apara...

Page 93: ...tranite baterije in jih ponovno vstavite Baterij ki niso namenjene ponovnemu polnjenju ne smete ponovno napolniti Baterije za ponovno polnjenje je treba pred polnjenjem odstraniti iz naprave Baterije za ponovno polnjenje je treba polniti pod nadzorom odrasle osebe Ne smete mešati različnih vrst baterij ali novih in rabljenih baterij Uporabljate lahko samo isto ali enakovredno vrsto baterij Baterij...

Page 94: ...ODE NAČIN 10 Gumb PLAY PAUSE PREDVAJAJ PAVZA 11 Gumb PREDHODNO VOL zmanjšaj glasnost 12 Gumb NASLEDNJE VOL povečaj glasnost Prednji del 13 Enote zvočnikov Hrbtišče 14 Hrbtišče A DC priključek B Priključek mikrofona 3 5 mm C Mikrofon ON OFF VKL IZK in gumb glasnosti 15 Držalo za mikrofon 2 1 5 4 3 7 8 6 9 10 11 12 13 14 15 13 A B C Opomba Ko se mikrofon ne uporablja prosimo da zagotovite da je gumb...

Page 95: ...RAVE 1 Pred vklopom zvočnega stolpa Bluetooth poskrbite da ima napajanje Ko je vklopljen indikator POWER MODE VKOP NAČIN zasveti 2 Za vklop izklop naprave pritisnite gumb POWER MODE VKOP NAČIN Uporabite lahko tudi daljinski upravljalnik s pritiskom na gumb POWER MOČ 3 Če ga želite izklopiti pritisnite in držite gumb POWER VKLOP približno dve sekundi Opomba Če jo ne boste uporabljali dolgo časa izv...

Page 96: ...te zasveti ustrezna opozorilna lučka 2 Stolp bo samodejno predvajal glasbo iz USB kartice 3 Na daljincu pritisnite gumbe PREVIOUS PREDHODNO i NEXT NBASLEDNJE da izberete želeno glasbo ali številko skladbe številskimi tipkami vašega daljinskega upravljalnika 4 Pritisnite gumb PLAY PAUSE za predvajanje ali pavzo Reža za SD MMC kartico za predvajanje 1 Vklopite napravo in vstavite ključ SD MMC ni pri...

Page 97: ...stavite nivo glasnosti zvoka z pomoč gumbi na vaši osebni napravi ali gumbi za glasnost na stolpu 5 Če želite prekiniti povezavo z zvočnikom pritisnite drug način na zgornji plošči ali gumb na vašem glasbenem predvajalniku Ko se povezava ustavi LED indikator utripa Aux in priključek Prav tako lahko uživate v glasbi iz zvočne stolpa z AUX priključka ko je priključen zunanji avdio predvajalnik 1 Vkl...

Page 98: ...li da je zvok izklopljen Zagotovite da se predvaja skladba Zagotovite da je Bluetooth naprave pravilno seznanjena Poskrbite da glasnost ni previsoka Pritisnite gumb VOL da zmanjšate glasnost Ponovno seznanjanje Ko se izklopi Bluetooth način zvočnega stolpa ali se izklopi naprava 1 Vklopite Bluetooth vašega avdio predvajalnika in pritisnite gumb MODE NAČIN za izbiro Bluetooth načina 2 Zvočni stolp ...

Page 99: ...1 9 1 EN 62479 2010 EN 60065 2014 Izjavljamo da je zgoraj navedeni izdelek v skladu z zahtevami Direktive EMC 2004 108 ES Direktive o nizki napetosti 2006 95 ES in Direktive R TTE 1999 5 ES Evropske komisije Yiu Wai Man Vodja razvoja izdelkov 18 05 2016 Hong Kong 2522 TEHNIČNI PODATKI Vhod Vhod AC DC Adapterja 100 240 V 50 60 Hz Izhod DC 12V 1 2A Zvočniki 10W x 2 Audio Stereo priključek 3 5mm Mikr...

Page 100: ...je vse okvare ki so nastale zaradi napak v materialu in izdelavi z izjemo okvar ki nastanejo zaradi neupoštevanja navodil za uporabo ali malomarne uporabe tega izdelka kot je razstavljanje izpostavljanje vročini in vlagi itd Priporočamo da shranite embalažo za morebitno prihodnjo uporabo OPOMBA Shranite ta priročnik za uporabo ker vsebuje pomembne informacije Naše storitve stalno izboljšujemo zato...

Reviews: