27
ENGLISH
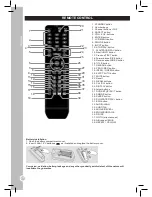
1. STANDBY button
2. Number keys
3. Channel b10/2
4. ASPECT button
5. VOL+/VOL- buttons
6. ENTER button
7. LCD MENU button
8. PMODE button
9. INPUT button
10. STOP/FAV- button
11. PLAY/PAUSE/FAV button
12. Next /HOLD button
13. Previous/TEXT button
14. Forward scan/SIZE button
15. Reverse scan/INDEX button
16. TITLE button
17. D.MENU button
18. PROG /RED button
19. INTRO / GREEN button
20. EJECT AUTO button
21. MUTE button
22. Recall
23. NICAM buttons
24. CH+/CH- button
25. DISPLAY button
26. Arrow buttons
27. DVD SETUP /EXIT button
28. SMODE button
29. SLEEP button
30. SLOW/STEP/FAV+ button
31. EPG button
32. AUDIO/LANG
33. SUBTITLE
34. ANGLE/REVEAL
35. ZOOM/SUBPAGE
36. D.DISP
37. GOTO (direct access)
38. A-B repeat /BLUE
39. REPEAT / YELLOW
Effective distance of the remote control:
within 7 metres.
Note:
when there is an obstacle between the TV and the transmitter, the transmitter
may not operate. When direct sunlight, an incandescent lamp, fluorescent lamp or
any other strong light shines on the remote sensor of the unit, the remote operation
may be unstable.
INSTALLATION
Unpacking the device
When unpacking, ensure that the following elements are included:
1 LCD display with integrated DVD player and DTV tuner
1 remote control
2 AAA/LR03 batteries
1 adapter
1 AC power cord
1 instruction manual
WARNING:
All packaging materials, such as tape, plastic sheets, wire ties and tags are not part of this TV
set and should be discarded.
Setting up the TV
Place the unit on a sturdy, horizontal, vibration-free surface. The set must not be subjected to vibrations or
shocks. Please observe the conditions in the safety instructions.
To operate the TV, you can use the keys on the right side and on the top of the LCD screen, or the remote
control’s keys. Use the input and output connections on the left side of the screen to connect other devices
to the unit.
Antenna connection
Connect your antenna to the antenna socket located on the left side of the unit.
Computer connection
You may use your LCD display as a monitor/loudspeaker by connecting the S-video or VGA standard
interface to the video/audio interface of your PC. Then select the corresponding source (“VGA” source,
please refer to the section “Video source selection” on p.30)
.
HDMI connection
Your LCD display has an HDMI port, which allows you to connect directly High Definition equipments
(camcorder, satellite receptors, HD DVD player, computer or game console). Then select the
corresponding source (“HDMI” source, please refer to the section “Video source selection” on p.30).
Mains connection
Do not connect your TV to the mains supply before finishing all other connections. Use the AC/DC adapter
(AC 220V- 240V~ 50Hz) provided with the unit to connect the TV to a main socket.
Non-rechargeable batteries are not to be recharged. Rechargeable batteries are to be removed from
the product before being charged. Rechargeable batteries are only to be charged under adult
supervision. Different types of batteries or new and used batteries are not to be mixed. Only batteries
of the same or equivalent type as recommended are to be used. Batteries are to be inserted with the
correct polarity. Exhausted batteries are to be removed from the product. The supply terminals are not
to be short circuited. Do not throw batteries into a fire. Remove the batteries if you are not going to
use the product for a long period of time.
WARNING:
Mal-function or loss of memory may be caused by strong frequency interference or
electrostatic discharge. Should any abnormal function occur, reset the unit or remove the batteries and
insert them again, or unplug the AC/DC adapter from the mains socket and replug it again.
Summary of Contents for LCDDVD2TFFR
Page 2: ...B A ...


