T
N
A
O
E
D
I
V
-
S
S
E
N
O
H
P
N
I
O
I
D
U
A
-
C
P
A
G
V
AV IN
VIDEO
L
R
SCART
DC IN
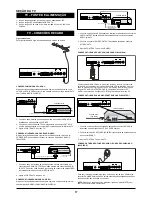
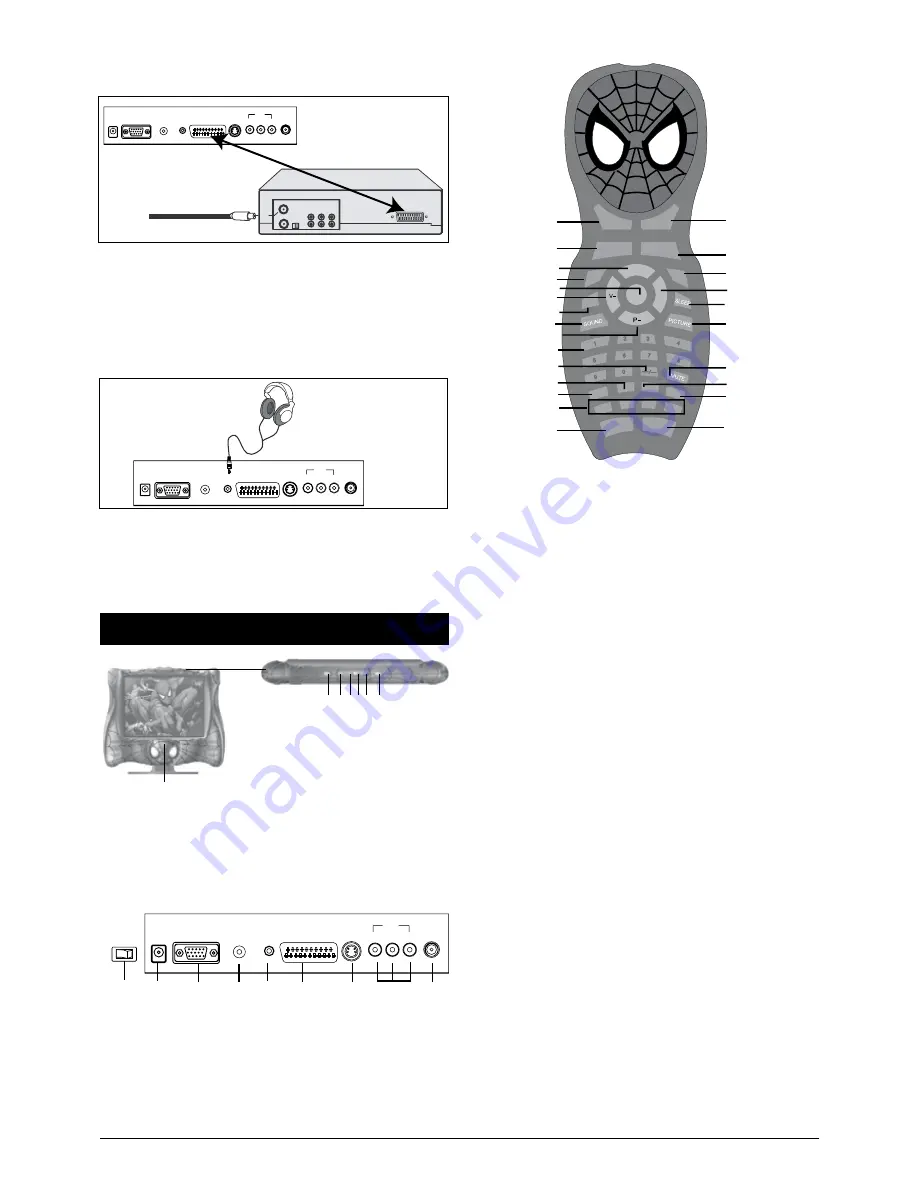
For private listening, connect headphone (not included) into the
PHONES jack of TV. The speakers will be disconnected when
headphone are inserted into the jack.
NOTE:
When the headphone is connected, the MUTE button on the
remote handset will not work.
CONNECTION USING SCART CABLE (CABLE NOT
INCLUDED):
T
N
A
O
E
D
I
V
-
S
S
E
N
O
H
P
N
I
O
I
D
U
A
-
C
P
A
G
V
AV IN
VIDEO
L
R
SCART
DC IN
EXTERNAL UNIT
INCOMING CATV
CABLE (VCR)
1. Connect the cable, satellite or incoming antenna to the VHF/UHF
IN jack on the rear of the VCR or DVD recorder.
2. Connect the SCART cable (not included) from the external unit’s
SCART jack.
3. Set the SOURCE of TV to SACRT mode.
CONNECTION USING HEADPHONE: (HEADPHONE NOT
INCLUDED)
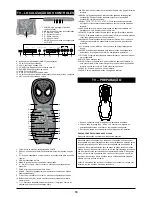
TV - LOCATION OF CONTROLS
2
3 4 5 6
7
1
1. POWER: Turns the TV POWER On or Off (standby)
2 MENU: Enter to setting menus
3. V-: Volume down
4. V+: Volume up
5. P-: Channel down
6. P+: Channel up
7. MODE: Enter to SOURCE setting menus
T
N
A
O
E
D
I
V
-
S
S
E
N
O
H
P
N
I
O
I
D
U
A
-
C
P
A
G
V
AV IN
VIDEO
L
R
SCART
DC IN
10
9
8
11
12
13
14
15
16
8. Main Power ON/OFF Switch
9. DC IN: DC input jack
10. VGA: VGA input jack
11. PC-AUDIO IN: Stereo audio input jack for PC.
12. PHONES: Phones jack
13. SCART: Scart jacks
14. S-VIDEO: S-Video input jack
15. AV IN: Audio (Left & Right) and Composite Video input jacks
16. ANT: Antenna input jack
P+
TV/AV
POWER
RECALL
RECALL
RECALL
TXT/TV
MENU
V+
CANCE
L
TXT-C
HOLD
MIX
SIZE
TXT-Y
INDEX
TXT-G
REV
EAL
TXT-R
OSD
SWA
P
NICAM/A2
1
2
3
4
5
6
17
18
16
19
20
21
22
23
24
25
7
8
9
10
11
12
13
14
15
1. TV/AV: Enter in SOURCE setting menu.
2. RECALL: Return to previous TV channel (in TV mode only).
3. P+: Channel up/Move the cursor in setting menu to up position.
4. OSD: On Screen Display.
5. MENU: Enter settings’ menu.
6. V- : Volume down/Move the cursor in setting menu to the left.
7. SWAP: SWAP channels between source channel and target
channel.
8. SOUND: Press repeatedly to select the presetting sound effect
modes.
9. P-: Channel down/Move the cursor in setting menu downwards.
10. Numeric buttons (0-9): Enter the channel number for direct
channel access.
11. -/--/---: Press repeatedly to select 1-3 digit of program number for
direct channels access.
12. INDEX: In Teletext mode, press this button to display the Teletext
index page.
13. REVEAL: Some of Teletext pages are linked with several
secondary pages. Press this button repeatedly to view the
secondary pages as desired.
14. TXT-R, TXT-G, TXT-Y and TXT-C buttons: Press to activate the
corresponding functions shows on the lower side of the Teletext
page.
15. MIX: Press to displaying the TV picture and Teletext page on the
screen simultaneously. Press again to exit.
16. POWER: Press to turn the TV On or OFF (Standby).
17. TXT/TV: Press to activate theTeletext mode, press again to
exit.(Operation in TV mode only)
18. NICAM/A2: Press repeatedly to select Stereo, Dual I or Dual
II.(Functions depends on the audio signal broadcasting from TV
station)
19. V+: Volume up/Move the cursor in the setting menu to the right.
20. SLEEP: Press repeatedly to activate the sleep function and sleep
timer setting.
21. PICTURE: Press repeatedly to select the presetting picture
modes.
22. MUTE: Mute ON/OFF.
23. SIZE: Press once to display the upper half of the Teletext page to
the full screen. Press again to display the lower half of the Teletext
page to the full screen. Press again to exit.
24. CANCEL: Press to exit from Teletext mode.
25. HOLD: Press to hold on the Teletext page.
Summary of Contents for Spider-Man LCD1SP
Page 2: ... ...


