background image

Setting up the printer

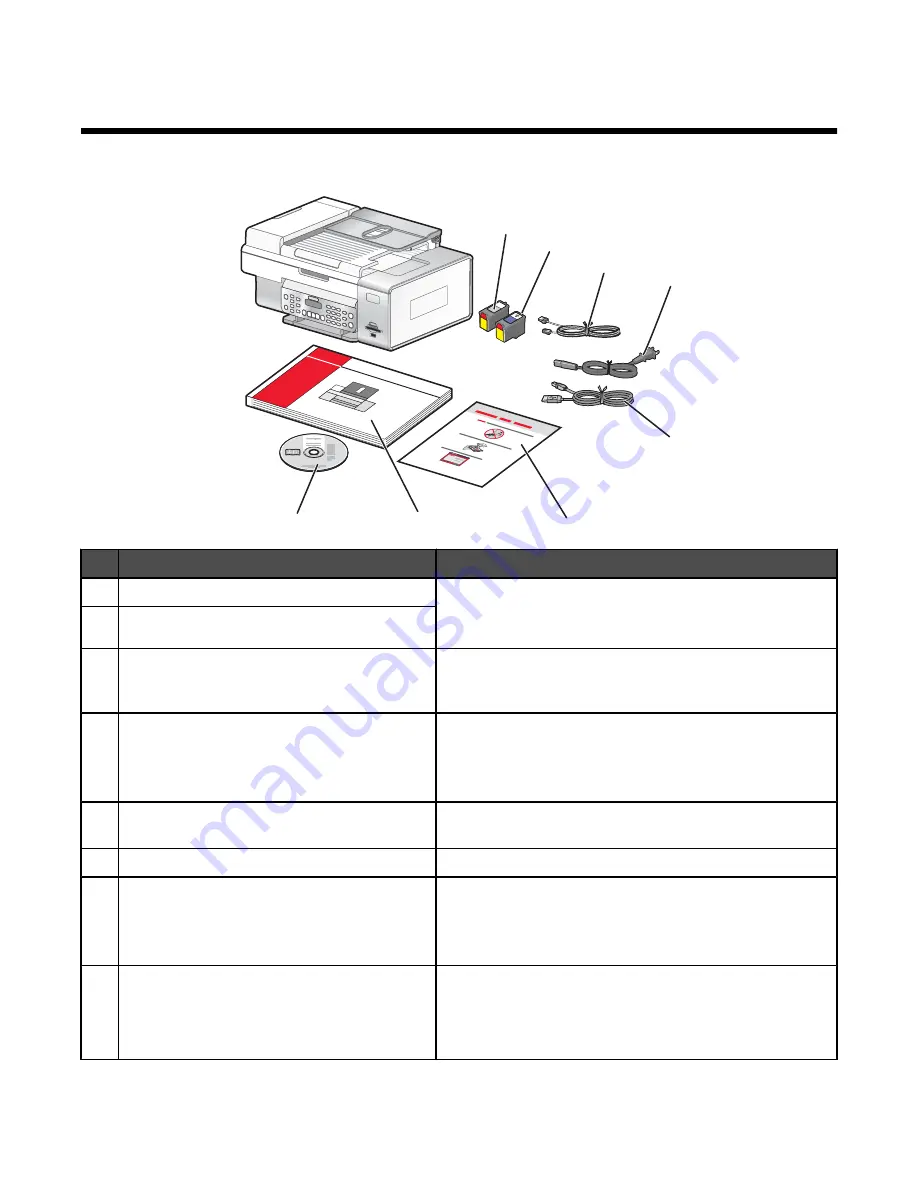
Checking the box contents

1

2

3

4

5

7

8

1

2

3

6

Name

Description

1

Black print cartridge

Cartridges to be installed into the printer.

Note: 

Cartridge combinations vary depending on the

product purchased.

2

Color print cartridge

3

Telephone cord

Use for faxing. For more information about connecting this
cord, see “Choosing a fax connection” on page 30. Your
telephone cord may look different from the one shown.

4

Power cord

Attaches to the power supply port located at the back of the
printer.

Note: 

Your power cord may look different from the one

shown.

5

Installation cable

Connects the printer to the computer temporarily during
some methods of installation.

6

Quick Setup

 sheet

Initial setup directions

7

User's Guide

Printed booklet that serves as a guide.

Note: 

Complete user information (

User's Guide:

Comprehensive Version

 or 

Mac Help

) can be found on the

installation software CD.

8

Installation software CD for Windows and Mac

Installation software for the printer

User's Guide: Comprehensive Version

 in electronic

format

Mac Help


17

Summary of Contents for 13R0245 - X6575 USB 2.0/PictBridge/ 802.11g All-in-One Color Printer Scanner Copier Fax Photo

Page 1: ...own 4 Power cord Attaches to the power supply port located at the back of the printer Note Your power cord may look different from the one shown 5 Installation cable Connects the printer to the computer temporarily during some methods of installation 6 Quick Setup sheet Initial setup directions 7 User s Guide Printed booklet that serves as a guide Note Complete user information User s Guide Compre...

Page 2: ...old documents as they exit from the ADF 6 Wi Fi indicator Check wireless status Off indicates that no wireless option is installed Orange indicates that the printer is ready for wireless connection but not connected Green indicates that the printer is connected to a wireless network 7 Memory card slots Insert a memory card 8 PictBridge port Connect a PictBridge enabled digital camera or a flash dr...

Page 3: ...Remove paper jams 5 Lexmark N2050 internal wireless print server Connect the printer to a wireless network Note The internal wireless print server may not come installed on all printers To purchase the Lexmark N2050 see Ordering paper and other supplies on page 136 6 LINE port LINE Connect the printer to an active telephone line to send and receive faxes The printer must be connected to this telep...

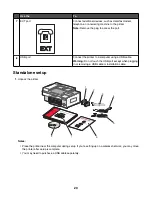
Page 4: ... to a computer using a USB cable Warning Do not touch the USB port except when plugging in or removing a USB cable or installation cable Standalone setup 1 Unpack the printer 1 2 3 4 5 7 8 1 2 3 6 Notes Place the printer near the computer during setup If you re setting up on a wireless network you may move the printer after setup is complete You may need to purchase a USB cable separately 20 ...

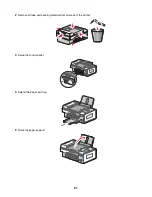
Page 5: ...2 Remove all tape and packing material from all areas of the printer 3 Raise the control panel 4 Extend the paper exit tray 5 Raise the paper support 21 ...

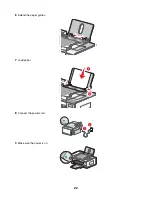
Page 6: ...6 Extend the paper guides 7 Load paper 8 Connect the power cord 2 1 9 Make sure the power is on 22 ...

Page 7: ...e language you want appears on the display b Press to save 11 If prompted set the country region 2 1 1 a Using the control panel of the printer press or repeatedly until the country or region you want appears on the display b Press to save 12 Open the printer 13 Press down on the cartridge carrier levers 23 ...

Page 8: ...k print cartridge and insert it in the left cartridge carrier 15 Close the black cartridge carrier lid 16 Remove the tape from the color print cartridge and insert it in the right cartridge carrier 17 Close the color cartridge lid 24 ...

Page 9: ... for use with multiple computers on the network insert the installation CD into each additional computer and follow the instructions on the computer screen You do not need to repeat the connection steps for each computer you want to print to the printer The printer should appear as a highlighted printer in the installation If multiple printers appear in the list make sure you select the printer wi...

Page 10: ...Run and then type D setup exe where D is the letter of your CD ROM drive 3 Follow the instructions on the computer screen to set up the printer Your security software may notify you that Lexmark software is trying to communicate with your computer system Always allow these programs to communicate This is necessary for the printer to work properly Lexmark XXXX Series Installation Welcome To prevent...

Page 11: ... use the telephone line adapter included in the box with the printer 1 Connect one end of the telephone cord into the Line port of the printer 2 Connect the adapter to the telephone line that came with the printer Note The UK adapter is shown Your adapter may look different but it will fit the telephone outlet used in your location 3 Connect the telephone line of your chosen telecommunications equ...

Page 12: ...ou connect to the printer by the adapter as shown will not function properly 2 Connect your telecommunications equipment directly to the EXT port on the back of the printer Warning Do not touch cables or the printer in the area shown while actively sending or receiving a fax Country region Saudi Arabia United Arab Emirates Egypt Bulgaria Czech Republic Belgium Australia South Africa Greece Israel ...

Page 13: ...our telecommunications equipment directly to the EXT port on the back of the printer Warning Do not touch cables or the printer in the area shown while actively sending or receiving a fax Country region Germany Austria Switzerland There is a plug installed in the EXT port of the printer This plug is necessary for the proper functioning of the printer Note Do not remove the plug If you remove it ot...

Page 14: ...elephone cord Send and receive faxes without using a computer Connecting directly to a telephone wall jack on page 32 The printer A telephone Two telephone cords Use the fax line as a normal telephone line Send and receive faxes without using a computer Connecting to a telephone on page 34 The printer A telephone An answering machine Three telephone cords Receive both incoming voice messages and f...

Page 15: ...lug it into an active telephone wall jack 3 Remove the protective plug from the EXT port of the printer 4 Connect a second telephone cord from the telephone to the answering machine 5 Connect a third telephone cord from the answering machine to the EXT port of the printer 31 ...

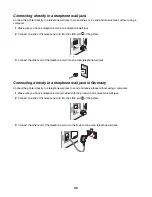
Page 16: ...r 3 Connect the other end of the telephone cord into an active telephone wall jack Connecting directly to a telephone wall jack in Germany Connect the printer directly to a telephone wall jack to send and receive faxes without using a computer 1 Make sure you have a telephone cord provided with the product and a telephone wall jack 2 Connect one end of the telephone cord into the LINE port of the ...

Page 17: ...not provided between the answering machine and the other N slot of the telephone wall jack Connecting to a computer with a modem Connect the printer to a computer with a modem to send faxes from the software application Note Setup steps may vary depending on your country or region For more information on connecting the printer to telecommunications equipment see the related topic Using an RJ11 ada...

Page 18: ... EXT port of the printer 4 Connect a second telephone cord from the computer modem to the EXT port of the printer Connecting to a telephone Connect a telephone to the printer to use the fax line as a normal telephone line Then set up the printer wherever your telephone is located to make copies or to send and receive faxes without using a computer 34 ...

Page 19: ...1 adapter 1 Make sure you have the following A telephone Two telephone cords A telephone wall jack 2 Connect one telephone cord to the LINE port of the printer and then plug it into an active telephone wall jack 3 Remove the protective plug from the EXT port of the printer 4 Connect the other telephone cord to a telephone and then plug it into the EXT port of the printer 35 ...

Page 20: ...the setting Using a digital phone service The fax modem is an analog device Certain devices can be connected to the printer so that digital telephone services can be used If you are using an ISDN telephone service connect the printer to an analog telephone port an R interface port on an ISDN terminal adapter For more information and to request an R interface port contact your ISDN provider If you ...

Page 21: ...he mode is selected when the button light is on 4 Scan Mode Access the scan default screen and scan documents Note The mode is selected when the button light is on 5 Fax Mode Access the fax default screen and send faxes Note The mode is selected when the button light is on 6 Photo Card Access the photo default screen and print photos Note The mode is selected when the button light is on 7 Settings...

Page 22: ...y Feed or eject paper 4 Increase a number Enter a space between letters or numbers Scroll through menus submenus or settings on the display 5 Cancel a print copy scan or fax job in progress Clear a fax number or end a fax transmission and return to the fax default screen Exit a menu or submenu and return to the default copy scan fax or photo card screen Clear current settings or error messages and...

Page 23: ...ook Access any of the programmed Speed Dial numbers 1 89 or Group Dial numbers 90 99 5 Start Color Start a color copy scan fax or photo print job depending on which mode is selected 6 Start Black Start a black and white copy scan fax or photo print job depending on which mode is selected Saving settings In a setting menu an appears next to the default setting To change the setting 1 From the contr...

Page 24: ...anding the Settings menu The Settings menu lets you perform maintenance functions and also change and save various printer settings For information on saving temporary and other settings see Saving settings on page 39 1 From the control panel press Settings 2 Press or repeatedly until the menu item you want appears 3 Press 4 Press or repeatedly until the submenu item you want or the setting you wa...

Page 25: ...lume of the tone when a control panel button is pressed to either On or Off On is the default Power Saver to set the number of minutes before the printer if left unused enters the Power Saver mode Caller ID Pattern to choose from one of the following patterns available based on the country or region you selected during initial setup If phones in your country use two detection patterns call your te...

Page 26: ...hich lets you reset the wireless network settings TCP IP to view the IP Address IP Netmask and IP Gateway of the printer Network Time to choose whether to enable the time server Installing another language control panel These instructions apply only if you received one or more additional language control panels with the printer 1 Lift the scanner unit 2 Grasp the control panel at the front Lift an...

Page 27: ...inter CD icon that automatically appears 4 Double click the Install icon 5 Follow the instructions on the computer screen Using the World Wide Web 1 Go to the Lexmark Web site at www lexmark com 2 From the home page navigate through the menu selection and then click Drivers Downloads 3 Choose the printer and the printer driver for your operating system 4 Follow the instructions on the computer scr...

Page 28: ...o complete Depending on the printer you have some of the features of this software may not be applicable Click To Details Scan Scan a photo or document Save edit or share a photo or document Copy Copy a photo or document Reprint or enlarge a photo Fax Send a photo or document as a fax E mail Send a photo or document as an attachment to an e mail message Transfer Photos Download photos from a memor...

Page 29: ...nting features as printing photos troubleshooting printing problems installing print cartridges and performing maintenance tasks To open the Solution Center use one of the following methods Method 1 Method 2 1 From the desktop double click on the Solution Center icon 2 Click Setup and diagnose printer The Solution Center appears with the Maintenance tab open 1 Do one of the following In Windows Vi...

Page 30: ...fore installing a new print cartridge Order new print cartridges Print a test page Clean print cartridges to fix horizontal streaks Align print cartridges to fix blurry edges View ink levels Troubleshoot other ink problems Turning printing voice notification on or off The printer has a voice notification feature that tells you when printing starts and when it is completed To turn the voice notific...

Page 31: ... from the wall outlet before you proceed 2 Remove the back cover plate by pushing the tab down and then pulling the cover away from the printer 1 3 2 3 Unpack the internal wireless print server Save the packaging materials Warning Wireless print servers are easily damaged by static electricity Touch something metal such as the printer frame before you touch the wireless print server 4 Align the ed...

Page 32: ...g a USB cable If the printer does not have a wireless print server installed and you want to connect the printer to the computer using a USB cable Orange indicates that the printer is ready to be configured for wireless printing but it is not connected to a wireless network Select this option if you want to set up the printer on your wireless network Orange blinking indicates that the printer is c...

Page 33: ...les and or have wireless network adapters built in or installed in them There are different ways a network can be set up Five common examples appear below Note The printers in the following diagrams represent Lexmark printers with Lexmark internal print servers built in or installed in them so that they can communicate over a network Lexmark internal print servers are devices made by Lexmark to en...

Page 34: ...re connected wirelessly to the router The network is connected to the Internet through a DSL or a cable modem Internet Scenario 2 Computer laptop and printer connected wirelessly with Internet A computer a laptop and a printer are connected wirelessly to a wireless router The network is connected to the Internet through a DSL or a cable modem Internet 50 ...

Page 35: ...ame also known as the SSID The wireless mode the type of wireless network you are using either infrastructure or ad hoc The type of security used on the network WEP WPA or WPA2 Any applicable security keys or passwords used with the network security encryption type Note You must know this information in order to properly set up the printer for use on the wireless network To obtain these settings s...

Page 36: ...tup page only after a print server has been installed To print a network setup page 1 From the control panel of the printer press Settings 2 Press or repeatedly until Network Setup appears 3 Press 4 Press or repeatedly until Print Setup Page appears 5 Press 6 Press again Finding a printer print server located on remote subnets The printer software CD can automatically find the printers that are lo...

Page 37: ...rol Panel Printers 2 Right click the Lexmark 6500 Series icon 3 From the sidebar menu select Properties 4 Click the Ports tab 5 Make sure The port is set to a USB port File is not set as the port Wireless networking Using a wireless network connection This printer may contain an internal wireless print server which allows the printer to be used on a wireless network The following settings from you...

Page 38: ...rk can only communicate with each other if they have unique and valid IP addresses A unique IP address means no two devices on the same network have the same IP address How to locate a printer IP address You can locate the printer IP address by printing out the printer network setup page For more information see Printing a network setup page on page 52 How to locate a computer IP address 1 Do one ...

Page 39: ...two wireless devices are from each other the more likely it is that the communication signal will be weaker Installing the printer on a network Follow the instructions for the networking method you want to use Make sure the selected network is set up and working properly and that all relevant devices are turned on For more information on your specific network see your network documentation or cons...

Page 40: ...upport person for more information Add printers Specify remote subnets that may have direct network attached printers If the software detects a direct network attached printer you must first highlight the printer in the window and then click Configure to manually assign an IP address to the printer Contact your system support person for more information Note The software does not automatically con...

Page 41: ...ure the adapter connections are secure Make sure the computer is turned on Make sure you entered the correct IP address Advanced wireless setup Creating an ad hoc wireless network using Windows The recommended way to set up your wireless network is to use a wireless access point wireless router A network set up this way is called an infrastructure network If you have an infrastructure network in y...

Page 42: ...erence For Windows XP users 1 Click Start Settings Control Panel Network Connections 2 Right click Wireless Network Connections 3 If Enable appears in the pop up menu click it Note If Enable does not appear your wireless connection is already enabled 4 Right click the Wireless Network Connection icon 5 Click Properties 6 Click the Wireless Networks tab Note If the Wireless Networks tab does not ap...

Page 43: ...Right click the Wireless Network Connections icon b Select View Available Wireless Networks If the network is listed but the computer is not connected select the ad hoc network and then click the Connect button If the network does not appear wait a minute and then click the Refresh network list button 21 Click Start Programs or All Programs Lexmark 6500 Series 22 Click Wireless Setup Utility Note ...

Page 44: ...d print cartridge on page 130 4 If you are installing new print cartridges remove the tape from the back and bottom of the black cartridge and insert the cartridge in the left carrier Warning Do not touch the gold contact area on the back or the metal nozzles on the bottom of the cartridge 5 Close the black cartridge carrier lid 131 ...

Page 45: ... Note The printer must be closed to start a new scan print or copy job Refilling print cartridges The warranty does not cover repair of failures or damage caused by a refilled cartridge Lexmark does not recommend use of a refilled cartridge Refilling a cartridge can affect print quality and may cause damage to the printer For best results use Lexmark supplies Using genuine Lexmark print cartridges...

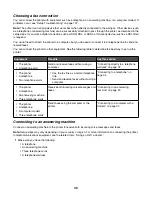
Page 46: ...Press or repeatedly until Maintenance appears 4 Press 5 Press or repeatedly until Align Cartridges appears 6 Press An alignment page prints If you aligned the cartridges to improve print quality print your document again If print quality has not improved clean the print cartridge nozzles Cleaning the print cartridge nozzles 1 Load plain paper 2 Press Settings 3 Press or repeatedly until Maintenanc...

Page 47: ... cartridges 8 Print the document again 9 If the print quality does not improve clean the print nozzles For more information see Cleaning the print cartridge nozzles on page 133 10 Repeat step 9 up to two more times 11 If print quality is still not satisfactory replace the print cartridges Preserving the print cartridges Keep a new cartridge in its packaging until you are ready to install it Do not...

Page 48: ... exit tray 3 Dampen a clean lint free cloth with water Warning Do not use household cleaners or detergents as they may damage the finish of the printer 4 Wipe only the outside of the printer making sure to remove any ink residue that has accumulated on the paper exit tray Warning Using a damp cloth to clean the interior may cause damage to your printer 5 Make sure the paper support and paper exit ...

Page 49: ...ent smudging or scratching avoid touching the printed surface with your fingers or sharp objects For best results remove each printed sheet individually from the paper exit tray and allow the sheets to dry at least 24 hours before stacking displaying or storing Item Part Number USB cable 1021294 Lexmark N2050 Internal wireless print server Note If your printer did not come with an internal wireles...

Page 50: ...ort is selected Setup Troubleshooting Incorrect language appears on the display These are possible solutions Try one of the following Change the language selection during initial setup After you select a language Language appears again on the display To change the selection 1 Press or repeatedly until the language you want appears on the display 2 Press to save Select a different language after in...

Page 51: ...ing Check your operating system The following operating systems are supported Windows Vista Windows XP Windows 2000 with Service Pack 3 or later Mac OS X Check your system requirements Check that your computer meets the minimum system requirements listed on the printer box Check your USB connection Follow these steps if you are not using the printer on a wireless network 1 Check the USB cable for ...

Page 52: ...rror message is displayed see Error messages on the computer screen on page 197 Check power If the light is not on see Power button is not lit on page 138 Reload paper Remove and then load paper Check ink Check the ink levels and install new print cartridges if necessary Check cartridges 1 Remove the print cartridges 2 Make sure the sticker and tape have been removed 1 2 3 Reinsert the cartridges ...

Page 53: ...ctBridge printing on the camera by selecting the correct USB mode For more information see the digital camera documentation Make sure the camera is a PictBridge enabled digital camera 1 Disconnect the camera 2 Connect a PictBridge enabled digital camera to the PictBridge port See the digital camera documentation to determine whether it is PictBridge enabled Check USB cable Use only the USB cable t...

Page 54: ...tter of your CD ROM drive If the software still does not install correctly visit our Web site at www lexmark com to check for the latest software 1 In all countries or regions except the United States select your country or region 2 Click the links for drivers or downloads 3 Select your printer family 4 Select your printer model 5 Select your operating system 6 Select the file you want to download...

Page 55: ...inter on Wireless troubleshooting How do I find out what type of security my network is using You must know the security key and security mode in order to properly set up the printer for use on the wireless network To obtain this information see the documentation that came with your wireless router see the Web page associated with the router or consult the person who set up your wireless network C...

Page 56: ...ndicator light is green If it is not green see Wi Fi indicator light is orange or Wi Fi indicator light is blinking orange during installation in Wireless troubleshooting Check if printer driver is installed Make sure the printer driver is installed on the computer from which you are sending the print job 1 Do one of the following In Windows Vista click Control Panel Printers In Windows XP click S...

Page 57: ...ress that matches the address on the back of your printer Network printer does not show up in the printer selection list during installation Check whether the printer is on the same wireless network as the computer The SSID of the printer must match the SSID of the wireless network 1 If you do not know the SSID of the network use the following steps to obtain it before rerunning the Wireless Setup...

Page 58: ...ight is blinking orange during installation When the Wi Fi indicator light is blinking orange it indicates that the printer has been set up for wireless networking but cannot connect to the network for which it has been configured The printer may be unable to join the network because of interference or its distance from the wireless access point wireless router or until its settings are changed Th...

Page 59: ...ur IP address might also start with the numbers 10 or 169 This is determined by your operating system or wireless network software 2 Ping the wireless access point wireless router a Click In Windows Vista All Programs Accessories Command Prompt In Windows XP and earlier Start Programs or All Programs Accessories Command Prompt b Type ping followed by a space and the IP address of the wireless acce...

Page 60: ...light is orange These are possible solutions Try one or more of the following Check cable Make sure the installation cable is not connected to the printer Configure the optional internal wireless print server Note This solution does not apply to printers that have a pre installed internal wireless print server If you purchased the optional internal wireless print server after your printer was alre...

Page 61: ...system cameras Make sure your wireless access point wireless router is not positioned too closely to these devices Move your computer and or printer Move the computer and or printer closer to the wireless access point wireless router Although the possible distance between devices in 802 11b or 802 11g networks is 300 feet the effective range for optimal performance is generally 100 150 feet You ca...

Page 62: ...hem on the network For more information see Run the Wireless Setup Utility for Windows or Run the Wireless Setup Assistant for Mac Changing wireless settings after installation To change your password network name or other wireless setting rerun the wireless setup For more information see Run the Wireless Setup Utility for Windows or the Run the Wireless Setup Assistant for Mac Resetting an intern...

Page 63: ...setup process 4 Follow the instructions on the computer screen Check whether the printer is on the same wireless network as the computer The SSID of the printer must match the SSID of the wireless network If you do not know the SSID of the network use the following steps to obtain it and then rerun the Wireless Setup Utility to set up the printer again 1 Enter the IP address of your wireless acces...

Page 64: ...u do not know how to make these changes see the documentation that came with the wireless network or contact the person who set up your wireless network Wireless Setup Utility cannot communicate with the printer during installation Windows users only These are possible solutions for Windows users Try one or more of the following Check power If the light is not on see Power button is not lit Check ...

Page 65: ...dows Vista click All Programs Accessories Command Prompt In Windows XP click Start Programs or All Programs Accessories Command Prompt b Type ping followed by a space and the IP address of the wireless access point wireless router For example ping 192 168 0 100 c Press Enter 3 If the wireless access point wireless router responds you will see several lines appear that start with Reply from Turn of...

Page 66: ... connect your computer to the wireless network b The printer may need to be reconfigured for new wireless network settings For more information see Run the Wireless Setup Utility Run the Wireless Setup Utility Windows users only 1 Click Start Programs or All Programs Lexmark 6500 Series 2 Click Wireless Setup Utility Note You may be prompted to connect the printer to the computer again using the i...

Page 67: ...ol panel to change the paper size to 4 x 6 in 10 x 15 cm 1 Insert the USB cable that came with your camera to the camera and insert the other end into the PictBridge port on the front of the printer 2 Turn the camera on and choose your first photo using the camera control panel 3 Wait for PictBridge Printing to appear on the display of the printer control panel Note If Paper Photo Size Error appea...

Page 68: ...ee Installing print cartridges on page 130 4 Wipe the print nozzles and contacts For more information see Wiping the print cartridge nozzles and contacts on page 133 If print quality is still not satisfactory replace the print cartridges For more information see Ordering supplies on page 135 Poor text and graphic quality Blank pages Dark print Faded print Incorrect colors Light and dark bands in p...

Page 69: ...ore information see Removing and reinstalling the software on page 141 Poor quality at the edges of the page These are possible solutions Try one or more of the following Check minimum print settings Unless you are using the borderless feature use these minimum print margin settings Left and right margins 6 35 mm 0 25 in for letter size paper 3 37 mm 0 133 in for all paper sizes except letter Top ...

Page 70: ...u are printing on plain paper Make sure the paper size matches the printer setting 1 From the software application click File Print 2 Click Properties Preferences Options or Setup 3 Click Paper Setup 4 Check the paper size Print speed is slow These are possible solutions Try one or more of the following Maximize computer processing speed Close all applications not in use Minimize the number and si...

Page 71: ...own on the cartridge carrier latches to raise the cartridge carrier lids Are the cartridges low on ink 1 Do one of the following In Windows Vista click In Windows XP and earlier click Start 2 Click Start Programs or All Programs Lexmark 6500 Series 3 Click Solution Center 4 If an exclamation point appears on a cartridge the ink level is low Install a new cartridge For more information see Installi...

Page 72: ... left carrier Check the USB connection 1 Check that the USB cable is connected to the computer The USB port on the back of the computer is marked by the USB symbol Plug the long flat end of the USB cable into this port 2 Make sure that the smaller more square end of the USB cable is plugged into the back of the printer 3 Check that the USB cable is not damaged and that the light is on Close other ...

Page 73: ...printer Allow them to dry before stacking It takes longer for the ink to dry on the surface of photo paper or transparencies than it does on most printouts Are you using a transparency or photo paper designed for an inkjet printer For information on ordering supplies see Choosing compatible specialty paper types on page 71 Page prints with different fonts Make sure the correct printer is selected ...

Page 74: ...may be out of alignment 1 Do one of the following In Windows Vista click Control Panel In Windows XP or 2000 click Start 2 Click Start Programs or All Programs Lexmark 6500 Series 3 Click Solution Center 4 Click the Maintenance tab 5 Click Align to fix blurry edges Are the print cartridges clean You may need to clean the print cartridge nozzles Printouts have alternating bands of light and dark pr...

Page 75: ...n the print catridges You may need to clean the print cartridge nozzles Vertical straight lines are not smooth Adjust the Quality Speed settings 1 With a document or photo open click File Print 2 Click Properties Preferences Options or Setup 3 From the Quality Copies tab select Photo when printing photos Normal when printing transparencies Align the print cartridges 1 Do one of the following In Wi...

Page 76: ... Settings Printers and Faxes 2 Make sure The printer icon does not say Paused If the printer is paused right click the icon and then click Resume Printing The printer icon says Ready If it says Offline right click the icon and then click Use Printer Online The printer icon has a check mark indicating that the printer is set as the default printer If it is not right click the icon and then click Se...

Page 77: ... is low Install a new cartridge Check the USB connection 1 Check that the USB cable is connected to the computer The USB port on the back of the computer is marked by the USB symbol Plug the long flat end of the USB cable into this port 2 Make sure that the smaller more square end of the USB cable is plugged into the back of the printer 3 Check that the USB cable is not damaged and that the light ...

Page 78: ...ent to print Is there a problem with the connections 1 Check that the USB cable is connected to the computer The USB port on the back of the computer is marked by the USB symbol Plug the long flat end of the USB cable into this port 2 Make sure that the smaller more square end of the USB cable is plugged into the back of the printer 3 Check that the USB cable is not damaged and that the light is o...

Page 79: ...s port 2 Make sure that the smaller more square end of the USB cable is plugged into the back of the printer 3 Check that the USB cable is not damaged and that the light is on Make sure the cartridges are properly installed With the front of the printer facing you check for proper print cartridge installation If you are using a color cartridge make sure it is properly installed in the right carrie...

Page 80: ...ack on Cable is not connected is loose or is damaged The printer cable must be fully connected and undamaged for proper communication Make sure the USB cable is connected to the USB port on the back of the computer The USB port on the back of the computer is marked by Plug the long flat end of the USB cable into this port Make sure the other end of the USB cable is connected to the back of the pri...

Page 81: ...rt Printer cannot communicate with computers over peer to peer network These are possible solutions Try one or more of the following Check the status of the host computer and printer Make sure The host computer is on and is directly connected to the printer The host computer can print to the printer The printer is shown as Shared in the Printers and Faxes folder Windows XP and Windows 2000 or Prin...

Page 82: ...3 Click Properties 4 Click the Ports tab and then click the Add Port button 5 Select Local Port and then click the New Port button 6 Type the Universal Naming Convention UNC Port name which consists of the server name and the distinctive printer name The name should be in the form server printer 7 Click OK 8 Click Close 9 Make sure the new port has been selected on the Ports tab and then click App...

Page 83: ...run properly 1 Start Windows 2 When the desktop appears insert the software CD for Windows The installation screen appears 3 Click Install 4 When the Existing Printer Driver Found dialog box appears select Update the existing driver software Bidirectional communication is not established The printer and computer may not be able to exchange data These are possible solutions Try one or more of the f...

Page 84: ...sparencies stick together Cannot print to the network printer These are possible solutions Try one or more of the following Check print server setup documentation See the print server documentation for setup instructions if The lights of the print server are not on The installation cable is not connected to the print server The print server is not connected to a power source Check USB connection I...

Page 85: ...ke sure the computer contains the applications that support the desired file formats Resetting the printer to factory default settings You can reset your printer to the original settings without using the printer menus Note Resetting to factory default settings will delete all the printer settings you have previously selected Make sure the printer is on 1 Press and hold and Start Color at the same...

Page 86: ...ssible solutions if paper or specialty media misfeeds or skews or if multiple sheets feed or stick together Try one or more of the following Check paper condition Use only new unwrinkled paper Check paper loading Load a smaller amount of paper into the printer Load paper with the print side facing you If you are not sure which side is the printable side see the instructions that came with the pape...

Page 87: ...e settings 1 In Windows Vista click Control Panel Printers under Hardware and Sound In Windows XP click Start Settings Printers and Faxes 2 Double click the print queue device 3 Click Printer Make sure no check mark appears next to Pause Printing If a check mark does not appear next to Set As Default Printer you must select the print queue device for each file you want to print Banner paper jams T...

Page 88: ...ed correctly into the printer For more information see Choosing compatible specialty paper types on page 71 Are you loading the paper correctly For more information see Loading paper on page 60 Note Do not force paper into the printer Paper jam in the Automatic Document Feeder ADF 1 Flip open the ADF by grasping the notch in the left side of the ADF and pulling up 2 Firmly grasp the paper and gent...

Page 89: ...c duplexing use only letter or A4 size plain paper Check for paper jams Check for and clear any paper jams For more information see Paper jam in the duplex unit on page 175 Make sure the duplex unit is properly installed Remove the duplex unit and reinstall it For more information see Paper jam in the duplex unit on page 175 Memory card troubleshooting Memory card cannot be inserted These are poss...

Page 90: ...any obvious damage 2 Firmly plug the square end of the USB cable into the back of the printer 3 Firmly plug the rectangular end of the USB cable into the USB port of the computer The USB port is marked with the USB symbol Check the network connection If the printer and computer are connected over a network make sure that the correct host and device are communicating Select the printer from the com...

Page 91: ...contains photos The printer reads photos that are in the JPEG format For more information see the documentation that came with your camera Check to see if your printer or the computer is turned on Make sure that your printer and your computer are turned on Make sure that Windows is open Check to see if your wireless connection is active Make sure that your wireless network is connected and active ...

Page 92: ...to improve print quality See Improving print quality on page 154 Adjust the brightness of the copy 1 Load the document facedown on the scanner glass 2 From the control panel press Copy Mode 3 Press Lighter Darker 4 Press or repeatedly to lighten or darken the copy 5 Press Start Color or Start Black Check quality of original document If the quality of the original document is not satisfactory try u...

Page 93: ... original item Is the original document loaded correctly on the scanner glass Make sure the original document is placed in the lower right corner of the scanner glass Place the item you want to copy facedown on the scanner glass Make sure the upper left corner of the front of the item lines up with the arrows in the lower right corner of the scanner glass Scan troubleshooting Scanner does not resp...

Page 94: ...eck USB cable connection 1 Check the USB cable for any obvious damage 2 Firmly plug the square end of the USB cable into the back of the printer 3 Firmly plug the rectangular end of the USB cable into the USB port of the computer The USB port is marked with the USB symbol Restart computer Turn off and then restart your computer Scanning takes too long or freezes the computer These are possible sol...

Page 95: ...ing or scanning from photo or glossy paper a magazine or a newspaper see Removing wavy patterns from scanned photos magazines or newspapers on page 90 Check quality of original document If the quality of the original document is not satisfactory try using a clearer version of the document or image Check document placement Make sure the document or photo is loaded facedown on the scanner glass in t...

Page 96: ... the printer so that digital telephone services can be used If you are using an ISDN telephone service connect the printer to an analog telephone port an R interface port on an ISDN terminal adapter For more information and to request an R interface port contact your ISDN provider If you are using DSL connect to a DSL filter or router that supports analog use For more information contact your DSL ...

Page 97: ...e ring on page 127 Setting selections include single ring double ring triple ring and any ring Consider adding a second telephone line for the printer Check country code Make sure the country code has been set for the country or region where you are operating the printer 1 From the control panel press Settings 2 Press or repeatedly until Device Setup appears 3 Press 4 Press or repeatedly until Cou...

Page 98: ...e 127 Check ink Check the ink levels and install a new cartridge if necessary Check whether Fax Forwarding is selected 1 From the control panel press Fax Mode 2 Press 3 Press or repeatedly until Fax Setup appears 4 Press 5 Press or repeatedly until Ringing and Answering appears 6 Press 7 Press or repeatedly until Fax Forward appears 8 Press 9 Press or repeatedly to view the current Fax Forwarding ...

Page 99: ... been programmed for the number that you want to dial See Setting up Speed Dial on page 128 As an alternative dial the telephone number manually Be sure the printer is detecting a dial tone See Sending a fax while listening to a call On Hook Dial on page 115 Check the Dial Method setting 1 Listen for a dial tone If you hear a dial tone but the printer hangs up without dialing this means it did not...

Page 100: ...f the original document is satisfactory Resend the fax There may have been a problem with the quality of the telephone line connection Increase the fax scan resolution Check ink Check the ink levels and install a new print cartridge if necessary Clean scan lens and white roller 1 Unplug the power cord and the phone line from the wall 2 Open the control panel 3 Push the roller lever gently to the l...

Page 101: ... Device Setup appears 3 Press 4 Press or repeatedly until Caller ID Pattern appears 5 Press 6 Press or repeatedly until the Caller ID pattern setting indicated by an appears Note The number of patterns is defined by the country or region setting and only the number of patterns defined for the selected country or region is shown 7 If you want to change the Caller ID pattern a Press or repeatedly un...

Page 102: ...er it will take your fax to send This solution will reduce the speed for future faxes until you reset the transmission speed 11 Resend the fax 12 If the problem persists repeat the previous steps to send the fax at successively lower transmission speeds Note 2400 bps is the lowest transmission speed Phone Line Busy These are possible causes and solutions Try one or more of the following Change red...

Page 103: ...lephone line connection Place a test call to the telephone number to which you want to send a fax to make sure that it is working correctly If the telephone line is being used by another device wait until the other device is finished before sending the fax Make sure the printer detects dial tone See Sending a fax while listening to a call On Hook Dial on page 115 Check the Dial Method setting 1 Li...

Page 104: ...hone line for the fax machine For more information on faxing when using a PBX telephone service see Setting up to fax while behind a PBX on page 36 Check phone line If the telephone line is being used by another device wait until the other device is finished before sending the fax Check cable connections Make sure cable connections for the following hardware are secure if applicable Power supply T...

Page 105: ...nect the power cord to the electrical outlet 5 If the button is not lit press 6 Reinsert the black or photo print cartridge and close the cartridge carrier lid 7 Close the scanner unit 8 If the error Reappears replace the black or photo print cartridge with a new one close the cartridge carrier lid and close the scanner unit Does not reappear reinsert the color print cartridge close the cartridge ...

Page 106: ...nd close the cartridge carrier lid 2 Close the scanner unit 3 Disconnect the power cord from the electrical outlet 4 Reconnect the power cord to the electrical outlet 5 If the button is not lit press 6 Reinsert the print cartridge and close the cartridge carrier lid 7 Close the scanner unit 8 If the error Does not reappear the problem has been corrected Reappears replace the print cartridge with a...

Page 107: ...e black cartridge installed You cannot copy or print when only the photo cartridge is installed To remove the error message press Memory Failure These are possible solutions Try one or more of the following Reduce memory use If applicable Print pending received faxes Send fewer pages Select the After Dial setting 1 From the desktop double click the Productivity Studio icon 2 From the Welcome Scree...

Page 108: ...d or flash drive The printer will read photos created using the JPEG format For more information see the documentation that came with the digital camera Only one photo enhancement may be chosen at a time You have selected more than one option on step 2 of the photo proof sheet you printed and scanned 1 Make sure you completely fill in only one circle for each option 2 Press to continue Only one ph...

Page 109: ...ory card See Memory card cannot be inserted on page 176 See Nothing happens when memory card is inserted on page 177 2 Sided Paper Type Error The paper type loaded in the printer is not plain paper To print or copy on both sides of the paper use only plain paper 1 Press to clear the error message 2 Load plain paper 3 Press Settings 4 Press or until Paper Setup appears on the display 5 Press 6 Pres...

Page 110: ...pecific instructions 2 After correcting the error condition click Continue to resume printing If the error remains but you want to clear the error message 1 Click Cancel Printing The error message closes and the Canceling Printing dialog box appears 2 Follow the instructions on the Canceling Printing dialog box Left Right Cartridge Missing This message indicates that one of the necessary cartridge...

Page 111: ...tion see Checking printer readiness on page 164 Ink Low A print cartridge is almost out of ink Install a new cartridge For more information see Installing print cartridges on page 130 To order a new cartridge see Ordering paper and other supplies on page 136 Out of Memory The printer software cannot obtain enough memory to print Try the following Before sending a document to print close any other ...

Page 112: ...ed file types For more information on supported file types see the User s Guide on the CD that came with your printer Paper Jam The printer has a paper jam and you must clear the paper path Note To avoid paper jams do not force paper into the printer Multiple All In Ones found Multiple Lexmark printers attached either locally or over a network have been detected on your computer You can choose whi...

Page 113: ...work address The address may be assigned manually by you Static IP address automatically by the DHCP server DHCP IP address or automatically by the device AutoIP address ipconfig A command that displays the IP address and other network information of a Windows computer MAC Media Access Control address A hardware address that uniquely identifies each device on a network You can usually find the MAC...

Page 114: ...that helps prevent unauthorized access to a wireless network Other possible security settings are WPA and WPA2 wireless access point A device that connects wireless devices together to form a wireless network wireless router A router that also serves as a wireless access point Wi Fi An industry term that describes the technology used to create an interoperable wireless local area network WLAN WPA ...

Page 115: ... 39 Right arrow 38 Scan Mode 37 Select 38 Settings 37 Start Black 39 Start Color 39 Two sided Duplex 37 buttons Productivity Studio Copy 44 E mail 44 Fax 44 Photo Greeting Cards 44 Photo Packages 44 Poster 44 Scan 44 Transfer Photos 44 using 44 buttons Solution Center Advanced 45 How To 45 Maintenance 45 Troubleshooting 45 using 45 C cable connections checking 165 167 Caller ID changing using cont...

Page 116: ...g adjusting quality 101 borderless photos 102 cloning an image 103 collating copies 103 customizing settings 98 enlarging an image 104 making a copy lighter or darker 102 on both sides of paper 99 on both sides of paper using ADF 99 photo using the computer 101 photos 100 reducing an image 104 repeating an image 103 could not detect a proof sheet 195 cover open 193 creating and viewing slideshow 9...

Page 117: ...faded colors 160 failed to connect error message 190 fax activity reports 129 confirmation reports 129 customizing settings 120 forwarding 118 receiving automatically 117 receiving manually 116 receiving with an answer code 116 setting a manual answer code 116 Fax button 44 fax cover page creating using the Fax Setup Utility 120 creating using the Productivity Studio 125 fax error 188 fax footer s...

Page 118: ... misfeeds 173 printer does not feed paper envelopes or specialty media 174 junk faxes blocking 125 L labels loading 61 language changing 137 last page first 69 left cartridge error 193 left cartridge incorrect 193 left cartridge missing 194 Lexmark Productivity Studio creating and viewing slideshow 97 library preferences changing 87 LINE port 19 loading banner paper 63 custom size paper 63 documen...

Page 119: ...nt Feeder ADF 18 Automatic Document Feeder ADF output tray 18 Automatic Document Feeder ADF paper guide 18 Automatic Document Feeder ADF tray 18 control panel 18 duplex cover 19 EXT port 20 LINE port 19 memory card slots 18 paper exit tray 18 paper feed guard 18 paper guides 18 paper support 18 PictBridge port 18 power supply port 19 print cartridge carrier 19 scanner glass 19 scanner unit 19 top ...

Page 120: ...speed is slow 157 print troubleshooting cannot print documents from a flash drive 172 improving print quality 154 ink levels seem incorrect 158 ink levels seem to go down quickly 159 partial 4x6in 10x15cm photo prints when using PictBridge 154 partial document or photo prints 158 photo scratches 158 photo smudges 158 poor quality at the edges of the page 156 poor text and graphic quality 155 print...

Page 121: ...g 89 Exposure setting 90 Scan menu 108 scan settings changing 110 scan troubleshooting cannot scan to computer over network 182 partial document or photo scans 182 poor scanned image quality 182 scan was not successful 181 scanner does not respond 180 scanning takes too long or freezes the computer 181 scan was not successful 181 scanned image attaching to e mail message 111 scanned images saving ...

Page 122: ...nues to jam 175 paper jam error 199 port setting 53 print is dark or smudged 161 printed characters are improperly formed or not aligned 161 printer cannot communicate over peer to peer network 168 printer is trying to print to file 168 printer not communicating with computer 169 printer plugged in but does not print 167 printer status 163 printing failure error 198 printouts have alternating band...

Page 123: ...ridge 140 incorrect language appears on display 137 page does not print 139 power button is not lit 138 software does not install 138 troubleshooting wireless changing wireless settings after installation 149 check printer ports Windows 153 checking network name Windows 151 network printer does not show up in printer selection list during installation Windows 144 photos do not print from memory ca...

Page 124: ...oss wireless network 177 ping printer Windows 152 ping wireless access point Windows 152 printer cannot connect to wireless network 150 run Wireless Setup Utility Windows 153 wireless network printer does not print 143 wireless printer is no longer working 148 Wireless Setup Utility cannot communicate with printer during installation 151 Wi Fi indicator is not lit 145 Wi Fi indicator light is blin...

Reviews: