background image

vii


Introduction

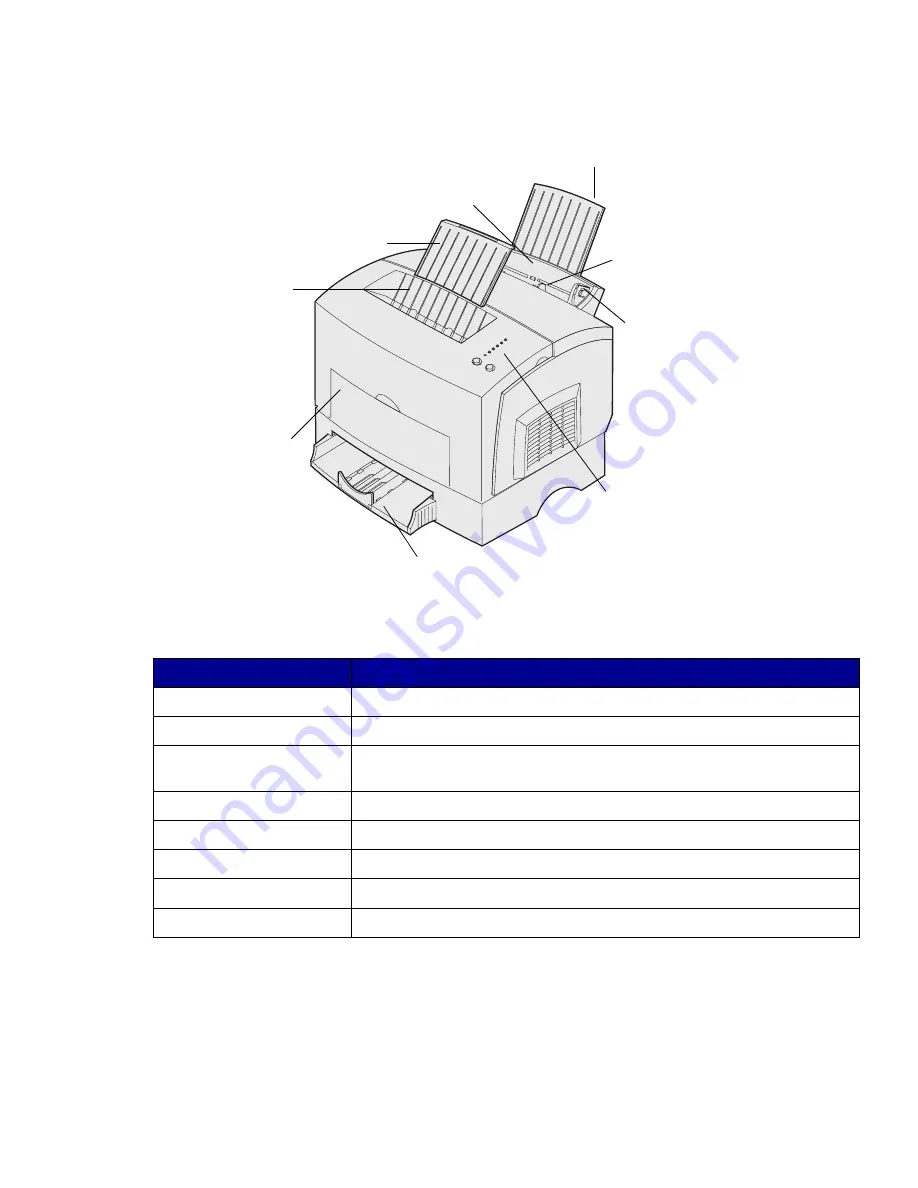
Tray 1

Paper support

Paper 
support

Top 
output 
bin

Operator 
panel 
lights

Paper 
guide

Manual 
feed

Front 
output 
door

Optional 250-sheet tray

Use this feature:

When you want to:

Tray 1

Load up to 150 sheets of paper or 10 sheets of other media.

Paper support

Support media in tray 1 or the top output bin.

Manual feed

Load a single sheet of paper or other media. Use for transparencies, 
labels, envelopes, and card stock.

Paper guides

Adjust the width of the media in tray 1 and the manual feed.

Operator panel lights

Check the status of your printer.

Top output bin

Stack printed documents face down.

Front output door

Print on special media, for example, labels or card stock.

Optional 250-sheet drawer

Increase your paper capacity.

Summary of Contents for 21S0034 - E323n - Printer

Page 1: ...www lexmark com Setup Guide October 2002 E321 E323 Printer ...

Page 2: ...egistered trademark of Adobe Systems Incorporated Other trademarks are the property of their respective owners Copyright 2002 Lexmark International Inc All rights reserved UNITED STATES GOVERNMENT RIGHTS This software and any accompanying documentation provided under this agreement are commercial computer software and documentation developed exclusively at private expense FCC emissions information...

Page 3: ...tall printer supplies 5 Installing the print cartridge 5 Step 4 Install memory cards 8 Removing the printer side cover 8 Removing the system board shield 10 Installing a memory card 10 Reinstalling the system board shield 12 Reattaching the printer side cover 13 Step 5 Load paper 14 Loading tray 1 15 Loading the optional 250 sheet tray 18 Loading the manual feed 21 Step 6 Attach cables 24 Attachin...

Page 4: ...r TCP IP 37 Assigning a printer IP address 37 Verifying the IP settings 38 Step 10 Install drivers for network printing 39 Windows 39 Macintosh 40 UNIX Linux 40 NetWare 41 Step 11 Distribute information to users 42 Identifying printer users 42 Locating helpful information 42 Distributing the information 43 Congratulations 43 Understanding the operator panel lights 44 Troubleshooting tips 51 Statem...

Page 5: ...exmark E323n Base memory 8MB 16MB 16MB Maximum memory 72MB 144MB 144MB Emulations PCL 5e and Macintosh compatibility PostScript 3 PCL 6 and Windows Macintosh Linux compatibility PostScript 3 PCL 6 and Windows Macintosh Linux compatibility Connectivity Parallel and Universal Serial Bus USB Parallel and USB 10 100 Base TX Ethernet and USB Ships with print cartridge yield at approximately 5 coverage ...

Page 6: ...ort Support media in tray 1 or the top output bin Manual feed Load a single sheet of paper or other media Use for transparencies labels envelopes and card stock Paper guides Adjust the width of the media in tray 1 and the manual feed Operator panel lights Check the status of your printer Top output bin Stack printed documents face down Front output door Print on special media for example labels or...

Page 7: ... Use this feature When you want to Parallel cable connector Connect your computer to theLexmark E321 or Lexmark E323 parallel port with a parallel cable USB cable connector Connect your computer to your printer USB port with a USB cable Ethernet cable connector Connect your computer to the Lexmark E323n network port with an Ethernet cable Power cord connector Plug your printer into a properly grou...

Page 8: ...lexmark com publications Quick Reference card The printer Quick Reference card provides easy access to information about loading paper clearing jams and understanding common operator panel light messages Drivers CD The drivers CD contains the necessary printer drivers to get your printer up and running It may also contain printer utilities screen fonts and additional documentation Lexmark s Web si...

Page 9: ... air conditioners heaters or ventilators Free of sunlight humidity extremes or temperature fluctuations Clean dry and free of dust 2 Remove all items from the box except the printer Make sure you have the following items Printer with print cartridge installed Power cord Setup Guide with a Publications CD Quick Reference card Drivers CD Operator panel overlay non English only Note The Lexmark E321 ...

Page 10: ...mark support phone number for your country Save the carton and packing material in case you need to repack the printer Attaching an operator panel overlay If you have a non English operator panel overlay in your printer box and want to use it peel it off align it on the operator panel and press it into place ...

Page 11: ...h the optional 250 sheet drawer which attaches underneath the printer A drawer consists of a tray and a support unit 1 Remove the tray from the support unit 2 Remove all packing material and tape from the tray and the support unit 3 Place the support unit in the location you have chosen for your printer Support unit Tray ...

Page 12: ...rinter before installing it 4 Align the printer with the front of the support unit and place it on top of the support unit Make sure the support unit is firmly in place When you complete setting up the printer print a menu settings page to verify the 250 sheet drawer is listed under Installed Features see page 35 5 Insert the tray ...

Page 13: ...alling the print cartridge Removing print cartridge packaging 1 Use the finger tab to pull down the printer cover 2 Grasp the cartridge handle and pull the print cartridge straight up 3 Remove the protective foam packaging from the print cartridge Cartridge handle ...

Page 14: ...ff the plastic piece attached to the ends of the print cartridge Discard the plastic piece foam and paper Note Do not touch the photoconductor drum on the bottom of the print cartridge 5 Shake the cartridge to distribute the toner evenly ...

Page 15: ...dge with the corresponding arrows in the printer b Holding the cartridge by the handle tilt the cartridge down and guide it between the print cartridge grooves c Push down on the cartridge until it is firmly in place 7 Close the printer cover What do I do next Task Go to page Install memory cards 8 Load paper 14 ...

Page 16: ...ity by adding optional cards CAUTION If you are installing memory cards sometime after setting up the printer turn the printer off and unplug the power cord before continuing Removing the printer side cover Before installing any memory options you must remove the printer side cover 1 Open the printer front cover ...

Page 17: ...9 Install memory cards 2 Firmly push in the two oval tabs as you pull open the side cover 3 Gently pull off the cover and set it aside ...

Page 18: ... screws but do not remove them 3 Slide the system board shield along the top and bottom grooves and set it aside Installing a memory card Follow the instructions in this section to install either a printer memory card or if you have a Lexmark E323 or Lexmark E323n a flash memory card The system board has two connectors for optional memory cards You can install a card in either connector ...

Page 19: ...Avoid touching the connection points along the edge of the card Save the packaging 3 Align the notches on the bottom of the card with the notches on the connector 4 Guide the card between the latches on each end of the connector and push the card firmly into the connector 5 Make sure each latch fits over the notch on each end of the memory card 6 Reattach the metal shield and side cover See page 1...

Page 20: ...ards Reinstalling the system board shield 1 Align the metal shield between the top and bottom grooves and slide it all the way back 2 Tighten the bottom three screws and reattach the top screw to keep the shield in place ...

Page 21: ...cards Reattaching the printer side cover 1 Align the top and bottom tabs with the corresponding slots 2 As you close the printer side cover push the oval tabs firmly into the slots 3 Close the printer front cover Tab Tab ...

Page 22: ...single sheet front output door provides a straight through paper path for special media reducing curling and potential paper jams The following table lists page numbers where you can find loading instructions for each tray Tray 1 Manual feed Optional 250 sheet tray Front output door Top output bin Paper support Paper support Source Capacity sheets Paper sizes supported Paper types supported Go to ...

Page 23: ...and special media Tray 1 holds up to 150 sheets of paper 10 sheets of transparencies or labels 10 envelopes 10 sheets of card stock 1 Extend the rear paper support until you hear a click 2 Flex the sheets back and forth to loosen them fan the sheets on all four sides and flex them again ...

Page 24: ...own with the stamp area in the top left corner To reduce paper jams do not use envelopes that Have excessive curl Are stuck together Are damaged in any way Contain windows holes perforations cutouts or embossing Use metal clasps string ties or metal folding bars Have postage stamps attached Have any exposed adhesive when the flap is in the sealed position ...

Page 25: ...lide the paper guides against the edges of the paper or envelopes 8 Select the paper size and type from your software application 9 Select the number of copies from your software application or printer driver if you are printing multiple copies 10 Start your print job Note If you load any print media other than plain letter or A4 paper in trays 1 or 2 make sure you change the Paper Type and Paper ...

Page 26: ...he tabs on either side of the tray and pull it completely out of the printer 2 Make sure the metal plate is pressed down before inserting the tray into the printer After the tray is inserted the metal plate springs back up so the paper can feed into the printer ...

Page 27: ...nd the paper support on the front of the tray 4 Flex the sheets back and forth to loosen them fan the sheets on all four sides and flex them again 5 If loading letterhead paper insert letterhead face down with the top of the page entering the printer first ...

Page 28: ... bucklers and lying flat in the tray Note When you load the tray do not exceed the maximum stack height indicated by the label in the tray Overfilling the tray may cause paper jams 7 Slide the paper guides flush against the edges of the paper Corner bucklers ...

Page 29: ...blems feeding envelopes or card stock in tray 1 try printing them one at a time from the manual feed 1 Extend the front paper support on the top output bin until you hear a click 2 If you are loading legal paper extend the front paper support all the way up 3 Open the front output door if you are printing on special media 4 If loading letterhead paper insert one sheet of letterhead with the top of...

Page 30: ...ny way Contain windows holes perforations cutouts or embossing Use metal clasps string ties or metal folding bars Have postage stamps attached Have any exposed adhesive when the flap is in the sealed position 5 Slide the paper guides flush against the edges of the paper or envelope 6 Select the paper size and type from your software application 7 Start your print job 8 Press and release Continue t...

Page 31: ...d Paper light and the Press Continue light come on place another piece of media in the manual feed 10 Press and release Continue to print another page Error Paper Jam Load Paper Toner Low Ready Data Continue Cancel Press Continue ...

Page 32: ...also support USB connections Refer to your computer operating system documentation to see if your system supports USB To attach the printer to a computer 1 Connect the printer to the computer using a USB or parallel cable A USB port requires a USB cable such as Lexmark part number 12A2405 2 m 6 5 ft Be sure to match the USB symbol on the cable to the USB symbol on the printer 2 Plug one end of the...

Page 33: ...ndard network cables Ethernet cable A 10BaseT 100BaseTx Fast Ethernet port is standard on the network model To attach the printer to a network 1 Make sure the printer is turned off and unplugged 2 Plug one end of the standard network cable into a LAN drop or hub and the other end into the Ethernet port on the back of the printer The printer automatically adjusts for the network speed 3 Plug one en...

Page 34: ...than Ready on the display refer to the publications CD for instructions on clearing the message Look for information about understanding printer messages 5 Turn on your computer and any other peripherals 6 Continue with Verify printer setup on page 35 ...

Page 35: ...re that lets your computer communicate with your printer The procedure to install drivers depends on the operating system you are using Select your operating system and cable from the table below for driver installation instructions Operating system Cable Go to page Windows XP USB or Parallel 28 Windows 2000 USB or Parallel 29 Windows Me USB or Parallel 29 Windows 98 USB or Parallel 30 Windows NT ...

Page 36: ...lso available in downloadable software packages on Lexmark s Web site at www lexmark com Using Windows XP with USB or parallel cable When the Found New Hardware Wizard screen appears 1 Insert the drivers CD If the CD auto launches exit the CD Click Next Note Business versions of Windows XP require that you have administrative access to install printer drivers on your computer 2 Browse to the locat...

Page 37: ...etup a Click Start Settings Printers b Select the printer you just created c Click File Properties d Click Print Test Page When a test page prints successfully printer setup is complete Using Windows Me with USB or parallel cable You must install both a USB port driver and an enhanced custom print driver Note Depending on the software and printers already installed on your computer your screens ma...

Page 38: ...driver Note Depending on the software and printers already installed on your computer your screens may vary from those in the instructions When the Add New Hardware Wizard screen appears 1 Insert the drivers CD and then click Next If the CD auto launches exit the CD 2 Select Search for the best driver for your device recommended and then click Next 3 Select only CD ROM drive and then click Next 4 ...

Page 39: ...lect Local Printer and click Next 5 Make sure the correct printer and port are listed and click OK You are now ready to print Using Windows 95 with a parallel cable When the Update Device Driver Wizard screen appears 1 Insert the drivers CD If the CD auto launches exit the CD If a system compatible driver is found on your operating system the Wizard installs it If no compatible system driver is fo...

Page 40: ...f Choose a default paper size g On the Easy Install screen click Install All the necessary files are installed on your computer h Click Quit when installation is complete Note A PPD for your printer is also available in a downloadable software package from Lexmark s Web site at www lexmark com 2 Do one of the following Macintosh 8 6 9 0 Open Apple LaserWriter Macintosh 9 1 9 x Open Applications an...

Page 41: ... On the Easy Install screen click Install All the necessary files are installed on your computer i Click Close when installation is complete 2 Open Finder click Applications and then click Utilities 3 Double click Print Center Note A PPD for your printer is also available in a downloadable software package from Lexmark s Web site at www lexmark com 4 Do one of the following If your USB attached pr...

Page 42: ...rs in UNIX and Linux environments All the printer driver packages support local printing using a parallel connection The driver package for Sun Solaris supports USB connections to Sun Ray appliances and Sun workstations Visit the Lexmark Web site at www lexmark com for a complete list of supported UNIX and Linux platforms ...

Page 43: ... to print the page s 2 On the Menu Settings page Verify that the options you installed are correctly listed under Installed Features If an option you installed is not listed on the Menu Settings page turn the printer off unplug the power cord and reinstall the option Verify that the amount of memory installed is correctly listed under Printer Information Verify that the paper trays are configured ...

Page 44: ...36 Verify printer setup What do I do next Task Go to page Configure for TCP IP 37 Distribute information to users 42 ...

Page 45: ...35 2 Go to Verifying the IP settings on page 38 and begin with step 2 If your network is not using DHCP then you must manually assign an IP address to the printer One of the easiest ways is to use the Print Server TCP IP Setup Utility on the drivers CD Launch the CD click View Documentation Network Printer Install Look for information about using the Print Server TCP IP Setup Utility To use this u...

Page 46: ...up pages on page 35 if you need help Note On Windows computers click Start Programs Command prompt or Accessories Command prompt if using Windows 2000 2 Ping the printer and verify that it responds For example at a command prompt on a network computer type ping followed by the new printer IP address for example 192 168 0 11 ping xxx xxx x xx If the printer is active on the network you receive a re...

Page 47: ...rinter is installed on the network computer attached to the printer During the driver installation the printer is set up to be shared so that other network computers are allowed to print to it More information about each of these network printing methods is on the drivers CD that shipped with your printer Creating ports and installing drivers Read the detailed instructions on the drivers CD Click ...

Page 48: ...sks on his computer Note A PostScript Printer Description PPD file provides detailed information about the capabilities of a printer to your UNIX or Macintosh computers Install a custom PostScript Printer Description PPD file A custom PPD can be found on the drivers CD that shipped with your printer A PPD for your printer is also available in a downloadable software package from Lexmark s Web site...

Page 49: ...e gives detailed instructions for installing and using Lexmark printers in UNIX and Linux environments You can download these packages from Lexmark s Web site You may also find the driver package you need on the drivers CD NetWare You printer supports NetWare network environments For the latest information about installing a network printer in a NetWare environment launch the drivers CD and click ...

Page 50: ...s to see a complete list of the available information If you have a version of Acrobat capable of full text searching we have created catalog entries to help you find the information you need Note The publications CD is shipped inside the Setup Guide The information provided on the Publications CD includes Tips for successful printing Ways to improve print quality Information about using the print...

Page 51: ... on the Publications CD is a separate PDF Launch the CD click Other resources and then click File locations Send Lexmark s printer documentation URL to printer users www lexmark com publications Users with Internet access can browse the site Print the information on the Publications CD and store it near the printer for easy access For printing instructions launch the CD and then click Navigation C...

Page 52: ...he printer is ready to print the printer needs intervention or the printer needs servicing Some of the more common light sequences are shown in the next section For a complete explanation of all of the light sequences refer to the Understanding the operator panel lights section of the Publications CD Error Paper Jam Load Paper Toner Low Ready Data Continue Cancel Press Continue ...

Page 53: ...ight is blinking slowly Press Continue Press Continue briefly approximately one second to restart the printer Press and release Continue twice quickly to display an error code Press Cancel Press and release Cancel to cancel the job currently printing Press and hold Cancel until all of the lights come on to reset the printer ...

Page 54: ...rinter is ready to receive and process data The printer is busy receiving or processing data Error Paper Jam Load Paper Toner Low Ready Data Continue Cancel Press Continue Error Paper Jam Load Paper Toner Low Ready Data Continue Cancel Press Continue ...

Page 55: ...additional data is received Tray 1 or the optional 250 sheet tray is out of media or the media did not feed properly Error Paper Jam Load Paper Toner Low Ready Data Continue Cancel Press Continue Error Paper Jam Load Paper Toner Low Ready Data Continue Cancel Press Continue ...

Page 56: ...ia in the manual feed The printer detects a jam Press and release Continue twice quickly to display the secondary paper jam light sequence Error Paper Jam Load Paper Toner Low Ready Data Continue Cancel Press Continue Error Paper Jam Load Paper Toner Low Ready Data Continue Cancel Press Continue ...

Page 57: ... light does not come on if the 1 500 page starter print cartridge is installed A secondary error has occurred 1 Quickly press and release Continue twice to display the secondary error code light sequence 2 Refer to the Understanding the Operator Panel Lights section in the Publications CD for information on what the light sequence means and what you can do Error Paper Jam Load Paper Toner Low Read...

Page 58: ...rator panel lights The printer has a service error Turn the printer off and back on If the lights are still blinking contact your point of purchase Error Paper Jam Load Paper Toner Low Ready Data Continue Cancel Press Continue ...

Page 59: ... firmly plugged in at the back of the printer The operator panel lights do not come on when the printer is turned on Make sure the power cord is firmly plugged in at the back of the printer and at the electrical outlet Loading paper Toner smudges appear on the page Make sure the paper is straight and unwrinkled The paper sticks together printer feeds multiple sheets of paper Remove the paper from ...

Page 60: ...rom the optional 250 sheet tray Make sure optional 250 sheet tray is selected from the printer driver Make sure the tray is pushed all the way in Make sure the metal plate is pressed down Make sure the paper is under both corner bucklers Make sure the paper does not exceed the stack height indicator Remove the paper from the optional 250 sheet tray and fan the paper Problem What to do ...

Page 61: ...anty service under the terms of this statement is available to that user for the remainder of the warranty period You should transfer proof of original purchase and this statement to that user Warranty service The warranty period is12 months and starts on the date of original purchase as shown on the purchase receipt To obtain warranty service you may be required to present proof of original purch...

Page 62: ... performance or nonperformance of Lexmark or a Remarketer for this product under this Statement of Limited Warranty you may recover actual damages up to the limit set forth in the following paragraph Lexmark s liability for actual damages from any cause whatsoever will be limited to the greater of 1 5 000 or 2 the amount you paid for the product that caused the damages This limitation of liability...

Page 63: ...Lexmark with diamond design are trademarks of Lexmark International Inc registered in the United States and or other countries 2002 Lexmark International Inc 740 West New Circle Road Lexington Kentucky 40550 P N 21S0260 E C 1SP004 ...

Reviews: