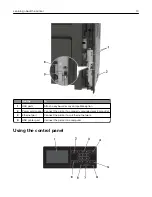
Use the
To
1
Display
•
View the printer messages and supply status.
•
Set up and operate the printer.
2
Home button
Go to the home screen.
3
Keypad
Enter numbers or symbols in an input field.
4
Power button
•
Turn on or turn off the printer.
Note:
To turn off the printer, press and hold the power button for five
seconds.
•
Set the printer to Sleep or Hibernate mode.
•
Wake the printer from Sleep or Hibernate mode.
5
Stop or Cancel button
Stop the current job.
6
Indicator light
Check the status of the printer.
7
Volume buttons
Adjust the volume of the headset or speaker.
8
Headset or speaker port Attach a headset or speaker.
9
Backspace button
Move the cursor backward and delete a character in an input field.
Understanding the status of the power button and
indicator light
Indicator light
Printer status
Off
The printer is off or in Hibernate mode.
Blue
The printer is ready or processing data.
Red
The printer requires user intervention.
Power button light
Printer status
Off
The printer is off, ready, or processing data.
Solid amber
The printer is in sleep mode.
Blinking amber
The printer is in hibernate mode.
Using the home screen
When the printer is turned on, the display shows the home screen. Use the home screen buttons and icons to
initiate an action.
Note:
Your home screen may vary depending on your home screen customization settings, administrative
setup, and active embedded solutions.
Learning about the printer
14
Summary of Contents for CS921
Page 1: ...CS921 CS923 CS927 User s Guide August 2017 www lexmark com Machine type s 5059 Model s 130 530...
Page 43: ...5 Insert the new toner cartridge 6 Remove the waste toner bottle Maintaining the printer 43...
Page 48: ...8 Insert the waste toner bottle and then close the door Maintaining the printer 48...
Page 71: ...Below the fuser area Duplex area Clearing jams 71...
Page 76: ...2 Open door J 3 Open door H Clearing jams 76...
Page 126: ...5 Remove the controller board shield Upgrading and migrating 126...
Page 134: ...7 Connect the tray connector to the printer 8 Open trays 2 and 3 Upgrading and migrating 134...
Page 139: ...9 Remove the stabilizing feet from the tray Upgrading and migrating 139...
Page 143: ...17 Secure the tray cable with the clamp Upgrading and migrating 143...
Page 155: ...8 Attach the nisher to the printer Upgrading and migrating 155...
Page 164: ...Laser advisory label The following laser notice label is affixed to the printer Notices 164...


