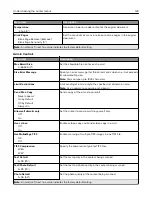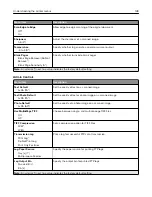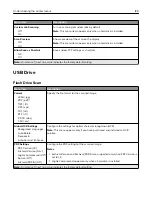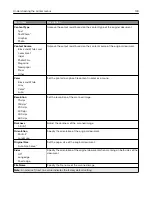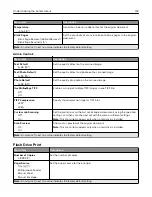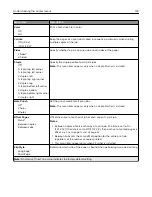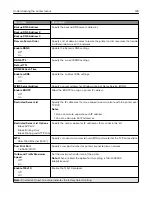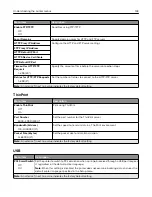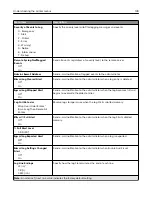
Menu item
Description
Setup Using Mobile App
Configure the wireless connection using Lexmark
Mobile Assistant.
Setup On Printer Panel
Choose Network
Add Wi
‑
Fi Network
Network Name
Network Mode (Infrastructure*)
Wireless Security Mode (Disabled*)
Configure the wireless connection using the control
panel.
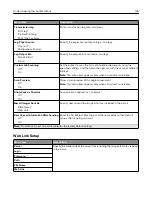
Wi
‑
Fi Protected Setup
Start Push Button Method
Start PIN Method
Establish a Wi
‑
Fi network and enable network security.
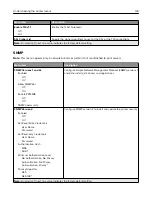
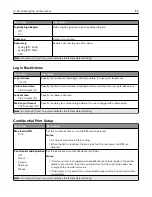
Enable Wi
‑
Fi Direct
On
Off*
Enable Wi-Fi Direct
‑
capable devices to connect to the
printer.
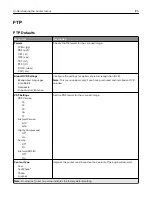
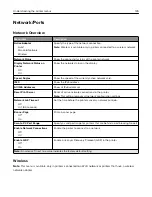
Compatibility
802.11b/g/n (2.4GHz)
802.11a/b/g/n/ac (2.4GHz/5GHz)*
802.11a/n/ac (5GHz)
Specify the standard for the Wi
‑
Fi network.
Wireless Security Mode
Disabled*
WEP
WPA2/WPA-Personal
WPA2-Personal
802.1x - RADIUS
Set the security mode for connecting the printer to Wi
‑
Fi
devices.
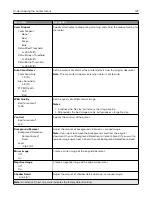
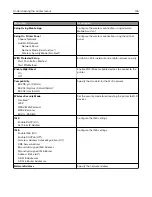
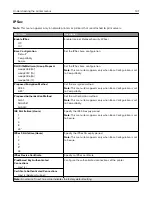
IPv4
Enable DHCP (On*)
Set Static IP Address
Configure the IPv4 settings.
IPv6
Enable IPv6 (On*)
Enable DHCPv6 (Off*)
Stateless Address Autoconfiguration (On*)
DNS Server Address
Manually Assigned IPv6 Address
Manually Assigned IPv6 Router
Address Prefix (64*)
All IPv6 Addresses
All IPv6 Router Addresses
Configure the IPv6 settings.
Network Address
Specify the network address.
Understanding the printer menus
136
Summary of Contents for CX920
Page 164: ... Scanner glass Scanner glass pad 3 Close the scanner cover Maintaining the printer 164 ...
Page 172: ...5 Insert the new toner cartridge 6 Remove the waste toner bottle Maintaining the printer 172 ...
Page 177: ...8 Insert the waste toner bottle and then close the door Maintaining the printer 177 ...
Page 207: ... Below the fuser area Duplex area Clearing jams 207 ...
Page 212: ...2 Open door J Clearing jams 212 ...
Page 214: ... Areas H1 and H2 Area H6 Clearing jams 214 ...
Page 218: ...2 Remove the staple cartridge holder 3 Remove the loose staples Clearing jams 218 ...
Page 220: ...2 Remove the staple cartridge holder 3 Remove the loose staples Clearing jams 220 ...
Page 222: ...2 Remove the staple cartridge holder 3 Remove the loose staples Clearing jams 222 ...
Page 276: ...6 Remove the controller board shield Upgrading and migrating 276 ...
Page 279: ...4 Remove the controller board shield Upgrading and migrating 279 ...
Page 285: ...7 Connect the tray connector to the printer 8 Open trays 2 and 3 Upgrading and migrating 285 ...
Page 290: ...9 Remove the stabilizing feet from the tray Upgrading and migrating 290 ...
Page 294: ...17 Secure the tray cable with the clamp Upgrading and migrating 294 ...
Page 301: ...7 Remove the paper guides 8 Attach the sensor cover Upgrading and migrating 301 ...
Page 307: ...8 Attach the finisher to the printer Upgrading and migrating 307 ...


