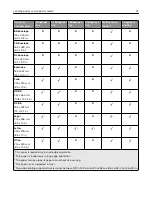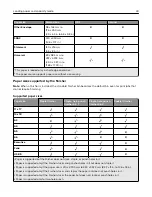
Paper size
Dimensions
ADF
Scanner
12 x 18
305 x 457 mm
(12 x 18 in.)
X
X
A3
297 x 420 mm
(11.69 x 16.54 in.)
A4
210 x 297 mm
(8.3 x 11.7 in.)
A5
148 x 210 mm
(5.8 x 8.3 in.)
2
A6
105 x 148 mm
(4.1 x 5.8 in.)
1,2
1,2
B5 Envelope
176 x 250 mm
(6.9 x 9.8 in.)
X
X
C5 Envelope
162 x 229 mm
(6.4 x 9 in.)
X
X
DL Envelope
110 x 220 mm
(4.3 x 8.7 in.)
X
X
Business card
N/A
X
1,2
Custom Scan Size [x]
N/A
2
2
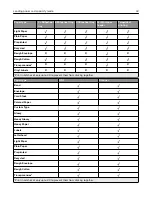
Hagaki
100 x 148 mm
(3.94 x 5.83 in.)
Executive
184 x 267 mm
(7.3 x 10.5 in.)
Folio
216 x 330 mm
(8.5 x 13 in.)
JIS B4
257 x 364 mm
(10.12 x 14.33 in.)
JIS B5
182 x 257 mm
(7.2 x 10.1 in.)
Letter
216 x 279 mm
(8.5 x 11 in.)
Legal
216 x 356 mm
(8.5 x 14 in.)
Oficio
216 x 340 mm
(8.5 x 13.4 in.)
2
2
1
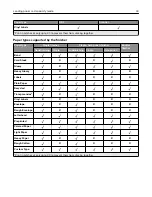
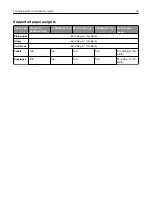
This paper is loaded only in short
‑
edge orientation.
2
The paper source supports paper size
without size sensing
.
Loading paper and specialty media
39
Summary of Contents for CX920
Page 164: ... Scanner glass Scanner glass pad 3 Close the scanner cover Maintaining the printer 164 ...
Page 172: ...5 Insert the new toner cartridge 6 Remove the waste toner bottle Maintaining the printer 172 ...
Page 177: ...8 Insert the waste toner bottle and then close the door Maintaining the printer 177 ...
Page 207: ... Below the fuser area Duplex area Clearing jams 207 ...
Page 212: ...2 Open door J Clearing jams 212 ...
Page 214: ... Areas H1 and H2 Area H6 Clearing jams 214 ...
Page 218: ...2 Remove the staple cartridge holder 3 Remove the loose staples Clearing jams 218 ...
Page 220: ...2 Remove the staple cartridge holder 3 Remove the loose staples Clearing jams 220 ...
Page 222: ...2 Remove the staple cartridge holder 3 Remove the loose staples Clearing jams 222 ...
Page 276: ...6 Remove the controller board shield Upgrading and migrating 276 ...
Page 279: ...4 Remove the controller board shield Upgrading and migrating 279 ...
Page 285: ...7 Connect the tray connector to the printer 8 Open trays 2 and 3 Upgrading and migrating 285 ...
Page 290: ...9 Remove the stabilizing feet from the tray Upgrading and migrating 290 ...
Page 294: ...17 Secure the tray cable with the clamp Upgrading and migrating 294 ...
Page 301: ...7 Remove the paper guides 8 Attach the sensor cover Upgrading and migrating 301 ...
Page 307: ...8 Attach the finisher to the printer Upgrading and migrating 307 ...


