Menu item
Description
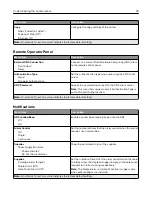
Copy
Sides (1 sided to 1 sided*)
Pages per Side (Off*)
Darkness (5*)
Configure the copy settings of the printer.
Note:
An asterisk (*) next to a value indicates the factory default setting.
Remote Operator Panel
Menu item
Description
External VNC Connection
Don’t Allow*
Allow
Connect an external Virtual Network Computing (VNC) client
to the remote control panel.
Authentication Type
None*
Standard Authentication
Set the authentication type when accessing the VNC client
server.
VNC Password
Specify the password to connect to the VNC client server.
Note:
This menu item appears only if Authentication Type is
set to Standard Authentication.
Note:
An asterisk (*) next to a value indicates the factory default setting.
Notifications
Menu item
Description
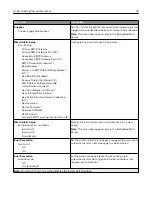
ADF Loaded Beep
Off
On*
Enable a sound when loading paper into the ADF.
Alarm Control
Off
Single*
Continuous
Set the number of times that the alarm sounds when the printer
requires user intervention.
Supplies
Show Supply Estimates
Show estimates*
Do not show estimates
Show the estimated status of the supplies.
Supplies
Cartridge Alarm (Single*)
Staple Alarm (Off*)
Hole Punch Alarm (Off*)
Set the number of times that the alarm sounds when the toner
cartridge is low, the staple cartridge is empty, or the hole punch
receptacle is full or missing respectively.
Note:
The Staple Alarm and Hole Punch Alarm appear only
when output options are installed.
Note:
An asterisk (*) next to a value indicates the factory default setting.
Understanding the printer menus
78
Summary of Contents for CX920
Page 164: ... Scanner glass Scanner glass pad 3 Close the scanner cover Maintaining the printer 164 ...
Page 172: ...5 Insert the new toner cartridge 6 Remove the waste toner bottle Maintaining the printer 172 ...
Page 177: ...8 Insert the waste toner bottle and then close the door Maintaining the printer 177 ...
Page 207: ... Below the fuser area Duplex area Clearing jams 207 ...
Page 212: ...2 Open door J Clearing jams 212 ...
Page 214: ... Areas H1 and H2 Area H6 Clearing jams 214 ...
Page 218: ...2 Remove the staple cartridge holder 3 Remove the loose staples Clearing jams 218 ...
Page 220: ...2 Remove the staple cartridge holder 3 Remove the loose staples Clearing jams 220 ...
Page 222: ...2 Remove the staple cartridge holder 3 Remove the loose staples Clearing jams 222 ...
Page 276: ...6 Remove the controller board shield Upgrading and migrating 276 ...
Page 279: ...4 Remove the controller board shield Upgrading and migrating 279 ...
Page 285: ...7 Connect the tray connector to the printer 8 Open trays 2 and 3 Upgrading and migrating 285 ...
Page 290: ...9 Remove the stabilizing feet from the tray Upgrading and migrating 290 ...
Page 294: ...17 Secure the tray cable with the clamp Upgrading and migrating 294 ...
Page 301: ...7 Remove the paper guides 8 Attach the sensor cover Upgrading and migrating 301 ...
Page 307: ...8 Attach the finisher to the printer Upgrading and migrating 307 ...

