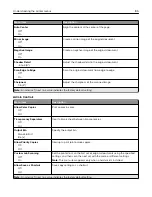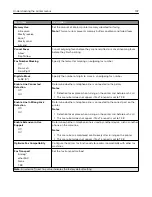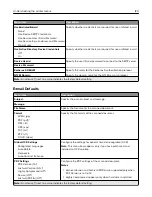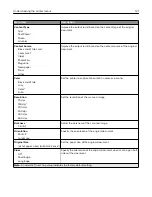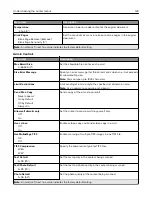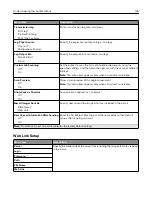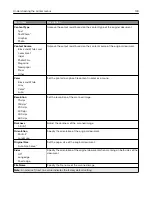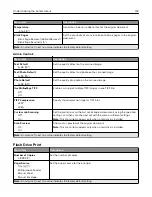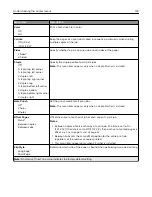
E
‑
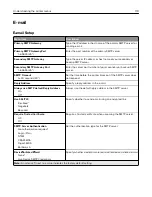
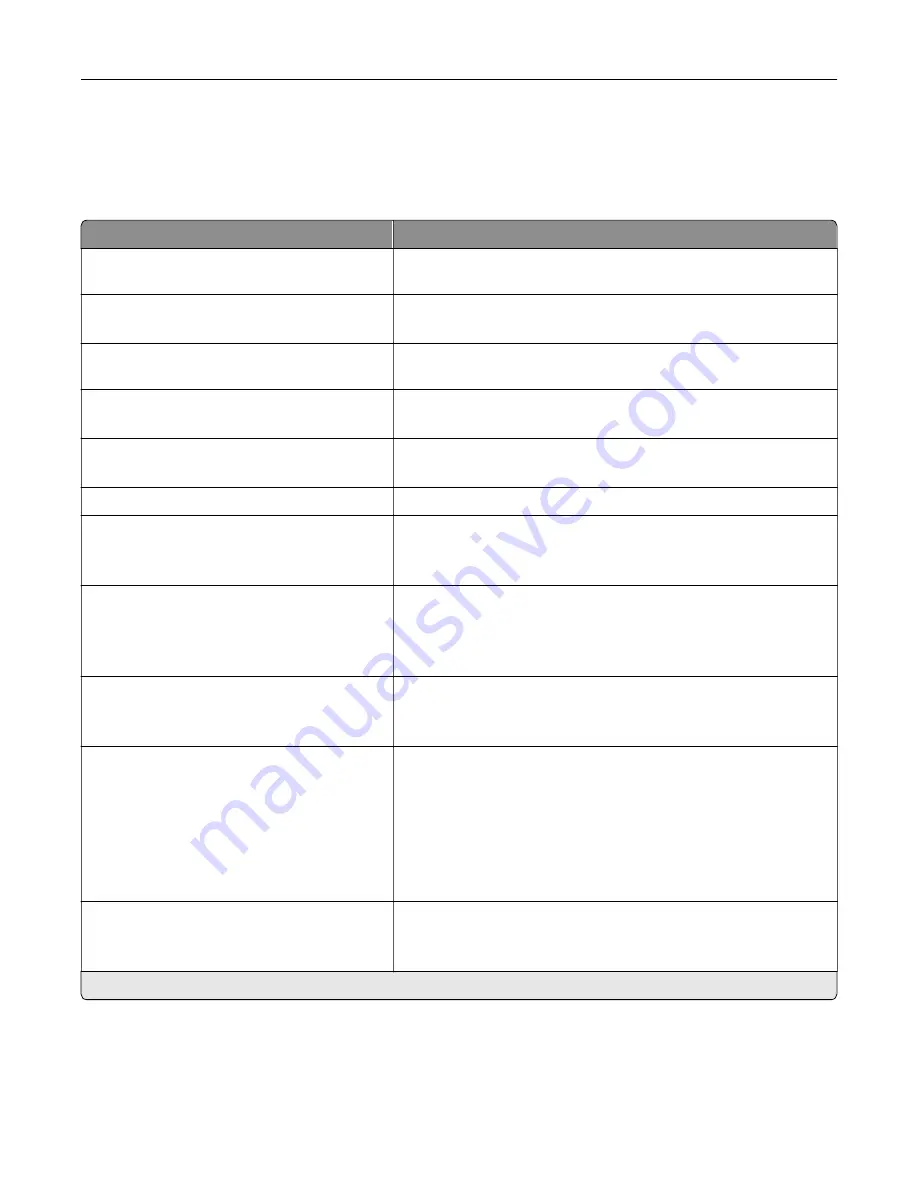
mail Setup
Menu item
Description
Primary SMTP Gateway
Type the IP address or host name of the primary SMTP server for
sending e-mail.
Primary SMTP Gateway Port
1–65535 (25*)
Enter the port number of the primary SMTP server.
Secondary SMTP Gateway
Type the server IP address or host name of your secondary or
backup SMTP server.
Secondary SMTP Gateway Port
1–65535 (25*)
Enter the server port number of your secondary or backup SMTP
server.
SMTP Timeout
5–30 seconds (30*)
Set the time before the printer times out if the SMTP server does
not respond.
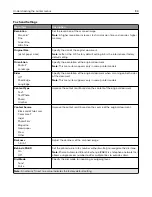
Reply Address
Specify a reply address in the e
‑
mail.
Always use SMTP default Reply Address
On
Off*
Always use the default reply address in the SMTP server.
Use SSL/TLS
Disabled*
Negotiate
Required
Specify whether to send e
‑
mail using an encrypted link.
Require Trusted Certificate
Off
On*
Require a trusted certificate when accessing the SMTP server.
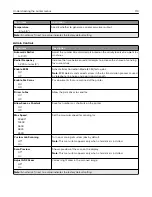
SMTP Server Authentication
No authentication required*
Login / Plain
NTLM
CRAM
‑
MD5
Digest
‑
MD5
Kerberos 5
Set the authentication type for the SMTP server.
Device
‑
Initiated E
‑
None*
Use Device SMTP Credentials
Specify whether credentials are required for device
‑
initiated e
‑
mail.
Note:
An asterisk (*) next to a value indicates the factory default setting.
Understanding the printer menus
119
Summary of Contents for CX920
Page 164: ... Scanner glass Scanner glass pad 3 Close the scanner cover Maintaining the printer 164 ...
Page 172: ...5 Insert the new toner cartridge 6 Remove the waste toner bottle Maintaining the printer 172 ...
Page 177: ...8 Insert the waste toner bottle and then close the door Maintaining the printer 177 ...
Page 207: ... Below the fuser area Duplex area Clearing jams 207 ...
Page 212: ...2 Open door J Clearing jams 212 ...
Page 214: ... Areas H1 and H2 Area H6 Clearing jams 214 ...
Page 218: ...2 Remove the staple cartridge holder 3 Remove the loose staples Clearing jams 218 ...
Page 220: ...2 Remove the staple cartridge holder 3 Remove the loose staples Clearing jams 220 ...
Page 222: ...2 Remove the staple cartridge holder 3 Remove the loose staples Clearing jams 222 ...
Page 276: ...6 Remove the controller board shield Upgrading and migrating 276 ...
Page 279: ...4 Remove the controller board shield Upgrading and migrating 279 ...
Page 285: ...7 Connect the tray connector to the printer 8 Open trays 2 and 3 Upgrading and migrating 285 ...
Page 290: ...9 Remove the stabilizing feet from the tray Upgrading and migrating 290 ...
Page 294: ...17 Secure the tray cable with the clamp Upgrading and migrating 294 ...
Page 301: ...7 Remove the paper guides 8 Attach the sensor cover Upgrading and migrating 301 ...
Page 307: ...8 Attach the finisher to the printer Upgrading and migrating 307 ...

