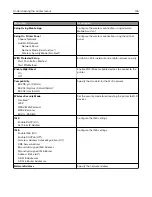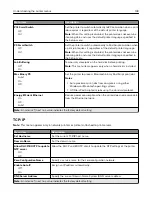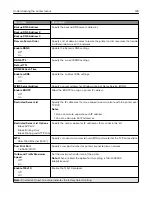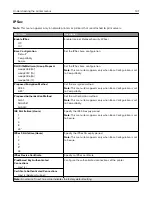
Menu item
Description
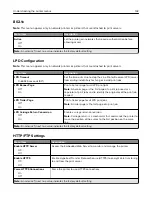
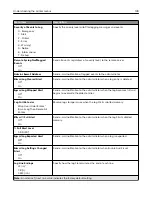
Enable TLSv1.1
Off
On*
Enable the TLSv1.1 protocol.
SSL Cipher List
Specify the cipher algorithms to use for the SSL or the TLS connections.
Note:
An asterisk (*) next to a value indicates the factory default setting.
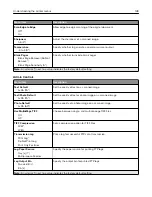
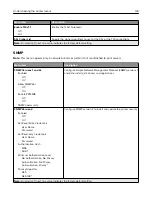
SNMP
Note:
This menu appears only in network printers or printers that are attached to print servers.
Menu item
Description
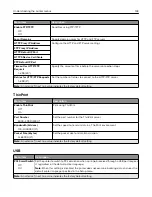
SNMP Versions 1 and 2c
Enabled
Off
On*
Allow SNMP Set
Off
On*
Enable PPM MIB
Off
On*
SNMP Community
Configure Simple Network Management Protocol (SNMP) versions 1
and 2c to install print drivers and applications.
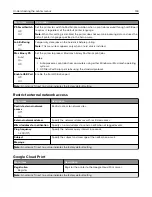
SNMP Version 3
Enabled
Off
On*
Set Read/Write Credentials
User Name
Password
Set Read
‑
only Credentials
User Name
Password
Authentication Hash
MD5
SHA1*
Minimum Authentication Level
No Authentication, No Privacy
Authentication, No Privacy
Authentication, Privacy*
Privacy Algorithm
DES
AES
‑
128*
Configure SNMP version 3 to install and update the printer security.
Note:
An asterisk (*) next to a value indicates the factory default setting.
Understanding the printer menus
140
Summary of Contents for CX920
Page 164: ... Scanner glass Scanner glass pad 3 Close the scanner cover Maintaining the printer 164 ...
Page 172: ...5 Insert the new toner cartridge 6 Remove the waste toner bottle Maintaining the printer 172 ...
Page 177: ...8 Insert the waste toner bottle and then close the door Maintaining the printer 177 ...
Page 207: ... Below the fuser area Duplex area Clearing jams 207 ...
Page 212: ...2 Open door J Clearing jams 212 ...
Page 214: ... Areas H1 and H2 Area H6 Clearing jams 214 ...
Page 218: ...2 Remove the staple cartridge holder 3 Remove the loose staples Clearing jams 218 ...
Page 220: ...2 Remove the staple cartridge holder 3 Remove the loose staples Clearing jams 220 ...
Page 222: ...2 Remove the staple cartridge holder 3 Remove the loose staples Clearing jams 222 ...
Page 276: ...6 Remove the controller board shield Upgrading and migrating 276 ...
Page 279: ...4 Remove the controller board shield Upgrading and migrating 279 ...
Page 285: ...7 Connect the tray connector to the printer 8 Open trays 2 and 3 Upgrading and migrating 285 ...
Page 290: ...9 Remove the stabilizing feet from the tray Upgrading and migrating 290 ...
Page 294: ...17 Secure the tray cable with the clamp Upgrading and migrating 294 ...
Page 301: ...7 Remove the paper guides 8 Attach the sensor cover Upgrading and migrating 301 ...
Page 307: ...8 Attach the finisher to the printer Upgrading and migrating 307 ...


