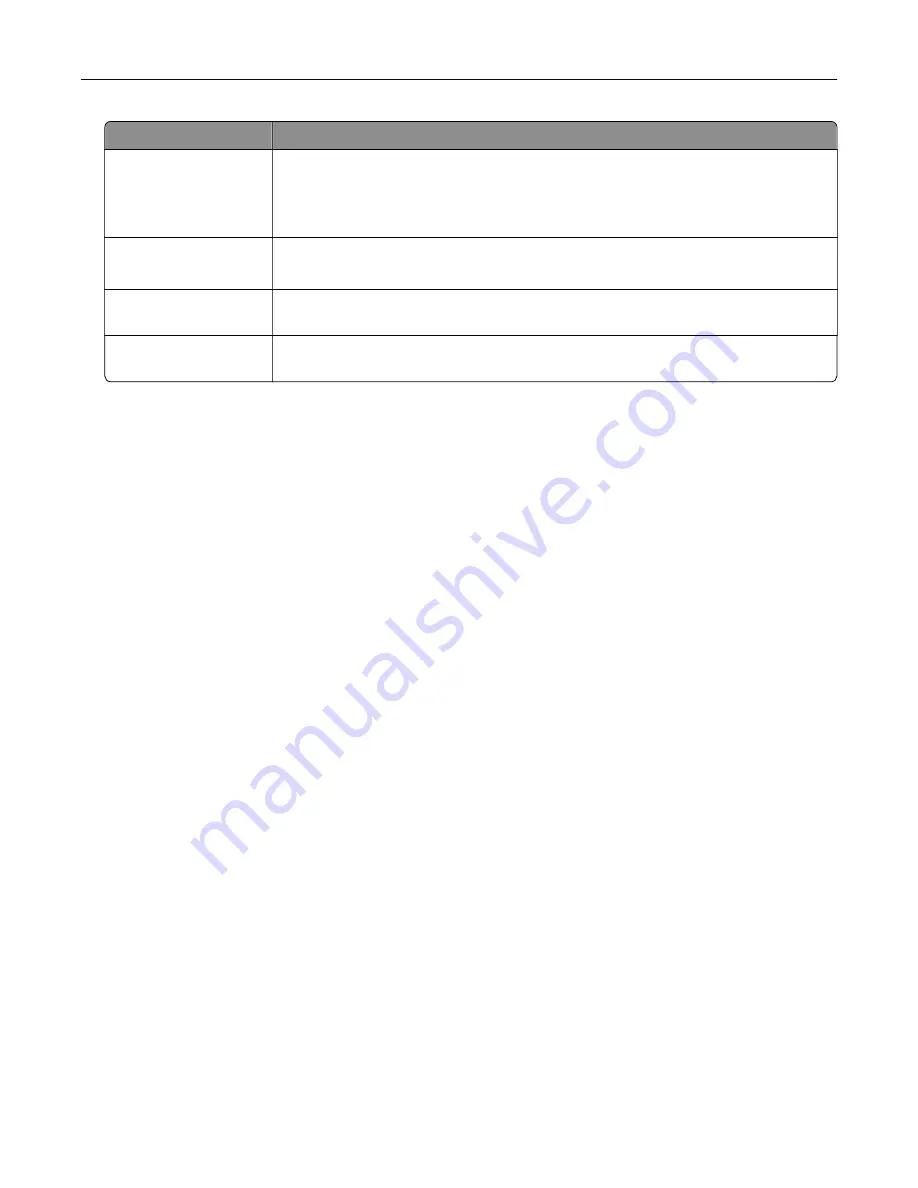
Use
To
Verify Job Expiration
Set the expiration time that the printer prints a copy before printing the remaining
copies.
Note:
Verify jobs print one copy to check if it is satisfactory before printing the
remaining copies.
Reserve Job Expiration
Set the expiration time that the printer stores print jobs.
Note:
Reserve held jobs are automatically deleted after printing.
Require All Jobs to be
Held
Set the printer to hold all print jobs.
Keep duplicate
documents
Set the printer to print all documents with the same file name.
Printing confidential and other held jobs
For Windows users
1
With a document open, click
File
>
.
2
Click
Properties
,
Preferences
,
Options
, or
Setup
.
3
Click
Print and Hold
.
4
Select
Use Print and Hold
, and then assign a user name.
5
Select the print job type (Confidential, Repeat, Reserve, or Verify).
If the print job is confidential, then enter a four
‑
digit PIN.
6
Click
OK
or
.
7
From the printer home screen, release the print job.
•
For confidential print jobs, navigate to:
Held jobs
> select your user name >
Confidential
> enter the PIN > select the print job > configure the
settings >
•
For other print jobs, navigate to:
Held jobs
> select your user name > select the print job > configure the settings >
For Macintosh users
1
With a document open, choose
File
>
.
If necessary, click the disclosure triangle to see more options.
2
From the print options or Copies & Pages menu, choose
Job Routing
.
3
Select the print job type (Confidential, Repeat, Reserve, or Verify).
If the print job is confidential, then assign a user name and a four
‑
digit PIN.
4
Click
OK
or
.
Printing
49
Summary of Contents for CX920
Page 164: ... Scanner glass Scanner glass pad 3 Close the scanner cover Maintaining the printer 164 ...
Page 172: ...5 Insert the new toner cartridge 6 Remove the waste toner bottle Maintaining the printer 172 ...
Page 177: ...8 Insert the waste toner bottle and then close the door Maintaining the printer 177 ...
Page 207: ... Below the fuser area Duplex area Clearing jams 207 ...
Page 212: ...2 Open door J Clearing jams 212 ...
Page 214: ... Areas H1 and H2 Area H6 Clearing jams 214 ...
Page 218: ...2 Remove the staple cartridge holder 3 Remove the loose staples Clearing jams 218 ...
Page 220: ...2 Remove the staple cartridge holder 3 Remove the loose staples Clearing jams 220 ...
Page 222: ...2 Remove the staple cartridge holder 3 Remove the loose staples Clearing jams 222 ...
Page 276: ...6 Remove the controller board shield Upgrading and migrating 276 ...
Page 279: ...4 Remove the controller board shield Upgrading and migrating 279 ...
Page 285: ...7 Connect the tray connector to the printer 8 Open trays 2 and 3 Upgrading and migrating 285 ...
Page 290: ...9 Remove the stabilizing feet from the tray Upgrading and migrating 290 ...
Page 294: ...17 Secure the tray cable with the clamp Upgrading and migrating 294 ...
Page 301: ...7 Remove the paper guides 8 Attach the sensor cover Upgrading and migrating 301 ...
Page 307: ...8 Attach the finisher to the printer Upgrading and migrating 307 ...

