background image

Notices

Edition notice

April 2009

The following paragraph does not apply to any country where such provisions are inconsistent with local
law:

 LEXMARK INTERNATIONAL, INC., PROVIDES THIS PUBLICATION “AS IS” WITHOUT WARRANTY OF ANY KIND,

EITHER EXPRESS OR IMPLIED, INCLUDING, BUT NOT LIMITED TO, THE IMPLIED WARRANTIES OF MERCHANTABILITY
OR FITNESS FOR A PARTICULAR PURPOSE. Some states do not allow disclaimer of express or implied warranties in
certain transactions; therefore, this statement may not apply to you.

This publication could include technical inaccuracies or typographical errors. Changes are periodically made to the
information herein; these changes will be incorporated in later editions. Improvements or changes in the products
or the programs described may be made at any time.

References in this publication to products, programs, or services do not imply that the manufacturer intends to make
these available in all countries in which it operates. Any reference to a product, program, or service is not intended
to state or imply that only that product, program, or service may be used. Any functionally equivalent product,
program, or service that does not infringe any existing intellectual property right may be used instead. Evaluation
and verification of operation in conjunction with other products, programs, or services, except those expressly
designated by the manufacturer, are the user’s responsibility.

For Lexmark technical support, visit 

support.lexmark.com

.

For information on supplies and downloads, visit 

www.lexmark.com

.

If you don't have access to the Internet, you can contact Lexmark by mail:

Lexmark International, Inc.
Bldg 004-2/CSC
740 New Circle Road NW
Lexington, KY 40550
USA

© 2009 Lexmark International, Inc.

All rights reserved.

UNITED STATES GOVERNMENT RIGHTS

This software and any accompanying documentation provided under this agreement are commercial computer
software and documentation developed exclusively at private expense.

Trademarks

Lexmark and Lexmark with diamond design are trademarks of Lexmark International, Inc., registered in the United
States and/or other countries.

All other trademarks are the property of their respective owners.

Notices

37

Summary of Contents for Intuition S505

Page 1: ...Lexmark Intuition S500 Series Quick Reference Guide April 2009 www lexmark com ...

Page 2: ...s license agreement to any subsequent user of this printer The patented Lexmark inkjet cartridges and their contents are licensed subject to a restriction that they may be used only once After this single use the license to use the print cartridges and their contents terminates and you agree to return them only to Lexmark for recycling Replacement inkjet cartridge s sold without these terms are av...

Page 3: ...ges 14 Maintaining ink cartridges 15 Using the printer software 17 Minimum system requirements 17 Installing the printer software 17 Using the Windows printer software 18 Using the Macintosh printer software 20 Printing 21 Printing a document 21 Printing on both sides of the paper duplexing automatically 21 Printing photos using the printer control panel 23 Printing documents from a memory card or...

Page 4: ...ng to a local or network computer 27 Scanning to a flash drive or memory card 28 Scanning directly to e mail using the printer software 28 Scanning to a PDF 29 Canceling scan jobs 29 Troubleshooting 30 Notices 37 Edition notice 37 Contents 4 ...

Page 5: ...le click User s Guide Help using the printer software Software Help installed automatically with the printer software 1 Click Help from any printer software program or application The latest supplemental information updates online technical support and telephone support Support Web site support lexmark com 1 Available on the installation software CD and on the Lexmark Web site at www lexmark com p...

Page 6: ...ogram application or flash drive for presentation Use recycled paper Conserving ink Use Quick Print or Draft Mode These modes can be used to print documents using less ink than normal and are ideal for printing documents that are mostly text Use High Yield cartridges Inks in High Yield cartridges allow you to print more pages with fewer cartridges Clean the printhead Before replacing and recycling...

Page 7: ...esolution flatbed scanner Photo printing Print photos directly from digital memory cards PictBridge enabled digital cameras and USB flash drives Select photos to print using the proof sheet for computer free printing Eco Mode Save energy and paper by activating Eco Mode It automatically dims the printer display light puts the printer into Power Saver mode after 10 minutes of inactivity and prints ...

Page 8: ...he To 1 Top cover Access the scanner glass 2 Scanner glass Scan and copy photos and documents 3 USB port Connect the printer to a computer using a USB cable Warning Potential Damage Do not touch the USB port except when plugging in or removing a USB cable or installation cable 4 Power supply with port Connect the printer to a power source 5 Duplex unit Print on both sides of a sheet of paper Remov...

Page 9: ...s the scan menu and scan documents 4 Photo button Access the photo menu and print photos 5 Back button Return to the previous screen Exit from one menu level to a higher one 6 Color Black Switch to color mode or black and white mode 7 Start button Start a print scan or copy job depending on which mode is selected 8 2 Sided Eco Mode Activate 2 Sided to Print on both sides of the paper duplex Activa...

Page 10: ...eturn to default settings 10 Arrow buttons Choose a menu or submenu item that appears on the display 11 Select button Select menu options Save settings Feed or eject paper Press and hold for 3 seconds to feed or eject paper from the printer 12 Display Note The display is turned off in Power Saver mode View Printer status Messages Menus 13 Setup button Access the setup menu and change printer setti...

Page 11: ...he printer For more information see Supported memory cards and file types on page 12 Notes The flash drive uses the same port that is used for a PictBridge camera cable An adapter may be necessary if your flash drive does not fit directly into the port Warning Potential Damage Do not touch any cables any network adapter anyconnector thememorydevice ortheprinter intheareasshownwhileactively printin...

Page 12: ...Memory Stick PRO Memory Stick Duo with adapter Memory Stick PRO Duo with adapter xD Picture Card xD Picture Card Type H xD Picture Card Type M Secure Digital High Capacity SDHC Documents doc Microsoft Word xls Microsoft Excel ppt Microsoft PowerPoint pdf Adobe Portable Document Format rtf Rich Text Format docx Microsoft Word Open Document Format xlsx Microsoft Excel Open Document Format pptx Micro...

Page 13: ...icensed for a single use only After use return this cartridge to Lexmark for remanufacturing refilling or recycling 2 Available only on the Lexmark Web site at www lexmark com Lexmark S508 models Item Return Program Cartridge1 Regular cartridge2 Black cartridge 108 108A High yield black cartridge 108XL 108XLA Yellow color cartridge 108 108A High yield yellow color cartridge 108XL 108XLA Cyan color...

Page 14: ...urn on your printer 2 Open the printer Note The printhead moves to the cartridge installation position 3 Press the release tab and then remove the used ink cartridge or cartridges 4 Install each ink cartridge Use two hands to install the black cartridge Note Install the new ink cartridges immediately after removing the protective cap to avoid exposing the ink to air 5 Close the printer Ordering an...

Page 15: ...nts Note Do not remove the alignment page until printing is finished Using the printer software For Windows users 1 Load plain paper 2 Click or Start 3 Click All Programs or Programs and then select the printer program folder from the list 4 Select Printer Home 5 Choose your printer from the printer drop down list 6 From the Maintenance tab click Align cartridges 7 Follow the instructions on the c...

Page 16: ... panel press 2 Press the up or down arrow button to scroll to Maintenance and then press 3 Press the up or down arrow button to scroll to Clean Printhead or Deep Clean Printhead and then press A cleaning page prints Using the printer software For Windows users 1 Click or Start 2 Click All Programs or Programs and then select the printer program folder from the list 3 Select Printer Home 4 From the...

Page 17: ...re but need to reinstall the software then uninstall the current software first For Windows users 1 Close all open software programs 2 Insert the installation software CD If the Welcome screen does not appear after a minute then launch the CD manually a Click or click Start and then click Run b In the Start Search or Run box type D setup exe where D is the letter of your CD or DVD drive 3 Follow t...

Page 18: ...heinstallationsoftware andthenselectInstallAdditionalSoftware from theSoftwareAlreadyInstalledscreen Printer software Use the To LexmarkTM Printer Home referred to as Printer Home Launch applications or programs Access the Fax Solutions software Scan or e mail a photo or document Edit scanned documents Scan documents to PDF Adjust settings for the printer Order supplies Maintain ink cartridges Pri...

Page 19: ...as wireless capability Lexmark Service Center referred to as Service Center Troubleshoot the printer Access the printer maintenance functions Contact technical support Notes This program is installed automatically with the printer software You may be prompted to install this program from the Web depending on your printer model Printing Preferences When you select File Print with a document open an...

Page 20: ... All In One Center referred to as All In One Center Scan photos and documents Customize settings for scan jobs Lexmark Fax Setup Utility referred to as Fax Setup Utility Customize settings for fax jobs Create and edit the Speed Dial list Lexmark Network Card Reader referred to as Network Card Reader View the contents of a memory device inserted into a network printer Transfer photosandPDFdocuments...

Page 21: ...s to print the type of paper to use and how the pages should print e Click Print Printing on both sides of the paper duplexing automatically The automatic duplex unit available only on selected printer models supports letter and A4 size paper If you purchased a model without automatic duplex or if you need to print duplex using other paper sizes then see the instructions for printing on both sides...

Page 22: ...ut 4 From the Two Sided menu select Long edge binding or Short edge binding For Long edged binding pages are bound along the long edge of the page left edge for portrait top edge for landscape Note Long edged binding is not available in Mac OS X v10 3 Portrait Landscape For Short edged binding pages are bound along the short edge of the page top edge for portrait left edge for landscape Portrait L...

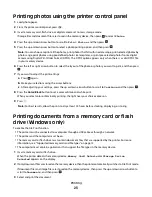
Page 23: ...s the up or down arrow button to scroll to Continue and then press 8 Press the Color Black button to set a color or black and white print When you select color or black only printing the light near your choice comes on 9 Press Note For best results allow the prints to dry at least 24 hours before stacking displaying or storing Printing documents from a memory card or flash drive Windows only To en...

Page 24: ... requires it Enter the PIN using the keypad To assign a computer name and a PIN to the computer see the Help for the printer software associated with your operating system Canceling print jobs Tocancelaprintjobfromtheprintercontrolpanel press Tocancelaprintjobfromthecomputer dothefollowing For Windows users 1 Click or click Start and then click Run 2 In the Start Search or Run box type control pri...

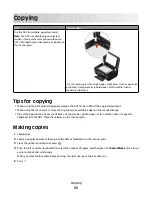
Page 25: ...ginal document When using the scanner glass close the top cover to avoid dark edges on the scanned image Do not load postcards photos small items transparencies photo paper or thin media such as magazine clippings into the ADF Place these items on the scanner glass Making copies 1 Load paper 2 Load an original document faceup into the ADF or facedown on the scanner glass 3 From the printer control...

Page 26: ...ee the instructions for making a duplex copy manually Note You cannot make duplex copies on envelopes card stock or photo paper 1 Load paper 2 Load an original document faceup into the ADF or facedown on the scanner glass 3 From the printer control panel press 4 Press the up or down arrow button to scroll to 2 Sided Copies 5 Choose the duplex option that matches your original document If you are c...

Page 27: ... as magazine clippings into the ADF Place these items on the scanner glass Scanning to a local or network computer 1 Load an original document faceup into the ADF or facedown on the scanner glass 2 From the printer control panel press 3 Press the left or right arrow button to scroll to USB or the name of the network computer and then press The local or network computer is the destination that will...

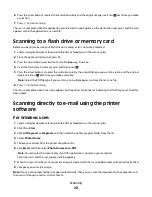
Page 28: ...F file type if you want to scan multiple pages and save them as one file 6 Press to start scanning The scan is complete when a message appears on the printer control panel indicating that the file you scanned has been saved Scanning directly to e mail using the printer software For Windows users 1 Load an original document faceup into the ADF or facedown on the scanner glass 2 Click or Start 3 Cli...

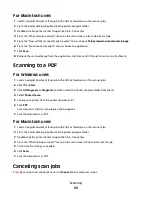
Page 29: ...ocument faceup into the ADF or facedown on the scanner glass 2 Click or Start 3 Click All Programs or Programs and then select the printer program folder from the list 4 Select Printer Home 5 Choose your printer from the printer drop down list 6 Click PDF Scanning starts and the scan progress dialog appears 7 Save the document as a PDF For Macintosh users 1 Load an original document faceup into th...

Page 30: ...Service Center to solve printer problems The Service Center provides step by step troubleshooting help and contains links to printer maintenance tasks and customer support To open the Service Center use one of these methods Method 1 Method 2 If it appears on an error message dialog click the For additional assistance use the Service Center link 1 Click or Start 2 Click All Programs or Programs and...

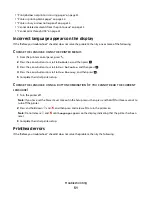
Page 31: ... the arrow buttons to scroll to Set Defaults and then press 4 Press the arrow buttons to scroll to Use Factory and then press 5 Complete the initial printer setup CHANGE THE LANGUAGE USING A BUTTON COMBINATION IF YOU CANNOT READ THE CURRENT LANGUAGE 1 Turn the printer off Note If you have set the Power Saver timeout in the Setup menu then press and hold for three seconds to turn off the printer 2 ...

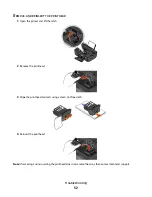
Page 32: ...r and lift the latch 2 Remove the printhead 3 Wipe the printhead contacts using a clean lint free cloth 4 Reinsert the printhead Note If removing and reinserting the printhead does not resolve the error then contact technical support Troubleshooting 32 ...

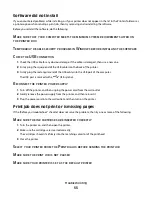
Page 33: ...the USB port of the computer The USB port is marked with a USB symbol RECONNECT THE PRINTER POWER SUPPLY 1 Turn off the printer and then unplug the power cord from the wall outlet 2 Gently remove the power supply from the printer and then reinsert it 3 Plug the power cord into the wall outlet and then turn on the printer Print job does not print or is missing pages If the Before you troubleshoot c...

Page 34: ...HE INK CARTRIDGES AND DEEP CLEAN AND ALIGN THE PRINTHEAD 1 Reinstall the ink cartridges see Replacing ink cartridges on page 14 for more information If the cartridges do not seem to fit make sure the printhead is properly seated and then try installing the cartridges again 2 Load plain paper 3 From the printer control panel press 4 Press the arrow buttons to scroll to Maintenance and then press 5 ...

Page 35: ...not be communicating RESTART THE COMPUTER AND TRY AGAIN Cannot print through USB If the Before you troubleshoot checklist does not solve the problem then try one or more of the following CHECK THE USB CONNECTION 1 Check the USB cable for any obvious damage If the cable is damaged then use a new one 2 Firmly plug the square end of the USB cable into the back of the printer 3 Firmly plug the rectang...

Page 36: ...ive User s Guide available on the installation software CD Printing a network setup page A network setup page lists the configuration settings of the printer including the IP address and MAC address of the printer 1 Load plain paper 2 From the printer control panel press 3 Press the arrow buttons to scroll to Network Setup and then press 4 Press to select Print Setup Page The network setup page pr...

Page 37: ... or service is not intended to state or imply that only that product program or service may be used Any functionally equivalent product program or service that does not infringe any existing intellectual property right may be used instead Evaluation and verification of operation in conjunction with other products programs or services except those expressly designated by the manufacturer are the us...

Page 38: ...terference received including interference that may cause undesired operation Any questions on this statement should be directed to Director of Lexmark Technology Services Lexmark International Inc 740 West New Circle Road Lexington KY 40550 859 232 3000 For additional compliance information see the online documentation Federal Communications Commission FCC compliance information statement Thispro...

Reviews: