950–958 errors
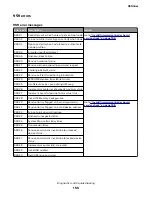
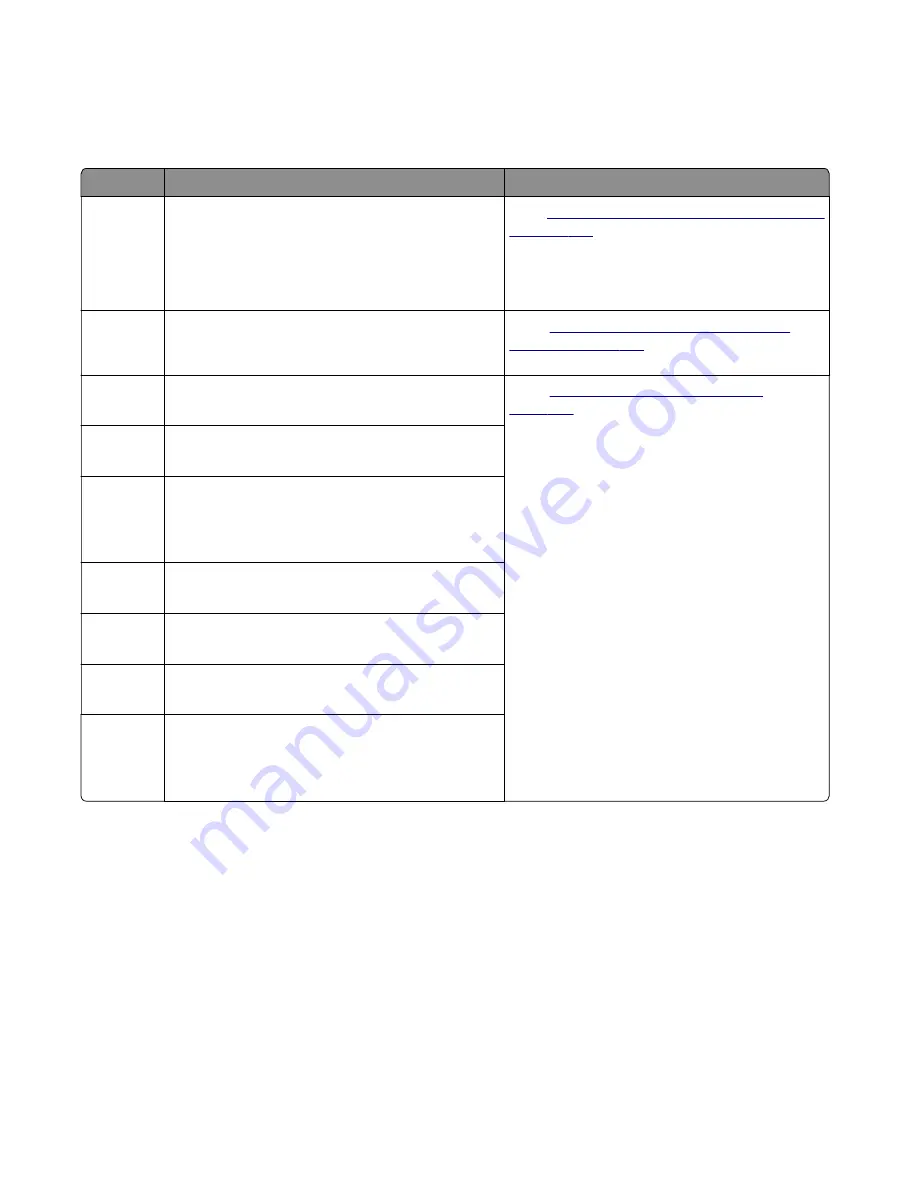
950–958 error messages
Error code Description
Action
950.xx
NVRAM mismatch failure—mismatch between
controller board EEPROM and control panel mirror.
".xx" codes:
•
00-29— mismatch between system and mirror
•
30-60—mismatch between secure and system
Go to
“NVRAM mismatch failure service check”
952.xx
A recoverable NVRAM Cyclic Redundancy Check
(CRC) error occurred—n is the offset at which the
error occurred.
“NVRAM cyclic redundancy service
.
953.xx
NVRAM chip failure with mirror part
Replace the controller board.
“Controller board removals” on
.
954.xx
NVRAM chip failure with system part
Replace the controller board.
955.xx
The Code ROM or NAND flash failed the Cyclic
Redundancy Check (CRC) or the NAND
experienced an uncorrectable multi-bit failure.
Replace the controller board.
956.xx
RIP card failure—processor failure
Replace the controller board.
956.01
Processor temperature is over the limit.
Replace the controller board.
957.xx
RIP card failure—ASIC failure
Replace the controller board.
958.xx
Controller Board NAND Failure—printer has
performed more than 100 shift and reflash
operations as a result of ECC bit corrections.
Replace the controller board.
NVRAM mismatch failure service check
Warning—Potential Damage:
When replacing any of the following components:
•
Control panel assembly
•
Controller board assembly
Replace only one component at a time. Replace the required component and perform a POR before
replacing a second component listed above. If this procedure is not followed, the printer will be rendered
inoperable. Never replace two or more of the components listed above without a POR after installing each
one or the printer will be rendered inoperable.
4514-6xx
Diagnostics and troubleshooting
153
Summary of Contents for M3150
Page 12: ...Part name index 393 4514 6xx Table of contents 12 ...
Page 20: ...4514 6xx 20 ...
Page 38: ...4514 6xx 38 ...
Page 172: ...4514 6xx 172 ...
Page 246: ...3 Remove two screws A and then remove the cooling fan mount A 4514 6xx Parts removal 246 ...
Page 256: ...5 Remove the four screws B and then remove the right front mount B 4514 6xx Parts removal 256 ...
Page 260: ...b Set the spring over the plunger 4514 6xx Parts removal 260 ...
Page 277: ...3 Squeeze the latches B to release the left and right links B 4514 6xx Parts removal 277 ...
Page 300: ...3 Place the printer on its rear side 4 Release the sensor flag A 4514 6xx Parts removal 300 ...
Page 301: ...5 Remove the screw B 6 Remove the sensor flag bracket C 4514 6xx Parts removal 301 ...
Page 323: ...3 Swing the right cover backward to remove 4 Remove the screw D 4514 6xx Parts removal 323 ...
Page 333: ...4514 6xx 333 ...
Page 335: ...Assembly 1 Covers 4514 6xx Parts catalog 335 ...
Page 338: ...4514 6xx Parts catalog 338 ...
Page 339: ...Assembly 2 Electronics 1 1 2 3 4 5 7 9 10 11 6 8 12 4514 6xx Parts catalog 339 ...
Page 342: ...4514 6xx Parts catalog 342 ...
Page 343: ...Assembly 3 Electronics 2 4 3 2 1 5 6 8 9 7 4514 6xx Parts catalog 343 ...
Page 345: ...4514 6xx Parts catalog 345 ...
Page 346: ...Assembly 4 Frame 10 11 12 13 14 9 1 5 6 7 8 4 4 2 3 4514 6xx Parts catalog 346 ...
Page 349: ...Assembly 5 Option trays 3 4 5 6 1 2 4514 6xx Parts catalog 349 ...
Page 354: ...4514 6xx Parts catalog 354 ...
Page 356: ...4514 6xx Parts catalog 356 ...
Page 364: ...4514 6xx 364 ...
Page 376: ...4514 6xx 376 ...
Page 386: ...4514 6xx Index 386 ...
Page 392: ...4514 6xx Part number index 392 ...
Page 398: ...4514 6xx Part name index 398 ...


