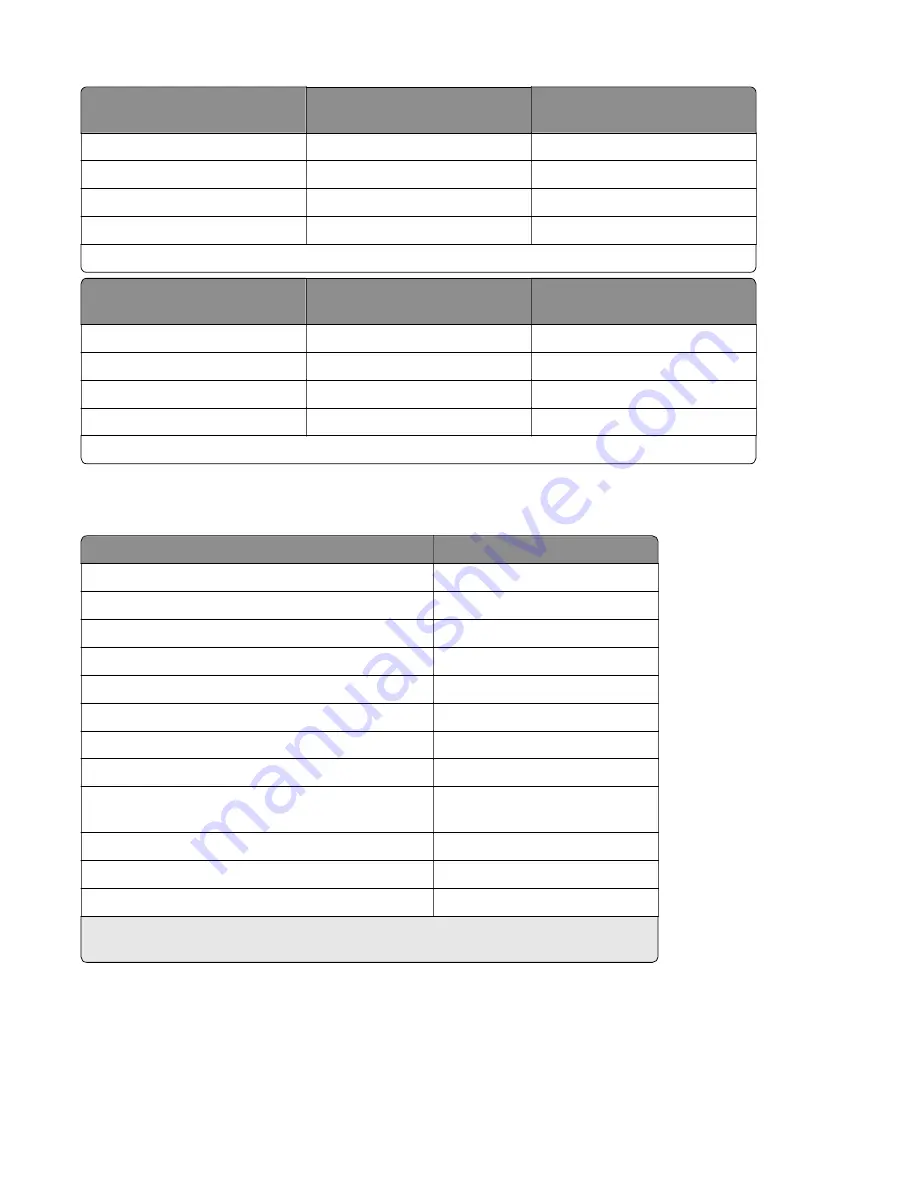
Status
1 meter average sound pressure
dBA
Declared sound power level
(Bels)
Idle (Standby)
Inaudible
Inaudible
Quiet Mode
51 dBA
6.6 Bels
Simplex Printing
54 dBA
6.9 Bels
Sleep/Hibernate Mode
Inaudible
Inaudible
Measurements apply to 300 dpi, 600 dpi and 1200 dpi printing.
Status
1 meter average sound pressure
dBA
Declared sound power level
(Bels)
Idle (Standby)
Inaudible
Inaudible
Quiet Mode
52 dBA
6.7 Bels
Simplex Printing
55 dBA
7.0 Bels
Sleep/Hibernate Mode
Inaudible
Inaudible
Measurements apply to 300 dpi, 600 dpi and 1200 dpi printing.
Operating environment
Environment
Specification
Temperature—printer operating
60 to 90 °F (16 to 32 °C)
Relative humidity—printer operating
8 to 80%
Maximum wet bulb temperature—printer operating
73 °F (23 °C)
Temperature—printer off
50 to 110 °F (10 to 43 °C)
Relative humidity—printer off
8 to 80%
Maximum wet bulb temperature—printer off
80 °F (27 °C)
Temperature—ambient operating environment*
60 to 90 °F (16 to 32 °C)
Relative humidity—ambient operating environment*
8 to 80%
Temperature—storage and shipping (packaged
printer) with or without print cartridge
-40 to 110 °F (-40 to 43 °C)
Altitude
10,000 ft (0 to 3,048 m)
Atmospheric pressure
74.6 kPa
Tilt
2°
*In some cases, performance specifications (such as paper OCF, EP cartridge usage) are
measured at an ambient condition.
Enabling the security reset jumper
The security reset jumper can reset a printer that is locked due to a forgotten password or lost network
connectivity.
4514-6xx
Printer specifications
361
Summary of Contents for M3150
Page 12: ...Part name index 393 4514 6xx Table of contents 12 ...
Page 20: ...4514 6xx 20 ...
Page 38: ...4514 6xx 38 ...
Page 172: ...4514 6xx 172 ...
Page 246: ...3 Remove two screws A and then remove the cooling fan mount A 4514 6xx Parts removal 246 ...
Page 256: ...5 Remove the four screws B and then remove the right front mount B 4514 6xx Parts removal 256 ...
Page 260: ...b Set the spring over the plunger 4514 6xx Parts removal 260 ...
Page 277: ...3 Squeeze the latches B to release the left and right links B 4514 6xx Parts removal 277 ...
Page 300: ...3 Place the printer on its rear side 4 Release the sensor flag A 4514 6xx Parts removal 300 ...
Page 301: ...5 Remove the screw B 6 Remove the sensor flag bracket C 4514 6xx Parts removal 301 ...
Page 323: ...3 Swing the right cover backward to remove 4 Remove the screw D 4514 6xx Parts removal 323 ...
Page 333: ...4514 6xx 333 ...
Page 335: ...Assembly 1 Covers 4514 6xx Parts catalog 335 ...
Page 338: ...4514 6xx Parts catalog 338 ...
Page 339: ...Assembly 2 Electronics 1 1 2 3 4 5 7 9 10 11 6 8 12 4514 6xx Parts catalog 339 ...
Page 342: ...4514 6xx Parts catalog 342 ...
Page 343: ...Assembly 3 Electronics 2 4 3 2 1 5 6 8 9 7 4514 6xx Parts catalog 343 ...
Page 345: ...4514 6xx Parts catalog 345 ...
Page 346: ...Assembly 4 Frame 10 11 12 13 14 9 1 5 6 7 8 4 4 2 3 4514 6xx Parts catalog 346 ...
Page 349: ...Assembly 5 Option trays 3 4 5 6 1 2 4514 6xx Parts catalog 349 ...
Page 354: ...4514 6xx Parts catalog 354 ...
Page 356: ...4514 6xx Parts catalog 356 ...
Page 364: ...4514 6xx 364 ...
Page 376: ...4514 6xx 376 ...
Page 386: ...4514 6xx Index 386 ...
Page 392: ...4514 6xx Part number index 392 ...
Page 398: ...4514 6xx Part name index 398 ...


