4-6
Service Manual
4080-001
Front Access Door Removal
1. Remove the input / output tray assembly.
2. Open the front access door, refer to
“Covers and Doors” on
page 4-3
.
3. Depress the plastic hinges releasing the pressure and remove
the front access door.
Front Cover Removal
1. Remove the input / output tray assembly.
2. Remove the two screws from the front cover, located on the
bottom of the printer. Refer to
“Covers and Doors” on
page 4-3
.
3. Release the latch beside each screw from the front cover and
pull forward off the base.
4. Disconnect the operator panel cable and note the routing.
Note: Do not turn the printer on its back, as this may cause the ink
to spill.
Gutter Pad Removal
1. Remove the input / output tray assembly.
2. Remove all covers, refer to the
“Covers and Doors” on
page 4-3
.
3. Remove the gutter pad.
Summary of Contents for Optra Color 45
Page 11: ...xi 4080 001 ...
Page 12: ...xii Service Manual 4080 001 ...
Page 22: ...1 10 Service Manual 4080 001 ...
Page 68: ...3 16 Service Manual 4080 001 ...
Page 71: ...Repair Information 4 3 4080 001 Covers and Doors ...
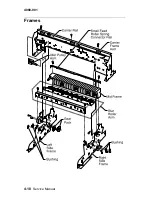
Page 78: ...4 10 Service Manual 4080 001 Frames ...
Page 82: ...4 14 Service Manual 4080 001 Paper Feed ...
Page 86: ...4 18 Service Manual 4080 001 Electronics ...
Page 95: ...Repair Information 4 27 4080 001 Carrier ...
Page 99: ...Repair Information 4 31 4080 001 Maintenance Station ...
Page 104: ...6 2 Service Manual 4080 001 ...
Page 106: ...7 2 Service Manual 4080 001 Assembly 1 Covers ...
Page 108: ...7 4 Service Manual 4080 001 Assembly 2 Frames ...
Page 110: ...7 6 Service Manual 4080 001 Assembly 3 Paper Feed ...
Page 112: ...7 8 Service Manual 4080 001 Assembly 4 Electronics ...
Page 114: ...7 10 Service Manual 4080 001 Assembly 5 Carrier ...
Page 116: ...7 12 Service Manual 4080 001 Assembly 6 Carrier Transport ...
Page 118: ...7 14 Service Manual 4080 001 Assembly 7 Maintenance Station ...


