4026-0XX
Diagnostic Information 2-27
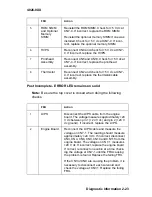
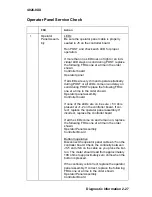
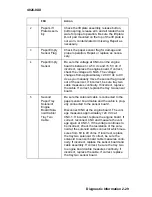
Operator Panel Service Check
FRU
Action
1
Operator
Panel Assem-
bly
LEDs
Be sure the operator panel cable is properly
seated in J5 on the controller board.
Run POST and check each LED for proper
operation.
If more than one LED does not light or an indi-
vidual LED stays on solid during POST, replace
the following FRUs one at a time in the order
shown:
Controller board
Operator panel
If all LEDs are very dim and operate erratically
during POST or all LEDs come on and stay on
solid during POST replace the following FRUs
one at a time in the order shown:
Operator panel assembly
Controller board
If none of the LEDs are on, be sure +5 V dc is
present at J1-2 on the controller board. If cor-
rect, replace the operator panel assembly. If
incorrect, replace the controller board.
If all the LEDs come on and remain on, replace
the following FRUs one at a time in the order
shown:
Operator Panel Assembly
Controller Board
Button Inoperative
Disconnect the operator panel cable at J5 on the
controller board. Check the continuity between
J5-5 and J5-6 on the cable as you press the but-
ton. The meter should read from approximately
10K ohms to approximately zero ohms when the
button is pressed.
If the continuity is incorrect, replace the operator
panel assembly. If correct, replace the following
FRUs one at a time in the order shown:
Operator Panel Assembly
Controller Board
Summary of Contents for Optra E
Page 8: ...viii Service Manual 4026 0XX ...
Page 15: ...Notices and Safety Information xv 4026 0XX Japanese Laser Notice Chinese Laser Notice ...
Page 72: ...4026 0XX 3 5 ...
Page 74: ...4026 0XX 3 7 ...
Page 101: ...4026 0XX Connector Locations 5 6 ...
Page 105: ...4026 0XX Connector Locations 5 10 ...
Page 108: ...4026 0XX 6 2 Assembly 1 Covers ...
Page 110: ...4026 0XX 6 4 Assembly 1 Covers continued ...
Page 112: ...4026 0XX 6 6 Assembly 2 Frame ...
Page 114: ...4026 0XX 6 8 Assembly 2 Frame continued ...
Page 116: ...4026 0XX 6 10 Assembly 2 Frame continued ...
Page 118: ...4026 0XX 6 12 Assembly 3 Printhead ...
Page 120: ...4026 0XX 6 14 Assembly 4 Paper Feed Input Tray ...
Page 122: ...4026 0XX 6 16 Assembly 5 Paper Feed Frame ...
Page 124: ...4026 0XX 6 18 Assembly 6 Fuser ...
Page 126: ...4026 0XX 6 20 Assembly 6 Fuser continued ...
Page 128: ...4026 0XX 6 22 Assembly 7 Electronics ...
Page 130: ...4026 0XX 6 24 Assembly 7 Electronics continued ...
Page 132: ...4026 0XX 6 26 Assembly 8 Transfer Assembly ...
Page 134: ...4026 0XX 6 28 Assembly 9 Option Second Paper Drawer ...
Page 136: ...4026 0XX 6 30 Assembly 9 Option Second Paper Drawer continued ...
Page 138: ...4026 0XX 6 32 Assembly 9 Option Second Paper Drawer continued ...


