Diagnostic Aids
3-15
4045-XXX
Viewing the Permanent Page Count
The Permanent Page Count can only be viewed and cannot be
changed.
To view the Permanent Page Count:
1. Select Permanent Page Count from the menu.
2. Press Return/Stop to exit the Diagnostic menu.
Setting Configuration ID
The configuration ID is used to communicate information about
certain areas of the printer that cannot be determined using
hardware sensors. The Configuration ID is originally set at the
factory when the printer is manufactured, however it requires
resetting whenever you replace the engine board and can be set on
the operator panel. However the Configuration ID is the only
diagnostic function displayed until a valid ID is entered.
To set the Configuration ID:
1. Select Configuration ID from the Printer Setup menu.
– The current ID displays on the screen. The Configuration ID
is on a label located inside the printer. The label is visible
when the top front cover is open.
– The leftmost digit blinks indicating that it is the first digit to be
changed.
2. To change the value, press either Menu> or <Menu until the
value you want is reached. Press Select to move to the next
digit, or press Select again to skip a digit. Change each digit as
required. When the last digit is changed, press Select to
validate the Configuration ID. If the ID is invalid then "INVALID
ID" message displays on Line 2 before the ID redisplays. You
have to reenter the Configuration ID until a valid ID is verified. If
the ID is valid then the ID is saved in NVRAM and the printer
automatically PORs to activate the new setting.
Note:
When the printer PORs it does so in the normal mode.
Summary of Contents for Optra M410
Page 6: ...vi Service Manual 4045 XXX ...
Page 8: ...viii Service Manual 4045 XXX Class 1 Laser Statement Label ...
Page 14: ...xiv Service Manual 4045 XXX Japanese Laser Notice Chinese Laser Notice ...
Page 20: ...xx Service Manual 4045 XXX ...
Page 26: ...1 6 Service Manual 4045 XXX ...
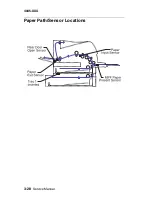
Page 102: ...3 28 Service Manual 4045 XXX Paper Path Sensor Locations ...
Page 103: ...Diagnostic Aids 3 29 4045 XXX Cable Locations ...
Page 104: ...3 30 Service Manual 4045 XXX ...
Page 116: ...4 12 Service Manual 4045 XXX 5 Remove the cooling fan ...
Page 137: ...Connector Locations 5 3 4045 XXX ...
Page 143: ...Connector Locations 5 9 4045 XXX ...
Page 145: ...Connector Locations 5 11 4045 XXX ...
Page 147: ...Connector Locations 5 13 4045 XXX ...
Page 148: ...5 14 Service Manual 4045 XXX ...
Page 150: ...6 2 Service Manual 4045 XXX Assembly 1 Covers ...
Page 152: ...6 4 Service Manual 4045 XXX Assembly 1 Covers continued ...
Page 154: ...6 6 Service Manual 4045 XXX Assembly 2 Frame ...
Page 156: ...6 8 Service Manual 4045 XXX Assembly 3 Printhead ...
Page 158: ...6 10 Service Manual 4045 XXX Assembly 4 Paper Feed Multipurpose Unit ...
Page 160: ...6 12 Service Manual 4045 XXX Assembly 5 Paper Feed Alignment ...
Page 162: ...6 14 Service Manual 4045 XXX Assembly 6 Paper Feed Output ...
Page 164: ...6 16 Service Manual 4045 XXX Assembly 7 Main Drive ...
Page 166: ...6 18 Service Manual 4045 XXX Assembly 8 Developer Drive ...
Page 168: ...6 20 Service Manual 4045 XXX Assembly 9 Fuser ...
Page 170: ...6 22 Service Manual 4045 XXX Assembly 9 Fuser continued ...
Page 172: ...6 24 Service Manual 4045 XXX Assembly 10 Transfer ...
Page 174: ...6 26 Service Manual 4045 XXX Assembly 11 Charging ...
Page 176: ...6 28 Service Manual 4045 XXX Assembly 12 Electronics ...
Page 178: ...6 30 Service Manual 4045 XXX Assembly 12 Electronics continued ...
Page 180: ...6 32 Service Manual 4045 XXX Assembly 12 Electronics continued ...
Page 182: ...6 34 Service Manual 4045 XXX Assembly 13 250 Sheet Tray ...
Page 184: ...6 36 Service Manual 4045 XXX Assembly 14 500 Sheet Tray ...
Page 186: ...6 38 Service Manual 4045 XXX Assembly 14 500 Sheet Tray continued ...


