


Diagnostic information
2-67
7510
Go Back
Previous
Next
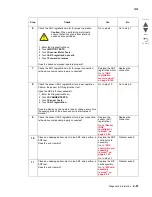
290.01 Sensor (sheet through) late jam
Step
Check
Yes
No
1
Check the original document condition.
Is the original document free of paper clips and staples as
well as damage such as creases, tears, holes or excessive
wear?
Go to step 2.
Remove
damaged original
document and
replace with a
new undamaged
original
document.
Perform a ADF
test. If the
problem remains,
go to step 2.
2
Check the ADF rolls for wear.
Is the ADF feed/pick roll assembly or the ADF separation roll
assembly free of excess wear?
Go to step 3.
Clean or replace
the ADF feed/pick
roll assembly or
the ADF
separation roll
guide assembly.
Go to
“ADF feed/
pick roll
assembly
removal” on
page 4-149
or
“ADF separation
roll guide
assembly” on
page 4-162
.
3
Check the media path for contaminates.
Is the media path free of excess media dust and foreign
objects such as paper clips and staples?
Go to step 4.
Remove all
contaminates
from the media
path.
4
Check the pick roll position motor assembly.
Caution:
When performing motor tests,
ensure that all cover and door interlock
switches are overridden.
1. Enter the Diagnostics Menu.
2. Touch
MOTOR TESTS.
3. Touch
Scanner Motor Tests.
4. Touch
Pick roll position mtr.
Does the above component operate properly?
Go to step 6.
Go to step 5.
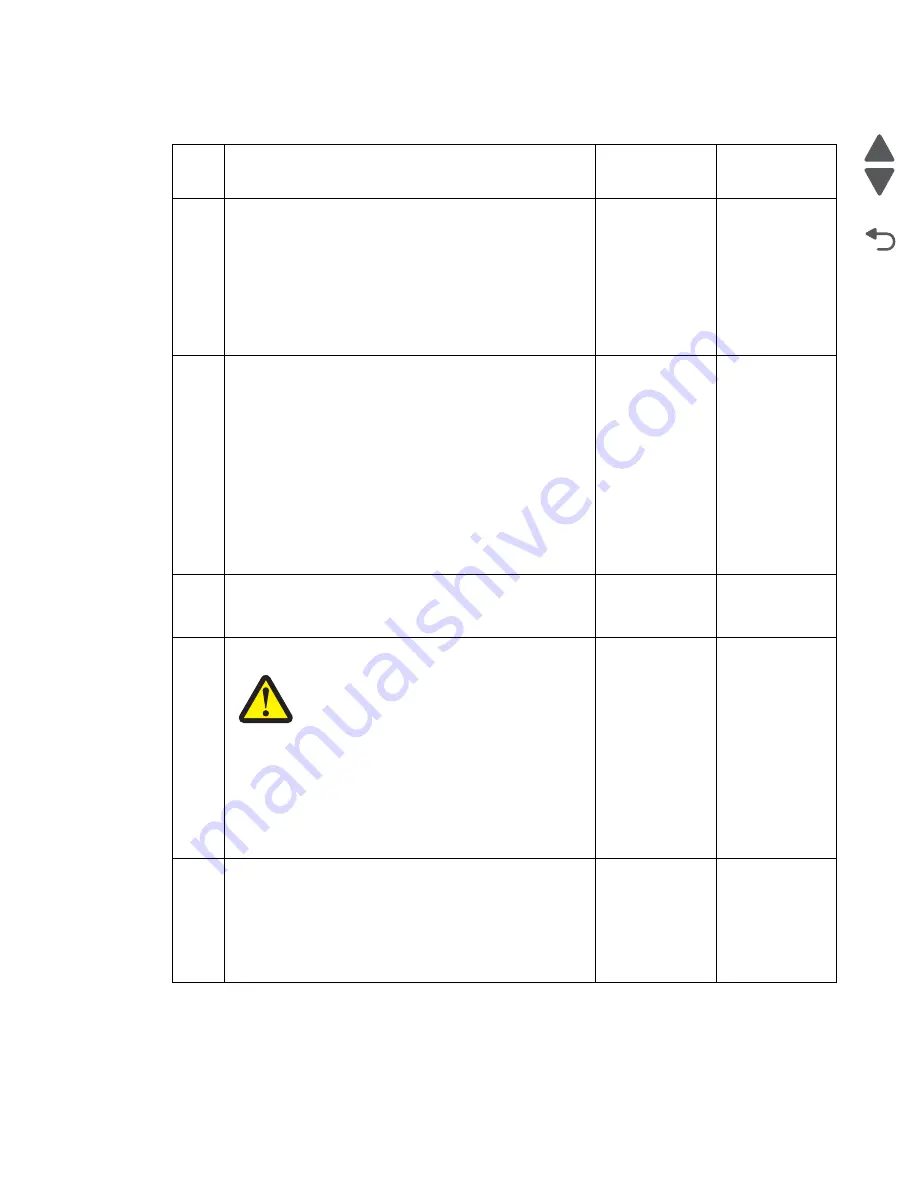
5
Check the pick roll position motor assembly connection.
Is the above component properly connected?
Replace the pick
roll position motor
assembly.
Go to
“Pick roll
position motor
assembly
removal” on
page 4-151
.
Replace the
connection.
Summary of Contents for X945E
Page 20: ...xx Service Manual 7510 Go Back Previous Next ...
Page 25: ...Notices and safety information xxv 7510 Go Back Previous Next ...
Page 26: ...xxvi Service Manual 7510 Go Back Previous Next ...
Page 32: ...xxxii Service Manual 7510 Go Back Previous Next ...
Page 88: ...1 56 Service Manual 7510 Go Back Previous Next TTM theory ...
Page 97: ...General information 1 65 7510 Go Back Previous Next 3TM theory ...
Page 104: ...1 72 Service Manual 7510 Go Back Previous Next 1TM theory ...
Page 111: ...General information 1 79 7510 Go Back Previous Next Duplex ...
Page 432: ...3 52 Service Manual 7510 Go Back Previous Next ...
Page 475: ...Repair information 4 43 7510 Go Back Previous Next E F ...
Page 483: ...Repair information 4 51 7510 Go Back Previous Next Connectors A ...
Page 623: ...Repair information 4 191 7510 Go Back Previous Next ...
Page 653: ...Repair information 4 221 7510 Go Back Previous Next ...
Page 714: ...4 282 Service Manual 7510 Go Back Previous Next ...
Page 715: ...Connector locations 5 1 7510 Go Back Previous Next 5 Connector locations Locations ...
Page 720: ...5 6 Service Manual 7510 Go Back Previous Next Printhead Polygon mirror motor ...
Page 725: ...Connector locations 5 11 7510 Go Back Previous Next ...
Page 726: ...5 12 Service Manual 7510 Go Back Previous Next ...
Page 729: ...Connector locations 5 15 7510 Go Back Previous Next Switch media size Switch TTM media size ...
Page 765: ...Parts catalog 7 31 7510 Go Back Previous Next Assembly 29 Electrical 1 3 5 9 2 10 6 4 8 1 7 ...
Page 770: ...7 36 MFP Service Manual 7510 Go Back Previous Next Assembly 32 Electrical 4 2 1 4 3 5 7 6 8 9 ...
Page 797: ...Parts catalog 7 63 7510 Go Back Previous Next Assembly 50 1TM feed unit assembly 4 3 5 4 1 2 ...
Page 802: ...7 68 MFP Service Manual 7510 Go Back Previous Next Assembly 53 1TM drive and electrical ...
Page 804: ...7 70 MFP Service Manual 7510 Go Back Previous Next Assembly 54 3TM covers 3 5 2 4 1 ...
Page 812: ...7 78 MFP Service Manual 7510 Go Back Previous Next Assembly 58 3TM drive and electrical ...
Page 815: ...Parts catalog 7 81 7510 Go Back Previous Next Assembly 60 TTM media trays 3 5 4 3 7 2 6 8 1 ...
Page 824: ...7 90 MFP Service Manual 7510 Go Back Previous Next Assembly 67 TTM drive and electrical ...
Page 828: ...7 94 MFP Service Manual 7510 Go Back Previous Next ...
Page 836: ...I 8 Service Manual 7510 Go Back Previous Next ...
Page 844: ...I 16 Service Manual 7510 Go Back Previous Next ...


