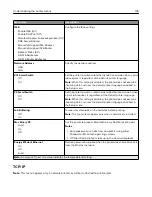
Menu item
Description
Packet Size (kbytes)
0–64000 (0*)
Set the packet size for data transmission.
Note:
An asterisk (*) next to a value indicates the factory default setting.
USB
Menu item
Description
PCL SmartSwitch
Off
On*
Set the printer to switch to PCL emulation when a print job received through a
USB port requires it, regardless of the default printer language.
Note:
If PCL SmartSwitch is off, then the printer does not examine incoming
data and uses the default printer language specified in the Setup menu.
PS SmartSwitch
Off
On*
Set the printer to switch to PS emulation when a print job received through a
USB port requires it, regardless of the default printer language.
Note:
If PS SmartSwitch is off, then the printer does not examine incoming
data and uses the default printer language specified in the Setup menu.
Job Buffering
Off*
On
Temporarily store jobs on the printer hard disk before printing.
Note:
This menu item appears only when a hard disk installed.
Mac Binary PS
On
Auto*
Off
Set the printer to process Macintosh binary PostScript print jobs.
Notes:
•
When set to On, the printer processes raw binary PostScript print jobs
from computers using the Macintosh operating system.
•
When set to Auto, the printer processes print jobs from computers using
either Windows or Macintosh operating systems
•
When set to Off, the printer filters PostScript print jobs using the standard
protocol.
Enable USB Port
Off
On*
Enable the standard USB port.
Note:
An asterisk (*) next to a value indicates the factory default setting.
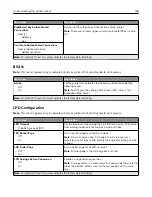
Restrict external network access
Menu item
Description
Restrict external network
access
Off*
On
Restrict access to network sites.
External network address
Specify the network addresses with restricted access.
E
‑
mail address for notification
Specify an e
‑
mail address to send a notification of logged events.
Note:
An asterisk (*) next to a value indicates the factory default setting.
Understanding the printer menus
151
Summary of Contents for XC2235
Page 16: ...2 Locate the serial number at the left side of the printer Learning about the printer 16 ...
Page 185: ...6 Insert the new waste toner bottle 7 Insert the right side cover Maintaining the printer 185 ...
Page 188: ...4 Remove the waste toner bottle 5 Remove the toner cartridges Maintaining the printer 188 ...
Page 192: ...11 Insert the waste toner bottle 12 Insert the right side cover Maintaining the printer 192 ...
Page 207: ...4 Close doors A and B Clearing jams 207 ...
Page 263: ...Upgrading and migrating 263 ...


