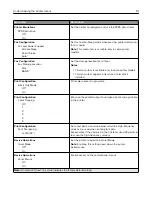
Menu item
Description
USB Scan to Local
On*
Off
Set whether the USB device driver enumerates as a USB
Simple device (single interface) or as a USB Composite device
(multiple interfaces).
USB Configuration
USB Speed
Full
Auto*
Set the USB port to run at full speed and disable its high
‑
speed
capabilities.
Note:
This menu item appears only in some printer models.
Tray Configuration
Tray Linking
Automatic*
Off
Set the printer to link the trays that have the same paper type
and paper size settings.
Tray Configuration
Show Tray Insert Message
Off*
On
Display a message that lets the user change the paper size and
paper type settings after inserting the tray.
Tray Configuration
Paper Prompts
Auto*
Multipurpose Feeder
Manual Paper
Envelope Prompts
Auto*
Multipurpose Feeder
Manual Paper
Set the paper source that the user fills when a prompt to load
paper or envelope appears.
Notes:
•
The multipurpose feeder is available only in some printer
models.
•
For Multipurpose Feeder to appear, set Configure MP to
Cassette from the Paper menu.
Tray Configuration
Action for Prompts
Prompt user*
Continue
Use current
Set the printer to resolve paper- or envelope-related change
prompts.
Reports
Menu Settings Page
Event Log
Event Log Summary
HealthCheck Statistics
Print reports about printer menu settings, status, and event
logs.
Supply Usage And Counters
Clear Supply Usage History
Reset the supply usage history, such as number of pages and
days remaining, to the factory shipped level.
Supply Usage And Counters
Reset Maintenance Counter
Reset the counter after installing a new maintenance kit.
Supply Usage And Counters
Tiered Coverage Ranges
Adjust the range for the amount of color coverage on the
printed page.
Note:
An asterisk (*) next to a value indicates the factory default setting.
Understanding the printer menus
90
Summary of Contents for XC2235
Page 16: ...2 Locate the serial number at the left side of the printer Learning about the printer 16 ...
Page 185: ...6 Insert the new waste toner bottle 7 Insert the right side cover Maintaining the printer 185 ...
Page 188: ...4 Remove the waste toner bottle 5 Remove the toner cartridges Maintaining the printer 188 ...
Page 192: ...11 Insert the waste toner bottle 12 Insert the right side cover Maintaining the printer 192 ...
Page 207: ...4 Close doors A and B Clearing jams 207 ...
Page 263: ...Upgrading and migrating 263 ...


