


Use the
To
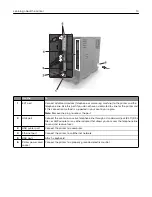
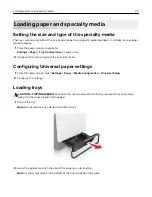
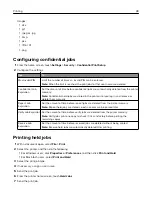
1
EXT port
Connect additional devices (telephone or answering machine) to the printer and the
telephone line. Use this port if you do not have a dedicated fax line for the printer and
if this connection method is supported in your country or region.
Note:
Remove the plug to access the port.
2
LINE port
Connect the printer to an active telephone line through a standard wall jack (RJ
‑
11), DSL
filter, or VoIP adapter, or any other adapter that allows you to access the telephone line
to send and receive faxes.
3
USB printer port
Connect the printer to a computer.
4
Ethernet port
Connect the printer to an Ethernet network.
5
USB ports
Attach a keyboard.
6
Printer power cord
socket
Connect the printer to a properly grounded electrical outlet.
Learning about the printer
13
Summary of Contents for XC6100 Series
Page 1: ...XC6100 Series User s Guide January 2016 www lexmark com Machine type s 7563 Model s 196 197 ...
Page 66: ...2 Open door A 3 Remove the waste toner bottle Maintaining the printer 66 ...
Page 69: ...2 Open door A 3 Remove the waste toner bottle Maintaining the printer 69 ...
Page 73: ...3 Remove the pick roller 4 Unpack the new pick roller Maintaining the printer 73 ...
Page 92: ...2 Open door G 3 Pull out the staple cartridge holder Maintaining the printer 92 ...
Page 111: ...2 Open door G 3 Pull out the staple cartridge holder Clearing jams 111 ...
Page 162: ...4 Remove the paper bail 5 Remove the standard bin insert Upgrading and migrating 162 ...


