

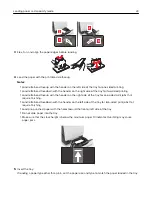


3
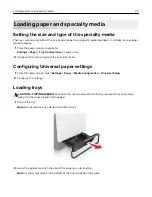
Flex, fan, and align the paper edges before loading.
4
Load the paper with the printable side faceup.
Notes:
•
Load letterhead faceup with the header on the left side of the tray for one
‑
sided printing.
•
Load letterhead facedown with the header on the right side of the tray for two
‑
sided printing.
•
Load letterhead faceup with the header on the right side of the tray for one
‑
sided print jobs that
require finishing.
•
Load letterhead facedown with the header on the left side of the tray for two
‑
sided print jobs that
require finishing.
•
Load pre
‑
punched paper with the holes toward the front or left side of the tray.
•
Do not slide paper into the tray.
•
Make sure that the stack height is below the maximum paper fill indicator. Overfilling may cause
paper jams.
5
Insert the tray.
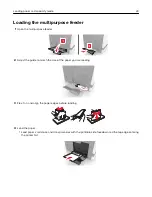
If loading a paper type other than plain, set the paper size and type to match the paper loaded in the tray.
Loading paper and specialty media
23
Summary of Contents for XC6100 Series
Page 1: ...XC6100 Series User s Guide January 2016 www lexmark com Machine type s 7563 Model s 196 197 ...
Page 66: ...2 Open door A 3 Remove the waste toner bottle Maintaining the printer 66 ...
Page 69: ...2 Open door A 3 Remove the waste toner bottle Maintaining the printer 69 ...
Page 73: ...3 Remove the pick roller 4 Unpack the new pick roller Maintaining the printer 73 ...
Page 92: ...2 Open door G 3 Pull out the staple cartridge holder Maintaining the printer 92 ...
Page 111: ...2 Open door G 3 Pull out the staple cartridge holder Clearing jams 111 ...
Page 162: ...4 Remove the paper bail 5 Remove the standard bin insert Upgrading and migrating 162 ...


