


CAUTION—POTENTIAL INJURY:
The lithium battery in this product is not intended to be replaced.
There is a danger of explosion if a lithium battery is incorrectly replaced. Do not recharge, disassemble,
or incinerate a lithium battery. Discard used lithium batteries according to the manufacturer's instructions
and local regulations.
This equipment is not suitable for use in locations where children are likely to be present.
This product is designed, tested, and approved to meet strict global safety standards with the use of specific
manufacturer's components. The safety features of some parts may not always be obvious. The manufacturer
is not responsible for the use of other replacement parts.
Refer service or repairs, other than those described in the user documentation, to a service representative.
This product uses a printing process that heats the print media, and the heat may cause the media to release
emissions. You must understand the section in your operating instructions that discusses the guidelines for
selecting print media to avoid the possibility of harmful emissions.
This product may produce small amounts of ozone during normal operation, and may be equipped with a filter
designed to limit ozone concentrations to levels well below the recommended exposure limits. To avoid high
ozone concentration levels during extensive usage, install this product in a well-ventilated area and replace
the ozone and exhaust filters if instructed to do so in the product maintenance instructions. If there are no
references to filters in the product maintenance instructions, then there are no filters requiring replacement for
this product.
Use only the telecommunications (RJ
‑
11) cord provided with this product or a 26 AWG or larger replacement
when connecting this product to the public switched telephone network.
SAVE THESE INSTRUCTIONS.
Safety information
8
Summary of Contents for XC6100 Series
Page 1: ...XC6100 Series User s Guide January 2016 www lexmark com Machine type s 7563 Model s 196 197 ...
Page 66: ...2 Open door A 3 Remove the waste toner bottle Maintaining the printer 66 ...
Page 69: ...2 Open door A 3 Remove the waste toner bottle Maintaining the printer 69 ...
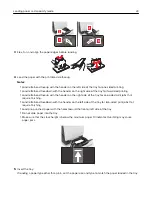
Page 73: ...3 Remove the pick roller 4 Unpack the new pick roller Maintaining the printer 73 ...
Page 92: ...2 Open door G 3 Pull out the staple cartridge holder Maintaining the printer 92 ...
Page 111: ...2 Open door G 3 Pull out the staple cartridge holder Clearing jams 111 ...
Page 162: ...4 Remove the paper bail 5 Remove the standard bin insert Upgrading and migrating 162 ...


