background image

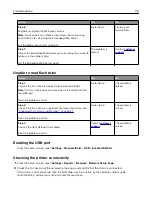
Print jobs do not print

Action

Yes

No

Step 1

a

From the document you are trying to print, open the Print
dialog, and then check if you have selected the correct printer.

b

Resend the print job.

Is the document printed?

The problem is
solved.

Go to step 2.

Step 2

a

Check if the printer is on.

b

Resolve any error messages that appear on the display.

c

Resend the print job.

Is the document printed?

The problem is
solved.

Go to step 3.

Step 3

a

Check if the ports are working and if the cables are securely
connected to the computer and the printer.

For more information, see the setup documentation that came
with the printer.

b

Resend the print job.

Is the document printed?

The problem is
solved.

Go to step 4.

Step 4

a

Turn off the printer, wait for about 10 seconds, and then turn it
back on.

b

Resend the print job.

Is the document printed?

The problem is
solved.

Go to step 5.

Step 5

a

Remove, and then reinstall the printer software.

Note: 

The printer software is available at

http://support.lexmark.com

.

b

Resend the print job.

Is the document printed?

The problem is
solved.

Contact 

customer

support

.

Troubleshooting

123

Summary of Contents for XC6100 Series

Page 1: ...XC6100 Series User s Guide January 2016 www lexmark com Machine type s 7563 Model s 196 197 ...

Page 2: ...17 Setting up and using the home screen applications 18 Customizing the home screen 18 Setting up Forms and Favorites 18 Setting up Card Copy 18 Using Shortcut Center 19 Setting up Scan Center 19 Using Customer Support 19 Setting up Device Quotas 19 Using QR Code Generator 20 Using Google Drive 20 Using Display Customization 21 Configuring Eco Settings 21 Loading paper and specialty media 22 Settin...

Page 3: ... both sides of the paper two sided 30 Reducing or enlarging copies 31 Collating copies 31 Placing separator sheets between copies 31 Copying multiple pages onto a single sheet 31 Creating a copy shortcut 31 E mailing 32 Setting up the e mail function 32 Configuring e mail settings 32 Sending an e mail 32 Creating an e mail shortcut 33 Faxing 34 Setting up the printer to fax 34 Sending a fax 47 Sche...

Page 4: ...ng factory default settings 53 Statement of Volatility 53 Maintaining the printer 55 Networking 55 Setting up serial printing Windows only 56 Cleaning printer parts 57 Ordering parts and supplies 58 Replacing parts and supplies 61 Moving the printer 94 Saving energy and paper 95 Recycling 96 Clearing jams 97 Avoiding jams 97 Identifying jam locations 98 Paper jam in trays 99 Paper jam in the multi...

Page 5: ... Hardware options problems 116 Paper feed problems 118 Printing problems 121 Color quality problems 140 Faxing problems 143 Scanning problems 146 Contacting customer support 149 Upgrading and migrating 150 Hardware 150 Software 166 Firmware 166 Notices 168 Index 172 Contents 5 ...

Page 6: ...ed by a laser printer and may result in a risk of fire property damage or poor printer performance CAUTION POTENTIAL INJURY Only a Lexmark Inline Surge Protector that is properly connected between the printer and the power cord provided with the printer may be used with this product The use of non Lexmark surge protection devices may result in a risk of fire property damage or poor printer performan...

Page 7: ...ured with optional trays then lift the printer off the trays Do not try to lift the printer and the trays at the same time Always use the handholds on the printer to lift it Any cart used to move the printer must have a surface able to support the full footprint of the printer Any cart used to move the hardware options must have a surface able to support the dimensions of the options Keep the prin...

Page 8: ...rocess that heats the print media and the heat may cause the media to release emissions You must understand the section in your operating instructions that discusses the guidelines for selecting print media to avoid the possibility of harmful emissions This product may produce small amounts of ozone during normal operation and may be equipped with a filter designed to limit ozone concentrations to ...

Page 9: ... Information Center Authoritative online resource for the latest product tips instructions and reference material Go to http infoserve lexmark com ids and select your product Help Menu Pages The guides may be available on the printer firmware and at http support lexmark com Information on setting up and configuring the accessibility features of your printer Lexmark Accessibility Guide The guide is a...

Page 10: ...r Product Information Guide This document contains basic safety environmental and regulatory information for your product For more information see the documentation that came with the printer or go to http support lexmark com Selecting a location for the printer When selecting a location for the printer leave enough room to open trays covers and doors and to install hardware options Set up the pri...

Page 11: ... Front 381 mm 15 in 4 Left side 457 mm 18 in 5 Rear 203 mm 8 in Printer configurations CAUTION TIPPING HAZARD Installing one or more options on your printer or MFP may require a caster base furniture or other feature to prevent instability causing possible injury For more information on supported configurations see www lexmark com multifunctionprinters You can configure your printer by adding three o...

Page 12: ...nly the power cord provided with this product or the manufacturer s authorized replacement CAUTION POTENTIAL INJURY To avoid the risk of electrical shock do not set up this product or make any electrical or cabling connections such as the power cord fax feature or telephone during a lightning storm Use only the telecommunications RJ 11 cord provided with this product or a 26 AWG or larger replacem...

Page 13: ...ess the port 2 LINE port Connect the printer to an active telephone line through a standard wall jack RJ 11 DSL filter or VoIP adapter or any other adapter that allows you to access the telephone line to send and receive faxes 3 USB printer port Connect the printer to a computer 4 Ethernet port Connect the printer to an Ethernet network 5 USB ports Attach a keyboard 6 Printer power cord socket Conn...

Page 14: ...er numbers or symbols in an input field 5 Pause button Place a dial pause in a fax number 6 Start button Start a job depending on which mode is selected 7 Clear all or Reset button Reset the default settings of a function such as copying faxing or scanning 8 Stop or Cancel button Stop the current job 9 Backspace button Move the cursor backward and delete a character in an input field 10 Indicator li...

Page 15: ...de Blinking amber The printer is in hibernate mode Using the home screen Note Your home screen may vary depending on your home screen customization settings administrative setup and active embedded solutions Touch To 1 Copy Make copies 2 E mail Send e mails 3 Change Language Change the language on the printer display 4 Fax Send fax 5 Settings Access the printer menus 6 Held Faxes Show all the curr...

Page 16: ...l the current print jobs Note You can also access this setting by touching the top section of the home screen These settings may also appear on the home screen Touch To App Profiles Access application profiles Lock Device Prevent users from accessing any printer functions from the home screen Menus list Device Print Paper Copy Fax Preferences Notifications Group Lists Alert Types Anti Spam Logic Desc...

Page 17: ...strictions Confidential Print Setup Disk Encryption Erase Temporary Data Files Solutions LDAP Settings Miscellaneous Option Card Menu Reports Help Note This setting appears only when an optional card is installed Menu Settings Page Print Quality Pages Device Print Shortcuts Fax Network Print All Guides Color Quality Guide Connection Guide Copy Guide E mail Guide Information Guide Media Guide Moving...

Page 18: ...as four sets of numbers separated by periods such as 123 123 123 123 If you are using a proxy server then temporarily disable it to load the Web page correctly 2 Click Apps Forms and Favorites Configure 3 Click Add and then customize the settings Notes To make sure that the location settings of the bookmark are correct type the IP address of the host computer where the bookmark is located Make sure...

Page 19: ...t name 4 Apply the changes Setting up Scan Center 1 From the home screen touch Scan Center 2 Select and create a destination and then configure the settings Notes When creating a network destination make sure to validate and adjust the settings until no errors occur Only destinations created from the Embedded Web Server are saved For more information see the documentation that came with the solutio...

Page 20: ...ress field Notes View the printer IP address on the printer home screen The IP address appears as four sets of numbers separated by periods such as 123 123 123 123 If you are using a proxy server then temporarily disable it to load the Web page correctly 2 Click Apps QR Code Generator Configure 3 Do either of the following Select a default QR code value Type a QR code value 4 Apply the changes Using...

Page 21: ... document Note For information on how to configure the printer for the application see the Google Drive Administrator s Guide Using Display Customization 1 From the home screen touch Change Background 2 Select a background to use 3 Apply the changes Configuring Eco Settings 1 From the home screen touch Eco Settings 2 Configure the settings 3 Apply the changes Setting up and using the home screen appl...

Page 22: ...media Configuring Universal paper settings 1 From the home screen touch Settings Paper Media Configuration Universal Setup 2 Configure the settings Loading trays CAUTION TIPPING HAZARD To reduce the risk of equipment instability load each tray separately Keep all other trays closed until needed 1 Pull out the tray Note Do not remove trays while the printer is busy 2 Adjust the guides to match the siz...

Page 23: ...the tray for one sided print jobs that require finishing Load letterhead facedown with the header on the left side of the tray for two sided print jobs that require finishing Load pre punched paper with the holes toward the front or left side of the tray Do not slide paper into the tray Make sure that the stack height is below the maximum paper fill indicator Overfilling may cause paper jams 5 Insert ...

Page 24: ... guide to match the size of the paper you are loading 3 Flex fan and align the paper edges before loading 4 Load the paper Load paper card stock and transparencies with the printable side facedown and the top edge entering the printer first Loading paper and specialty media 24 ...

Page 25: ...r home screen The IP address appears as four sets of numbers separated by periods such as 123 123 123 123 If you are using a proxy server then temporarily disable it to load the Web page correctly 2 Click Settings Paper 3 Match the paper size and type for the trays you are linking Note To unlink trays make sure that no trays have the same paper size or type 4 Save the settings Note You can also ch...

Page 26: ...nt job 1 With a document open click File Print 2 If necessary adjust the settings 3 Send the print job Printing forms 1 From the home screen navigate to Forms and Favorites select form Print 2 If necessary configure the print settings 3 Send the print job Printing from a flash drive 1 Insert a flash drive into the USB port Notes If you insert the flash drive when an error message appears then the prin...

Page 27: ... actively printing reading or writing from the memory device Loss of data or a malfunction can occur Supported flash drives and file types Flash drives Lexar JumpDrive S70 16GB and 32GB SanDisk Cruzer 16GB and 32GB PNY Attaché 16GB and 32GB Notes The printer supports high speed USB flash drives with full speed standard USB flash drives must support the File Allocation Table FAT system File types Docum...

Page 28: ...he printer memory Note Repeat held jobs are stored so extra copies can be printed later Verify Job Expiration Set the amount of time before verify jobs are deleted from the printer memory Note Verify jobs print one copy to check if it is satisfactory before printing the remaining copies Reserve Job Expiration Set the amount of time before reserved jobs are deleted without being printed Note Reserv...

Page 29: ...print job From the printer control panel 1 From the home screen touch Job Queue Note You can also access this setting by touching the top section of the home screen 2 Select the job to cancel From the computer 1 Depending on the operating system do either of the following Open the printers folder and then select your printer From the System Preferences in the Apple menu navigate to your printer 2 ...

Page 30: ... touch Copy Content Photo 3 From the Content Source menu select the setting that best matches the original photo 4 Send the copy job Copying on letterhead 1 Load an original document into the ADF tray or on the scanner glass 2 From the home screen touch Copy and then specify the size of the original document 3 Touch Copy to and then select the tray that contains the specialty media If you are load...

Page 31: ...ent into the ADF tray or on the scanner glass 2 From the home screen touch Copy and then set Collate to On 3 Send the copy job Placing separator sheets between copies 1 Load an original document into the ADF tray or on the scanner glass 2 From the home screen touch Copy Separator Sheets 3 Adjust the settings 4 Send the copy job Copying multiple pages onto a single sheet 1 Load an original document...

Page 32: ...n The IP address appears as four sets of numbers separated by periods such as 123 123 123 123 If you are using a proxy server then temporarily disable it to load the Web page correctly 2 Click Settings E mail 3 Enter the needed information 4 Apply the changes Sending an e mail Using the control panel 1 Load an original document into the ADF tray or on the scanner glass 2 From the home screen touch...

Page 33: ...Creating an e mail shortcut 1 From the home screen touch E mail 2 Configure the settings and then touch 3 Enter a shortcut name 4 Apply the changes E mailing 33 ...

Page 34: ...is enabled and not fully set up Warning Potential Damage Do not touch cables or the printer in the area shown while actively sending or receiving a fax Setting up the fax function 1 From the home screen touch Settings Device Preferences Run Initial Setup 2 Turn off the printer wait for about 10 seconds and then turn it back on 3 From the Before You Begin screen select Change the Settings and Conti...

Page 35: ...lectrical shock do not use the fax feature during a lightning storm Setup 1 Printer is connected to a dedicated fax line 1 Connect one end of the telephone cable to the line port of the printer 2 Connect the other end of the telephone cable to an active analog wall jack Notes You can set the printer to receive faxes automatically Auto Answer On or manually Auto Answer Off If you want to receive fa...

Page 36: ... pattern for the printer Otherwise the printer does not receive faxes even if you have set it to receive faxes automatically Connected to the same telephone wall jack 1 Connect one end of the telephone cable to the line port of the printer 2 Connect the other end of the telephone cable to an active analog wall jack 3 Connect the answering machine to the telephone port of the printer Faxing 36 ...

Page 37: ...e cable to an active analog wall jack Notes If you have only one telephone number on your line then set the printer to receive faxes automatically Set the printer to pick up calls two rings after the answering machine For example if the answering machine picks up calls after four rings then set the printer Rings to Answer setting to six Faxing 37 ...

Page 38: ...nnect the telephone to the telephone port of the printer Notes This setup works best if you are using voice mail more often than fax and if you subscribe to a distinctive ring service When you answer the telephone and you hear fax tones press 9 or the manual answer code on the telephone to receive the fax You can also set the printer to receive faxes automatically but turn off the voice mail servi...

Page 39: ...ARD To avoid the risk of electrical shock do not use the fax feature during a lightning storm Digital subscriber line DSL splits your regular telephone line into two channels voice and Internet Telephone and fax signals travel through the voice channel and internet signals pass through the other channel Install a DSL filter to minimize interference between the two channels and ensure a quality conn...

Page 40: ...dapter plug from the telephone port of the printer and then connect the telephone Setting up fax using VoIP telephone service CAUTION SHOCK HAZARD To avoid the risk of electrical shock do not set up this product or make any electrical or cabling connections such as the power cord fax feature or telephone during a lightning storm CAUTION SHOCK HAZARD To avoid the risk of electrical shock do not use...

Page 41: ...a dial tone If you need two phone ports for your devices but do not want to pay extra cost then use a phone splitter Plug the phone splitter into the port labeled Phone Line 1 or Phone Port and then plug the printer and telephone into the splitter To check the splitter plug an analog telephone into the splitter and then listen for a dial tone Setting up fax using cable modem connection CAUTION SHO...

Page 42: ...the printer 2 Connect the other end of the cable to the port labeled Phone Line 1 or Phone Port on the cable modem 3 Connect your analog telephone to the telephone port of the printer Note To check if the telephone port on the cable modem is active connect an analog telephone and then listen for a dial tone Faxing 42 ...

Page 43: ...ble to an active analog telephone wall jack 3 Connect your analog telephone to the telephone port of the printer Setting up fax in countries or regions with different telephone wall jacks and plugs CAUTION SHOCK HAZARD To avoid the risk of electrical shock do not set up this product or make any electrical or cabling connections such as the power cord fax feature or telephone during a lightning sto...

Page 44: ...le with this type of connection then use a telephone adapter An adapter for your country or region may not come with your printer and you may need to purchase it separately There may be an adapter plug installed in the telephone port of the printer Do not remove the adapter plug from the telephone port of the printer if you are connecting to a serial or cascaded telephone system Part name Part num...

Page 45: ...ble to the line port of the printer 2 Connect the other end of the cable to the RJ11 adapter and then connect the adapter to the wall jack 3 If you want to connect another device with a non RJ11 connector to the same wall jack then connect it directly to the telephone adapter Faxing 45 ...

Page 46: ... is for telephones Connect the printer to any of the N ports 1 Connect one end of the telephone cable to the line port of the printer 2 Connect the other end of the telephone cable to the RJ11 adapter and then connect the adapter to an N port 3 If you want to connect a telephone and answering machine to the same wall jack then connect the devices as shown Faxing 46 ...

Page 47: ...daylight saving time 1 From the home screen touch Settings Device Preferences Date and Time Configure 2 In the Time Zone menu select Custom 3 Configure the settings Sending a fax Using the control panel 1 Load the original document into the ADF tray or on the scanner glass 2 From the home screen touch Fax and then enter the needed information 3 If necessary configure other fax settings 4 Send the fax...

Page 48: ...ax job Creating a fax destination shortcut 1 From the home screen touch Fax To 2 Enter the recipient number Note To create a group of fax numbers touch and then enter another fax number 3 Touch 4 Enter a shortcut name 5 Apply the changes Changing the fax resolution 1 Load an original document into the ADF tray or on the scanner glass 2 From the home screen touch Fax and then enter the needed infor...

Page 49: ...b page correctly 2 Click Settings Reports Fax 3 Click Fax Job Log or Fax Call Log Blocking junk faxes 1 From the home screen touch Settings Fax Analog Fax Setup Fax Receive Settings Admin Controls Block No Name Fax 2 Apply the changes Holding faxes 1 From the home screen touch Settings Fax Analog Fax Setup Fax Receive Settings Holding Faxes 2 Select a mode Forwarding a fax 1 From the home screen t...

Page 50: ...dress and then touch 3 Enter a shortcut name 4 Apply the changes Scanning to a flash drive 1 Load an original document into the ADF tray or on the scanner glass 2 Insert the flash drive into the USB port 3 Select the destination folder and then touch Scan to USB 4 If necessary adjust the scan settings 5 Send the scan job Warning Potential Damage Do not touch the printer or the flash drive in the area...

Page 51: ...ments to a computer 1 Load an original document into the ADF tray or on the scanner glass 2 From the home screen touch Scan Profiles Scan To Computer 3 Select the scan profile where you want to save the document Scanning 51 ...

Page 52: ... embedded solutions do the following 1 From the home screen touch Settings Device Maintenance Out of Service Erase 2 Select the Sanitize all information on nonvolatile memory check box and then touch ERASE 3 Follow the instructions on the display Erasing printer hard disk memory 1 From the home screen touch Settings Device Maintenance Out of Service Erase 2 Select the Sanitize all information on h...

Page 53: ...etwork settings and user data Type of memory Description Volatile memory Your printer uses standard random access memory RAM to temporarily buffer user data during simple print jobs Non volatile memory Your printer may use two forms of non volatile memory EEPROM and NAND flash memory Both types are used to store the operating system device settings network information and bookmark settings and embe...

Page 54: ... or its hard disk is removed from your premises Degaussing Flushes the hard disk with a magnetic field that erases stored data Crushing Physically compresses the hard disk to break component parts and render them unreadable Milling Physically shreds the hard disk into small metal bits Note Most data can be erased electronically but the only way to guarantee that all data are completely erased is to...

Page 55: ...ings Network Ports Wireless Wi Fi Protected Setup Start Push Button Method 2 Follow the instructions on the display Using the personal identification number PIN method 1 From the control panel navigate to Settings Network Ports Wireless Wi Fi Protected Setup Start PIN Method 2 Copy the eight digit WPS PIN 3 Open a Web browser and then type the IP address of your access point in the address field Not...

Page 56: ...he IP address 5 Apply the changes For Macintosh users 1 From System Preferences in the Apple menu navigate to the list of printers and then select IP 2 Type the IP address in the address field 3 Apply the changes Setting up serial printing Windows only 1 Set the parameters in the printer a From the control panel navigate to the menu for the port settings b Locate the menu for the serial port settin...

Page 57: ...bin and multipurpose feeder 3 Remove any dust lint and pieces of paper around the printer using a soft brush or vacuum 4 Wipe the outside of the printer with a damp soft lint free cloth Notes Do not use household cleaners or detergents as they may damage the finish of the printer Make sure that all areas of the printer are dry after cleaning 5 Connect the power cord to the electrical outlet and the...

Page 58: ...ouch Status Supplies 2 Select the parts or supplies that you want to check Note You can also access this setting by touching the top section of the home screen Using genuine Lexmark parts and supplies Your Lexmark printer is designed to function best with genuine Lexmark parts and supplies Use of third party supplies or parts may affect the performance reliability or life of the printer and its im...

Page 59: ...6510 BSD LAD Black 24B2454 Cyan 24B2154 Magenta 24B2155 Yellow 24B2421 Item Worldwide BSD Black 24B6515 Cyan 24B6512 Magenta 24B6513 Yellow 24B6514 BSD LAD Black 24B4803 Cyan 24B2455 Magenta 24B3581 Yellow 24B3587 Ordering a photoconductor unit Item Part number Photoconductor unit 1 pack 72K0P00 Photoconductor unit 3 pack 72K0Q00 Ordering developer units Item Part number Return Program developer u...

Page 60: ...genta imaging unit 21K3402 Yellow imaging unit 21K3404 Ordering staple cartridges Item Part number Staple cartridges 25A0013 Ordering a waste toner bottle Item Part number Waste toner bottle 72K0W00 Configuring supply notifications 1 Open a Web browser and then type the printer IP address in the address field Notes View the printer IP address on the printer home screen The IP address appears as four ...

Page 61: ...cing parts and supplies Replacing a developer unit 1 Open door B CAUTION HOT SURFACE The inside of the printer might be hot To reduce the risk of injury from a hot component allow the surface to cool before touching it 2 Open door A Maintaining the printer 61 ...

Page 62: ...3 Remove the waste toner bottle 4 Remove the imaging unit 5 Remove the developer unit 6 Unpack the new developer unit and then remove the packing material Maintaining the printer 62 ...

Page 63: ...te toner bottle 10 Close doors A and B Replacing the fuser 1 Turn off the printer 2 Open door B CAUTION HOT SURFACE The inside of the printer might be hot To reduce the risk of injury from a hot component allow the surface to cool before touching it Maintaining the printer 63 ...

Page 64: ...3 Remove the fuser 4 Unpack the new fuser 5 Clean the fuser lens using the cotton swab that came with the package Maintaining the printer 64 ...

Page 65: ...e door B 8 Turn on the printer Replacing a photoconductor unit 1 Open door B CAUTION HOT SURFACE The inside of the printer might be hot To reduce the risk of injury from a hot component allow the surface to cool before touching it Maintaining the printer 65 ...

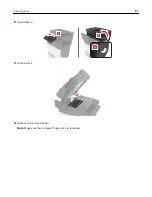
Page 66: ...2 Open door A 3 Remove the waste toner bottle Maintaining the printer 66 ...

Page 67: ... Potential Damage Do not expose the photoconductor unit to direct light for more than 10 minutes Extended exposure to light may cause print quality problems Warning Potential Damage Do not touch the photoconductor drum Doing so may affect the print quality of future print jobs 7 Insert the new photoconductor unit Maintaining the printer 67 ...

Page 68: ... bottle 10 Close doors A and B Replacing an imaging unit 1 Open door B CAUTION HOT SURFACE The inside of the printer might be hot To reduce the risk of injury from a hot component allow the surface to cool before touching it Maintaining the printer 68 ...

Page 69: ...2 Open door A 3 Remove the waste toner bottle Maintaining the printer 69 ...

Page 70: ...e Do not expose the photoconductor unit to direct light for more than 10 minutes Extended exposure to light may cause print quality problems Warning Potential Damage Do not touch the photoconductor drum Doing so may affect the print quality of future print jobs 6 Insert the new imaging unit Maintaining the printer 70 ...

Page 71: ...7 Insert the waste toner bottle 8 Close doors A and B Replacing a toner cartridge 1 Open door A 2 Remove the toner cartridge 3 Unpack the new toner cartridge Maintaining the printer 71 ...

Page 72: ...t the new toner cartridge until it clicks into place 5 Close door A Replacing the pick roller Replacing the pick roller in the 550 sheet tray 1 Turn off the printer 2 Remove the tray Maintaining the printer 72 ...

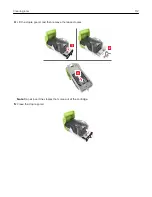
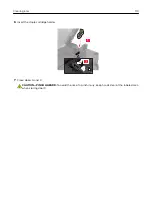
Page 73: ...3 Remove the pick roller 4 Unpack the new pick roller Maintaining the printer 73 ...

Page 74: ...5 Insert the new pick roller until it clicks into place 6 Insert the tray 7 Turn on the printer Maintaining the printer 74 ...

Page 75: ...placing the pick roller in the 2200 sheet tray 1 Turn off the printer 2 Pull out and then unlock the tray 3 Remove the tray 4 Remove the pick roller 5 Unpack the new pick roller Maintaining the printer 75 ...

Page 76: ...6 Insert the new pick roller until it clicks into place 7 Insert the tray 8 Turn on the printer Maintaining the printer 76 ...

Page 77: ...he separator bracket 1 Pull out the tray 2 Remove the separator bracket 3 Unpack the new separator bracket 4 Insert the new separator bracket until it clicks into place 5 Insert the tray Maintaining the printer 77 ...

Page 78: ...Replacing the waste toner bottle 1 Open door A 2 Remove the waste toner bottle 3 Unpack the new waste toner bottle 4 Insert the new waste toner bottle 5 Close door A Maintaining the printer 78 ...

Page 79: ... Turn off the printer 2 Open door B CAUTION HOT SURFACE The inside of the printer might be hot To reduce the risk of injury from a hot component allow the surface to cool before touching it 3 Open door A Maintaining the printer 79 ...

Page 80: ...4 Remove the waste toner bottle 5 Open door A1 6 Remove the transfer belt Maintaining the printer 80 ...

Page 81: ...belt to direct light for more than 10 minutes Extended exposure to light may cause print quality problems Warning Potential Damage Do not touch the transfer belt Doing so may affect the print quality of future print jobs 8 Insert the new transfer belt until it clicks into place 9 Close door A1 Maintaining the printer 81 ...

Page 82: ...n the printer Replacing the transfer roller 1 Open door B CAUTION HOT SURFACE The inside of the printer might be hot To reduce the risk of injury from a hot component allow the surface to cool before touching it 2 Remove the transfer roller Maintaining the printer 82 ...

Page 83: ...3 Unpack the new transfer roller Note Do not remove the white packing material 4 Insert the new transfer roller 5 Remove the white packing material 6 Close door B Maintaining the printer 83 ...

Page 84: ...cover 4 Remove the ADF pick roller Warning Potential Damage Some parts of the printer are easily damaged by static electricity Before touching any parts or components in an area marked with the static sensitive symbol touch a metal surface in an area away from the symbol Maintaining the printer 84 ...

Page 85: ...s of the printer are easily damaged by static electricity Before touching any parts or components in an area marked with the static sensitive symbol touch a metal surface in an area away from the symbol 7 Insert the ADF pick roller cover until it clicks into place 8 Close door D 9 Turn on the printer Maintaining the printer 85 ...

Page 86: ...cover 4 Remove the ADF feed roller Warning Potential Damage Some parts of the printer are easily damaged by static electricity Before touching any parts or components in an area marked with the static sensitive symbol touch a metal surface in an area away from the symbol Maintaining the printer 86 ...

Page 87: ... the new ADF feed roller 6 Insert the new ADF feed roller until it clicks into place 7 Insert the ADF pick roller cover until it clicks into place 8 Close door D 9 Turn on the printer Maintaining the printer 87 ...

Page 88: ...r cover 4 Remove the ADF separator roller Warning Potential Damage Some parts of the printer are easily damaged by static electricity Before touching any parts or components in an area marked with the static sensitive symbol touch a metal surface in an area away from the symbol Maintaining the printer 88 ...

Page 89: ...r roller until it clicks into place 7 Insert the ADF separator roller cover until it clicks into place 8 Close door D 9 Turn on the printer Replacing the staple cartridge unit Replacing the staple cartridge in the staple finisher 1 Open door C Maintaining the printer 89 ...

Page 90: ...2 Open door G 3 Remove the staple cartridge 4 Unpack the new staple cartridge Maintaining the printer 90 ...

Page 91: ...s into place 6 Close doors G and C CAUTION PINCH HAZARD To avoid the risk of a pinch injury keep hands clear of the labeled area when closing door C Replacing the staple cartridge holder in the staple finisher 1 Open door C Maintaining the printer 91 ...

Page 92: ...2 Open door G 3 Pull out the staple cartridge holder Maintaining the printer 92 ...

Page 93: ...4 Remove the staple cartridge 5 Unpack the new staple cartridge holder 6 Insert the staple cartridge until it clicks into place Maintaining the printer 93 ...

Page 94: ...ter damage Make sure that all doors and trays are closed Turn off the printer and then unplug the power cord from the electrical outlet Disconnect all cords and cables from the printer If the printer has a caster base then carefully roll it to the new location Use caution when passing over thresholds and breaks in flooring If the printer does not have a caster base but is configured with optional tr...

Page 95: ...ore it enters Sleep mode Hibernate mode 1 From the home screen touch Settings Device Power Management Timeouts Hibernate Timeout 2 Select the amount of time before the printer enters hibernate mode Notes Make sure to wake the printer from hibernate mode before sending a print job The Embedded Web Server is disabled when the printer is in hibernate mode Adjusting the brightness of printer display 1...

Page 96: ...ackaging recycling programs is included with the information on product recycling Lexmark cartons are 100 recyclable where corrugated recycling facilities exist Facilities may not exist in your area The foam used in Lexmark packaging is recyclable where foam recycling facilities exist Facilities may not exist in your area When you return a cartridge to Lexmark you can reuse the box that the cartri...

Page 97: ...e stack height is below the maximum paper fill indicator Do not slide paper into the tray Load paper as shown in the illustration Make sure that the paper guides are positioned correctly and are not pressing tightly against the paper or envelopes Push the tray firmly into the printer after loading paper Use recommended paper Use only recommended paper or specialty media Do not load paper that is wri...

Page 98: ...control panel Store paper according to manufacturer recommendations Identifying jam locations Notes When Jam Assist is set to On the printer flushes blank pages or pages with partial prints after a jammed page has been cleared Check your printed output for blank pages When Jam Recovery is set to On or Auto the printer reprints jammed pages Jam locations 1 Multipurpose feeder 2 Duplex unit 3 Fuser 4...

Page 99: ...m locations 5 Standard bin 6 Door G 7 Door F 8 Trays Paper jam in trays 1 Pull out the tray 2 Remove the jammed paper Note Make sure that all paper fragments are removed 3 Insert the tray Clearing jams 99 ...

Page 100: ...ote Make sure that all paper fragments are removed 6 Close the tray cover Paper jam in the multipurpose feeder 1 Remove paper from the multipurpose feeder 2 Remove the jammed paper Note Make sure that all paper fragments are removed Clearing jams 100 ...

Page 101: ...AUTION HOT SURFACE The inside of the printer might be hot To reduce the risk of injury from a hot component allow the surface to cool before touching it 4 Close door B 5 Flex fan and align the paper edges before loading 6 Reload paper Clearing jams 101 ...

Page 102: ... paper Note Make sure that all paper fragments are removed Warning Potential Damage Some parts of the printer are easily damaged by static electricity Before touching any parts or components in an area marked with the static sensitive symbol touch a metal surface in an area away from the symbol 4 Close door D Clearing jams 102 ...

Page 103: ...5 Open the scanner cover 6 Open door E 7 Remove the jammed paper Note Make sure that all paper fragments are removed Clearing jams 103 ...

Page 104: ...mmed paper Note Make sure that all paper fragments are removed 2 Open door B and then remove any paper fragments CAUTION HOT SURFACE The inside of the printer might be hot To reduce the risk of injury from a hot component allow the surface to cool before touching it Clearing jams 104 ...

Page 105: ...Open door B CAUTION HOT SURFACE The inside of the printer might be hot To reduce the risk of injury from a hot component allow the surface to cool before touching it 2 Remove the jammed paper Note Make sure that all paper fragments are removed Clearing jams 105 ...

Page 106: ...re that all paper fragments are removed 5 Close door B Paper jam in the duplex unit 1 Open door B CAUTION HOT SURFACE The inside of the printer might be hot To reduce the risk of injury from a hot component allow the surface to cool before touching it Clearing jams 106 ...

Page 107: ...2 Remove the jammed paper Note Make sure that all paper fragments are removed 3 Open the duplex cover 4 Remove the jammed paper Note Make sure that all paper fragments are removed Clearing jams 107 ...

Page 108: ...5 Close the duplex cover and door B Paper jam in the finisher bin 1 Remove the jammed paper Note Make sure that all paper fragments are removed Clearing jams 108 ...

Page 109: ...2 Open door C 3 Open door F 4 Remove the jammed paper Note Make sure that all paper fragments are removed Clearing jams 109 ...

Page 110: ...5 Close doors F and C CAUTION PINCH HAZARD To avoid the risk of a pinch injury keep hands clear of the labeled area when closing door C Staple jam in door G 1 Open door C Clearing jams 110 ...

Page 111: ...2 Open door G 3 Pull out the staple cartridge holder Clearing jams 111 ...

Page 112: ...4 Lift the staple guard and then remove the loose staples Note Do not insert the staples that came out of the cartridge 5 Close the staple guard Clearing jams 112 ...

Page 113: ...6 Insert the staple cartridge holder 7 Close doors G and C CAUTION PINCH HAZARD To avoid the risk of a pinch injury keep hands clear of the labeled area when closing door C Clearing jams 113 ...

Page 114: ...pears as four sets of numbers separated by periods such as 123 123 123 123 Is the printer IP address correct Go to step 3 Type the correct printer IP address in the address field Note Depending on the network settings you may need to type https instead of http before the printer IP address to access the Embedded Web Server Step 3 Check if the printer is on Is the printer on Go to step 4 Turn on the...

Page 115: ... Does the problem remain Go to step 2 The problem is solved Step 2 Check if the flash drive is supported For more information see Supported flash drives and file types on page 27 Does the problem remain Go to step 3 The problem is solved Step 3 Check if the front USB port is disabled Does the problem remain Contact customer support The problem is solved Enabling the USB port From the home screen touc...

Page 116: ...is installed in the appropriate connector in the controller board c Connect the power cord to the electrical outlet and then turn on the printer CAUTION POTENTIAL INJURY To avoid the risk of fire or electrical shock connect the power cord to an appropriately rated and properly grounded electrical outlet that is near the product and easily accessible Does the internal option operate correctly The pr...

Page 117: ...eceptacle of the controller board Does the ISP operate correctly The problem is solved Contact customer support Parallel or serial interface card does not operate correctly Action Yes No Step 1 Print a menu settings page and then check if the parallel or serial interface card appears in the Installed Features list Is the parallel or serial interface card listed in the Installed Features list Go to...

Page 118: ... 1 a From the home screen touch Settings Print Layout Collate b Set Collate to 1 2 3 1 2 3 c Resend the print job Is the document printed and collated correctly The problem is solved Go to step 2 Step 2 a From the printer software set Collate to 1 2 3 1 2 3 b Resend the print job Is the document printed and collated correctly The problem is solved Go to step 3 Step 3 a Reduce the number of pages i...

Page 119: ...ep 3 The problem is solved Step 3 a Remove paper from the tray and then turn it over b Resend the print job Is the paper still curled Go to step 4 The problem is solved Step 4 a Load paper from a fresh package Note Paper absorbs moisture due to high humidity Store paper in its original wrapper until you are ready to use it b Resend the print job Is the paper still curled Contact customer support T...

Page 120: ...t the stack height is below the maximum paper fill indicator Make sure to print on recommended paper size and type c Insert the tray d Print the document Do paper jams still occur frequently Go to step 2 The problem is solved Step 2 a Load paper from a fresh package b Print the document Do paper jams still occur frequently Contact customer support The problem is solved Jammed pages are not reprinte...

Page 121: ... new file and then print the documents Are the documents printed The problem is solved Go to step 3 Step 3 If you are printing from the Internet then the printer may be reading the multiple job titles as duplicates For Windows users a Open the Printing Preferences dialog b From the Print and Hold section select Keep duplicate documents c Enter a PIN d Resend the print job For Macintosh users a Save...

Page 122: ...e print job Is the printer still printing slow Go to step 3 The problem is solved Step 3 a Remove held jobs b Resend the print job Is the printer still printing slow Go to step 4 The problem is solved Step 4 a Connect the printer cable securely to the printer and the computer print server option or other network device b Resend the print job Is the printer still printing slow Go to step 5 The prob...

Page 123: ...orts are working and if the cables are securely connected to the computer and the printer For more information see the setup documentation that came with the printer b Resend the print job Is the document printed The problem is solved Go to step 4 Step 4 a Turn off the printer wait for about 10 seconds and then turn it back on b Resend the print job Is the document printed The problem is solved Go...

Page 124: ... light may cause print quality problems Warning Potential Damage To avoid damage do not touch the underside of the imaging unit or imaging kit b Resend the print job Is the printer still printing blank or white pages Go to step 2 The problem is solved Step 2 Replace the imaging unit or imaging kit and then resend the print job Is the printer still printing blank or white pages Contact customer sup...

Page 125: ...he settings match the paper loaded in the tray You can also change the settings on the printer control panel b Resend the print job Is the print still too dark Go to step 4 The problem is solved Step 4 Make sure that the paper has no texture or rough finishes Are you printing on textured or rough paper Change the texture settings to match the paper you are printing on Go to step 5 Step 5 a Load pap...

Page 126: ...om the Printing Preferences or Print dialog Notes Make sure that the settings match the paper loaded in the tray You can also change the settings on the printer control panel b Resend the print job Do ghost images still appear on prints Go to step 3 The problem is solved Step 3 Replace the imaging unit or imaging kit and then resend the print job Do ghost images still appear on prints Contact cust...

Page 127: ...nutes Extended exposure to light may cause print quality problems Warning Potential Damage To avoid damage do not touch the underside of the imaging unit or imaging kit b Resend the print job Does gray background still appear on prints Contact customer support The problem is solved Horizontal dark lines ABCDE ABCDE ABCDE Note If horizontal dark lines keep appearing on your prints then see the Repe...

Page 128: ...l dark lines still appear on prints Go to step 4 The problem is solved Step 4 a Remove and then reinstall the imaging unit or imaging kit Warning Potential Damage Do not expose the imaging unit or imaging kit to direct light for more than 10 minutes Extended exposure to light may cause print quality problems Warning Potential Damage To avoid damage do not touch the underside of the imaging unit or...

Page 129: ...nt job Do horizontal white lines still appear on prints Go to step 3 The problem is solved Step 3 a Remove and then reinstall the imaging unit or imaging kit Warning Potential Damage Do not expose the imaging unit or imaging kit to direct light for more than 10 minutes Extended exposure to light can cause print quality problems Warning Potential Damage To avoid damage do not touch the underside of...

Page 130: ...ings on the printer control panel b Resend the print job Are the margins correct The problem is solved Contact customer support Jagged or uneven characters Action Yes No a Check if the printer supports the fonts that are installed on your computer 1 From the control panel touch Settings Reports Print Print Fonts 2 Select PCL Fonts or PS Fonts b If the font is not supported then install a supported...

Page 131: ...still too light Go to step 3 The problem is solved Step 3 a Depending on your operating system specify the paper type texture and weight from the Printing Preferences or Print dialog Notes Make sure that the settings match the paper loaded in the tray You can also change the settings on the printer control panel b Resend the print job Is the print still too light Go to step 4 The problem is solved...

Page 132: ...print quality problems Warning Potential Damage To avoid damage do not touch the underside of the imaging unit or imaging kit Is the print still too light Contact customer support The problem is solved Mottled print and dots ABC DEF Action Yes No Replace the imaging unit or imaging kit and then resend the print job Warning Potential Damage Do not expose the imaging unit or imaging kit to direct li...

Page 133: ...2 a Load paper from a fresh package Note Paper absorbs moisture due to high humidity Store paper in its original wrapper until you are ready to use it b Resend the print job Is the print still crooked or skewed Go to step 3 The problem is solved Step 3 a Check if you are printing on a supported paper b Resend the print job Is the print still crooked or skewed Contact customer support The problem i...

Page 134: ...l appear Take note of the distance and then contact customer support or your service representative The problem is solved Solid color or black images Action Yes No Step 1 a Remove and then reinstall the imaging unit or imaging kit Warning Potential Damage Do not expose the imaging unit or imaging kit to direct light for more than 10 minutes Extended exposure to light may cause print quality proble...

Page 135: ... in the tray You can also change the settings on the printer control panel b Resend the print job Is the page or image still clipped Go to step 3 The problem is solved Step 3 a Remove and then reinstall the imaging unit or imaging kit Warning Potential Damage Do not expose the imaging unit or imaging kit to direct light for more than 10 minutes Extended exposure to light may cause print quality pr...

Page 136: ... Does the toner still rub off Contact customer support The problem is solved Uneven print density Action Yes No Replace the imaging unit or imaging kit and then resend the print job Warning Potential Damage Do not expose the imaging unit or imaging kit to direct light for more than 10 minutes Extended exposure to light can cause print quality problems Warning Potential Damage To avoid damage do no...

Page 137: ...er until you use it b Resend the print job Do vertical dark lines or streaks still appear on prints Go to step 3 The problem is solved Step 3 a Remove and then reinstall the imaging unit or imaging kit Warning Potential Damage Do not expose the imaging unit or imaging kit to direct light for more than 10 minutes Extended exposure to light can cause print quality problems Warning Potential Damage T...

Page 138: ...pe b Resend the print job Do vertical white lines still appear on prints Go to step 3 The problem is solved Step 3 a Remove and then reinstall the imaging unit or imaging kit Warning Potential Damage Do not expose the imaging unit or imaging kit to direct light for more than 10 minutes Extended exposure to light may cause print quality problems Warning Potential Damage To avoid damage do not touch...

Page 139: ...step 4 Turn on the printer Step 4 Check if the printer is in sleep or hibernate mode Is the printer in sleep or hibernate mode Press the power button to wake the printer Go to step 5 Step 5 Check if the cables connecting the printer and the computer are inserted in the correct ports Are the cables inserted in the correct ports Go to step 6 Make sure to match the following The USB cable with the US...

Page 140: ... the paper size from the Printing Preferences or Print dialog Notes Make sure that the settings match the paper loaded in the tray You can also change the settings on the printer control panel b Print the document Is the document printed from the correct tray or on the correct paper The problem is solved Go to step 3 Step 3 a Check if the trays are not linked b Print the document Is the document p...

Page 141: ...fications for Web Offset Publishing SWOP color output Euro CMYK Applies color correction to approximate Euroscale color output Vivid CMYK Increases the color saturation of the US CMYK color correction setting Off FAQ about color printing What is RGB color RGB color is a method of describing colors by indicating the amount of red green or blue used to produce a certain color Red green and blue light...

Page 142: ...ts are also available from the Color Samples page of the Embedded Web Server Selecting any sample set generates multiple page prints consisting of hundreds of colored boxes Each box contains a CMYK or RGB combination depending on the table selected The observed color of each box is obtained by passing the CMYK or RGB combination labeled on the box through the selected color conversion table By exa...

Page 143: ...check if it is working properly If you are using the On Hook Dial feature then turn up the volume to check if you hear a dial tone Can you hear a dial tone Go to step 5 Go to step 4 Step 4 Check the telephone wall jack a Connect the analog telephone directly to the wall jack b Listen for a dial tone c If you do not hear a dial tone then use a different telephone cable d If you still do not hear a ...

Page 144: ... an analog connection on the PBX If none exists then consider installing an analog telephone line for the fax machine Can you send or receive a fax The problem is solved Go to step 6 Step 6 Temporarily disconnect other equipment and disable other telephone services a Disconnect other equipment such as answering machines computers modems or telephone line splitters between the printer and the telep...

Page 145: ...support Can send but not receive faxes Action Yes No Step 1 Make sure that the tray or multipurpose feeder is not empty Can you receive faxes The problem is solved Go to step 2 Step 2 Check the ring count delay settings a From the home screen touch Settings Fax Analog Fax Setup Fax Receive Settings Rings to Answer b If necessary configure the setting Can you receive faxes The problem is solved Go t...

Page 146: ...3 Replace the toner cartridge For more information see the instruction sheet that came with the supply Is the fax print quality satisfactory The problem is solved Contact customer support Scanning problems Cannot scan from a computer Action Yes No Step 1 a Turn off the printer wait for about 10 seconds and then turn it back on b Resend the scan job Can you send the scan job The problem is solved G...

Page 147: ...e ADF glass with a damp soft lint free cloth b Make sure that the document or photo is loaded facedown on the upper left corner of the scanner glass c Copy the document or photo Is the copy quality satisfactory The problem is solved Go to step 2 Step 2 a Check the quality of the original document or photo b Adjust the scan quality settings c Copy the document or photo Is the copy quality satisfact...

Page 148: ...job successful The problem is solved Contact customer support Scanner does not close Action Yes No Remove obstructions that keep the scanner unit open Did the scanner unit close correctly The problem is solved Contact customer support Scanning takes too long or freezes the computer Action Yes No Step 1 Close all applications that are interfering with the scan Does scanning take too long or freeze ...

Page 149: ...have already taken to find a solution You need to know your printer model type and serial number For more information see the label at the back of the printer The serial number is also listed on the menu settings page Lexmark has various ways to help you solve your printing problem Visit the Lexmark Web site at http support lexmark com and then select one of the following Tech Library You can brows...

Page 150: ...optional hardware or memory devices sometime after setting up the printer then turn the printer off and unplug the power cord from the electrical outlet before continuing If you have any other devices attached to the printer then turn them off as well and unplug any cables going into the printer 1 Turn off the printer and then unplug the power cord from the electrical outlet 2 Using a flat head scr...

Page 151: ...of electrical shock if you are accessing the controller board or installing optional hardware or memory devices sometime after setting up the printer then turn the printer off and unplug the power cord from the electrical outlet before continuing If you have any other devices attached to the printer then turn them off as well and unplug any cables going into the printer 1 Turn off the printer and ...

Page 152: ...3 Unpack the internal solutions port ISP kit 1 ISP 2 Mounting bracket 3 Thumbscrews 4 If necessary remove the printer hard disk Upgrading and migrating 152 ...

Page 153: ...5 Insert the bracket into the board until it clicks into place 6 Attach the ISP to the bracket Upgrading and migrating 153 ...

Page 154: ...cessary attach the hard disk to the ISP a Remove the hard disk bracket b Connect the hard disk to the ISP Warning Potential Damage Do not touch or press the center of the hard disk Upgrading and migrating 154 ...

Page 155: ... the printer then turn the printer off and unplug the power cord from the electrical outlet before continuing If you have any other devices attached to the printer then turn them off as well and unplug any cables going into the printer 1 Turn off the printer and then unplug the power cord from the electrical outlet 2 Using a flat head screwdriver remove the controller board access cover Warning Pot...

Page 156: ...unded electrical outlet that is near the product and easily accessible Installing a printer hard disk CAUTION SHOCK HAZARD To avoid the risk of electrical shock if you are accessing the controller board or installing optional hardware or memory devices sometime after setting up the printer then turn the printer off and unplug the power cord from the electrical outlet before continuing If you have ...

Page 157: ...tatic electricity Touch a metal surface on the printer before touching any controller board components or connectors 3 Unpack the hard disk 4 Attach the hard disk to the controller board Warning Potential Damage Do not touch or press the center of the hard disk Upgrading and migrating 157 ...

Page 158: ...If an internal solutions port ISP is installed then do the following a Remove the hard disk bracket b Attach the hard disk to the ISP Upgrading and migrating 158 ...

Page 159: ...cal outlet before continuing If you have any other devices attached to the printer then turn them off as well and unplug any cables going into the printer CAUTION TIPPING HAZARD Installing one or more options on your printer or MFP may require a caster base furniture or other feature to prevent instability causing possible injury For more information on supported configurations see www lexmark com ...

Page 160: ...L INJURY To avoid the risk of fire or electrical shock connect the power cord to an appropriately rated and properly grounded electrical outlet that is near the product and easily accessible 7 Turn on the printer If necessary manually add the tray in the print driver to make it available for print jobs For more information see Adding available options in the print driver on page 166 When installing...

Page 161: ... Printer Staple finisher Installing the staple finisher 1 Turn off the printer 2 Open door C 3 Open door A Upgrading and migrating 161 ...

Page 162: ...4 Remove the paper bail 5 Remove the standard bin insert Upgrading and migrating 162 ...

Page 163: ...d then remove the packing material 8 Insert the staple finisher until it clicks into place 9 Close doors A and C CAUTION PINCH HAZARD To avoid the risk of a pinch injury keep hands clear of the labeled area when closing door C 10 Turn on the printer Upgrading and migrating 163 ...

Page 164: ...Installing the keyboard tray 1 Turn off the printer 2 Open door A 3 Remove the keyboard attach cover 4 Unpack the keyboard tray Upgrading and migrating 164 ...

Page 165: ...5 Attach the keyboard to the base 6 Insert the keyboard tray 7 Close door A 8 Turn on the printer Upgrading and migrating 165 ...

Page 166: ...anges For Macintosh users 1 From System Preferences in the Apple menu navigate to your printer and then select Options Supplies 2 Navigate to the list of hardware options and then add any installed options 3 Apply the changes Firmware Exporting or importing a configuration file You can export the configuration settings of your printer into a text file and then import the file to apply the settings to o...

Page 167: ...ion or Import Configuration b Follow the instructions on the screen Updating firmware Some applications require a minimum device firmware level to operate correctly For more information on updating the device firmware contact your Lexmark representative 1 From the Embedded Web Server click Settings Device Update Firmware 2 Browse to locate the required flash file 3 Apply the changes Upgrading and migrat...

Page 168: ...ference to a product program or service is not intended to state or imply that only that product program or service may be used Any functionally equivalent product program or service that does not infringe any existing intellectual property right may be used instead Evaluation and verification of operation in conjunction with other products programs or services except those expressly designated by ...

Page 169: ... the printer emulates the functions corresponding to the commands PostScript is a registered trademark of Adobe Systems Incorporated in the United States and or other countries The following terms are trademarks or registered trademarks of these companies Albertus The Monotype Corporation plc Antique Olive Monsieur Marcel OLIVE Apple Chancery Apple Computer Inc Arial The Monotype Corporation plc C...

Page 170: ...eported in conformance with ISO 9296 Note Some modes may not apply to your product 1 meter average sound pressure dBA Printing One sided 54 mono 55 color Two sided 56 mono 56 color Scanning 54 mono 55 color Copying 57 mono 58 color Ready 15 Values are subject to change See www lexmark com for current values Static sensitivity notice This symbol identifies static sensitive parts Do not touch the are...

Page 171: ...otstelling aan de laser DANGER Rayonnements laser invisibles lors du retrait des cartouches et du déverrouillage des loquets Eviter toute exposition au rayon laser VAARA Näkymätöntä lasersäteilyä on varottava kun värikasetit on poistettu ja lukitus on auki Vältä lasersäteelle altistumista GEFAHR Unsichtbare Laserstrahlung beim Herausnehmen von Druckkassetten und offener Sicherheitssperre Laserstra...

Page 172: ...settings 32 configuring port settings 56 configuring supply notifications 60 connecting printer to distinctive ring service 47 connecting to a wireless network using PIN method 55 using Push Button method 55 conservation settings Eco Mode 95 hibernate mode 95 sleep mode 95 conserving supplies 95 contacting customer support 149 control panel using 14 copy troubleshooting partial copies of documents or...

Page 173: ...ing faxes 49 FTP address creating shortcuts 50 FTP server scanning to using the control panel 50 fuser replacing 63 G green settings Eco Mode 95 hibernate mode 95 sleep mode 95 H hardware options installing 159 hardware options adding print driver 166 held jobs 28 printing from a Macintosh computer 28 printing from Windows 28 held print jobs printing from a Macintosh computer 28 printing from Wind...

Page 174: ...ose feeder 100 standard bin 104 trays 99 paper jams avoiding 97 paper size setting 22 paper type setting 22 parallel interface card troubleshooting 117 parts status checking 58 personal identification number method 55 phone splitter 40 photoconductor unit ordering 59 replacing 65 photos copying 30 pick roller replacing 72 placing separator sheets between copies copying 31 port settings configuring 5...

Page 175: ...r unit 65 replacing a toner cartridge 71 replacing an imaging unit 68 replacing parts ADF feed roller 86 ADF pick roller 84 ADF separator roller 88 pick roller 72 separator bracket 77 replacing supplies staple cartridge 89 staple cartridge holder 91 waste toner bottle 78 replacing the ADF feed roller 86 replacing the ADF pick roller 84 replacing the ADF separator roller 88 replacing the fuser 63 r...

Page 176: ...documents or photos 147 poor copy quality 147 scanner does not respond 149 scanner unit does not close 148 troubleshooting fax cannot receive faxes 145 cannot send faxes 145 cannot send or receive faxes 143 received fax has poor print quality 146 troubleshooting print collated printing does not work 118 confidential and other held documents do not print 121 envelope seals when printing 118 incorrec...

Page 177: ...scanner glass copying 30 V verify print jobs 28 printing from a Macintosh computer 28 printing from Windows 28 vertical dark lines or streaks appear on prints 137 vertical white lines appear 138 viewing a fax log 49 voice mail setting up 35 voice over Internet Protocol VoIP fax setup 40 VoIP adapter 40 volatile memory 53 erasing 52 volatility statement of 53 W waste toner bottle ordering 60 replac...

Reviews: