

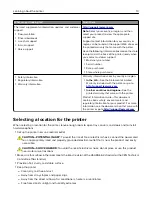

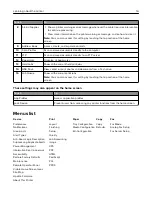


Setting up and using the home screen
applications
Customizing the home screen
1
Open a Web browser, and then type the printer IP address in the address field.
Notes:
•
View the printer IP address on the printer home screen. The IP address appears as four sets of
numbers separated by periods, such as 123.123.123.123.
•
If you are using a proxy server, then temporarily disable it to load the Web page correctly.
2
Click
Settings
>
Device
>
Visible Home Screen Icons
.
3
Select the icons that you want to appear on the home screen.
4
Apply the changes.
Setting up Forms and Favorites
1
Open a Web browser, and then type the printer IP address in the address field.
Notes:
•
View the printer IP address on the printer home screen. The IP address appears as four sets of
numbers separated by periods, such as 123.123.123.123.
•
If you are using a proxy server, then temporarily disable it to load the Web page correctly.
2
Click
Apps
>
Forms and Favorites
>
Configure
.
3
Click
Add
, and then customize the settings.
Notes:
•
To make sure that the location settings of the bookmark are correct, type the IP address of the host
computer where the bookmark is located.
•
Make sure that the printer has access rights to the folder where the bookmark is located.
4
Apply the changes.
Setting up Card Copy
1
Open a Web browser, and then type the printer IP address in the address field.
Notes:
•
View the printer IP address on the printer home screen. The IP address appears as four sets of
numbers separated by periods, such as 123.123.123.123.
•
If you are using a proxy server, then temporarily disable it to load the Web page correctly.
2
Click
Apps
>
Card Copy
>
Configure
.
Setting up and using the home screen applications
18
Summary of Contents for XC6100 Series
Page 1: ...XC6100 Series User s Guide January 2016 www lexmark com Machine type s 7563 Model s 196 197 ...
Page 66: ...2 Open door A 3 Remove the waste toner bottle Maintaining the printer 66 ...
Page 69: ...2 Open door A 3 Remove the waste toner bottle Maintaining the printer 69 ...
Page 73: ...3 Remove the pick roller 4 Unpack the new pick roller Maintaining the printer 73 ...
Page 92: ...2 Open door G 3 Pull out the staple cartridge holder Maintaining the printer 92 ...
Page 111: ...2 Open door G 3 Pull out the staple cartridge holder Clearing jams 111 ...
Page 162: ...4 Remove the paper bail 5 Remove the standard bin insert Upgrading and migrating 162 ...


