background image


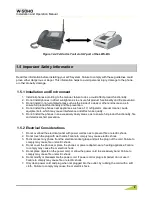
Installation and Operation Manual 


4


2

2


I

I

N

N

S

S

T

T

A

A

L

L

L

L

A

A

T

T

I

I

O

O

N

N


2.1 Pre-Installation 


Please read the following guidelines concerning installation and connection before installing the LG-
Ericsson Wireless SOHO System. Be sure to comply with any applicable local regulations. 

(Note: telephone extension cabling in Australia must be performed by an ACMA (Australian 
Communications and Media Authority) registered installer). 


2.1.1 Safety Installation Instructions 

When installing telephone wiring, basic safety precautions should always be followed to reduce 
the risk of fire, electric shock and personal injury: 

1.  Never install telephone wiring during a lightning storm. 
2.  Never install a telephone jack in wet locations unless the jack is specifically designed for a wet 

environment. 

3.  Never touch un-insulated telephone wires or terminals unless the telephone line has been 

disconnected 

.

Summary of Contents for W-Soho

Page 1: ...INSTALLATION OPERATION MANUAL ...

Page 2: ...Monday Friday on 1 902 297 646 at a cost of approximately 1 50 min The method of signalling and connection between the devices is 1 88 1 89GHz SHF radio transmission utilizing Digital Enhanced Cordless Telecommunications DECT technology The products are fully compliant with Radiocommunications Digital Cordless Communications Devices DECT Devices Standard 2007 made by Australian Communications And ...

Page 3: ...llation Operation Manual Revision History ISSUE DATE Contents of Changes 1 0 1 1 1 2 1 3 February 2010 March 2010 September 2010 February 2011 Initial release Software update included Update Branding Update ...

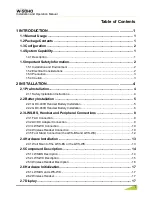
Page 4: ...ation 5 2 2 1 GDC 400H Handset Battery Installation 5 2 2 2 GDC 450H Handset Battery Installation 6 2 3 LWS BS Handset and Peripheral Connections 8 2 3 1 FAX Connection 9 2 3 2 AC DC Adapter Connection 9 2 3 3 LWS WK Connection 10 2 3 4 Wireless Handset Connection 10 2 3 5 Foot Stand Connection the LWS BS and LWS WK 12 2 4 Hardware Installation 13 2 4 1 Wall Mount of the LWS BS or the LWS WK 13 2 ...

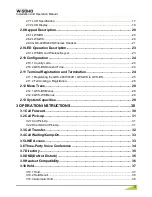
Page 5: ...nation 24 2 11 1 Registering the GDC 400H 450H LWS WK to LWS BS 25 2 11 2 Terminating a Registration 26 2 12 Menu Trees 28 2 12 1 LWS BS Menus 28 2 12 2 LWS WK Menus 28 2 13 System Capacities 29 3 OPERATION INSTRUCTIONS 30 3 1 Call Forward 30 3 2 Call Pick up 31 3 2 1 Call Pick Up 31 3 2 2 Directed Call Pick Up 31 3 3 Call Transfer 32 3 4 Call Waiting Camp On 33 3 5 LINE Access 33 3 6 Three Party ...

Page 6: ... System Speed Dial 41 3 15 VSF Integrated Auto Attendant Voice Mail 42 3 15 1 VSF 42 3 15 2 Auto Attendant 42 3 15 3 VSF Voice Mail 43 3 16 Wake Up Alarm 48 3 17 Intercom Call ICM Call 49 3 18 Intercom Call Hold 50 3 19 Line Ring Assignment 50 3 20 Night Weekend mode 51 3 21 Call Log Display 51 3 22 Mute 52 3 23 Tel Fax Line 52 3 24 Feature Code 53 4 USEFUL INFORMATION 54 4 1 Trouble shooting 54 ...

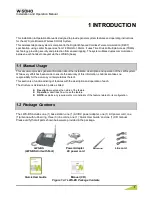
Page 7: ... of the LWS system While every effort has been made to ensure the accuracy of this information LG Ericsson takes no responsibility for the accuracy or interpretations thereof This section is a functional listing of features with the description and operation of each The structure is divided into 3 parts as listed Description explains the nature of the feature Operation describes how to use the fea...

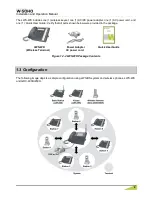
Page 8: ...r Guide Verify that all parts shown below were provided in the package LWS WK Power Adapter Quick User Guide Wireless Terminal AC power cord Figure 1 2 2 LWS WK Package Contents 1 3 Configuration The following image depicts a sample configuration using LWS BS system and wireless phones LWS WK and GDC 400H 450H Figure 1 3 1 Sample Configuration ...

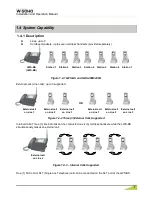
Page 9: ...e 3 internal calls can be conducted on six 6 cordless handsets while the LWS BS simultaneously makes an external call Figure 1 4 3 Internal Calls Supported One 1 FAX call or SLT Single Line Telephone call can be conducted on the SLT port of the LWS BS LWS BS LWS BS Station 1 Station 2 Station 3 Station 4 Station 5 Station 6 Station 7 External call on Line 1 External call on Line 2 External call on...

Page 10: ...affect voice quality 5 Do not install the phones in an excessively dusty area so as to ensure full product functionality fire and electrical short prevention 1 5 2 Electrical Considerations 1 Do not overload the electrical outlet with power cords so as to prevent fire or electric shock 2 Do not touch the plug with wet hands Failure to comply may cause electric shock 3 To disconnect any phone from ...

Page 11: ...degrees and vibration and should not be exposed to direct sunlight 3 To Clean the LWS BS the LWS WK and DECT Terminals wipe with a soft cloth only Do not use benzene paint thinner or an abrasive cleansing powder as these may cause damage to the system and possible fire or electric shock 1 5 4 Caution 1 If the product casing is broken disconnect the power supply cord immediately and return the syst...

Page 12: ...formed by an ACMA Australian Communications and Media Authority registered installer 2 1 1 Safety Installation Instructions When installing telephone wiring basic safety precautions should always be followed to reduce the risk of fire electric shock and personal injury 1 Never install telephone wiring during a lightning storm 2 Never install a telephone jack in wet locations unless the jack is spe...

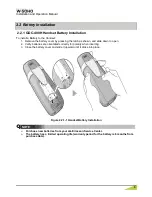
Page 13: ... as shown and slide down to open 2 Verify batteries are orientated correctly for polarity when inserting 3 Close the battery cover and slide it upward until it clicks into place Figure 2 2 1 1 Handset Battery Installation Purchase new batteries from your LG Ericsson Service Center The battery has a limited operating life warranty period for the battery is 6 months from purchase date NOTE ...

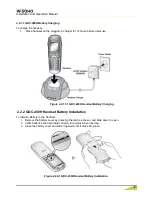
Page 14: ...Figure 2 2 1 1 1 GDC 400H Handset Battery Charging 2 2 2 GDC 450H Handset Battery Installation To install a Battery to the Handset 1 Remove the battery cover by pressing the latch as shown and slide down to open 2 Verify batteries are orientated correctly for polarity when inserting 3 Close the battery cover and slide it upward until it clicks into place Figure 2 2 2 1 GDC 450H Handset Battery Ins...

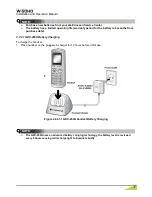
Page 15: ...date 2 2 2 1 GDC 450H Battery Charging To charge the handset 1 Place handset on the plugged in charger for 12 hours before initial use Figure 2 2 2 1 1 GDC 450H Handset Battery Charging Figure 2 2 2 1 1 GDC 450H Handset Battery Charging The GDC 450H uses an advanced battery charging technology the battery level is reviewed every 6 hours causing red recharge light to illuminate briefly NOTE NOTE ...

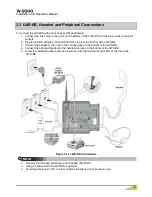
Page 16: ...o the bottom of the LWS BS 3 Connect the handset curly cord to the handset jack on the bottom of the LWS BS 4 Connect the optional Headset to the headphone jack on the bottom of the LWS BS 5 Screw the included rubber antenna clockwise onto the terminal at right side of the top of the LWS BS Figure 2 3 1 LWS BS Connections Use only the included LG Ericsson AC Adapter SA B122 Using a headset with th...

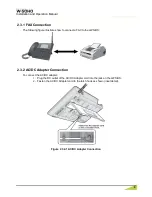
Page 17: ...ates how to connect a FAX to the LWS BS 2 3 2 AC DC Adapter Connection To connect the AC DC adapter 1 Plug the DC outlet of the AC DC Adapter cord into the jack on the LWS BS 2 Fasten the AC DC Adapter cord to the latch hook as shown inset detail Figure 2 3 2 1 AC DC Adapter Connection ...

Page 18: ... the LWS WK Use only the included LG Ericsson AC Adapter SA B122 Using a headset with the LWS WK is optional Avoid mounting near TV and another cordless telephone microwave oven or personal computers and other electrical equipment Figure 2 3 3 1 LWS WK Connection 2 3 4 Wireless Handset Connection To connect a Wireless Handset to be used with the system 1 Plug in the AC adapter cord to the Handset ...

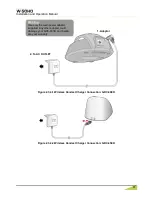
Page 19: ...Wireless Handset Charger Connection GDC 400H Figure 2 3 4 2 Wireless Handset Charger Connection GDC 450H Warning Use only the main power adapter supplied Any other adapter could damage your GDC 400H and invalid ate your warranty 2 To AC OUTLET 1 Adaptor ...

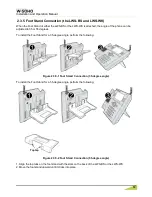
Page 20: ...grees To install the Foot Stand for a 35 degree angle perform the following Figure 2 3 5 1 Foot Stand Connection 35 degree angle To install the Foot Stand for a 55 degree angle perform the following Figure 2 3 5 2 Foot Stand Connection 55 degree angle 1 Align the top tabs on the foot stand with the slots on the back of the LWS BS or the LWS WK 2 Move the foot stand upward until it clicks into plac...

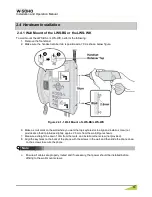
Page 21: ...l mark on the wall where you want the top keyhole slot to align and install a screw not provided so that it protrudes slightly approx 2 5mm from the wall Figure shown 7 Measure a straight line down 10cm from the mark and install another screw not provided 8 Align the keyholes on the back of the phone with the screws in the wall and then slide the phone down on the screws to secure the phone Ensure...

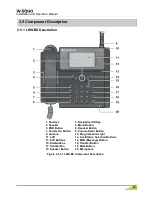
Page 22: ...nu Button 5 DND Button 6 Headset Button 7 Volume Up Button 8 Volume Down Button 9 Antenna 10 Ring Indication Light 11 LCD 12 Line Station Selection Buttons 13 Soft Buttons 14 MSG Message Button 15 Dial Buttons 16 Transfer Button 17 Hold Button 18 Mute Button 19 Speaker Button 20 Microphone Figure 2 5 1 1 LWS BS Component Description ...

Page 23: ...u Button 5 DND Button 6 Headset Button 7 Volume Up Button 8 Volume Down Button 9 Ring Indication 10 LCD 11 Line Station Selection Buttons 12 Soft Buttons 13 MSG Button 14 Dial Buttons 15 Transfer Button 16 Hold Button 17 Mute Button 18 Speaker Button 19 Microphone Figure 2 5 2 1 LWS WK Component Description ...

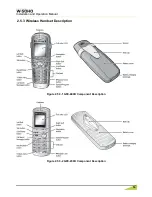
Page 24: ...Installation and Operation Manual 16 2 5 3 Wireless Handset Description Figure 2 5 3 1 GDC 400H Component Description Figure 2 5 3 2 GDC 450H Component Description ...

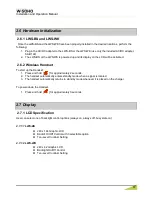
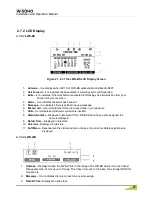
Page 25: ...t up the Handset 1 Press and hold for approximately 2 seconds 2 The handset automatically enters standby mode when a signal is located 3 The handset automatically returns to standby mode whenever it is placed on the charger To power down the Handset 1 Press and hold for approximately 3 seconds 2 7 Display 2 7 1 LCD Specification User can select one of backlight control options always on always off...

Page 26: ... Missed call Icon indicates that there are missed calls in your absence 7 USB Icon indicates a USB memory device is inserted 8 Station Number Displayed in idle state If the LWS BS station has a name assigned the name is displayed 9 Date Time Displayed in idle state 10 Calendar Displayed in idle state 11 Soft Menu Dependent on the status and menu choices the current available selections are display...

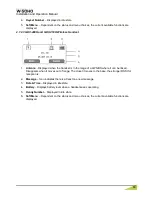
Page 27: ...dset is in the range of a LWS BS where it can be linked Disappears when it moves out of range The closer it moves to the base the stronger RSSI for reception is 2 Message Icon indicates there is at least one new message 3 Date Time Displayed in idle state 4 Battery Displays battery level when a handset keeps operating 5 Handy Number Displayed in idle state 6 Soft Menu Dependent on the status and m...

Page 28: ...g LCD contrast is turned down if phone is in idle state Trans An intercom call or line call can be transferred to another station or line during a conversation Hold When on a call the station user can place an active call on hold the held party will hear a hold tone Mute During a conversation pressing the MUTE button will disable the handset microphone or the speakerphone whilst continuing to list...

Page 29: ...sation Hold When on a call the station user can place an active call on hold the held party will hear a hold tone Mute During a conversation pressing the MUTE button will disable the handset microphone or the speakerphone whilst continuing to listen to the other party Pressing the MUTE button again will reactivate the microphone This button is active on all calls Speaker Pushing the Speaker button...

Page 30: ... Press for less than than 1 second Transfer a call to another station TRANS Press for longer than 1 second Hold a call release a holding call HOLD In an idle state In MENU right button To make a intercom call or a line call CALL BACK Press less than 1 second Leave a call back or a message UP DOWN Talk Mode Up Down the level of Rx volume Call by name CLIP Standby Mode In Menu Navigate and select am...

Page 31: ...on Red blink Line is held by others Orange Blink Indicates ringing state Green steady on The green LED illuminates when you are on a call Red steady on The red LED indicates that the associated line is in use by other user Station Selection Button ON RED Illuminates when you or others are on a call Red Blink Ringing state indication OFF Idle State DND Headset Mute Speaker ON Illuminates when each ...

Page 32: ...wireless keysets registered to the Base Station will automatically adjust Date and Time according to the Base Station value after pressing Talk key or Speaker button To set the Date Time 1 With the LWS BS in idle state press the Menu button 2 Select 1 CONFIGURATION 1 DATE TIME 3 In this menu set the Date and Time by entering the desired values using the keypad and scrolling with the navigation arr...

Page 33: ... the LWS BS or Registering LWS WK to the LWS BS 8 When the registration is completed below message is shown on the LCD of the LWS BS STATION 10X SUBSCRIBED SUCCESS 2 11 1 2 Registering GDC 400H 450H to the LWS BS To register to the LWS BS the below procedure must be performed on the GDC 400H 450H 1 Press Menu button to display the menu 2 Highlight Phone Register in the menu using the Navigation bu...

Page 34: ...erformed on the LWS BS 1 Press Menu button 2 Press Digit 1 CONFIGURATION submenu or Select 1 CONFIGURATION using Navigation up down key and OK Button 3 Press Digit 4 STATION REGISTRATION sub menu or Select 4 STATION REGISTRATION using Navigation up down key and OK Button 4 Press Digit 2 DEREGISTER STATION submenu or Select 2 DEREGISTER STATION using Navigation up down key and OK Button 5 Select th...

Page 35: ...ation information on the terminal itself 1 Press Menu button 2 Select Phone Register and press OK button 3 Select Reset on the Menu and press OK button 4 Enter HS PIN Code default 0000 using dial button And then press OK button 5 Select Handset on the menu and OK button ...

Page 36: ...tem 4 1 on the LWS BS menu it is advised that you record this password somewhere safe should you forget this password A service call is required if in fact you forget lose this password For convenience you may record this password in the space provided below or on the last page of this manual SYSTEM ADMIN PASSWORD 2 12 2 LWS WK Menus Note ...

Page 37: ...S BS station 1 Wireless Terminal 7 6 Simultaneously FAX SLT 1 Line 3 USB Host Port 1 System Speed Dial 800 200 999 LWS BS Voice Mail Box 240 minutes Max 3 Channel Allow deny list 50 50 Black call list 20 System Received Dialed call log 15 15 LWS BS System Missed call log 900 pool LWS BS Table 2 13 2 Wireless Terminal Capacity DESCRIPTION CAPACITY Remark Phone book 60 Phone Dialed call log 10 Phone...

Page 38: ...all forward LWS BS station 1 Press the Forward soft button in forward state 2 Select OFF in forward type 3 Press Save soft button Wireless Terminal 1 Press Talk key in GDC 4XX or Speaker button in LWS WK 2 Dial Call Forward code ex 554 3 Dial to cancel Call Forward Conditions 1 A station receiving a forwarded call can transfer the call to the forwarding station 2 Calls cannot be forwarded to a sta...

Page 39: ...inging simultaneously Call Pick up will connect the first in highest priority call Call priority order is Line transferred call Line hold recalled call Line incoming call queued call 3 2 2 Directed Call Pick Up Description A station may answer incoming and transferred intercom line calls ringing at another station Call Pick Up All ringing calls are subject to Directed Call Pick up except Queue Cal...

Page 40: ...g station until answered or abandoned Operation While on a call to perform a Screened Call Transfer LWS BS station and LWS WK 1 Press Trans 2 Dial the station to receive the transfer 3 When answered announce the call 4 Hang up to complete the transfer GDC 400H 450H 1 Press Navigation right shorter than 1 second 2 Dial the station to receive the transfer 3 When answered announce the call 4 Press En...

Page 41: ...user may not Camp On to a station in DND a conference etc 2 If the calling station disconnects from the call after activating Camp On Camp On is cancelled 3 A Camp On tone is sent each time the calling user presses the button 3 5 LINE Access Description Stations can access outgoing lines The LWS BS station and LWS WK may use flexible buttons assigned to access a specific line button for outgoing c...

Page 42: ... terminated Operation To establish an ad hoc conference call LWS BS station 1 Establish first call 2 Press the Conf soft button and the connected party is placed on exclusive hold 3 Place second call 4 When connected press Conf soft button to establish 3 party conference Conditions 1 There is no limit on the number of 3 way conferences the system will support 2 If the system receives a disconnect ...

Page 43: ...en the name and number display 1 Press the Select soft button 2 Press the Name Tel soft button Conditions 1 The LCD will display multiple names one per LCD line up to 12 characters 2 If a user selects a directory with no entries or there is no match to the user entry error tone is provided 3 8 DND Do Not Disturb Description A station can be placed in DND to block incoming Line and Intercom calls a...

Page 44: ...Headset Compatibility Description the LWS BS station The Headset button may be used only to select the mode between headset and speakerphone in idle state In busy talk state the switchover between headset and speakerphone isn t supported In the headset mode pressing the Speaker button will send audio to the Headset instead of the speakerphone LWS WK By pressing Headset the user can use the headset...

Page 45: ...1 Press the LINE button OR 1 Lift the handset or press the Speaker button 2 Dial Held Individual LINE Access code ex 8 3 Dial the Line number 01 03 OR 1 Lift the handset or press the Speaker button 2 Dial Held Line Access code ex 8 GDC 400H 450H 1 Press Talk key 2 Dial Held Individual LINE Access code ex 8 3 Dial the Line number 01 03 OR 1 Press Talk key 2 Dial Held Line Access code ex 8 Condition...

Page 46: ...call on hold automatically if the user presses the Station Line button In this case pressing a Line button while on a Line call will place the active call on hold and access the selected Line Operation To use Automatic Hold while on an active Line call LWS BS station 1 Press the desired feature button or Line button the active call is placed on Hold Conditions 1 There is no limit on the number of ...

Page 47: ... entries the Deny entries are searched If the dialed number matches a Deny entry the call is restricted if no match is found the call is allowed Programming CONFIGURATION Outside Line Access Restrict Menu 1 5 1 Allowed Numbers Menu 3 2 Denied Numbers Menu 3 3 3 13 MOH Music On Hold Description When a call is placed on hold the system will deliver a recorded message from VSF In this way the connect...

Page 48: ...ion Speed Dial bins The base station has access to 20 Speed Dial numbers Operation To dial using an Station Speed Dial 1 Lift handset or press the Speaker button 2 Press the Directory button 3 Press the Speed button 4 Dial the desired bin number 00 19 To program an Individual Speed Dial number 1 Press the Directory button 2 Press the Speed button 3 Press the Add button 4 Dial the Speed Dial bin nu...

Page 49: ...peed soft button 3 Dial the desired bin number 200 999 Contact your System Administrator for System Speed dial numbers available Note In some cases your access to Speed dials may be limited in the system check with your System Administrator To dial using a System Speed Dial GDC 4XXH 1 Press the Talk or button you receive dial tone 2 Press the Speed Program or button 3 Dial the desired bin number 2...

Page 50: ...gs and messages and various system prompts The VSF has a storage capacity of up to 240 minutes of announcement and message storage 3 15 2 Auto Attendant Description The Auto Attendant feature allows you to have the W SOHO answer outside callers and direct them to a specific handset based on prompts in a message you record This system feature is easily configurable and can be activated on any line ...

Page 51: ... Message Storage Description Each station on the W SOHO has a mailbox with the exception of the Fax SLT The default password for each mailbox is Each station accesses its mailbox by pressing the MSG Message Button on LWS BS or LWS WK or via Feature Code 620 on any handset including the GDC 400 450 DECT then entering the station number and i e LWS BS Station 100 accesses its voicemail by dialling 1...

Page 52: ... one to play saved messages press two to set greeting or password press eight to disconnect press pound Press 0 for the operator Press nine to hear this message again When the user responds by dialing 1 the first new message is played At the end of message playback the New Message option prompt is played To replay message press one to listen to the next message press two to delete message press th...

Page 53: ...ton 5 Enter the station number and new password 6 Press Hold button in LWS WK GDC 400H 450H 1 Press Talk key 2 Press Change VM password code ex 559 3 If a current password exists enter the station number and current password 4 Press Navigation right longer than 1 second 5 Enter the station number and new password 6 Press Navigation right longer than 1 second To remove password for voice mail force...

Page 54: ...at his phone refer to operation 3 15 3 3 Message Retrieval Options Description The user may dial the digit 9 to receive the VM Long Options prompt while in the Voice Mail Box including during or after a voice message or system prompt except when an option has been selected that requires user dialing Some options involving user dialing include the Message Retrieval Option 1 2 Play New Saved Message...

Page 55: ...e the Password Entry prompt Please enter your new password and press pound when finished 2 Dial new password 3 Press the Reenter Password prompt will be heard Please re enter your password to confirm and press pound when finished 4 Dial new password again 5 Press and the Password Confirmation prompt will be heard Your password is saved To create a new greeting 1 Dial 4 to hear the Greeting Option ...

Page 56: ...ows To forward to another station dial the station number To deactivate Call Forward 1 Dial 2 and receive the Station forwarding is canceled prompt To return to the Main menu 1 Dial 9 and receive the Mail Box Settings prompt Conditions 1 If the user is external the user must begin dialing within and dial subsequent digits within the VSF Inter Digit Timer if not the call is released 2 This Mail Box...

Page 57: ... other stations in the system by dialing applicable digits as defined in the system Numbering Plan Operation To place an intercom call LWS BS station and LWS WK 1 Lift the handset or press the Speaker button to receive ICM dial tone 2 Dial station number or press the Station button 3 For ring back tone await answer GDC 400H 450H 1 Press Talk key to receive ICM dial tone 2 Dial station number 3 For...

Page 58: ... Station button associated with the held station GDC 400H 450H 1 Dial a station number of held station Conditions 1 Only one ICM call may be placed on hold at a time 3 19 Line Ring Assignment Description Each station in the system can be programmed to provide an audible signal when the system detects an incoming call on specified Lines Operation To set Line ring assignment LWS BS station 1 Press M...

Page 59: ...d mode 1 Press DND button 2 Select the ring destination 3 Press Save soft button Then DND LED is turned on To deactivate night weekend mode 1 Press DND button in night weekend mode 2 Select OFF 3 Press Save soft button Then DND LED is turned off Conditions 1 In night weekend mode the DND LED of base station is turned on 2 If the LWS BS station is in forwarding to other station the user can activat...

Page 60: ...utton the Mute button LED illuminates the microphone Handset Speakerphone Headset is muted and the connected party receives silence To activate the microphone 1 Press the illuminated Mute button the Mute button LED extinguishes and the microphone is activated transmitting audio to the connected party 3 23 Tel Fax Line Description If Tel Fax Line Mode Menu 1 3 1 is selected the system will detect a...

Page 61: ... password 559 Group Call Pickup Direct Call Pickup 7 Individual Line Access 88 XX XX 01 03 Line number Line Access Code 0 VSF VM access code 620 Access individual held Line 8 XX XX 01 03 Line number Access held Line 8 Attendant code 9 NZ Feature code Remark Intercom Call 700 708 DND 553 Call Forward 554 Change VM password 559 Group Call Pickup 1 Direct Call Pickup 42 Individual Line Access 48 XX X...

Page 62: ...ange Cannot make or receive calls Are the Handset batteries charged If the battery symbol shows empty then replace the handset on the charger and let it charge for a few hours Terminal does not ring Have you set the terminal ringer volume to Volume Off You can set the ringer volume for LWS BS Wireless Keyset and Handset Verify if the ringer volume is set too low for you and adjust if necessary Can...

Page 63: ...ia Menu item 4 1 on the LWS BS menu it is advised that you record this password somewhere safe should you forget this password A service call is required if in fact you forget lose this password For convenience you may record this password in the space provided below SYSTEM ADMIN PASSWORD Note ...

Reviews: