background image

Page 25

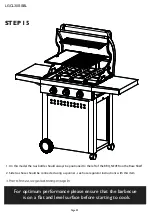
STEP 15

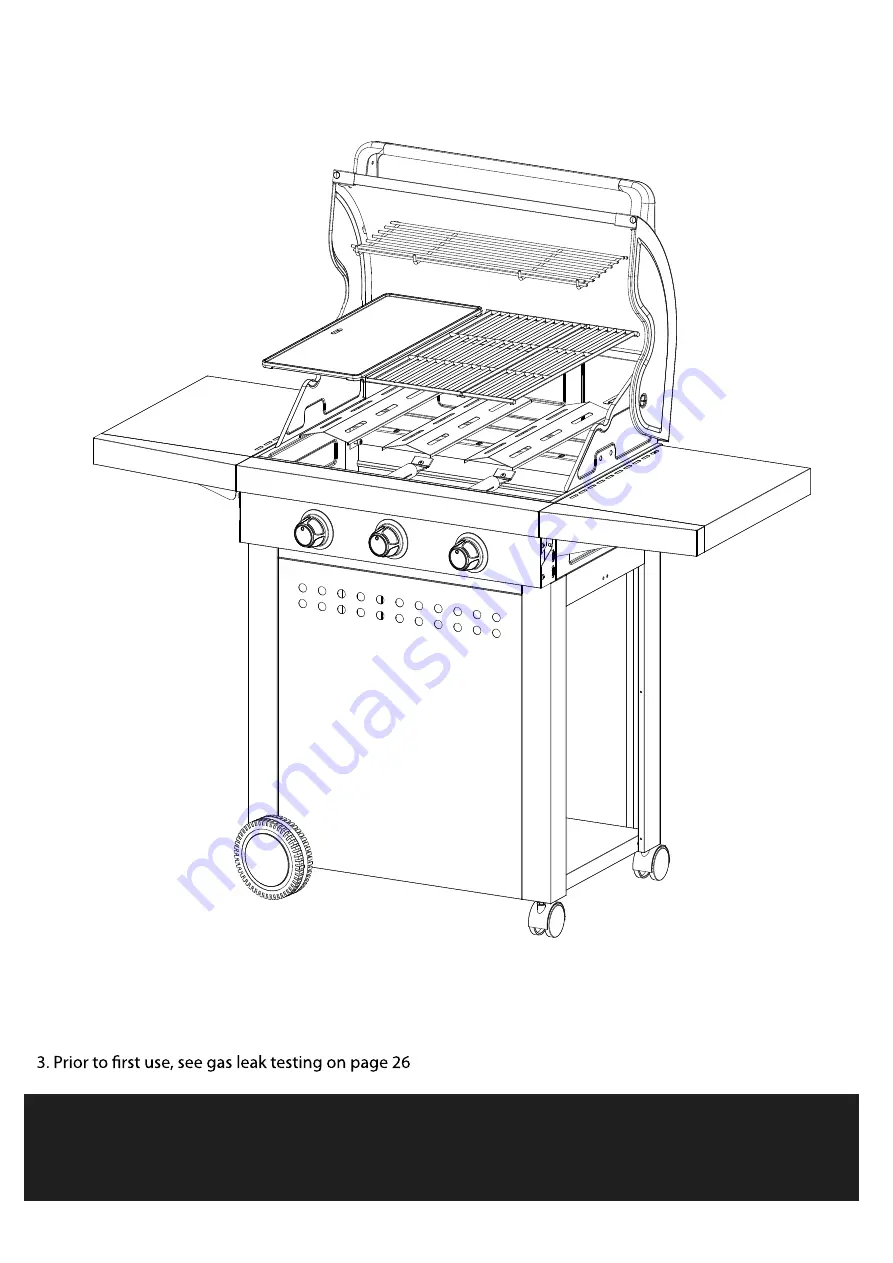
For optimum performance please ensure that the barbecue

 is on a flat and level surface befo

re starting to cook.

1. On this model the Gas bottle should always be positioned to the left of the BBQ, NEVER on the Base Shelf

2. Side Gas hose should be connected using a spanner - see hose regulator instructions with this item

LGCL30SSBL

Summary of Contents for LGSGM45BL

Page 1: ...PLE The fittings pack contains SMALL ITEMS which should be KEPT AWAY FROM YOUNG CHILDREN Read this leaflet in full before commencing assembly 1 3 Burner Roaster Please read these instructions carefully and ensure that your barbecue is properly installed assembled maintained and serviced in accordance with these instructions Failure to follow these instructions may result in serious injury and or d...

Page 2: ... Propane Are all gas bottle gases the same How is it different from natural gas Lighting your BBQ Using your BBQ Maintenance of your BBQ Troubleshooting Exploded Diagram Parts list Fittings list Assembly instructions Leak Test Page 3 Page 3 Page 3 Page 3 4 Page 4 Page 4 Page 4 Page 4 Page 4 Page 4 Page 5 Page 5 6 Page 7 Page 8 Page 9 Page 10 Page 11 25 Page 26 LGCL30SSBL ...

Page 3: ...a level surface Minimum clearance from any combustible materials on ALL sides is 430mm 18 Minimum clearance from any combustible material from the TOP of the bbq is 1000mm 39 Fig 1 Not to be used in garages porches breezeways sheds or other enclosed areas Not to be used on recreational vehicles Do not obstruct flow of combustion and vetilation air around the bbq 430mm Minimum 430mm Minimum 430mm M...

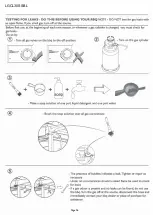
Page 4: ...nder is changed you must check for gas leaks Do so by Turn on the gas cylinder Turn all gas valves on the bbq to the off position Brush a soap solution of one part liquid detergent and one part water to all gas connections The presence of bubbles indicates a leak Tighten or repair as necessary Under no circumstances should a naked flame be used to check for leaks If a gas odour is present and no l...

Page 5: ...bove lightly coat the grills and griddle top and bottom with cooking oil either with a brush or aerosol spray Replace all the cooking surfaces back into the barbecue light the burners and turn them to low for at least 15 minutes Your cooking surfaces are now seasoned Note Curing seasoning cast iron will help to slow corrosion CLEANING THE FLAME TAMERS Periodically wash in a warm soapy solution Use...

Page 6: ...osition and the gas cylinder has been turned off Lift the grills off the bbq as shown in Fig 14 Lift the flame diffuser from position as shown in Fig 15 Remove the screws or clips located at the back of the burners Lift and swing out the burner from position as shown in Fig 16 Clean burners as described Reverse the previous procedure to re install the burners flame diffuser and grills LGCL30SSBL ...

Page 7: ...ash engines or motors Disperse gas by providing maximum ventilation and spraying with a fine water spray IF THERE IS A FIRE If there is a fire at the appliance If there is a fire at the appliance turn the gas off at the cylinder Smother the flames with a wet cloth If there is a fire at the cylinder or you cannot get to the valve to turn it off call the fire brigade direct a garden hose to the midd...

Page 8: ...Page 8 1 2 3c 4 5 7 6 8 9 11 12 13 14 15 16 17 18 19 20 21 22 23 24 25 26 27 28 29 3a 3b 10 30 LGCL30SSBL 31 ...

Page 9: ... 3 0 P S 3 s l e z e B 3 1 E M A R F 3 L C 0 1 0 P S 1 e m a r F Q B B 4 1 15 Trolley Front Panel 1 SP 100 CL30BL FP 16 Front Support Bar 1 SP 100 CL3 FXB 17 Left Support Bar 1 SP 100 CL LBAR 18 Right Support Bar 1 SP 100 CL RBAR 19 Trolley Base Shelf 1 SP 100 CL3 BS 20 Right Front Leg 1 SP 100 CL RFL 21 Right Back Leg 1 SP 100 CL RBL 22 Left Front Leg 1 SP 100 CL LFL 23 Left Back Leg 1 SP 100 CL ...

Page 10: ...crew M4x12 Screw NOTE ALL HARDWARE IS DRAWN IN FULL SCALE TO HELP IDENTIFY EACH PART Tools required not supplied Prepare frame for assembly Cross Head Screwdriver Philips Lift hood remove unpackage all items except burners burner assembly Proceed to step 1 Spanner LGCL30SSBL ...

Page 11: ...Page 11 STEP 1 Fittings for this step M4x12 Screw X 4 22 20 15 LGCL30SSBL ...

Page 12: ...Page 12 STEP 2 Fittings for this step M4x12 Screw X 2 LGCL30SSBL ...

Page 13: ...Page 13 STEP 3 Fittings for this step M4x12 Screw X 4 16 LGCL30SSBL ...

Page 14: ...Page 14 STEP 4 22 24 20 LGCL30SSBL ...

Page 15: ...Page 15 STEP 5 23 21 24 LGCL30SSBL ...

Page 16: ...Page 16 STEP 6 Fittings for this step M6x12 Screw X 8 19 LGCL30SSBL ...

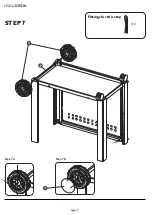
Page 17: ...Page 17 Step 7A Step 7B STEP 7 Fittings for this step 25 27 26 X 2 LGCL30SSBL ...

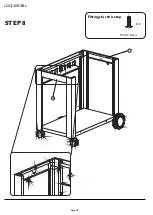
Page 18: ...Page 18 STEP 8 Fittings for this step 18 17 M4X12 Screw X 4 LGCL30SSBL ...

Page 19: ...Page 19 STEP 9 Fittings for this step M6X12 Screw X 10 M6 Washer X 4 14 LGCL30SSBL ...

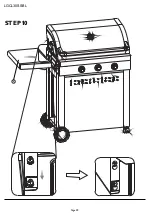
Page 20: ...Page 20 STEP 10 4 LGCL30SSBL ...

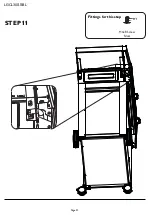
Page 21: ...Page 21 STEP 11 Fittings for this step M4x8 Screw Silver X 1 LGCL30SSBL ...

Page 22: ...Page 22 STEP 12 5 LGCL30SSBL ...

Page 23: ...Page 23 STEP 13 Fittings for this step M4x8 Screw Silver X 1 LGCL30SSBL ...

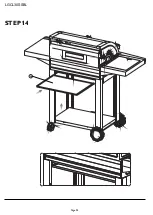
Page 24: ...Page 24 STEP 14 28 LGCL30SSBL ...

Page 25: ...e is on a flat and level surface before starting to cook 1 On this model the Gas bottle should always be positioned to the left of the BBQ NEVER on the Base Shelf 2 Side Gas hose should be connected using a spanner see hose regulator instructions with this item LGCL30SSBL ...

Page 26: ...Page 26 LGCL30SSBL ...

Page 27: ...SE KEEP THESE INSTRUCTIONS FOR FUTURE REFERENCE Leisuregrow Products Ltd Dewmead Farm New Inn Road Hinxworth Hertfordshire SG7 5HG United Kingdom Tel 44 0 1462 744500 E mail consumerservice leisuregrow com ...

Reviews: