background image

80

Part lists

Part lists

8

LGE Internal Use Only

Copyright © 2018 - 2020  LG Electronics Inc. All rights reserved.

Only training and service purposes.

Category

Loc No.

LG P/N

Description

Remark

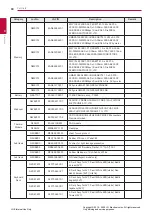
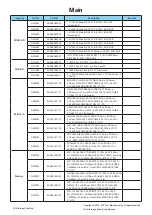
Memory

NMRY01

EAN64666101

M471A5244CB0-CRC 4GBYTE 512M x 64 PC4-

2400 SO-DIMM 69.60 x 30.00mm FBGA BK 260P 

4GB DDR4-2400Mbps 18nm 8Gb C-Die MIRAI 

SEMICONDUCTORS CO.,LTD

NMRY01

EAN64606601

HMA851S6AFR6N-UHN0 4GBYTE 512M x 64 PC4-

2400 SO-DIMM 69.60 x 30.00mm FBGA BK 260P 

4GB DDR4-2400Mbps 20nm 8Gb A-Die SK hynix Inc

NMRY01

EAN65208211

M471A1K43CB1-CTD 8GBYTE 1G x 64 PC4-2666 

SO-DIMM 69.60 x 30.00mm FBGA TRAY 260P 18nm 

8Gb 8GB DDR4-2666 MIRAI SEMICONDUCTORS 

CO.,LTD

NMRY01

EAN64646201

M471A1K43CB1-CRC 8GBYTE 1G x 64 PC4-

2400 SO-DIMM 69.60 x 30.00mm FBGA BK 260P 

8GB DDR4-2400Mbps 18nm 8Gb C-Die MIRAI 

SEMICONDUCTORS CO.,LTD

NMRY01

EAN64666001

HMA81GS6AFR8N-UHN0 8GBYTE 1G x 64 PC4-

2400 SO-DIMM 69.60 x 30.00mm FBGA BK 260P 

8GB DDR4-2400Mbps 20nm 8Gb A-Die  SK hynix Inc

NMRY01

EAN65170011

SK hynix HMA81GS6CJR8N-VKN0 8GB

NMRY01

EAN65170001

SK hynix HMA851S6CJR6N-VKN0 4GB

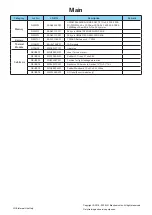
Battery

NBATT01

EAC63738201

15Z980 Battery ass'y - 72Wh

Webcam

NWEBC01

EBP63421707

CKFIH28-1 NONE LICHEN HD CMOS 1Mic CHICONY 

ELECTRONICS CO., LTD

NWEBC01

EBP63421703

CKFIH2821005290LH NONE CHICONY HD CMOS 

2Mic CHICONY ELECTRONICS CO., LTD

NWEBC01

EBP63421704

7BF109N2B NONE LICHEN HD CMOS 2Mic Luxshare 

Precision Limited

Thermal 

Module

NFAN01

EAL62100801

FAN module

NFAN02

MED64571101

Heat pipe

 Sub Items

NRUBB01

MCQ68404301

sheet for ssd protect

NRUBB02

MCQ70604501

Rubber LCD conn, 27x6x2.8t

NRUBB03

MHK66387601

Cushion for light leakage prevention

NRUBB04

MDS66250601

Gasket on Wifi module, Gasket, 12*5(+5)*1.6t

NRUBB05

MCQ68894601

Rubber Mainboard, 10x4.5x4.6t, White

 Sub Items

NRUBB06

MEZ63960601

S/N label(Export model only)

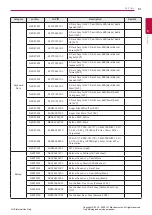
Keyboard 

Deck

NKDECK01

AFP75465301

K-Deck Assy for SVC, Pearl White, KBD(white) Baklit, 

Korean (SVC)

NKDECK01

AFP75465321

K-Deck Assy for SVC, Pearl White, KBD(white) Non 

Baklit, Korean (SVC) (LiteOn)

NKDECK01

AFP75426101

K-Deck Assy for SVC, Pearl White, KBD(white) Baklit, 

English (SVC)

NKDECK01

AFP75505001

K-Deck Assy for SVC, Pearl White, KBD(white) Baklit, 

Japanese (SVC)

NKDECK01

AFP75665101

K-Deck Assy for SVC, Pearl White, KBD(white) Baklit, 

Taiwan (SVC)

Summary of Contents for 15Z990 Series

Page 1: ...BITED unless you have obtained the prior written consent of the LG Electronics entity from which you received this Service Manual The material covered by this prohibition includes without limitation any text graphics or logos in this Service Manual REV 01 Retention period until 2022 11 15Z990 Series 2020 03 30 Copyright 2018 2020 LG Electronics Inc All rights reserved Only training and service pur...

Page 2: ...rmation and BIOS 12 Product Specifications 14 System Block Diagram 15 Using Hot Keys 16 Operation Status Lamps 17 BIOS Flash 19 Check Secure Boot 20 BIOS Setup 4 System Recovery 30 Recovering from a Boot Failure 5 Using the New Functions 32 LG Control Center 33 Fingerprint Recognition 40 Dual Storage When Mounting SSD NVMe Hard disk additionally 44 Type C Charging Function 6 Malfunction Diagnosis ...

Page 3: ...lacing a part make sure to use the correct one for the model When replacing a part you have to check whether the system mode and FRU s part number is the same as the part number in the part FRU list After it malfunctions once if you cannot reproduce it you should not replace the part Due to the radiation in nature discharging effects or software errors which are not deemed to be a hardware issue i...

Page 4: ...r excessive force NOTE Common Safety Rules Item Safety Rules After replacing a part do not turn on the power but first check whether every screw spring and other small parts are in the right place and whether they go loose inside the PC You can check it by shaking the PC If you hear some sounds it is not normal Metallic parts or pieces can cause electrical shocks If LCD is broken and leaking liqui...

Page 5: ... is in a dangerous positions When the system is operating place the disassembled cover and parts away from the reach of other persons Do not place the tool box near persons so that others do not fall over it Do not wear loose outfits that can get stuck in the operating machine Tie up your sleeves or lift it above your elbow Tie your long hair Insert the tip of your necktie or scarp into your cloth...

Page 6: ... tester reader and additional devices To protect yourself against metallic floor or machine devices groundings you must stand on a proper type of rubber mat For safe works periodically inspect and repair electrical tools that you use with hands Take the special safety prevention measures when working with high voltage The items are related to safety cautions for repair and maintenance Be extra car...

Page 7: ... for damages to the external cover Loose or broken or sharp edges Turn off the PC And remove the power cord Inspect the power cord Ʃ Ʃ 3 wire ground connector status using a tester check if the resistance between the external contact pin of the 3 wire ground connector and the system ground is below 0 1Ω Ʃ Ʃ Use the type of power cord that is listed in the part list Ʃ Ʃ Make sure that the insulatio...

Page 8: ...he ground you can ensure the safety of worker and also guarantee that the system operates properly The ground for the electrical outlet should be checked by approved electrical technicians Cautionary Items for Batteries Laptop Tablet Items Cautions The backup battery RTC Battery contains a slight amount of lithium and manganese Do not disassemble recharge the backup battery or throw it in the wate...

Page 9: ... the data and software on the drive CAUTION Cautionary Items for Optical Devices CD DVD ROM and etc When performing repair and maintenance on optical devices such as CD DVD ROM pay attention to the following If you disassemble the CD DVD ROM drive you can be exposed to harmful laser radiations There are no replacement parts for those in the CD DVD drive so do not disassemble it on your own If you ...

Page 10: ...nal Use Only Copyright 2018 2020 LG Electronics Inc All rights reserved Only training and service purposes Names of Parts Front 1 Webcam Operation Status Lamp 2 Webcam 3 Built in Microphone 4 Keyboard 5 Touchpad 6 Power button Fingerprint Sensor ...

Page 11: ...rt may differ depending on the type of storage device NVMe SSD HDD etc in the system and the connected USB device Thunderbolt connection may not be supported in some models Depending on the specifications of the device connected to the USB C port it acts as a USB 3 1 or Thunderbolt port The USB C port provides Quick Charging and Always On Charging functions for devices that support USB PD Power De...

Page 12: ...s on the system memory size System Memory DDR4 SODIMM The maximum capacity of the main board is 16 GB Memory of 3 GB or more is supported only in a 64 bit O S Memory size may differ depending on the model The user must not arbitrarily replace the memory Storage Device M 2 SSD or NVMe 2280 Storage device format and capacity may differ depending on the model Bluetooth Bluetooth 5 0 If you connect to...

Page 13: ...rved Only training and service purposes LAN 10 100 Megabit or Gigabit To use a wired LAN you need to have a LAN adapter installed separately The performance of the provided adapter depends on the model It may not be available depending on the model Product Weight Approx 1099 g battery included The weight may differ depending on the model ...

Page 14: ...14 System Information and BIOS System Information and BIOS 3 LGE Internal Use Only Copyright 2018 2020 LG Electronics Inc All rights reserved Only training and service purposes System Block Diagram ...

Page 15: ...when an external USB mouse is inserted press the button and disable Turn on touchpad when a mouse is connected under Settings Device Touchpad Every time you press Fn F5 the mode switches between Touchpad Off and Touchpad Auto Since it takes about 1 to 2 seconds to initialize after switching to the touchpad function we recommend you to use the device after initialization is completed TIP Fn F6 Airp...

Page 16: ...nition system On The system is on and running by the AC adapter or battery Off When the system is turned off or in Hibernate mode Blinking The system is in the standby mode 3 Power lamp a model without fingerprint recognition system On The system is on and running by the AC adapter or battery Off When the system is turned off or in Hibernate mode Blinking The system is in the standby mode 4 Caps L...

Page 17: ...Boot Menu switch the USB device to the highest booting priority or press the F10 key when the LG logo is displayed to retrieve the Boot Menu and select the device to use next time Flash sequence is as follows 1 Prepare a USB memory that can boot as an EFI shell 2 After decompressing the BIOS Flash files copy them to the USB device 3 Connect a USB memory to the USB port for the system to flash 4 In...

Page 18: ...G Electronics Inc All rights reserved Only training and service purposes 10 Press the F2 key to enter the setup menu and check if the BIOS update is performed In addition check the KBC version as well 11 In the Exit menu select Load Setup Defaults or press the F9 key to retrieve the initial BIOS settings ...

Page 19: ...IOS Setup menu and select the Security menu and move to Secure Boot Configuration 2 At the top of the screen check whether all of UEFI Secure Boot and Protected Signatures are enabled 3 UEFI Secure Boot Disabled Protected Signatures If disabled switch the Secure Boot Option to Enable 4 UEFI Secure Boot Disabled Protected Signatures If disabled run the Reset to Default option Warning message Yes an...

Page 20: ...n be checked during system booting A user can set the functions to change the environment settings for the laptop to change the hardware installed on it or to save the electrical power Setup execution is required in the following cases When you change in the setup needed for the user In case of system composition errors in the system When you change the boot sequence When you set and change the pa...

Page 21: ...can check the basic information of the system and change the system time and date Advanced Corresponds to environment setting necessary for using the peripherals You can select to enable or disable the Legacy USB USB keyboard mouse included Security You can set the supervisor and user passwords and secured boot options Boot Specify on which driver you will first start searching for the operating s...

Page 22: ...em Date Using the System Date F5 F6 keys you can change the system date System Time Using the System Time F5 F6 keys you can change the system time System Information Indicates system information Ʃ Ʃ Product Name Ʃ Ʃ BIOS Version Ʃ Ʃ Build Time Ʃ Ʃ SMBIOS Version Ʃ Ʃ KBC Version Ʃ Ʃ Serial Number Ʃ Ʃ UUID Number Ʃ Ʃ Processor Type Ʃ Ʃ Processor Speed Ʃ Ʃ System Memory Speed Ʃ Ʃ Total Memory ...

Page 23: ...ed Menu USB Legacy Support Set whether or not to support the USB Legacy UEFI Boot If you disable this Windows 8 cannot use it Legacy OS Boot Set whether to use an existing OS rather than EFI Extensible Firmware Interface RTC Wakeup from S4 Valid Only for ACPI Controls the value for the RTC S4 flag in the FACP table SW Guard Extensions Enable disable application security enhancements ...

Page 24: ... Security Menu Secure Boot Configuration Secure Boot Configuration Settings Set Supervisor Password Set Supervisor Password Set User Password Set User Password Password on boot Set whether or not to use the Password on boot Set SSD User Password Set up a Password on the device Current seleted TPM Device Choose current on board TPM device TPM Configuration Set the TPM function ...

Page 25: ... Only training and service purposes Boot Menu Boot Priority Order After moving to the drive with the booting disc by using the Boot Priority Order directional key press the F5 key to move up the device drive and press the F6 key to move down the device disk By moving the device drive up or down you can change the priority for system booting ...

Page 26: ...anges Select Exit Discarding Changes to discard new setup information If you made changes to items other than date time and passwords the Setup Warning asks you to save the new configurations Select Yes and press Enter to save the new configuration Load Setup Defaults Select Load Setup Defaults to change the setup information to the factory default settings If you select Load Setup Defaults or pre...

Page 27: ... s recovery function to recover or restore the system to its initial pre purchase state If you have deleted the restoration data in the protected area of the disk or have arbitrarily installed another operating system the Restore function may not work To recover the system the AC adapter must be connected CAUTION 1 Click the button and select the Settings menu 2 When the Settings screen appears se...

Page 28: ...e Reset this PC menu 4 If the following screen appears select a desired option to proceed with recovery Keep my files Recovers the PC without losing any personal files PC settings are reset to default and any user installed Desktop app will be deleted Remove everything Removes all items from the system and restores the system to its initial pre purchase state 1 When the following screen appears se...

Page 29: ...u want to proceed with the recovery Just remove my files Factory resets the drive where Windows is installed for example Drive C Remove files and clean the drive Resets all partitions and drives in the system All data is lost during the initialization so you must backup all critical data in advance It may take about 5 hours or longer depending on the system conditions CAUTION ...

Page 30: ...he system using LG Recovery Center RE If you have deleted the restoration data in the protected area of the hard disk or have arbitrarily installed another operating system the Restore function may not work CAUTION Using LG Recovery Center RE All data may be lost when the factory reset is performed so you must backup all critical data in advance CAUTION 1 Turn on the PC and press F11 2 When the fo...

Page 31: ...Electronics Inc All rights reserved Only training and service purposes 3 When the following screen appears select the I Agree button and click the Next button 4 When the factory reset has been completed as shown in the following figure click the Complete button and restart the system ...

Page 32: ... Using the New Functions LG Control Center The screen color can be set to cold with a bluish tint or warm with a reddish tint 1 Select LG Software and run LG Control Center 2 Select System Settings Color Temperature to set the color temperature Cold 4 levels Warm 4 levels When in Reader Mode On the color temperature is set to reflect the color of the Reader Mode NOTE ...

Page 33: ...t You can register your fingerprint through Windows Hello and use it for login For normal operation of the fingerprint recognition function it is recommended that you use Windows 10 RS3 or higher NOTE When Logged on Using Your Windows Live ID Step 1 Set your PIN 1 Press the button and select the Settings menu 2 When the Settings screen appears select Account Sign in options 3 Press the Add button ...

Page 34: ...Press the button and select the Settings menu 2 When the Settings screen appears select Account Sign in options 3 Press the Set up button in Windows Hello Fingerprint to register your fingerprint 4 Register your fingerprint as shown in the figure below You can register up to 10 fingerprints but registering more than 10 will reset the registration and you will have to register your fingerprint agai...

Page 35: ...D Step 1 Set your password 1 Press the button and select the Settings menu 2 When the Settings screen appears select Account Sign in options 3 Press the Add button under the Password menu to set the password Step 2 Set your PIN 1 Press the button and select the Settings menu 2 When the Settings screen appears select Account Sign in options 3 Press the Add button under the PIN menu to set the passw...

Page 36: ...Press the button and select the Settings menu 2 When the Settings screen appears select Account Sign in options 3 Press the Set up button in Windows Hello Fingerprint to register your fingerprint 4 Register your fingerprint as shown in the figure below You can register up to 10 fingerprints but registering more than 10 will reset the registration and you will have to register your fingerprint agai...

Page 37: ...dows Login You can log in using your registered fingerprint without entering a password To sign in scan your finger on the fingerprint reader Sige in options 2 One Touch Login currently only supported on LG gram You can simultaneously turn on the PC and log in to Windows using the registered fingerprint The One Touch login function is currently only available on LG gram models NOTE 1PXFS 0O 8JOEPX...

Page 38: ...in options One Touch Anti accident One Touch When the PC is turned off or is in sleep mode you can automatically log in to Windows by pressing the power button fingerprint recognition User s fingerprint must be registered on the PC to use this function NOTE 1 When you get a message saying Couldn t recognize that fingerprint Make sure you ve set up your fingerprint in Windows Hello The message can ...

Page 39: ...fingerprint must be registered on the PC to use this function NOTE 1 It prevents unintended power button operation during fingerprint registration or when using touch at login screen Anti accident function prevents the PC from turning off but the power button may be activated at times It is recommended that you lightly touch the fingerprint recognition device when using fingerprint recognition If ...

Page 40: ...tronics Inc All rights reserved Only training and service purposes Dual Storage When Mounting SSD NVMe Hard disk additionally Disk Formatting as a Disk Manager 1 Right click with the mouse button on the button Run Disk Management Select Mounted Disk 2 Right click with your mouse Select New Simple Volume ...

Page 41: ...nstalled F11 Recovery will not operate In case of F11 Recovery one recovery partition is searched for so if you set it to two it will not operate You are recommended to first reset the added disk as shown in the figure and use it after that Creating a New Pool and Storage Space RAID Response In Windows the storage space management function provides the function equivalent to the RAID function whic...

Page 42: ...Functions 5 LGE Internal Use Only Copyright 2018 2020 LG Electronics Inc All rights reserved Only training and service purposes 2 Proceed to configure the drive with the newly installed disk 3 After selecting a restoration type you can proceed ...

Page 43: ...tion for each restoration type 1 Simple no restoration RAID 0 Simple volume with no restoration 2 Two way mirror Corresponds to RAID 1 Provides the restoration function Needs two sets of physical disks 3 Three way mirror Complex composition of RAID 0 5 Needs at least five drives 4 Parity Corresponds to RAID 5 You can set the capacity to higher than the available disk space ...

Page 44: ... the input of 5V 3A or less or 9V 2A or less by connecting it to the port It only applies when the device to be charged supports the USB Power Delivery standard NOTE Sink Sink You can use the Sink function to charge LG gram through the Type C port Sink Specifications The function supports inputs of 5V 2A or more 9V 1 6A or more 12V 1 25A or more 15V 1A or more 19V 0 78A or more and 20V 0 75A or mo...

Page 45: ...n the system you should reset the system as follows 1 Connect the AC adapter 2 Long press the power button for more than 4 seconds to forcefully shut it down 3 Check if the system restarts successfully If the product such as laptop has a battery in it refix the battery and check if the problem is gone Refix the battery according to the following instructions CAUTION 1 Disconnect the AC adapter and...

Page 46: ...y condition 1 In Setting System Battery check the remaining battery level If the remaining battery level is more than 95 charging may fail If you want to reach 100 discharge it until below 95 and start charging again You can reach 100 The function is used to prevent over charging or lifetime reduction of battery 2 To check the battery condition move the cursor to the battery icon in the Windows ta...

Page 47: ...s incorrectly displayed or a yellow bang mark is displayed reinstall the driver 3 If the audio device is not accurately displayed after reinstalling the driver replace the system board Check Communication Module If the wireless communication has a problem go to Device Manager Network Adapter and check the wireless module WIFI BT information When the wireless module WIFI BT is not visible 1 Right c...

Page 48: ... displayed are low as well while near the AP check the antenna cable connection 6 If the problem continues after checking the antenna cable connection reinstall the module If the problem continues even after reinstallation replace the module 7 If the displayed RSSI and connection speed are normal check the frequency environment 8 If the frequency environment is poor or cannot be checked connect vi...

Page 49: ...F TUBUVT JO r FWJDF BOBHFSs PEVMF OPSNBM SFDPHOJUJPO 1FSJQIFSBM OGMVFODF POOFDU CZ 1 4QFFE OPSNBM FMMPX BOH 4ZNQUPN IFDL GPS BOE JOTUBMM UIF MBUFTU ESJWFST POGJSN QSPCMFN SFQSPEVDUJPOT XJUI PUIFS WFOEPS QSPEVDUT IBOHF CBOE DPOOFDUJPO PS GSFRVFODZ DIBOOFM 3FQMBDJOH UIF BOUFOOB DBCMFT IFDL QFSGPSNBODF BGUFS DPOOFDUJOH BEBQUFS IFDL QFSGPSNBODF PO PUIFS 1 3FQMBDF 4VC CPBSE MJDL 4DBO GPS IBSEXBSF DIBOH...

Page 50: ...tandby mode or max power saving mode Check it in Control Panel Hardware and Sounds Power Option System Setting LCD Backlight does not operate LCD is too dark LCD brightness cannot be adjusted a LCD assembly b System board For all in one products check the following items additionally a Check if the BLU cable is connected properly b Check if the JOG cable is connected properly c JOG board d MNT or ...

Page 51: ...e PC See Power System Check to see if the power supply used during malfunction is operating properly 1 Turn off the PC 2 Visually check for damages If there is a problem replace the faulty parts 3 Disassemble or remove all the following devices Other company s devices Printer monitor mouse and other external devices Storage device drive The memory is needed for system operation so replace it with ...

Page 52: ...parate the AC adapter from the PC and remove all the connected cables Before turning on the PC again after replacing the part check if screws springs and other small parts are in the correct positions on the PC Shake the PC and see if it makes noises Metallic parts or pieces can cause a short circuit to damage the system CAUTION Torque of 2 0 0 2kgf Cm applies when screwing on each part For furthe...

Page 53: ... Replacement Part Disassembly and Replacement 7 LGE Internal Use Only Copyright 2018 2020 LG Electronics Inc All rights reserved Only training and service purposes 1010 Bottom Case 1 Remove the 5 rubbers after 3 screw sheets ...

Page 54: ...pyright 2018 2020 LG Electronics Inc All rights reserved Only training and service purposes 2 Remove the 8 screws 1 1 1 1 1 2 2 2 No FRU No Specification Qty 1 FAB33419401 Screw M2 0 x L5 0 x D4 8 x H0 6 Silver 5 EA 2 FAB31738902 Screw M2 0 x L3 5 x D4 8 x H0 6 Black 3 EA 3 Remove the Bottom Case ...

Page 55: ...ctronics Inc All rights reserved Only training and service purposes 1020 Battery Remove the following parts in order before replacing this part a Bottom Case 1010 NOTE 1 Disconnect the 1 cable after removing the 6 screws Cable No FRU No Specification Qty 1 FAB34738801 SCREW M2 2 5L K W NI 1 NY 6 EA 2 Remove the Battery ...

Page 56: ...020 LG Electronics Inc All rights reserved Only training and service purposes 1030 SSD Remove the following parts in order before replacing this part a Bottom Case 1010 b Battery 1020 NOTE 1 Remove the 2 screw No FRU No Specification Qty 1 FAB31882801 Screw M2 0 x L2 0 x D5 8 x H0 4 Black 2 EA 2 Remove the SSD ...

Page 57: ...D the same performance is supported in either slot For NVMe SSD J6 supports PCIe x4 lane full specifications and J7 supports PCIe x2 lane half specifications Therefore it must be connected to J6 for full performance When it is installed on J7 only half the performance is theoretically supported For optimal performance when using both SATA SSD and NVMe SSD you should install NVMe SSD on J6 and SATA...

Page 58: ...ternal Use Only Copyright 2018 2020 LG Electronics Inc All rights reserved Only training and service purposes 1040 Memory Remove the following parts in order before replacing this part a Bottom Case 1010 b Battery 1020 NOTE 1 Disconnect the 2 hooks Hook Hook 2 Remove the Memory ...

Page 59: ...rnal Use Only Copyright 2018 2020 LG Electronics Inc All rights reserved Only training and service purposes 1050 Speaker Remove the following parts in order before replacing this part a Bottom Case 1010 b Battery 1020 NOTE 1 Disconnect the 2 cables Cable Cable 2 Remove the Speaker ...

Page 60: ...ice purposes 1060 FAN Heat Sink Remove the following parts in order before replacing this part a Bottom Case 1010 b Battery 1020 NOTE 1 Disconnect the 1 cable after removing the 6 screws Cable 1 1 1 2 2 2 No FRU No Specification Qty 1 FAB31738904 Screw M2 0 x L3 5 x D4 8 x H0 6 Silver 3 EA 2 1SZZBZ3009J Screw M2 0 x L2 5 x D4 0 x H 1 0 Green 3 EA 2 Remove the FAN Heat Sink ...

Page 61: ...61 Part Disassembly and Replacement Part Disassembly and Replacement 7 LGE Internal Use Only Copyright 2018 2020 LG Electronics Inc All rights reserved Only training and service purposes ...

Page 62: ... purposes 1070 Mainboard Remove the following parts in order before replacing this part a Bottom Case 1010 b Battery 1020 c SSD 1030 d Memory 1040 e Speaker 1050 f FAN Heat Sink 1060 NOTE 1 Disconnect the 5 cables after removing the 6 screws Cable Cable Cable Cable Cable No FRU No Specification Qty 1 1SZZBZ3009J Screw M2 0 x L2 5 x D4 0 x H1 0 Green 6 EA 2 Remove the Mainboard ...

Page 63: ... Only training and service purposes 1080 Sub Board Cable Remove the following parts in order before replacing this part a Bottom Case 1010 b Battery 1020 c Speaker 1050 NOTE 1 Disconnect the 3 cables after removing the 2screws Cable Cable No FRU No Specification Qty 1 1SZZBZ3009J Screw M2 0 x L2 5 x D4 0 x H1 0 Green 2 EA 2 Remove the Sub Board Cable ...

Page 64: ...Only Copyright 2018 2020 LG Electronics Inc All rights reserved Only training and service purposes If the gasket shown below is not attached the wireless performance will be degraded If you need to attach a gasket be sure to attach it carefully See attachment position below Gasket CAUTION ...

Page 65: ...0 LG Electronics Inc All rights reserved Only training and service purposes 1090 Finger Print Button Remove the following parts in order before replacing this part a Bottom Case 1010 b Battery 1020 c Speaker 1050 d Sub Board Cable 1080 NOTE 1 Disconnect the 1 cables Cable Option 2 Remove the Finger Print Button ...

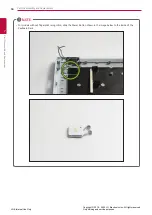
Page 66: ...eplacement 7 LGE Internal Use Only Copyright 2018 2020 LG Electronics Inc All rights reserved Only training and service purposes For models without fingerprint recognition slide the Power Button shown in the image below to the inside of the Keyboard Deck NOTE ...

Page 67: ...Use Only Copyright 2018 2020 LG Electronics Inc All rights reserved Only training and service purposes 1100 Touch Pad Cable Remove the following parts in order before replacing this part a Bottom Case 1010 b Battery 1020 NOTE 1 Disconnect the 1 cable Cable 2 Remove the Touch Pad Cable ...

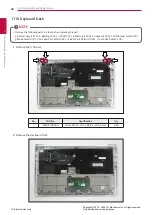
Page 68: ...oard Deck Remove the following parts in order before replacing this part a Bottom Case 1010 b Battery 1020 c SSD 1030 d Memory 1040 e Speaker 1050 f FAN Heat Sink 1060 g Mainboard 1070 h Sub Board Cable 1080 i Finger Print Button 1090 j Touch Pad Cable 1100 NOTE 1 Remove the 4 Screws No FRU No Specification Qty 1 FAB31738904 Screw M2 0 x L3 5 x D4 8 x H0 6 Silver 4 EA 2 Remove the Keyboard Deck ...

Page 69: ...0 k Keyboard Deck 1110 NOTE 1 Separate the front and rear hooks from the front case When detaching the front case be careful of the two parts of the hooks marked with spot colors Pushing the side of the front case inwards will release the hook easily If you attach too much force to the front case there is a risk of damage After removing the side hook please remove the top NOTE Tape Tape Hook Hook ...

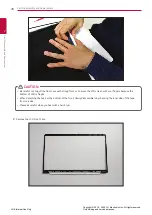
Page 70: ...nd service purposes Be careful not to pull the front case with strong force or to press the LCD screen with your fingers because the bottom of LCD is fragile When detaching the hook at the bottom of the front slowly disassemble it by checking the inner side of the tape from one side Please be careful when you heat with a hair dryer CAUTION 2 Remove the LCD Front Case ...

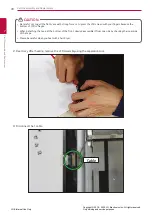
Page 71: ...this part a Bottom Case 1010 b Battery 1020 c SSD 1030 d Memory 1040 e Speaker 1050 f FAN Heat Sink 1060 g Mainboard 1070 h Sub Board Cable 1080 i Finger Print Button 1090 j Touch Pad Cable 1100 k Keyboard Deck 1110 l LCD Front Case 1120 NOTE 1 Use the hair dryer on the rear side of the Rear Ass y to heat the attachment area of the 4 sided Tape Tape Tape Tape Tape When detaching LCD Assembly Tape ...

Page 72: ...ll the front case with strong force or to press the LCD screen with your fingers because the bottom of LCD is fragile When detaching the hook at the bottom of the front slowly disassemble it from one side by checking the inner side of the tape Please be careful when you heat with a hair dryer CAUTION 2 Rear Ass y After heating remove the LCD Assembly using the separation tool 3 Disconnect the 1 ca...

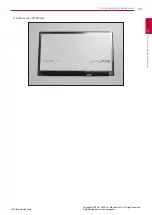
Page 73: ...art Disassembly and Replacement Part Disassembly and Replacement 7 LGE Internal Use Only Copyright 2018 2020 LG Electronics Inc All rights reserved Only training and service purposes 4 Remove the LCD Module ...

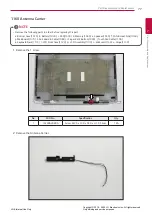
Page 74: ...m Remove the following parts in order before replacing this part a Bottom Case 1010 b Battery 1020 c SSD 1030 d Memory 1040 e Speaker 1050 f FAN Heat Sink 1060 g Mainboard 1070 h Sub Board Cable 1080 i Finger Print Button 1090 j Touch Pad Cable 1100 k Keyboard Deck 1110 l LCD Front Case 1120 m LCD Assembly 1130 NOTE 1 Disconnect the 1 cable Cable 2 Use the decomposition tool to remove the webcam ...

Page 75: ...75 Part Disassembly and Replacement Part Disassembly and Replacement 7 LGE Internal Use Only Copyright 2018 2020 LG Electronics Inc All rights reserved Only training and service purposes ...

Page 76: ...r before replacing this part a Bottom Case 1010 b Battery 1020 c SSD 1030 d Memory 1040 e Speaker 1050 f FAN Heat Sink 1060 g Mainboard 1070 h Sub Board Cable 1080 i Finger Print Button 1090 j Touch Pad Cable 1100 k Keyboard Deck 1110 l LCD Front Case 1120 m LCD Assembly 1130 n Webcam 1140 NOTE 1 Remove the 6 screws and remove the hinge LCD cable No FRU No Specification Qty 1 1SZZBA4080A Screw M2 ...

Page 77: ...r before replacing this part a Bottom Case 1010 b Battery 1020 c SSD 1030 d Memory 1040 e Speaker 1050 f FAN Heat Sink 1060 g Mainboard 1070 h Sub Board Cable 1080 i Finger Print Button 1090 j Touch Pad Cable 1100 k Keyboard Deck 1110 l LCD Front Case 1120 m LCD Assembly 1130 n Webcam 1140 o Hinge 1150 NOTE 1 Remove the 1 screw No FRU No Specification Qty 1 1SZZBA4080A Screw M2 0 x L4 0 x D4 0 x H...

Page 78: ...78 Part Disassembly and Replacement Part Disassembly and Replacement 7 LGE Internal Use Only Copyright 2018 2020 LG Electronics Inc All rights reserved Only training and service purposes ...

Page 79: ...512HAJQ 000 512GB 22 0mm x 80 0mm x 2 38mm SATA3 M 2 540 520 MB s 64L 3D 3bit MLC 3 3V MIRAI SEMICONDUCTORS CO LTD NMINI01 EAZ62921131 HFS512G39TNF N3A0A 512GBYTE 22 00mm x 80 00mm x 2 23mm SATA III M 2 2280 560 520 MB s 3D 48L TLC 3 3V SK hynix Inc NMINI01 EAZ63201102 MZNLN256HAJQ 000 256GB 22 0mm x 80 0mm x 2 38mm SATA3 M 2 540 520 MB s 64L 3D 3bit MLC 3 3V MIRAI SEMICONDUCTORS CO LTD NMINI01 EA...

Page 80: ... NMRY01 EAN65170001 SK hynix HMA851S6CJR6N VKN0 4GB Battery NBATT01 EAC63738201 15Z980 Battery ass y 72Wh Webcam NWEBC01 EBP63421707 CKFIH28 1 NONE LICHEN HD CMOS 1Mic CHICONY ELECTRONICS CO LTD NWEBC01 EBP63421703 CKFIH2821005290LH NONE CHICONY HD CMOS 2Mic CHICONY ELECTRONICS CO LTD NWEBC01 EBP63421704 7BF109N2B NONE LICHEN HD CMOS 2Mic Luxshare Precision Limited Thermal Module NFAN01 EAL6210080...

Page 81: ... SVC NKDECK01 AFP75725002 K Deck Assy for SVC Dark Silver KBD Black Baklit Portuguese SVC NKDECK01 AFP75725402 K Deck Assy for SVC Dark Silver KBD Black Baklit UK SVC NKDECK02 EBD63285704 Finger Print White For Z990 NKDECK02 EBD63285705 Finger Print Black For Z990 NKDECK02 MBG66762901 Button PWR White NKDECK02 MBG66762902 Button PWR Black NKDECK03 EAB64928410 P46 761777 P46 761777 LG ELECTRONICS 1...

Page 82: ...CD02 ABQ76323302 Front Case Assy Dark Silver NLCD03 EAJ64352201 15Z980 15 6 LCD Non AIT NLCD03 EAJ64449201 15Z980 15 6 LCD AIT NLCD04 EAD64490301 15Z980 LCD cable Ass y TY3C Non AIT NLCD04 EAD64490302 15Z980 LCD cable Ass y MEC Non AIT NLCD04 EAD64548301 15Z980 LCD cable Ass y TY3C AIT NLCD04 EAD64548302 15Z980 LCD cable Ass y MEC AIT NLCD05 AEH75356701 Hinge R 15Z970 Normal NLCD05 AEH75316701 Hin...

Page 83: ...de White Color Straight Body and Angle Type DC Plug 3pi 1 1pi NADT02 EAY65249101 ADS 48MS 19 2 19048E B 100 240V 19V 2 53A 50 60Hz WW INLET 2P DC PIN PLUG World Wide Black Color Straight Body and Angle Type DC Plug 3pi 1 1pi NADT03 EAD63769504 80 5946 111 MODULAR JACK USB Type C 10 100 0 115M 8p 6p WHITE AWG28 N MEC IMEX INC NADT03 EAD64185903 GD 08MF 36 WH LP10 MODULAR JACK USB Type C 10 100 0 15...

Page 84: ...th Gen for all color NLAB04 MEZ67333103 i7 CPU 8th Gen for all color NLAB04 MEZ67488601 COMPLEX CPU Label All model Pentium Gold size3 336144 001 NLAB05 MEZ67511801 All Day Battery Label for Z980 NLAB06 MEZ67029201 Thunderbolt label NLAB06 MEZ67029202 Thunderbolt Logo Label Black NLAB07 MEZ67353601 Win 10 Pro Win 10 Pro Sku only Z980 New NLAB10 MEZ68447001 ID Label Japan NLAB10 MEZ68447401 ID Labe...

Page 85: ...NLCD02 NLCD06 NLCD05 NLCD01 NLCD03 NLCD04 NWEBC01 LGE Internal Use Only Copyright 2018 2020 LG Electronics Inc All rights reserved Only training and service purposes ...

Page 86: ...r Assy Silver Improved product NLCD01 ABQ76401802 Case Rear Ass y Dark Silver NLCD02 ABQ76323301 Front Case Assy Pearl White NLCD02 ABQ76323302 Front Case Assy Dark Silver NLCD03 EAJ64352201 15Z980 15 6 LCD Non AIT NLCD03 EAJ64449201 15Z980 15 6 LCD AIT NLCD04 EAD64490301 15Z980 LCD cable Ass y TY3C Non AIT NLCD04 EAD64490302 15Z980 LCD cable Ass y MEC Non AIT NLCD04 EAD64548301 15Z980 LCD cable A...

Page 87: ...NKDECK01 NKDECK03 NKDECK02 NKDECK05 NKDECK04 LGE Internal Use Only Copyright 2018 2020 LG Electronics Inc All rights reserved Only training and service purposes ...

Page 88: ...Silver KBD black Backlit Korean SVC NKDECK01 AFP75426102 K Deck Assy for SVC Dark Silver KBD black Backlit English SVC NKDECK01 AFP75505002 K Deck Assy for SVC Dark Silver KBD black Backlit Japanese SVC NKDECK01 AFP75665102 K Deck Assy for SVC Dark Silver KBD black Backlit Taiwan SVC NKDECK01 AFP75605102 K Deck Assy for SVC Dark Silver KBD black Backlit Span ish SVC NKDECK01 AFP75645302 K Deck Ass...

Page 89: ...E Internal Use Only NBATT01 NSUB02 NFAN01 NMRY01 NMLB01 NSUB01 NMINI01 NFAN02 NRUBB04 NRUBB05 NRUBB03 NRUBB02 Copyright 2018 2020 LG Electronics Inc All rights reserved Only training and service purposes ...

Page 90: ... M 2 540 520 MB s 64L 3D 3bit MLC 3 3V MIRAI SEMICONDUCTORS CO LTD NMINI01 EAZ62921121 HFS256G39TNF N3A0A 256GBYTE 22 00mm x 80 00mm x 2 23mm SATA III M 2 2280 560 520 MB s 3D 48L TLC 3 3V SK hynix Inc NMINI01 EAZ63201101 MZNLN128HAHQ 000 128GB 22 0mm x 80 0mm x 2 38mm SATA3 M 2 540 500 MB s 64L 3D 3bit MLC 3 3V SAMSUNG ELECTRONIC CO LTD NMINI01 EAZ63261102 MZVLB512HAJQ 00000 512GB 22 0mm x 80 0mm...

Page 91: ... hynix HMA81GS6CJR8N VKN0 8GB NMRY01 EAN65170001 SK hynix HMA851S6CJR6N VKN0 4GB Battery NBATT01 EAC63738201 15Z980 Battery ass y 72Wh Thermal Module NFAN01 EAL62100801 FAN module NFAN02 MED64571101 Heat pipe Sub Items NRUBB01 MCQ68404301 sheet for ssd protect NRUBB02 MCQ70604501 Rubber LCD conn 27x6x2 8t NRUBB03 MHK66387601 Cushion for light leakage prevention NRUBB04 MDS66250601 Gasket on Wifi m...

Page 92: ...M05 NBOTM03 NKBD03 NBOTM01 LGE Internal Use Only NADT01 NPWCD01 NADT02 NADT03 Lan Gender White EAD63769504 EAD64185903 Lan Gender Black EAD63769505 EAD64185904 Copyright 2018 2020 LG Electronics Inc All rights reserved Only training and service purposes ...

Page 93: ...D01 EAD30754402 1xZ990 14T990 USA Black 2Pin NPWCD01 EAD62565305 1xZ990 China White 2Pin NPWCD01 EAD61856503 1xZ990 China Black 2Pin NPWCD01 EAD62565302 1xZ990 Spain White 2Pin NPWCD01 EAD61856501 1xZ990 Spain Black 2Pin Adapter NADT01 EAY65088601 ADS 48MSP 19 19048EPK W 100 240V 19V 2 53A 50 60Hz KC WALL 2P DC PIN PLUG Korea White Color Straight Body and Angle Type DC Plug 3pi 1 1pi SHENZHEN HONO...

Page 94: ...rew M2 0 x L3 5 x D4 8 x H0 6 Silver LABEL NLAB01 MEZ66725803 Power Reset Label 8X48 6sec NLAB02 MEZ65369602 COMPLEX HDMI Logo Label NT ALL Base Color White Font Color Black NLAB02 MEZ65369601 COMPLEX HDMI Logo Label NT ALL Base Color Black Font Color White NLAB03 MEZ57758001 energy star label for 16 x 16 37mm Blue NLAB03 MEZ65079601 Energy Star NT ALL Black NLAB04 MEZ67333101 i3 CPU 8th Gen for a...

Page 95: ......
Reviews: