background image

COLOR MONITOR
SERVICE MANUAL

CAUTION

BEFORE SERVICING THE UNIT, 
READ THE  SAFETY PRECAUTIONS IN THIS MANUAL.

MENU

SELECT

MODEL: 177V

CHASSIS NO. : CA-109

FACTORY MODEL: CS778G

Summary of Contents for 177V

Page 1: ...COLOR MONITOR SERVICE MANUAL CAUTION BEFORE SERVICING THE UNIT READ THE SAFETY PRECAUTIONS IN THIS MANUAL MENU SELECT MODEL 177V CHASSIS NO CA 109 FACTORY MODEL CS778G ...

Page 2: ...26 7 x 245 5 mm 12 86 x 9 67 Preset Image Size 310 x 230 mm 12 20 x 9 06 4 2 Display Color Full Colors 4 3 Display Resolution 1280 x 1024 60Hz Non Interlace 4 4 Video Bandwidth 110 MHz 5 ENVIRONMENT 5 1 Operating Temperature 15 C 30 C 59 F 86 F Ambient 5 2 Relative Humidity 8 80 Non condensing 5 3 Altitude 5 000 m 6 DIMENSIONS with TILT SWIVEL Width 400 0 mm 15 74 inch Depth 420 0 mm 16 53 inch He...

Page 3: ...sign Soldering must be inspected for the cold solder joints frayed leads damaged insulation solder splashes or the sharp points Be sure to remove all foreign materials IMPLOSION PROTECTION All used display tubes are equipped with an integral implosion protection system but care should be taken to avoid damage and scratching during installation Use only same type display tubes X RADIATION The only ...

Page 4: ...1 179 0 578 0 056 0 503 0 019 800 x 600 85Hz Yes MODE 7 60 023 16 660 13 003 3 657 1 219 2 235 0 203 75 0 13 328 12 795 0 533 0 050 0 466 0 017 1024 x 768 75Hz Yes MODE 8 68 677 14 561 10 836 3 725 1 016 2 201 0 508 84 997 11 765 11 183 0 582 0 044 0 524 0 015 1024 x 768 85Hz Yes MODE 9 63 981 15 630 11 852 3 777 1 037 2 296 0 444 60 02 16 661 16 005 0 657 0 047 0 594 0 016 1280 x 1024 60Hz Yes MO...

Page 5: ...s indicator lights up green when the monitor operates normally in DPMS Energy Saving mode stand by suspend or power off mode its color changes to amber and if abnormal or damaging circuit turns out amber blink 3 Select Button Use this button to enter a selection in the on screen display 4 Button Use these buttons to choose or adjust items in the on screen display 5 MENU Button Use this button to e...

Page 6: ...WIRING DIAGRAM 6 P501 P201 P405 P301 P302 G2 P702 P701 T1 P402 P902 S S Signal Cable AC Socket FBT ...

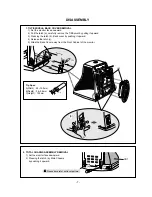
Page 7: ...rd 2 Pull the latch a carefully remove the Tilt Swivel by pulling it upward 3 Pressing the latch b Back cover by pushing it upward 4 Release the latch c 5 Slide the Back Cover away from the Front Cabinet of the monitor 2 TOTAL CHASSIS ASSEMBLY REMOVAL 1 Set the monitor face downward 2 Pressing the latch a Main Chassis by pushing it upward a a CDT Please be careful not to cut pattern ...

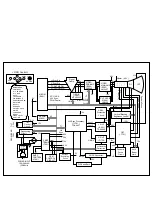
Page 8: ...g V Sync Sig I2C DATA SDA I2C CLOCK SCL VIDEO LM1269 PRE AMP IC302 Signal Cable R G B VIDEO LM2467 LM2480 CUT OFF IC IC304 MAIN AMP IC303 5V 5V H V Sync Processor IC701 TDA4857 V OUT IC601 TDA4866 H OUT Q706 H Linearity Correction DC DC Converter X RAY Protection Circuit FBT T701 Dynamic Focus Circuit Auto Beam Limit Vertical Blanking Brightness Control 160V 40V 400V STEP UP 15V D D Feed Back 15V ...

Page 9: ...or and its associated circuit is as follows 1 H and V sync signal is supplied from the signal cable 2 The Micom IC401 distinguishes polarity and frequency of H and V sync 3 The Micom sets operating mode and offers the controlled data H size H position V size etc 4 The controlled data of each mode is stored in itself 5 User can adjust screen condition by each OSD function The data of the adjusted c...

Page 10: ...periodical display pattern and the CDT s mask The positions of every other one dot video signal beams red green and blue beam are shifted finely thus reducing interference 18 OSD Circuit This circuit is used for performing the OSD On Screen Display function When a user selects the OSD Select Adjustment control the adjustment status displays on the screen 19 Video Pre Amp Circuit This circuit ampli...

Page 11: ... condition 6 DIST ADJ BALANCE command 7 Adjust balance of Pin Balance and Parallelogram correction as arrow keys to be the best condition 8 DIST ADJ FOS ADJ command 9 Adjust H POSITION as arrow keys to center of the screen 10 Adjust H SIZE as arrow keys to 310 2mm 11 Adjust V POSITION as arrow keys to center of the screen 12 Adjust V SIZE as arrow keys to 230 2mm 13 Adjust SPCC Side Pincushion and...

Page 12: ...djustment because it can t be recalled Following is Adjustment Item 1 H V size H V position 2 SHAPE except Tilt 3 Luminance box pattern 70x70mm SCO Sub Contrast 4 Luminance Back Raster SBR Sub Brightness 5 Luminance Full White ABL Auto Beam Limit Adjustment Procedure 1 Power on the monitor 2 First pushing the Down key and then with keeping the condition push the power key A screen of monitor blink...

Page 13: ...IN FUSE F901 TROUBLE IN IC901 TROUBLE IN D941 D942 D951 D961 D962 D971 TROUBLE IN Q903 Q952 Q951 Q942 Q941 CHECK FUSE OK CHECK C908 VOLTAGE AC120V 160VDC AC220V 304VDC NO YES YES YES YES NO NO NO CHECK IC901 PIN 5 WAVEFORM SQUARE WAVE COMES OUT CHECK D941 D942 D951 D961 D962 D971 VOLTAGE ...

Page 14: ... 2 3 CHECK IC303 PIN 4 80V PIN 8 12V TROUBLE IN P302 5V LINE TROUBLE IN PC SIGNAL P301 SIGNAL CABLE TROUBLE IN IC302 TROUBLE IN P302 PIN 15 80V PIN 14 15V TROUBLE IN IC303 NO YES NO NO YES YES YES YES NO NO CHECK R G B CATHODE VOLTAGE TROUBLE IN R341 R343 R331 R333 L311 L313 D307 D312 TROUBLE IN CRT SOCKET YES NO ...

Page 15: ...ECK POWER INDICATOR GREEN or AMBER CHECK D712 ANODE 157V CHECK G1 VOLTAGE 55V 150V TROUBLE IN D712 TROUBLE IN Q799 DPM MODE NO H and or V SYNC AMBER NO GREEN YES NO CHECK CDT HEAT VOLTAGE 6 3V TROUBLE IN D941 Q942 Q941 YES NO TROUBLE IN CDT YES ...

Page 16: ...VERTICAL LINE CHECK Q706 CHECK B VOLTAGE 50V CHECK T701 FBT PIN 2 31KHZ 60V 69KHZ 140V CHECK Q701 COLLECTOR WAVEFORM TROUBLE IN Q706 TROUBLE IN 50V LINE TROUBLE IN Q719 Q720 D710 TROUBLE IN Q701 TROUBLE IN T701 P701 NO NO YES YES YES YES NO NO 0V T ...

Page 17: ...N Q711 Q716 TROUBLE IN L703 TROUBLE IN C722 C723 C726 C729 NO NO NO YES YES YES Cs SIGNAL TABLE HORIZONTAL FREQUENCY fH 30kHz Hf 35kHz 35kHz Hf 39kHz 39kHz Hf 44kHz 44kHz Hf 48zkHz 48kHz Hf 52kHz 52kHz Hf 58kHz 58kHz Hf 62kHz 62kHz Hf 66kHz Cs0 0 0 0 0 0 0 0 0 0 Cs1 0 0 1 1 1 1 1 1 1 Cs2 0 1 0 0 0 1 1 1 1 Cs3 0 0 0 1 1 0 0 1 1 ...

Page 18: ...ECTION ONE HORIZONTAL LINE CHECK IC601 PIN 3 15V CHECK IC601 PIN 7 40V CHECK IC701 PIN 12 13 TROUBLE IN R603 15V LINE TROUBLE IN HIGH VOLTAGE OUT CIRCUIT FBT D721 R606 TROUBLE IN IC701 TROUBLE IN IC601 V CIRCUIT NO NO YES YES YES NO 3V ...

Page 19: ...OUBLE IN IC601 PIN8 V FBP IC701 PIN1 H FBP TROUBLE IN IC302 IC301 TROUBLE IN IC301 IC302 NO YES DC 5V YES YES YES NO NO NO Pin 5 5V Pin 10 5V H V 5V H V CHECK IC301 B 5V CHECK IC301 PIN 12 WAVEFORM ENTER BUTTON MUST BE PRESSED CHECK IC301 PIN 5 10 WAVEFORM CHECK IC301 PIN 13 14 15 ...

Page 20: ...K PC PC IS NOT GOING INTO DPM OFF MODE TROUBLE IN X401 TROUBLE IN IC401 MICOM TROUBLE IN Q941 Q942 Q951 Q952 TROUBLE IN PC OFF MODE FAILURE INPUT H V SYNC SIGNAL H V SYNC NO OFF MODE NO NO NO NO DPMF 0V DPM TABLE Mode Item NORMAL STAND BY SUSPEND OFF DPMF H L L L LED GREEN AMBER AMBER AMBER DPMS H H H L YES YES SEE DPM TABLE YES YES 5V 24MHz ...

Page 21: ...CK Q953 COLLECTOR VOLTAGE CHECK P902 CHECK RL901 TROUBLE IN IC401 MICOM TROUBLE IN Q953 TROUBLE IN P902 TROUBLE IN RL901 TROUBLE IN TH901 DEGAUSSING COIL NO DEGAUSSING DC 15V NO NO NO NO YES YES YES YES DEGAUSS ON THE OSD MENU MUST BE PRESSED ...

Page 22: ...LT NO ROTATION TROUBLE IN IC401 MICOM TROUBLE IN 15V LINE 6 3V LINE TROUBLE IN Q501 Q503 TROUBLE IN P501 TILT COIL D512 NO YES YES YES CHECK 15V LINE AND 6 3V LINE CHECK Q503 COLLECTOR VOLTAGE 15V NO NO CHECK IC401 PIN21 WAVE FORM ...

Page 23: ...EXPLODED VIEW 23 8 B A 2 1 4 3 12 12 13 6 7 5 11 13 10 9 a b c M ENU SELECT ...

Page 24: ...R SA 4S HUA JIE AC UNIVERSAL 3PIN BLACK CABLE D SUB UL 2990 9C 7 5 AT 1560MM GLAY CB777G DM PWB PCB ASSEMBLY SUB CB777G CONTROL TOTAL BRAND CA 109 METAL SHIELD BOTTOM A CKD HOLDER PCB FIX PC ABS BRACKET CB777F SUPPORTER CDT MAIN TOTAL ASSEMBLY CS778G KCFSEA BRAND SKYWAY PWB PCB ASSEMBLY MAIN CS778G KCFSEA BRAND CA 109 TOTAL SCREW DRAWING D3 5 L10 0 MSWR FZMY SW3 5 RW3 5 SCREW ASSEMBLY TAPTITE P TY...

Page 25: ...10K515 100PF 50V K B TR C407 0CK1010K515 100PF 50V K B TR C408 0CK1040K945 0 1UF 50V Z F TR C409 0CC5600K415 56P 50V J NP0 TP C410 0CK1010K515 100PF 50V K B TR C411 0CK1040K945 0 1UF 50V Z F TR C412 0CK1040K945 0 1UF 50V Z F TR C413 0CK1040K945 0 1UF 50V Z F TR C501 0CE106CF638 10UF SHL SD 16V M FM5 TP 5 C599 0CE225CK638 2 2UF SHL SD 50V M FM5 TP 5 C601 0CE477EH618 470UF KMG 25V M FL TP 5 C602 181...

Page 26: ... D402 971 0054 TIN 50MM TAPING D512 0DS141489AB 1N4148 TP GRANDE DO 34 500M D701 0DS141489AB 1N4148 TP GRANDE DO 34 500M D702 0DS141489AB 1N4148 TP GRANDE DO 34 500M D704 0DR150051AA DMV1500M F5 ST SGS THOMSON D705 0DR100009CA RGP10G TP GULF SEMICONDUCTO D706 0DR359150AA BY359F 1500 BK PHILIPS SO D709 0DR400409AB UF4004 TP G I DO204AL 400V D710 0DR320400AA S3L20U 4004P15 BK SHINDENGE D711 0DS14148...

Page 27: ...TA1270 Y KTA562TM TP KEC Q709 0TR141300AB KTD1413 BK KEC TO220I S NPN Q710 0TR440009CA KSP44 TP SAMSUNG Q711 0TF630000CA IRFS630A BK SAMSUNG 200V 6 DATE 2002 02 18 S AL LOC NO PART NO DESCRIPTION SPECIFICATION Q712 0TF630000CA IRFS630A BK SAMSUNG 200V 6 Q713 0TF630000CA IRFS630A BK SAMSUNG 200V 6 Q714 0TR319809AA KTC3198 Y KTC1815 TP KEC T Q715 0TR319809AA KTC3198 Y KTC1815 TP KEC T Q716 0TR319809...

Page 28: ...07 0RN5101F409 5 10K 1 6W 1 TA52 R608 0RD3300A609 330 OHM 1 2 W 7 0 5 TA52 DATE 2002 02 18 S AL LOC NO PART NO DESCRIPTION SPECIFICATION R610 0RD1101Q609 1 1K OHM 1 4 W 3 4 5 TA5 R612 0RN5101F409 5 10K 1 6W 1 TA52 R613 0RD1801Q609 1 80K 1 4W 3 5 TA52 R700 0RX0221K607 2 2 OHM 2 W 5 TA62 R701 0RD1500A609 150 OHM 1 2 W 7 0 5 TA52 R702 0RD5601Q609 5 60K 1 4W 3 5 TA52 R704 0RD3601Q609 3 60K 1 4W 3 5 TA...

Page 29: ...D4702A609 47K OHM 1 2 W 7 0 5 TA52 R953 0RX4700J609 470 OHM 1 W 5 TA52 R954 0RD4701Q609 4 70K 1 4W 3 5 TA52 R955 0RD4701Q609 4 70K 1 4W 3 5 TA52 R956 0RD4702Q609 47K 1 4W 3 5 TA52 R957 0RD0472A609 47 OHM 1 2 W 7 0 5 TA52 R960 0RD2200A609 220 OHM 1 2 W 7 0 5 TA52 R967 971 0054 TIN 50MM TAPING F1 430 858C AFC 520 BAE EUN TA F2 430 858C AFC 520 BAE EUN TA F901 0FZZTTH001D TIME LAG HBC 3 15A 250V 215 ...

Page 30: ...Vp TDA4866J Pin Configuration 1 9 Vin 4 1 2 5 3 START O V P LATCH DRIVE Vth1 Vth2 O S C ERROR AMP GND O C P F B S D REG STR G8644D Block Diagram M24C08 Serial I2C BUS EEPROM SYMBOL E0 E2 SDA SCL WC Vcc Vss DESCRIPTION Chip Enable Input Serial Data Address Input Output Serial Clock Write Control Supply Voltage Ground 1 PSDIP8 BN 0 25mm Frame 8 1 1 SO8 MN 150mil Width TSSOP8 DW 169mil Width 8 8 Logi...

Page 31: ...l Output 1 Descending Sawtooth Vertical Synchronization Input Horizontal Composite Synchronization Input Video Clamping Pulse V Blanking Output PIN 1 2 3 4 5 6 7 8 9 10 11 12 13 14 15 16 SYMBOL HUNLOCK SCL SDA i c VSMOD VAGC VREF VCAP SGND HPLL1 HBUF HREF HCAP HPLL 2 HSMOD FOCUS DESCRIPTION H Synchronization Unlock Protection V Blanking Output I2C Bus Clock Input I2C Bus Data Input Internally conn...

Page 32: ...IIC SDA IIC SCL DDC SDA DDC SCL 32 33 NOTICE Since this is a basic schematic diagram The value of components and some partial connection are sucject to be changed for improvement without notice ...

Page 33: ... 35 D CIRCUIT BOARD 4 MAIN BOARD Solder Side 2 CONTROL BOARD Solder Side ...

Reviews: