154
Using Software
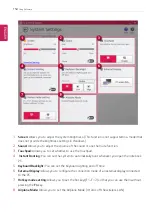
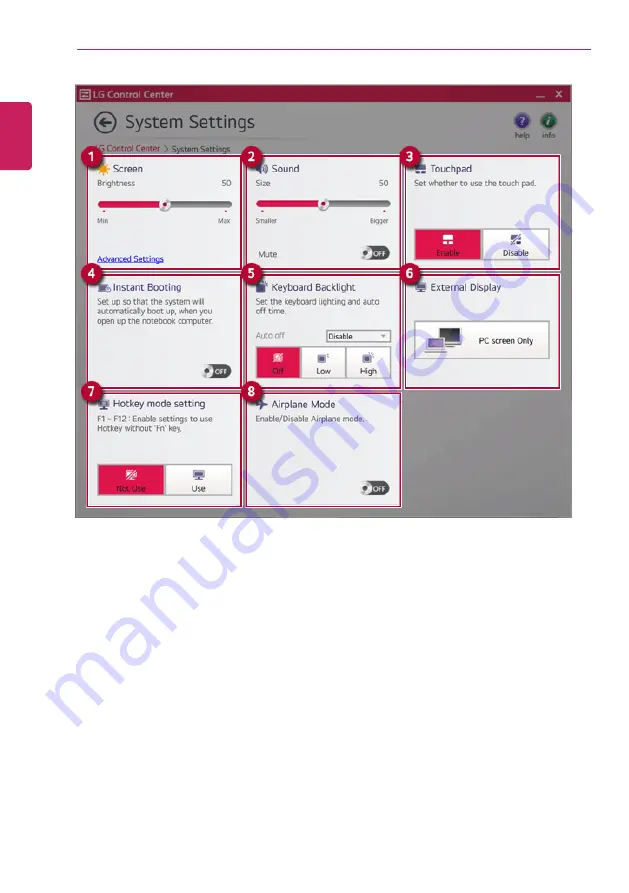
1
Screen:
Allows you to adjust the system brightness. (This function is not supported in a model that
does not provide the brightness settings in Windows.)
2
Sound:
Allows you to adjust the volume of the sound or use the mute function.
3
Touchpad:
Allows you to set whether to use the touchpad.
4
Instant Booting:
You can set the system to automatically boot whenever you open the notebook
PC.
5
Keyboard Backlight:
You can set the Keyboard Lighting and off time.
6
External Display:
Allows you to configure the connection mode of an external display connected
to the PC.
7
Hotkey mode setting:
Allows you to set the hot keys(F1~F12) so that you can use them without
pressing the
Fn
key.
8
Airplane Mode:
Allows you to set the Airplane Mode. (It turns off the wireless LAN.)
ENGLISH
Summary of Contents for 17Z90P Series
Page 22: ...22 Introduction Important Safety Precautions Regulatory Notices ENGLISH ...
Page 23: ...Introduction Important Safety Precautions 23 ENGLISH ...
Page 24: ...24 Introduction Important Safety Precautions ENGLISH ...
Page 25: ...Introduction Important Safety Precautions 25 ENGLISH ...
Page 26: ...26 Introduction Important Safety Precautions ENGLISH ...
Page 27: ...Introduction Important Safety Precautions 27 ENGLISH ...
Page 28: ...28 Introduction Important Safety Precautions ENGLISH ...
Page 29: ...Introduction Important Safety Precautions 29 ENGLISH ...
Page 30: ...30 Introduction Important Safety Precautions ENGLISH ...
Page 31: ...Introduction Important Safety Precautions 31 ENGLISH ...
Page 32: ...32 Introduction Important Safety Precautions ENGLISH ...
Page 33: ...Introduction Important Safety Precautions 33 ENGLISH ...
Page 34: ...34 Introduction Important Safety Precautions ENGLISH ...
Page 35: ...Introduction Important Safety Precautions 35 ENGLISH ...
Page 36: ...36 Introduction Important Safety Precautions ENGLISH ...
Page 37: ...Introduction Important Safety Precautions 37 ENGLISH ...
Page 38: ...38 Introduction Important Safety Precautions ENGLISH ...
Page 39: ...Introduction Important Safety Precautions 39 ENGLISH ...
Page 40: ...40 Introduction Important Safety Precautions ENGLISH ...
Page 41: ...Introduction Important Safety Precautions 41 ENGLISH ...
Page 42: ...42 Introduction Important Safety Precautions ENGLISH ...
Page 43: ...Introduction Important Safety Precautions 43 ENGLISH ...
Page 44: ...44 Introduction Important Safety Precautions ENGLISH ...
Page 45: ...Introduction Important Safety Precautions 45 ENGLISH ...
Page 46: ...46 Introduction Important Safety Precautions ENGLISH ...
Page 47: ...Introduction Important Safety Precautions 47 ENGLISH ...
Page 48: ...48 Introduction Important Safety Precautions ENGLISH ...
Page 49: ...Introduction Important Safety Precautions 49 ENGLISH ...
Page 50: ...50 Introduction Important Safety Precautions ENGLISH ...
Page 51: ...Introduction Important Safety Precautions 51 ENGLISH ...
Page 52: ...52 Introduction Important Safety Precautions ENGLISH ...
Page 53: ...Introduction Important Safety Precautions 53 ENGLISH ...
Page 54: ...54 Introduction Important Safety Precautions ENGLISH ...
Page 55: ...Introduction Important Safety Precautions 55 ENGLISH ...
Page 56: ...56 Introduction Important Safety Precautions ENGLISH ...
Page 57: ...Introduction Important Safety Precautions 57 ENGLISH ...
Page 58: ...58 Introduction Important Safety Precautions ENGLISH ...
Page 59: ...Introduction Important Safety Precautions 59 ENGLISH ...
Page 60: ...60 Introduction Important Safety Precautions ENGLISH ...
Page 73: ...Using Windows 10 73 3 The selected app is added to the Start menu or taskbar ENGLISH ...
Page 76: ...76 Using Windows 10 3 Click the New Desktop tile ENGLISH ...
Page 78: ...78 Using Windows 10 6 The screen is toggled to the selected app or desktop ENGLISH ...
Page 85: ...Using Windows 10 85 ENGLISH ...
Page 135: ...Using the PC 135 2 When the Settings screen appears select Devices ENGLISH ...
Page 139: ...Using the PC 139 2 Connect the wired LAN cable to the LAN port ENGLISH ...
Page 141: ...Using the PC 141 4 Select Network Internet Status Change adapter options ENGLISH ...
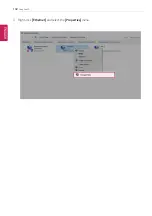
Page 142: ...142 Using the PC 5 Right click Ethernet and select the Properties menu ENGLISH ...
Page 147: ...Using the PC 147 3 Select the Access Point you want to connect to and press Connect ENGLISH ...
Page 160: ...160 Using Software 1 Select the All List Update needed menu item ENGLISH ...
Page 165: ...Using Software 165 1 Press the icon on the taskbar ENGLISH ...
Page 190: ...190 Using Software ENGLISH ...
Page 192: ...192 Using Software 3 Press OK to complete the setup ENGLISH ...
Page 196: ...196 Restoring the System 1 Select Keep my files ENGLISH ...
Page 199: ...Restoring the System 199 1 Select Remove everything ENGLISH ...
Page 226: ...226 Setup and Upgrade 3 Boots using the selected device ENGLISH ...
Page 228: ...228 Setup and Upgrade 2 Select System Display ENGLISH ...
Page 235: ...FAQ 235 2 Select System Display ENGLISH ...
Page 240: ...240 FAQ 1 Select Keep my files ENGLISH ...
Page 243: ...FAQ 243 1 Select Remove everything ENGLISH ...
Page 251: ...FAQ 251 3 Select the Access Point you want to connect to and press Connect ENGLISH ...


