120
Using the PC
Connecting an External USB-C
™
(Thunderbolt
™
) Device
The USB-C
™
port mounted on this product supports USB 4.0 Gen 3x2 standards.
Use the USB-C
™
port to connect USB devices or to output a screen to an external display.
TIP
The names of USB versions have changed from USB 3.0 (or USB 3.1 Gen 1) and USB 3.1 (or
USB 3.1 Gen 2) to USB 3.2 Gen 1x1 and USB 3.2 Gen 2x1.
Connecting a USB Device
If a USB device is connected to a USB-C
™
port, the port works as an ordinary USB port.
TIP
To use a conventional USB device, a separate conversion adapter should be used.
(Conversion adapters may be purchased separately.)
Outputting to an External Display
By connecting a display that supports USB-C
™
Alternate Mode, you can use the USB-C
™
port to
output a screen to an external display.
TIP
The Alternate mode allows you to use the DP (DisplayPort) and HDMI outputs through the
USB-C
™
port.
We support DP (DisplayPort) interface standards.
CAUTION
You must use a cable that supports
Alternate Mode
to output a screen to another display.
If you use USB-C
™
accessories (cables, interface adapters, etc.) that are used for other products,
you may have compatibility problems (no screen output or a malfunction).
Connecting a Thunderbolt
™
Device
You can connect to the USB-C
™
port an external display or a high-performance data device that
support the Thunderbolt
™
specifications.
Depending on the specifications of the device connected to the USB-C
™
port, it acts as a USB or
Thunderbolt
™
device.
ENGLISH
Summary of Contents for 17Z95P Series
Page 22: ...22 Instruction Safety Information Regulatory Notices ENGLISH ...
Page 23: ...Instruction Safety Information 23 ENGLISH ...
Page 24: ...24 Instruction Safety Information ENGLISH ...
Page 25: ...Instruction Safety Information 25 ENGLISH ...
Page 26: ...26 Instruction Safety Information ENGLISH ...
Page 27: ...Instruction Safety Information 27 ENGLISH ...
Page 28: ...28 Instruction Safety Information ENGLISH ...
Page 29: ...Instruction Safety Information 29 ENGLISH ...
Page 30: ...30 Instruction Safety Information ENGLISH ...
Page 31: ...Instruction Safety Information 31 ENGLISH ...
Page 32: ...32 Instruction Safety Information ENGLISH ...
Page 33: ...Instruction Safety Information 33 ENGLISH ...
Page 34: ...34 Instruction Safety Information ENGLISH ...
Page 35: ...Instruction Safety Information 35 ENGLISH ...
Page 36: ...36 Instruction Safety Information ENGLISH ...
Page 37: ...Instruction Safety Information 37 ENGLISH ...
Page 38: ...38 Instruction Safety Information ENGLISH ...
Page 39: ...Instruction Safety Information 39 ENGLISH ...
Page 40: ...40 Instruction Safety Information ENGLISH ...
Page 41: ...Instruction Safety Information 41 ENGLISH ...
Page 42: ...42 Instruction Safety Information ENGLISH ...
Page 43: ...Instruction Safety Information 43 ENGLISH ...
Page 44: ...44 Instruction Safety Information ENGLISH ...
Page 45: ...Instruction Safety Information 45 ENGLISH ...
Page 46: ...46 Instruction Safety Information ENGLISH ...
Page 47: ...Instruction Safety Information 47 ENGLISH ...
Page 48: ...48 Instruction Safety Information ENGLISH ...
Page 49: ...Instruction Safety Information 49 ENGLISH ...
Page 50: ...50 Instruction Safety Information ENGLISH ...
Page 51: ...Instruction Safety Information 51 ENGLISH ...
Page 52: ...52 Instruction Safety Information ENGLISH ...
Page 53: ...Instruction Safety Information 53 ENGLISH ...
Page 54: ...54 Instruction Safety Information ENGLISH ...
Page 55: ...Instruction Safety Information 55 ENGLISH ...
Page 56: ...56 Instruction Safety Information ENGLISH ...
Page 57: ...Instruction Safety Information 57 ENGLISH ...
Page 58: ...58 Instruction Safety Information ENGLISH ...
Page 59: ...Instruction Safety Information 59 ENGLISH ...
Page 60: ...60 Instruction Safety Information ENGLISH ...
Page 61: ...Instruction Safety Information 61 ENGLISH ...
Page 62: ...62 Instruction Safety Information ENGLISH ...
Page 63: ...Instruction Safety Information 63 ENGLISH ...
Page 64: ...64 Instruction Safety Information ENGLISH ...
Page 74: ...74 Using Windows 11 3 The app is added to the Start Screen or taskbar ENGLISH ...
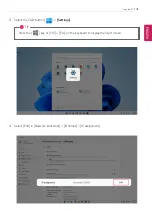
Page 114: ...114 Using the PC 3 Change the settings as needed on the Touchpad item ENGLISH ...
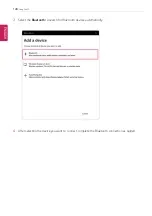
Page 127: ...Using the PC 127 2 Select Bluetooth devices Add device ENGLISH ...
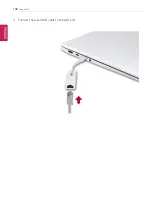
Page 130: ...130 Using the PC 2 Connect the wired LAN cable to the LAN port ENGLISH ...
Page 147: ...Using Software 147 1 Select the All List Update needed menu item ENGLISH ...
Page 159: ...Using Software 159 3 Select Android or iPhone and then click the Next button ENGLISH ...
Page 178: ...178 Using Software ENGLISH ...
Page 180: ...180 Using Software 3 Press OK to complete the setup ENGLISH ...
Page 186: ...186 Restoring the System 1 Select Remove everything ENGLISH ...
Page 213: ...Setup and Upgrade 213 3 Boots using the selected device ENGLISH ...

