background image

EXTERNAL EQ

UIPMENT SETUP

10

EXTERNAL EQUIPMENT SETUP

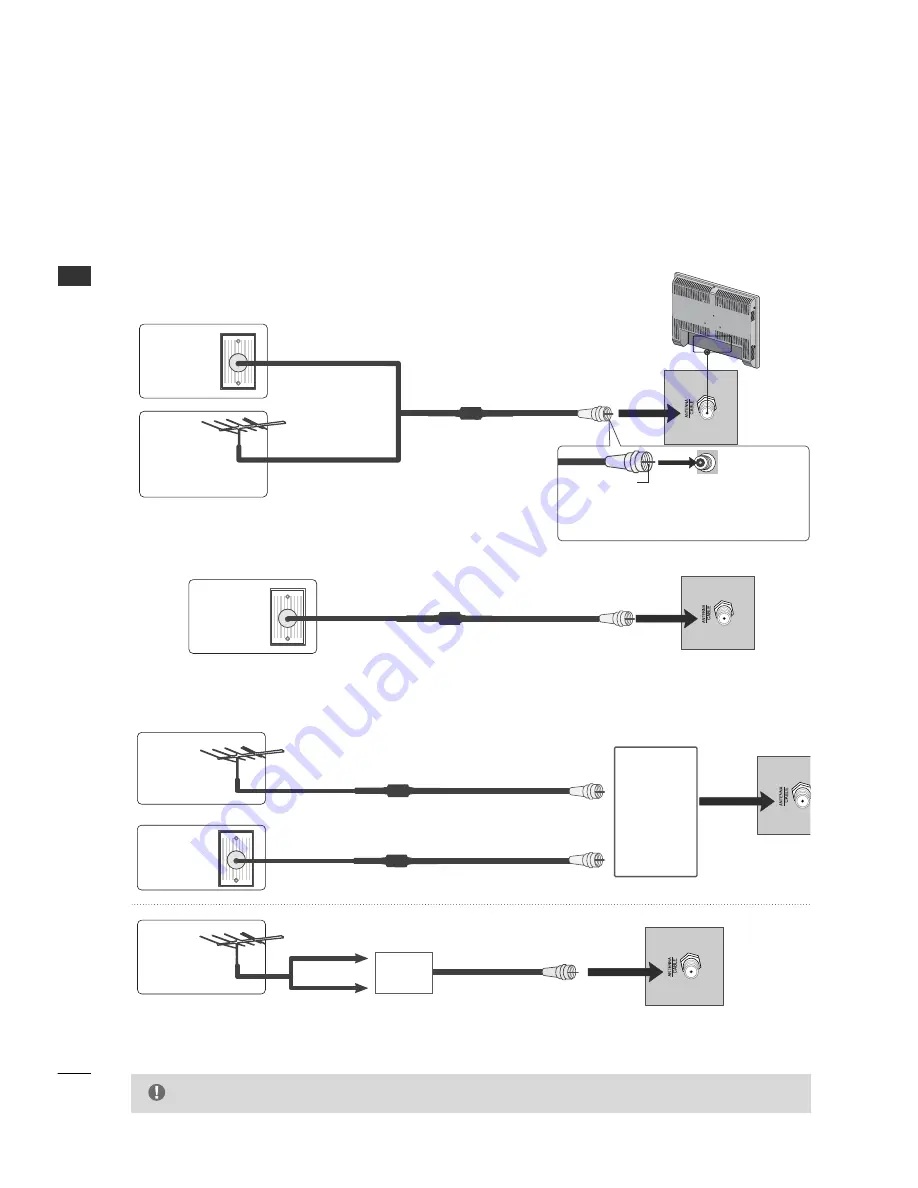
ANTENNA OR CABLE CONNECTION

1. Antenna (Analog or Digital)

Wall Antenna Socket or Outdoor Antenna without a Cable Box Connections.

For optimum picture quality, adjust antenna direction if needed.

Wall
Antenna
Socket

Outdoor
Antenna 
(VHF, UHF)

Multi-family Dwellings/Apartments
(Connect to wall antenna socket)

RF Coaxial Wire (75 ohm)

Single-family Dwellings /Houses
(Connect to wall jack for outdoor antenna)

Be careful not to bend the bronze wire
when connecting the antenna.

Copper Wire

2. Cable

Cable TV
Wall Jack

RF Coaxial Wire (75 ohm)

To improve the picture quality in a poor signal area, please purchase a signal amplifier and install properly.

If the antenna needs to be split for two TV’s, install a 2-Way Signal Splitter.

If the antenna is not installed properly, contact your dealer for assistance.

Antenna

UHF

Signal
Amplifier

VHF

3. Using both cable and antenna

Cable TV
Wall Jack

Antenna

RF Coaxial Wire (75 ohm)

RF Coaxial Wire (75 ohm)

Diplexer

(Signal

Combiner)

G

The TV will let you know when the analog, cable, and digital channel scans are complete.

NOTE

Summary of Contents for 20LH1DC1

Page 1: ...r set Retain it for future reference Record model number and serial number of the set See the label attached on the back cover and quote this information to your dealer when you require service Installation and Operating Guide 20LH1DC1 www lgcommercial com ...

Page 2: ...TO CONNECT THIS TV TO ANY TELECOMMUNICATION NETWORK TELEPHONE The exclamation point within an equilateral triangle is intended to alert the user to the presence of important operating and maintenance servicing instructions in the literature accompanying the appliance The lightning flash with arrowhead symbol within an equilateral triangle is intended to alert the user to the presence of uninsulate...

Page 3: ...TED WITH YOUR SAFETY IN MIND HOWEVER IMPROPER USE CAN RESULT IN POTENTIAL ELECTRICAL SHOCK OR FIRE HAZARDS TO AVOID DEFEATING THE SAFEGUARDS THAT HAVE BEEN BUILT INTO YOUR NEW PRODUCT PLEASE READ AND OBSERVE THE FOLLOWING SAFETY POINTS WHEN INSTALLING AND USING YOUR NEW PRODUCT AND SAVE THEM FOR FUTURE REFERENCE OBSERVING THE SIMPLE PRECAUTIONS DISCUSSED IN THIS MANUAL CAN HELP YOU GET MANY YEARS ...

Page 4: ...ripod bracket or table specified by the manufacturer or sold with the apparatus When a cart is used use caution when moving the cart apparatus combination to avoid injury from tip over 13 Unplug this apparatus during lightning storms or when unused for long periods of time 14 Refer all servicing to qualified service personnel Servicing is required when the apparatus has been damaged in any way suc...

Page 5: ...utomatic Volume Control Settings 40 Analog Audio Settings 41 Digital Audio Language 41 Using External Speakers 42 Menu Language 42 Menu Transparency Settings 43 Set ID 43 SOUND LANGUAGE CONTROL Preset Picture Settings 44 Screen Format Adjustments 45 Noise Reduction 46 Film Mode Options 46 PICTURE CONTROL Managing the Channel Banks 47 CHANNEL BANK Troubleshooting 66 Clone Troubleshooting Flow Chart...

Page 6: ...ections See your LG dealer if you wish to purchase the Installer remote and LT2002 The installer remote allows access to the Installer menus User menus and Channel Banks in the Manual Channel Set options on the Setup menu The installer remote has Menu Select and Adjust Keys The LT2002 Quickset II Clone Programmer is used to duplicate a TV s setup and install it on another identical TV O Op pt ti i...

Page 7: ...VOL VOL CH CH TV A TV AV MENU MENU I I VOL CH TV AV MENU I LED Color Action Status RED Power is Off Standby GREEN is flashing Power On sequence is processing GREEN Power is On ORANGE If Power is Off On Timer is set or Alarm is set If Power is On Off Timer is set or Sleep Timer is set VOL CH TV AV MENU I C B A F E D Front Panel Controls Remote Control Sensor Power Standby Indicator Glows red in Sta...

Page 8: ...S 232C SELECT SWITCH AC IN UPDATE SWITCH PILLOW JACK IN Used to connect to pillow speaker 12V DC 40mA SPEAKER SWITCH Used to select the speaker output switch Note If Pillow Speaker is selected no Sound will be heard from TV speakers NORMAL SPEAKER or PILLOW SPEAKER ANTENNA CABLE Connect to an antenna or cable system G RS 232C Update Switch and RS 232C Select Switch are reserved for qualified and a...

Page 9: ...le of stand selected is capable of supporting the weight of the TV If the mount will be on a wall a typical wooden stud behind the wall board would be the preferred choice for a location to attach the wall mount The wall mount location chosen should be appro priate for drilling holes and have available the required power source as well as antenna cable and other equipment leads For pedestal type m...

Page 10: ... Be careful not to bend the bronze wire when connecting the antenna Copper Wire 2 Cable Cable TV Wall Jack RF Coaxial Wire 75 ohm To improve the picture quality in a poor signal area please purchase a signal amplifier and install properly If the antenna needs to be split for two TV s install a 2 Way Signal Splitter If the antenna is not installed properly contact your dealer for assistance Antenna...

Page 11: ...hen connected the TV will tell a connected device what resolution it supports and the resolution it prefers If the device supports this Auto HDMI function the player output resolution will be automatically set to 720p G If the device does not support Auto HDMI you need to set the output resolution appropriately NOTE This TV can receive Digital Over the air Cable signals without an external digital...

Page 12: ... IN N jack on the set Connect the DVI output of the digital set top box to the H HD DM MI I I IN N jack on the set 1 How to connect Turn on the digital set top box Refer to the owner s manual for the digital set top box Select H HD DM MI I input source by using the 1 1 3 3 3 3 buttons on the remote control Refer to p 65 2 How to use 2 1 1 2 When connecting HDMI to DVI cable ...

Page 13: ...tion it prefers If the device supports this Auto HDMI function the player output resolution will be automatically set to 720p G If the device does not support Auto HDMI you need to set the output resolution appropriately To get the best picture quality adjust the output resolution of the DVD to 720p NOTE HDMI DVD OUTPUT AC IN VIDEO AUDIO IN VIDEO IN L L R R HDMI IN 1 Select H HD DM MI I input sour...

Page 14: ... and in consequence the manufactures warranty does not cover the product bearing this phenomenon L R S VIDEO VIDEO OUTPUT SWITCH ANT IN ANT OUT Wall Jack Antenna 1 2 Connect the antenna cable to the RF antenna in socket of the VCR Connect the RF antenna out socket of the VCR to the A AN NT TE EN NN NA A C CA AB BL LE E socket on the set 1 How to connect Set VCR output switch to 3 or 4 and then tun...

Page 15: ... Match the jack colors Video yellow Audio Left white and Audio Right red 1 How to connect 2 How to use Insert a video tape into the VCR and press PLAY on the VCR Refer to the VCR owner s manual Select A A V V input source by using the 1 1 3 3 1 1 buttons on the remote control Refer to p 65 1 1 When connecting with a RCA cable ...

Page 16: ... DVI output of the PC to the H HD DM MI I I IN N jack on the set 1 How to connect 2 How to use Turn on the PC and the TV Select H HD DM MI I input source by using the 1 1 3 3 3 3 buttons on the remote control Refer to p 65 2 1 DVI PC OUTPUT AUDIO VIDEO IN AC IN HDMI IN VIDEO AUDIO IN L L R R 1 2 When connecting HDMI to DVI cable PC SETUP ...

Page 17: ...hic card can not be changed change the PC graphic card or consult the manufacturer of the PC graphic card G Avoid keeping a fixed image on the screen for a long period of time The fixed image may become permanently imprinted on the screen G The synchronization input form for Horizontal and Vertical frequencies is separate HDMI DVI PC mode Horizontal Vertical Frequency KHz Frequency Hz 31 469 59 94...

Page 18: ...es three control lines and an audio output A patient pendant remote control or entertainment audio and nurse call system may be connected here All lines are isolated from the AC power line and earth ground Opto isolators isolate the control lines and a transformer isolates the audio There are no relays or inductive components in the control lines Pillow Speaker Interface Pin 4 common is momentaril...

Page 19: ...lowed by the then the sub channel number Analog channels do not contain a sub channel number POWER Turns TV On or Off INFO Press to display current program information GUIDE Use to view DTV program information FLASHBK Flashback Use to return to the last channel viewed NUMBER BUTTONS Use for direct channel entry CC Closed Captioning Press to access closed captions ALARM Use to go to the Alarm menu ...

Page 20: ... a Channel Memory Bank 1 2 3 or 4 Standby TIMER Press repeatedly to select a preset time to automatically shut the TV off BUTTON When selecting a digital broadcast channel key in the Main channel number followed by the then the sub channel number Analog channels do not contain a sub channel number MENU Press to display the main on screen menu POWER Turns TV On or Off INFO Press to display current ...

Page 21: ...fore TV shutoff SAP Display Selects MTS sound Mono Stereo and SAP in analog mode Change the audio language in DTV mode Caption Display Press the CC Turns selected option on or off See Closed Captions page to select options Alarm Timer Current Time 11 17 AM Adjust Move Exit OK Hr Off Min Alarm Display Press the ALARM Set a time for the TV to turn itself on Guide Display Press the GUIDE to view DTV ...

Page 22: ... En nt te er r button 2 Press the O OK K E En nt te er r button to highlight A Au ut to o p pr ro og gr ra am m 3 Press the O OK K E En nt te er r button to start the channel search After finding all available channels a display appears briefly showing the number of analog and digital channels found 4 Auto Program Channel Search G Tuning Band must be set before doing the channel search See Install...

Page 23: ...ghlight C Ch ha an nn ne el l L Li is st t and press the O OK K E En nt te er r button 2 Use the A AD DJ J D or E button to highlight the channel you wish to delete and press the A AD DJ J G button The A AD DJ J G button toggles the check mark on and off If the check mark appears next to the channel number the channel appears in the channel scan 3 When finished press M ME EN NU U repeatedly to rem...

Page 24: ... En nt te er r button 1 Use the A AD DJ J D or E button to highlight C Ch ha an nn ne el l L La ab be el l and press the O OK K E En nt te er r button This action displays the C Ch ha an nn ne el l L La ab be el l menu 2 Use C Ch ha an nn ne el l D or E button to select channels and the A AD DJ J D E F G buttons to navigate the labels menu 3 When the label is highlighted you want for the channel s...

Page 25: ...ecking the Strength of the Digital Signal Antenna Auto Program Channel Label Channel List Fine Tune Auto G Signal Strength Antenna Auto Program Channel Label Channel List Fine Tune Signal Strength Antenna Auto Program Channel Label Channel List Fine Tune Signal Strength G Antenna Auto Program Channel Label Channel List Fine Tune Signal Strength D E Move OK Select MENU Back F G Adjust MENU Back D E...

Page 26: ...ency Semi Opaque Set ID 1 D E Move OK Select MENU Back D E Move OK Select MENU Back D E Move OK Select MENU Back D E Select MENU Back D E Adjust F G Move MENU Back Press the M ME EN NU U button and then use the A AD DJ J D or E button to highlight the S Se et tu up p menu and press the O O K K E En nt te er r button 1 Use the A AD DJ J D or E button to the T Ti im me e 2 Press the O OK K E En nt t...

Page 27: ...inished press M ME EN NU U repeatedly to remove the menus 5 G Caution Some digital channels may change the time incorrectly using the Automatic Clock Set feature G In this event the Alarm may not function as intended and the TV may not turn on at the expected time G If the end user will have access to the Alarm it may be best to use the Manual Clock Set mode and set the clock to local time manuall...

Page 28: ...t the S Se et tu up p menu and press the O O K K E En nt te er r button 1 Use the A AD DJ J D or E button to the T Ti im me e 2 Press the O OK K E En nt te er r button to highlight C Cl lo oc ck k 3 Use the A AD DJ J D or E button to highlight the D Da ay yl li ig gh ht t S Sa av vi in ng g and press the O OK K E En nt te er r button 4 When finished press M ME EN NU U repeatedly to remove the menu...

Page 29: ... nt te er r button to highlight C Cl lo oc ck k 3 Use the A AD DJ J D or E button to highlight O On n T Ti im me er r and press the O OK K E En nt te er r button 4 Use the A AD DJ J D E F G buttons to choose A AM M P PM M H Ho ou ur rs s M Mi in nu ut te es s and time period to turn on 5 When finished press M ME EN NU U repeatedly to remove the menus 6 Press the M ME EN NU U button and then use th...

Page 30: ...e T Ti im me e 2 Use the A AD DJ J D or E button to highlight A Au ut to o O Of ff f and press the O OK K E En nt te er r button 4 Use the A AD DJ J D or E button to choose O O n n or O O f f f f 5 When finished press M ME EN NU U repeatedly to remove the menus 6 11 20 PM Sep 11 2006 Clock Manual Clock Daylight Saving Time Zone On Timer Off Timer Auto Off Off On D E Select MENU Back Time G V Chip ...

Page 31: ...d As soon as the 4 digits are entered re enter the same 4 digits on the C Co on nf fi ir rm m P PI IN N 7 If a password has been entered key it in using the number keypad If no password has been set enter the 4 digits password 0 9 using the remote control This is the PIN Each time the menu is entered the password will be required until the block time expires The TV is set up with the default passw...

Page 32: ...r button 4 Use the A AD DJ J D or E button to choose 1 1 1 12 2 hours and press the O OK K E En nt te er r button 5 Enter the 4 digits password 3 When finished press M ME EN NU U repeatedly to remove the menus 6 Time V Chip G PC Menu Language English Menu Transparency Semi Opaque Set ID 1 11 20 PM Sep 11 2006 D E Move OK Select Menu Back On Off On Changing PIN Set Block Hour 12 G TVPG Rating MPAA ...

Page 33: ...uidance suggested The program may contain infrequent coarse language limited violence some suggestive sexual dialog and situations TV G General audience This contains little or no violence no strong language and little or no sexual dialog or situations TV Y7 Directed for older children Themes and elements in this program may include mild physical or comedic violence or may frighten children under ...

Page 34: ...der 13 should be accompanied by an adult PG 13 Parental guidance suggested Children under 13 should be accompanied by an adult NC 17 Not classified Viewers should be 17 or older X Adults only MPAA ratings The selected rating will be locked In addition any ratings that are more restrictive will also be blocked PARENTAL CONTROL RATINGS 34 PARENTAL CONTROL RATINGS Enter the 4 digits password 3 Time V...

Page 35: ...ed by an adult 14 Restricted Viewers should be 14 or older 18 Restricted Viewers should be 18 or older Canadian French Ratings Press the M ME EN NU U button and then use the A AD DJ J D or E button to highlight the S Se et tu up p menu and press the O O K K E En nt te er r button 1 Use the A AD DJ J D or E button to highlight V V C Ch hi ip p and press the O OK K E En nt te er r button 2 Enter the...

Page 36: ... L Lo oc ck k m me en nu u D Do ow wn nl lo oa ad da ab bl le e R Ra at ti in ng g in the CD manual is added by the information presented here Your TV s OSD On Screen Display may differ slightly from what is shown in this manual Time V Chip Menu Language Menu Transparency Set ID 11 20 PM Sep 11 2006 On Off On Changing PIN Set Block Hour 12 TVPG Rating MPAA Rating D L Rating G Can English Rating Ca...

Page 37: ...ress the O OK K E En nt te er r button 3 Use the A AD DJ J D or E button to choose O O n n or O O f f f f 3 When finished press M ME EN NU U repeatedly to remove the menus 4 The term for the words that scroll across the bottom of the TV screen usually the audio portion of the program provided for the hearing impaired The term for the words that appear in a large black frame and almost cover the en...

Page 38: ... on nt t O Op pt ti io on ns s and press the O OK K E En nt te er r button 2 Use the A AD DJ J D E F G buttons to customize each option Font Size Font Style Foreground Color etc 3 When finished press M ME EN NU U repeatedly to remove the menus 4 G If the digital options custom settings are to be cloned all menu options should be set to any option other than Default If Default is left set for any o...

Page 39: ...he M ME EN NU U button and then use the A AD DJ J D or E button to highlight the S So ou un nd d menu and press the O O K K E En nt te er r button 1 Use the A AD DJ J D or E button to highlight M Mo od de e and press the O OK K E En nt te er r button 2 Use the A AD DJ J G button to choose M Ma an nu ua al l and use A AD DJ J D E F G buttons to set your own settings for the options When finished pr...

Page 40: ...lume On Multi Track Stereo Internal Speaker On 11 20 PM Sep 11 2006 Have the TV automatically maintain the sound level between different channels Automatic Volume Control Settings Press the M ME EN NU U button and then use the A AD DJ J D or E button to highlight the S So ou un nd d menu and press the O O K K E En nt te er r button 1 Use the A AD DJ J D or E button to highlight A Au ut to o V Vo o...

Page 41: ...ep 11 2006 Mono Stereo SAP D E Move OK Select MENU Back D E Select MENU Back You can set digital audio language This is only available for digital broadcasting Digital Audio Language Settings Press the M ME EN NU U button and then use the A AD DJ J D or E button to highlight the S So ou un nd d menu and press the O O K K E En nt te er r button 1 Use the A AD DJ J D or E button to highlight M Mu ul...

Page 42: ...d will not be heard 11 20 PM Sep 11 2006 Time V Chip Menu Language Menu Transparency Set ID English Español Français Time G V Chip Menu Language English Menu Transparency Semi Opaque Set ID 1 11 20 PM Sep 11 2006 Menu Language The menus can be shown on the screen inter selected language First select your language Press the M ME EN NU U button and then use the A AD DJ J D or E button to highlight t...

Page 43: ... Sep 11 2006 11 20 PM Sep 11 2006 Time V Chip Menu Language Menu Transparency Set ID Opaque Semi Opaque Semi Trans Transparent Set ID Use this function to specify a set ID number Press the M ME EN NU U button and then use the A AD DJ J D or E button to highlight the S Se et tu up p menu and press the O O K K E En nt te er r button 1 Use the A AD DJ J D or E button to highlight S Se et t I ID D and...

Page 44: ...n to highlight the P Pi ic ct tu ur re e menu and press the O O K K E En nt te er r button 1 Use the A AD DJ J D or E button to choose C Co ol lo or r T Te em mp pe er ra at tu ur re e and press the O OK K E En nt te er r button 2 Use the A AD DJ J D or E button to choose Normal Cool or Warm When finished press the O OK K E En nt te er r button 3 When finished press M ME EN NU U repeatedly to remo...

Page 45: ...AD DJ J D or E button to highlight the P Pi ic ct tu ur re e menu and press the O O K K E En nt te er r button 1 Use the A AD DJ J D or E button to highlight M Mo od de e and press the O OK K E En nt te er r button 2 Use the A AD DJ J G button to choose M Ma an nu ua al l and use A AD DJ J D E F G buttons to set your own settings for the options When finished press the M ME EN NU U button 3 When f...

Page 46: ...ions The user can watch movies with a more realistic picture on analog channels Noise Reduction Press the M ME EN NU U button and then use the A AD DJ J D or E button to highlight the P Pi ic ct tu ur re e menu and press the O O K K E En nt te er r button 1 Use the A AD DJ J D or E button to choose N No oi is se e R Re ed du uc ct ti io on n and press the O OK K E En nt te er r button 2 Use the A ...

Page 47: ...ANKS 3 Use the ADD DEL BLNK option also in the Setup menu to customize your program package You may delete channels or add some that have not been entered You can also Blank a channel for accommodating an audioonly program source or in house communication The ADD DEL BLNK option on page 15 has more details Note The Blank Channel feature is global A channel will be blanked in all channel banks 4 Re...

Page 48: ...M Figure 2 Typical channel banks after running Auto Program and customizing with Add Del Blnk Basic Extend All CTV Other A Active Channel was found during AUTO PROGRAM D Delete Channel was deleted using Add Del option BC Blanked Channel Channel was blanked using BLANK channel option ADD DEL BLNK ADDING DELETING CHANNELS It is best to do ADD DEL customizing before doing BLNK AUTO PROGRAM enters the...

Page 49: ...1 32 33 34 35 36 37 38 39 40 41 42 43 44 45 46 47 48 49 50 B A N K 1 2 3 4 Purpose Channel Number 51 52 53 54 55 56 57 58 59 60 61 62 63 64 65 66 67 68 69 70 71 72 73 74 75 B A N K 1 2 3 4 Purpose Channel Number 76 77 78 79 80 81 82 83 84 85 86 87 88 89 90 91 92 93 94 95 96 97 98 99 100 B A N K 1 2 3 4 Purpose Channel Number 101 105 106 107 108 109 1 10 1 1 1 1 1 2 1 1 3 1 14 1 1 5 1 1 6 1 1 7 1 1...

Page 50: ...1 and pressing Enter to reset the TV to default values in the installer menu You can do 2 5 4 Menu mode more than once but this mode is limited to only editing channel icons and channel labels Refer to the appropriate section in the Manual for other TV features Picture Sound etc LT2002 Clone Programmer As the cloning procedure is being performed specific steps need to be done at the indicated time...

Page 51: ...ransfer TV Setup to Controller Box 2 5 5 Menu After the TV channel scan has been edited and channel label icons added enter the Installer menu Once in the Installer menu press 2 5 5 and MENU on the remote This transfers the TV setup to the internal controller box Note Only do 2 5 5 MENU once or TV setup may be corrupted TV scans available channels and exits menu when transfer to controller is comp...

Page 52: ...hannel and connected to power See above Teaching and Learning is only possible between identical model devices However the LT2002 Clone programmer can store up to 3 different master setups WARNING Copying a blank or incorrect memory into a TV STB or other device will cause the TV STB or other device to operate erratically or become inoperable Use an Installer s remote to operate Learning and Teach...

Page 53: ... Programmer s time cannot be set directly the current time needs to be copied from a LG TV equipped with M P I input capability After the time is copied to the Clone programmer the current time can then be transferred to another TV This can be a master TV or another TV which has already had the features set up Note When using the clone programmer for teaching or learning be sure that the heartbeat...

Page 54: ...EACHING COMPLETE message is displayed press any button to return to the Clone menu then press ON OFF POWER or ENTER If finished detach M P I cable from the target newly cloned 20LH1DC1 Disconnect 20LH1DC1Power for 15 Seconds Unplug the AC power cord of the newly cloned 20LH1DC1 from the power outlet for about 15 seconds to activate the newly copied setup Clone Programmer Master 20LH1DC1 Ferrite Co...

Page 55: ... of hours of no activity before auto shut Off 002 AC ON 0 1 0 Set to 1 to enable auto turn On at power up 003 BAND AFC 0 3 1 Selects Tuning Band 0 Broadcast 1 CATV 2 HRC 3 IRC 004 STRT CHANNEL 0 127 255 255 Channel at turn on Set 255 to return to last channel before power Off 005 CHAN LOCK 0 1 0 If set to 1 cannot tune from current channel 007 STRT VOLUME 0 63 255 255 Sets Volume level at TV turn ...

Page 56: ... byte 079 UPN MSB 1 0 255 255 User programmable number most significant byte 1 080 UPN MSB 2 0 255 255 User programmable number most significant byte 2 081 UPN LSB 0 255 255 User programmable number least significant byte 082 CHASM ERROR 0 1 0 Enforces rigid M P I checksum 083 HANDSHK TIME 0 5 5 Relaxes M P I timing to be compatible with PC based Windows controlled systems 084 PERMANENT BLK 0 1 0 ...

Page 57: ... 0 63 The PTC software will translate this to the 0 100 scale used by the TV To translate a TV volume level to the installer menu value use the following formula Installer Value TV Value x 63 100 Enter only the whole number disregard fractions Detailed Descriptions of Installer Menu Items 000 INSTALLER SEQUENCE Specifies entry sequence to the Installer Menu 0 9876 1 4321 2 1478 3 3698 001 POWER MA...

Page 58: ...16 EN TIMER Enable On Off Timers If set to 1 Timer function is available to user Set to 0 to disable On Off Timer functions Clock must be set in order to use Timers 017 ALARM Gives the installer the option of making the Alarm function available to the end user If set to 1 Alarm function is available to end user Set to 0 to disable the Alarm function Note Clock must be set before the Alarm function...

Page 59: ...able custom color for the Channel Time display 070 FOR CH TIME Channel Time Display Foreground Color Set according to Color Chart 0 Black 3 Yellow 6 Cyan 1 Red 4 Blue 7 White 2 Green 5 Violet Note If foreground and background colors are the same menu background is transparent 071 BCK CH TIME Channel Time Display Background Color Set according to Color Chart 0 Black 3 Yellow 6 Cyan 1 Red 4 Blue 7 W...

Page 60: ...grams and is set at 004 for Zoom This optimum setting will not show any bars around the picture s image For Analog Channels Digital and SD Channels default is 4 3 Aux sources default is Set By Program Screen Formats can be changed in the Picture Menu Selects default aspect ratio at power up see settings below 102 ATSC BAND Sets up TV to receive different types of incoming signals 0 Broadcast 1 CAT...

Page 61: ...me Multi Track Internal Speaker Setup Time Clock Auto Off V Chip TVPG Rating MPAA Rating Menu Language SET ID Caption On Off Analog Mode Digital Mode Digital Font Option Note For Digital Font Options if any default setting is left unchanged prior to cloning then all the digital font options will be set to default settings If you want custom digital font options to be closable set all digital font ...

Page 62: ...nging Adding Labels orgo to the next channel Changing Adding Channel Labels on Master TV 1 Channel Up Down to select the desired channel 2 Press the A AD DJ J F or G repeatedly until the numbers 1 to 7 show up The number shows the position of the character that can be changed Number 1 is the first character number 2 the second character and so on 3 With the A AD DJ J D or E select the desired char...

Page 63: ...value will change back to 0 after the TV s internal controller has been restored to factory default condition b Within the Installer menu set the Installer menu items to the configuration required of your institution c It is important to set the tuning band at this time see Installer menu item 03 BAND AFC d Set Installer menu item 28 CH OVERIDE to 001 to allow access to the Auto Program and Channe...

Page 64: ...ss the MENU button at least 10 times until the menu display ceases to respond to MENU key presses Then press 9 8 7 6 OK Enter Select Procedure to Check Software Version Typical Installer Menu HOSPITAL_20 PTC INSTALLER MENU 000 INSTALLER SEQ 000 UPN 000 000 000 000 FPGA 09F1 PTC V1 00 000 CPU V1 01 00 PEFERENCE Software Version Check ...

Page 65: ...93 DVI HDMI1 35 COMPORT EN 0x08 3 Front Computer 0 VIDEO 3 Front Computer OLD_OCV 1 Source Input Source Mode Number Value Value Labeling Labeling Labeling 20LH1DC1 ENABLE Installer Menu MPI DATA STATUS TYPE 0x41 SOURCES ENABLED R W DATA STATUS TYPE 0xD2 CURRENT AV SOURCE R DATA STATUS TYPE 0X0D AUX SOURCE R MPI DATA STATUS AUX SOURCE ASSIGNMENT PEFERENCE 20LH1DC1 Aux Input Configuration ...

Page 66: ...r with item 1 17 set to 001 press Enter then redo Auto Program Channel List Clock etc Note 2 5 4 MENU can be done more than once 2 5 5 MENU performed more than once Software Corrupted 8 After 2 5 5 MENU only channels included in TV controller will appear If channel is available redo channel scan If it is not available it will not appear on the TV screen Channel not included in channel scan in TV c...

Page 67: ...oo far from IR sensor Remote too far from IR sensor 8 Move remote closer to TV s IR receiver or darken room IR path to TV s receiver obstructed 8 Remove obstructions Wrong Installer remote control 8 Requires compatible Installer remote contact your LG dealer Remote doesn t work 8 Press MUTE or use Volume Up key to increase sound level Audio muted 8 Try a different channel Broadcast problem Normal ...

Page 68: ...lthough the menus are not all displayed the clone functions all operate normally IMPORTANT INSTALLER SETUP INFORMATION PLEASE READ THE FOLLOWING Clone Programmer Troubleshooting Clone Programmer Cloning Notes While clone is copying or transferring a master setup do not touch or otherwise disturb clone or connections between clone and TV Cloning a master TV setup should take at least 45 seconds Tra...

Page 69: ...l tasks were performed Step s omitted or not performed 8 Redo cloning and be sure learning teaching time is about 1 min and 5 to15 seconds 75 seconds Insufficient cloning time 8 Reset Clone Programmer Cloning erratic Cloning did not work 8 Batteries must remain installed to retain time settings Batteries were removed Clone time disappeared 8 Disconnect newly cloned unit from power for 5 seconds 20...

Page 70: ...APPENDIX 70 APPENDIX CLONE TROUBLESHOOTING FLOW CHART ...

Page 71: ...APPENDIX 71 TV OPERATING CHECK ...

Page 72: ...eo signals DELETED Lets you remove channels from the list that the end user can scroll through using CH Channel Up Down HDMI High definition multimedia interface HDTV High definition television Refers to television signals that have higher resolution than ordinary analog TV signals HDSTB High definition set top box Refers to a tuner device that receives high definition television signals which hav...

Page 73: ...for 7 Transfer the TV setup After all menu options and features are set to your requirements enter the installer menu Press 2 5 5 MENU to start the transfer of the TV s setup to the PTC After the transfer is complete the system will exit the Installer menu 8 Set any Channel Labels as needed a Enter Installer menu b Press 2 5 4 MENU to enter the menu In this menu edit the assigned channel Icons ass...

Page 74: ...74 NOTE ...

Page 75: ...hm 32 104 F 0 40 C Less than 80 4 140 F 20 60 C Less than 85 Dimensions Width x Height x Depth Weight Power requirement Television System Program Coverage External Antenna Impedance Environment condition 16 35 pounds 7 4 kg Operating Temperature Operating Humidity Storage Temperature Storage Humidity The specifications shown above may be changed without prior notice for quality improvement ...

Page 76: ......

Reviews: