background image

Printed in China

1508-REV00)

www.lg.com

*MBM64076546*

łą

czanie do zasilania / Conexión a la alimentación / 

P

ř

Connecting the power / Raccordement à l’alimentation / Conexión a la alimentación / 

Raccordement à l’alimentation / Pod

ipojení napájení / Pripojenie napájania / Conectando a energia

Easy Setup Guide

ENG

FRA

ESP

ENGLISH
FRANÇAIS

ESPAÑOL

DEU

DEUTSCH

POL

POLSKI

SRP

SRPSKI

POR

PORTUGUÊS

Č

ES

Č

ESKY

SLO

SLOVEN

Č

INA


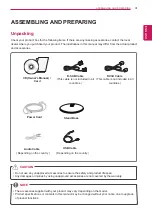
Accessories / Accessoires / Accesorios /  Zubehör /
Akcesoria / Dodatni pribor / P

ř

íslušenství / Príslušenstvo / Acessórios

User Manual/Card

1

2

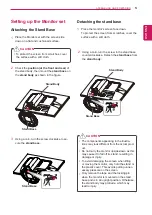
Attaching the Stand Base / Fixation du socle / Colocación de la base del soporte /
Anbringen des Standfußsockels / Monta

ż

 podstawy / Montiranje podnožja postoljae / 

P

ř

ipojení základny stojanu / Pripojenie základne stojana / Fixando a base

3

D-sUB Cable

22MB35PY

24MB35PY

DVI-D Cable

(This cable is not included in all countries.) 

Stand Base

Power Cord

( Depending on the country )

USB Cable

Audio Cable

( Depending on the country )

22MB35PY

24MB35PY

Press buttons on the 

bottom of the monitor

Power

4

Adjust the tilt of the Monitor set / Ajustement de l’inclination de l’écran / Ajuste de la inclinación del monitor / 
Neigung des Monitors anpassen / Regulacja nachylenia monitora / Podesite nagnutost monitora / 
Nastavte rozsah naklon

ě

ní monitoru / Upravenie rozsahu naklonenia monitora / Ajuste a inclinação do monitor

5

Connecting external devices /  Accordement d'appareils externes / Conexión de dispositivos exter-
nos / Verbinden externer Geräte / Pod

łą

czanie urz

ą

dze

ń

 zewn

ę

trznych / Ovezivanje spoljnih ure

đ

aja / 

P

ř

ipojení externích za

ř

ízení / Pripojenie externých zariadení / Conectando dispositivos externos

WARNING / AVERTISSEMENT / ADVERTENCIA / WARNUNG / 
Regulacja nachylenia monitora / Podesite nagnutost monitora / 
Nastavte rozsah naklon

ě

ní monitoru / Upravenie rozsahu naklonenia monitora / AVISO


Handle with care to avoid any damage. Do not touch or press the screen when 
adjusting the angle of the Monitor set.


Manipulez le moniteur avec précaution pour éviter de l’endommager. Ne pas 
toucher ou ne pas appuyez sur l’écran lorsque vous réglez l’angle du moniteur.


Manipular con cuidado para evitar daños. No toque ni apriete la pantalla al ajustar 
el ángulo del monitor.


Behandeln Sie das Gerät vorsichtig, um Beschädigungen zu vermeiden. Berühren 
oder drücken Sie beim Einstellen des Neigungswinkels des Monitors nicht auf den 
Bildschirm.


Z urz

ą

dzeniem nale

ż

y obchodzi

ć

 si

ę

 ostro

ż

nie, aby unikn

ąć

 uszkodze

ń

. Podczas 

zmiany k

ą

ta nachylenia urz

ą

dzenia, nie dotykaj ekranu ciek

ł

okrystalicznego ani nie 

wywieraj nacisku na jego powierzchni

ę


Rukujte pažljivo kako ne bi došlo do ošte

ć

enja. Nemojte da  dodirujete ili pritiskate 

ekran prilikom prilago

đ

avanja ugla gledanja na monitor.


Zacházejte se za

ř

ízením opatrn

ě

, abyste zabránili jeho poškození. P

fi

 i nastavování 

úhlu monitoru se nedot

˘

kejte obrazovky ani na ni nevyvíjejte tlak. 


So zariadením manipulujte opatrne, aby ste predišli jeho poškodeniu.  Pri nasta-
vovaní uhla monitora sa nedot

˘

kajte obrazovky ani na Àu netlaãte.


Manuseie com cuidado para evitar danos. Não toque na tela, nem a pressione 
enquanto ajusta o ângulo do monitor.

ENG

FRA

ESP

DEU

POL

SRP

Č

ES

SLO

POR

NOTE / REMARQUE / NOTA / WA

Ż

NE 

/ WA

Ż

NE / NAPOMENA / POZNÁMKA / 

POZNÁMKA


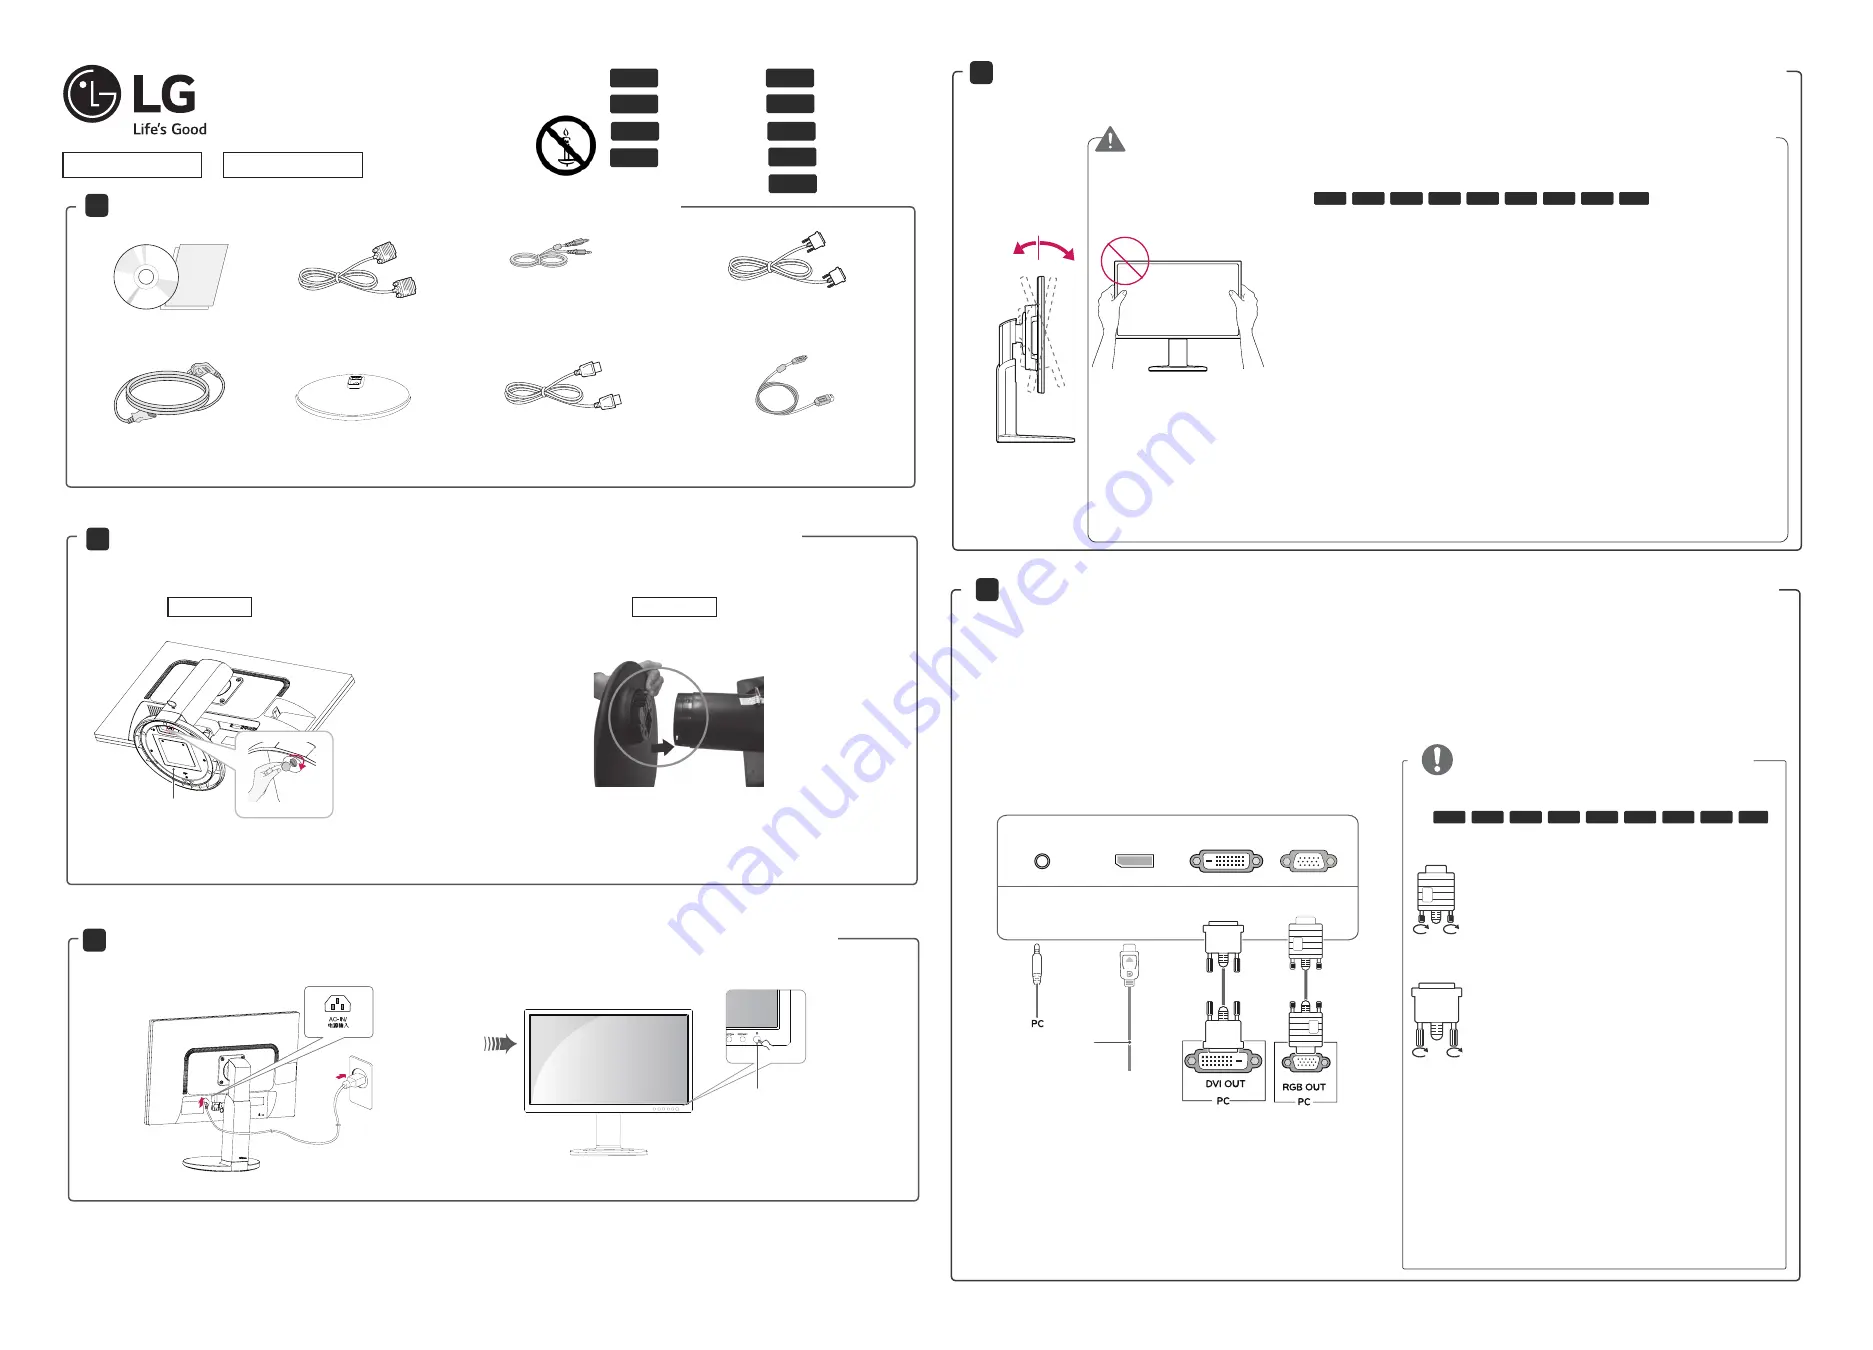
Connect the signal input cable and tighten it 
by turning the screws clockwise.


Raccordez le câble d’entrée de signal et 
serrez-le en tournant les vis dans le sens des 
aiguilles d’une montre.


Conecte el cable de entrada de señal y 
asegúrelo girando en el sentido de las agujas 
del reloj.


Schließen Sie das Eingangskabel an, und 
sichern Sie es, indem Sie die Schrauben im 
Uhrzeigersinn festziehen.


Pod

łą

cz przewód sygna

ł

u wej

ś

ciowego i 

zamocuj jego wtyczk

ę

, dokr

ę

caj

ą

c wkr

ę

ty 

zgodnie z kierunkiem ruchu wskazówek 
zegara.


Priklju

č

ite signalni kabl i pritegnite ga 

okretanjem u pravcu strelice.


P

ř

ipojte kabel vstupního signálu a utáhn

ě

te 

jej otá

č

ením šroub

ů

 ve sm

ě

ru hodinových 

ru

č

i

č

ek.


Pripojte vstupný signálny kábel a upevnite 
ho otá

č

aním skrutiek v smere hodinových 

ru

č

i

č

iek.

ENG

FRA

ESP

DEU

POL

SRP

Č

ES

SLO

POR

ENG

FRA

ESP

DEU

POL

SRP

Č

ES

SLO

POR

RGB

DVI

Front

Rear

(This cable is not included in all countries.) 

(Not Provided)

AUDIO IN

(PC)

DVI-D IN

DP IN

D-SUB IN

Stand Base

DisplayPort Cable

(This cable is not included in all 

countries.)

Summary of Contents for 22MB35PY

Page 1: ...ez sur l écran lorsque vous réglez l angle du moniteur Manipular con cuidado para evitar daños No toque ni apriete la pantalla al ajustar el ángulo del monitor Behandeln Sie das Gerät vorsichtig um Beschädigungen zu vermeiden Berühren oder drücken Sie beim Einstellen des Neigungswinkels des Monitors nicht auf den Bildschirm Z urządzeniem należy obchodzić się ostrożnie aby uniknąć uszkodzeń Podczas...

Page 2: ... zobrazíte kliknutím na súbor index htm ÉnecessárioinstalaroAdobeAcrobatReaderversão4 0ouposteriorparavisualizaroGuiadoUsuáriodoMacintosh http www adobe com O CD ROM é inicializado automaticamente quando inserido no drive apropriado em seguida é aberta a tela principal Quando utilizar o Windows o programa deve ser inici ado automaticamente Caso a Inicialização automática não ocorra automaticamente...

Page 3: ...www lg com OWNER S MANUAL IPS LED MONITOR 22MB35PY 23MB35PY Please read this manual carefully before operating your set and retain it for future reference IPS LED MONITOR MODEL ENGLISH ...

Page 4: ...WARNING This product contains chemicals known to the State of California to cause cancer and birth defects or other reproductive harm Wash hands after handling ...

Page 5: ...ing device 9 Swivel stand 9 Using the Pivot function 10 Mounting on a wall 11 USING THE MONITOR SET 11 Connecting to a PC 11 D SUB connection 11 DVI D connection 13 Peripheral device connection 14 CUSTOMIZING SETTINGS 15 Customizing Settings 15 Menu Settings 16 Picture 17 Color 18 Display 18 Audio 19 Others 20 READER Setting 21 SMART ENERGY SAVING 22 TROUBLESHOOTING 24 SPECIFICATIONS 24 22MB35PY 2...

Page 6: ...y and product life span y y Any damages or injuries by using unapproved accessories are not covered by the warranty y y The accessories supplied with your product may vary depending on the model y y Product specifications or contents in this manual may be changed without prior notice due to upgrade of product functions CAUTION NOTE Stand Base CD Owner s Manual Card D SUB Cable This cable is not in...

Page 7: ...4 ENG ENGLISH ASSEMBLING AND PREPARING Parts and buttons Power Button Power Indicator y y LED On Power is on y y LED Off Power is off Front Side Buttons Input Connectors See p to 13 ...

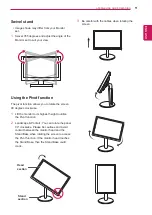
Page 8: ... may look different from the actual prod uct y y Do not carry the monitor upside down as this may cause it to fall off its stand resulting in damage or injury y y To avoid damaging the screen when lifting or moving the monitor only hold the stand or the plastic cover This avoids putting unnec essary pressure on the screen y y Only remove the tape and the locking pin when the monitor is mounted on ...

Page 9: ... PREPARING Detaching the stand body 1 Place the monitor s screen face down To protect the screen from scratches cover the surface with a soft cloth 2 Using a screwdriver remove the four screws and detach the stand from the monitor ...

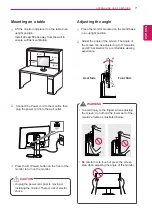
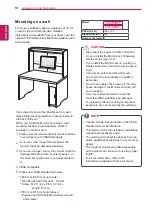
Page 10: ...strated below y y Be careful not to touch or press the screen area when adjusting the angle of the monitor WARNING Mounting on a table 1 Lift the monitor and place it on the table in an upright position Install at least 10 cm away from the wall to ensure sufficient ventilation 2 3 Press the Power button on the front of the monitor to turn on the monitor 10 cm 10 cm 10 cm 10 cm y y Unplug the power...

Page 11: ...ensington lock is optional The accessories can be purchased at your local electronics store NOTE y y Once the pin is removed it is not necessary to re insert it to adjust the height Adjusting the stand height 1 Place the monitor mounted on the stand base in an upright position 2 Remove the tape attached at the bottom rear of the stand body then pull out the locking pin 3 The height can be adjusted...

Page 12: ...on Using the Pivot function The pivot function allows you to rotate the screen 90 degrees clockwise 2 Landscape Portrait You can rotate the panel 90 clockwise Please be cautious and avoid contact between the monitor head and the Stand Base when rotating the screen to access the Pivot function If the monitor head touches the Stand Base then the Stand Base could crack Head section Stand section 3 Be...

Page 13: ... inch and above Please use VESA standard wall mount pad and screws 10 cm 10 cm 10 cm 10 cm y y Disconnect the power cord first and then move or install the Monitor set Otherwise electric shock may occur y y If you install the Monitor set on a ceiling or slanted wall it may fall and result in severe injury y y Use only an authorized LG wall mount and contact the local dealer or qualified personnel ...

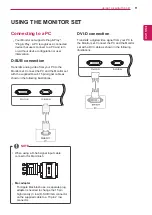
Page 14: ... PC and the Monitor set with the supplied D sub 15 pin signal cable as shown in the following illustrations y y Mac adapter For Apple Macintosh use a separate plug adapter is needed to change the 15 pin high density 3 row D SUB VGA connector on the supplied cable to a 15 pin 2 row connector y y When using a D Sub signal input cable connector for Macintosh NOTE DVI D connection Transmits a digital ...

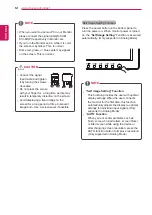
Page 15: ...ess the power button on the bottom panel to turn the power on When monitor power is turned on the Self Image Setting Function is executed automatically Only supported in Analog Mode y y When you want to use two PC in our Monitor please connect the signal cable D SUB DVI D DP respectively in Monitor set y y If you turn the Monitor set on while it is cold the screen may flicker This is normal y y So...

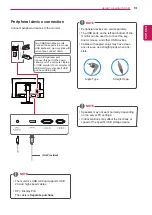
Page 16: ... NOTE NOTE y y Speakers may not work normally depending on the server PC settings y y Virtual solutions may affect the functions or speed of the specific USB storage device NOTE y y The monitor s USB terminal supports USB 2 0 and high speed cables y y DP Display Port The cable is Separate purchase Two USB Downstream ports Connect these ports to a mouse USB keyboard memory stick with current spec u...

Page 17: ...SD Unlocked will appear After selecting the Lock If you want to change to Unlock you can push the MENU button for several seconds The message OSD Unlocked will appear Use this button to enter Reader Mode menu Its function works to display screen as paper like picture for Eye comfort If you want to more information See p 20 Use this button to enter SMART ENERGY SAVING menu See p 21 When adjusting y...

Page 18: ...u use High Wide Original Wide Switch to full screen mode according to input image signal Original Change the input image signal ratio to original This function works only if input resolution is lower than Monitor set ratio 16 9 Reset Restore all factory default settings Press the buttons to reset immediately Menu Next Menu Analog Digital DP Description Picture Contrast To adjust the contrast of th...

Page 19: ...ion settings 3 Enter to Picture by pressing the button 4 Set the options by pressing the or or buttons 5 Select EXIT to leave the OSD menu To return to the upper menu or set other menu items use the up arrow button Each option is explained below Menu Next Menu Picture Description Contrast To adjust the contrast of the screen Sharpness To adjust the clearness of the screen ...

Page 20: ... gamma values display blackish images Color Temp Custom Red Set your own red color levels Green Set your own green color levels Blue Set your own blue color levels Select the screen color Warm Set the screen to warm color temperature more red Medium Set the screen to medium color temperature Cool Set the screen to cool color temperature more blue Six Color Sets and stores the hue and saturation fo...

Page 21: ... pressing the or buttons 6 Select EXIT to leave the OSD menu To return to the upper menu or set other menu items use the up arrow button Each option is explained below Menu Next Menu Display Description Horizontal To move image left and right Vertical To move image up and down Clock To minimize any vertical bars or stripes visible on the screen background The horizontal screen size will also chang...

Page 22: ...menu To return to the upper menu or set other menu items use the up arrow button Each option is explained below Menu Next Menu Others Description Language To choose the language in which the control names are displayed Power Indicator Use this function to set the power indicator on the bottom side of the monitor to On or Off If you set Off it will go off If you set On at any time the power indicat...

Page 23: ...n is adjusted to the best for the newspaper If you want screen more bright you can control brightness in Menu OSD Reader 2 It is a mode that the screen is adjusted to the best for the cartoon If you want screen more bright you can control brightness in Menu OSD Reader Off It is a mode that reader mode is off Each option is explained below NOTE If option of Reader Mode is Reader 1 or Reader 2 SMART...

Page 24: ...ly be Reader Off NOTE SMART ENERGY SAVING 1 Press button on the bottom of the Monitor set to display the SMART ENERGY SAVING OSD 2 Set the options by pressing the buttons Each option is explained below SMART ENERGY SAVING Description High Enables SMART ENERGY SAVING you can save energy with this energy high efficient function Low Enables SMART ENERGY SAVING you can save energy with this energy low...

Page 25: ...n y y When the monitor is on No Signal in 5 minutes the monitor goes to DPM mode Do you see a OSD LOCKED message on the screen Do you see OSD LOCKED when you push MENU button y y You can secure the current control settings so that they cannot be inadvertently changed You can unlock the OSD controls at any time by pushing the MENU button for several seconds the message OSD UNLOCKED will appear Disp...

Page 26: ...display driver from the display driver CD or diskette that comes with your display Or you can also download the driver from our web site http www lg com y y Make sure to check if the video card supports Plug Play function y y Check Control Panel Display Settings and see if the frequency or the resolution were changed If yes readjust the video card to the recommend resolution y y If the recommended...

Page 27: ...oing condition Sleep Mode 0 3 W Off Mode 0 3 W Power Input AC 100 240V 50 60Hz 1 0 A Speaker Wattage 1 W 1 W Dimensions Width x Height x Depth With Stand 50 9 cm x 35 3 cm x 22 4 cm Without Stand 50 9 cm x 30 4 cm x 14 4 cm Weight 4 1 kg Tilt Range 5 to 20 Environmental conditions Operating Temperature Operating Humidity 10 C to 35 C 10 to 80 Storage Temperature Storage Humidity 20 C to 60 C 5 to ...

Page 28: ... 20 4 W Typ Outgoing condition Sleep Mode 0 3 W Off Mode 0 3 W Power Input AC 100 240 V 50 60 Hz 1 0 A Speaker Wattage 1 W 1 W Dimensions Width x Height x Depth With Stand 54 8 cm x 36 7 cm x 24 6 cm Without Stand 54 8 cm x 33 5 cm x 16 8 cm Weight 4 5 kg Tilt Range 5 to 20 Environmental conditions Operating Temperature Operating Humidity 10 C to 35 C 10 to 80 Storage Temperature Storage Humidity ...

Page 29: ... 363 60 1024 x 768 60 023 75 1152 x 864 67 500 75 1280 x 1024 63 981 60 1280 x 1024 79 976 75 1680 x 1050 65 290 60 1920 x 1080 67 500 60 Recommend Mode DP Timing Factory support mode Preset Mode Horizontal Frequency kHz Vertical Frequency Hz DP 480P 31 50 60 O 576P 31 25 50 O 720P 37 50 50 O 720P 45 00 60 O 1080i 28 12 50 O 1080i 33 75 60 O 1080P 56 25 50 O 1080P 67 50 60 O Recommend Mode Indicat...

Page 30: ...R POSTURE Adjust the Monitor set and your posture to allow you to view images at the optimal viewing angle Place your hands gently on the keyboard keeping your arms bent at the elbows and horizontally outright Adjust the location of the Monitor set to avoid it reflecting light ...

Page 31: ... As an ENERGY STAR Partner LGE U S A Inc has determined that this product meets the ENERGY STAR guidelines for energy efficiency ENERGY STAR is a set of power saving guidelines issued by the U S Environmental Protection Agency EPA MODEL SERIAL above information is only for USA FCC Regulatory Declaration of Conformity Trade Name LG Model 22MB35PYI 23MB35PYI Responsible Party LG Electronics Inc Addr...

Reviews: