


6
Macintosh Users / Utilisateurs de Macintosh / Usuarios de Macintosh / Macintosh
Nutzer / U
ż
ytkownicy komputerów Macintosh / Korisnici Macintosh-a / Uživatelé
po
č
íta
čů
Macintosh / Používatelia po
č
íta
č
a Macintosh / Usuários do Macintosh
7
Monitor Driver Installation / Installation du pilote du moniteur / Guía de instalación del monitor /
Installation des Monitortreibers / Instalowanie sterownika monitora / Instaliranje upravlja
č
kog programa za
monitor / Instalace monitorové jednotky / Inštalácia ovláda
č
a monitora / Instalação do driver do monitor
The specifications shown above may be changed without prior notice for quality improvement.
Afin d’améliorer la qualité de ce produit, les spécifications ci-dessus sont sujettes à des modifications sans préavis.
Las especificaciones mostradas arriba pueden cambiar sin previo aviso para mejorar la calidad.
Die Spezifikationen können sich auf Grund von Quälitätsverbesserungen ohne Vorankündigung ändern.
Podane powy
ż
ej parametry mog
ą
zosta
ć
zmienione bez powiadomienia w celu poprawy jako
ś
ci.
Gore navedeni tehni
č
ki podaci mogu da se promene bez prethodnog obaveštenja, radi poboljšanja kvaliteta.
Výše uvedené technické údaje mohou být v rámci zvyšování kvality zm
ě
n
ě
ny bez p
ř
edchozího upozorn
ě
ní.
S cie
ľ
om zvýšenia kvality sa vyššie uvedené technické špecifikácie môžu zmeni
ť
bez predchádzajúceho upozornenia.
As especificações mostradas acima podem ser alteradas sem aviso prévio para fins de melhoria da qualidade.
Specifications / Spécifications / Especificaciones / Technische Daten /
Dane techniczne / Specifikacije / Technické Údaje / Technické Parametre
/ Especificações
8
You need Adobe Acrobat Reader Version 4.0 or higher to read User Guide for Macintosh. (http://www.adobe.com)
●
The CD-ROM automatically boots when inserted into the CD-ROM drive, showing its main screen. When using Windows, the program should start automatically.
●
If it fails Auto Boot and does not launch the main screen, to start automatically:
1) Open the Mac folder by double clicking the desktop icon.
2) Click 'index.htm' to view the main screen.
Vous devez avoir installer Adobe Acrobat Reader Version 4.0 ou une version plus élevée pour lire le Guide Utilisateur pour Macintosh. (http://www.adobe.com)
●
Le CD-ROM démarre automatiquement lorsqu’il est inséré dans le lecteur de CD-ROM, indiquant l’écran principal. Lorsque vous utilisez Windows, le programme démarre
automatiquement.
●
Si la fonction de démarrage automatique ne fonctionne pas et que l’écran principal ne s’ouvre pas, pour procéder au démarrage automatique :
1) Ouvrez le dossier Mac en double-cliquant sur l’icône du bureau.
2) Cliquez sur ‘index.htm’ pour visualiser l’écran principal.
Usted necesita la versión 4.0 o mayor del programa Adobe Acrobat Reader para leer el manual del usuario en Macintosh. (http://www.adobe.com)
●
El CD-ROM inicia automáticamente cuando es introducido en el drive CD-ROM, y muestra su menú principal. Al utilizar Windows, el programa debería inciarse
automáticamente.
●
Si tras el reinicio no aparece en pantalla, fuerce el inicio:
1) Abra el folder Mac pulsando en el ícono del escritorio.
2) Pulse en ‘index.htm’ para ver el menú principal.
Sie benötigen Adobe Acrobat Reader 4.0 oder höher um die Bedienungsanleitung für Macintosh zu lesen. (http://www.adobe.com)
●
Die CD-ROM startet automatisch im CD-ROM Laufwerk und zeigt ihr Hauptmenü. Unter Windows sollte das Programm automatisch starten.
●
Wenn das automatische Starten nicht funktioniert und der Hauptbildschirm nicht angezeigt wird, starten Sie das Programm folgendermaßen:
1) Öffnen Sie den Mac Ordner und Doppelklicken Sie das Desktop Icon.
2) Klicken ‘index.htm' um dass Hauptmenü.
Do czytania Podr
ę
cznika u
ż
ytkownika na komputerze Macintosh potrzebny jest program Adobe Acrobat Reader 4.0 lub nowszy. (http://www.adobe.com)
●
Po w
ł
o
ż
eniu do stacji CD-ROM dysk CD uruchomi si
ę
automatycznie i zostanie wy
ś
wietlony ekran g
ł
ówny. W przypadku korzystania z systemu Windows program powinien
zosta
ć
uruchomiony automatycznie.
●
Je
ś
li program nie uruchomi si
ę
automatycznie i nie zostanie wy
ś
wietlony ekran g
ł
ówny, aby go uruchomi
ć
wykonaj nast
ę
puj
ą
ce czynno
ś
ci:
1) Otwórz folder Mac, klikaj
ą
c dwukrotnie ikon
ę
na pulpicie.
2) Kliknij ikon
ę
'index.htm', aby wy
ś
wietli
ć
ekran g
ł
ówny.
Za
č
itanje korisni
č
kog priru
č
nika za Macintosh, potreban vam je Adobe Acrobat Reader verzija 4.0 ili novija. (http://www.adobe.com)
●
CD-ROM se automatski pokre
ć
e kada ga ubacite u CD-ROM pogon, i prikaže se njegov glavni ekran. Kada se koristi operativni sistem Windows, program bi trebao da se
pokrene automatski.
●
Ako automatsko podizanje sistema ne uspe i ne prikaže se glavni ekran, za automatsko pokretanje:
1) Otvorite Mac folder dvostrukim klikom na ikonicu na radnoj površini.
2) Kliknite ‘index.htm’ da biste videli glavni ekran.
Abyste si mohli p
ř
e
č
íst Uživatelskou p
ř
íru
č
ku pro po
č
íta
č
e Macintosh, pot
ř
ebujete program Adobe Acrobat Reader verze 4.0 nebo nov
ě
jší. (http://www.adobe.com)
●
Disk CD-ROM se po vložení do jednotky CD-ROM automaticky spustí a zobrazí hlavní obrazovku.
●
Pokud se automatické spušt
ě
ní nezda
ř
í a nedojde ke spušt
ě
ní hlavní obrazovky,
1) Otev
ř
ete složku Mac dvojím kliknutím na ikonu na ploše.
2) Kliknutím na možnost „index.htm“ zobrazíte hlavní obrazovku.
Na zobrazenie Používate
ľ
skej príru
č
ky pre po
č
íta
č
e Macintosh potrebujete program Adobe Acrobat Reader vo verzii 4.0 alebo novšej. (http://www.adobe.com)
●
Po vložení do jednotky CD-ROM sa disk CD-ROM automaticky na
č
íta a zobrazí sa jeho hlavná obrazovka.
●
Ak sa disk automaticky nena
č
íta a nezobrazí sa hlavná obrazovka,
1) Otvorte prie
č
inok Mac dvojitým kliknutím na ikonu na pracovnej ploche.
2) Hlavnú obrazovku zobrazíte kliknutím na súbor „index.htm“.
É necessário instalar o Adobe Acrobat Reader versão 4.0 ou posterior para visualizar o Guia do Usuário do Macintosh. (http://www.adobe.com)
●
O CD-ROM é inicializado automaticamente quando inserido no drive apropriado; em seguida, é aberta a tela principal. Quando utilizar o Windows, o programa deve ser inici-
ado automaticamente.
●
Caso a Inicialização automática não ocorra automaticamente e a tela principal não seja aberta:
1) Clique duas vezes no ícone da área de trabalho para abrir a pasta Mac.
2) Clique em ‘index.htm’ para visualizar a tela principal.
ENG
FRA
ESP
DEU
POL
Č
ES
SLO
SRP
FRA
ESP
●
For more information on how to install the monitor driver, refer to the "Monitor Driver Installation & Guide" on the CD-ROM.
●
For products information and drivers visit www.lg.com
●
Pour plus d‘informations sur l‘installation des pilotes du moniteur, reportez-vous au “Monitor Driver Installation & Guide
(Guide d‘installation des pilotes du moniteur)“ sur le CD-ROM.
●
Pour obtenir des renseignements sur votre produit et télécharger les pilotes, visitez notre site www.lg.com/fr
●
Para obtener más información acerca de cómo instalar el controlador del monitor, consulte la “Monitor Driver Installation & Guide
(Guía de instalación de controlador del monitor)” en el CD-ROM.
●
Para información sobre el producto y drivers visite www.lg.com
●
Weitere Informationen wie die Installation der Monitor - Treiber finden Sie auf der CD ROM “Monitor Driver Installation & Guide
(Monitor-Treiber-Installation & Anleitung)”.
●
Für Informationen und Treiber zu unseren Produkten besuchen Sie www.lg.com
●
Aby uzyska
ć
wi
ę
cej informacji na temat instalacji sterownika do monitora, prosimy przeczyta
ć
instrukcj
ę
„Instalacja sterowników monitora” zawart
ą
na p
ł
ycie CD-ROM.
●
Najnowsze wersje sterowników oraz informacje na temat naszych produktów znajd
ą
Pa
ń
stwo na stronie www.lg.com .
●
Za više informacija o tome kako da instalirate upravlja
č
ki program za monitor, pro
č
itajte “Priru
č
nik za instaliranje upravlja
č
kog
programa za monitor” na CD-ROM-u.
●
Za informacije o proizvodima I drajverima posetite www.lg.com
●
Další informace o instalaci monitorové jednotky naleznete v „Pr
ů
vodci instalací monitorové jednotky“ na disku CD-ROM.
●
Informace o výrobcích a jednotkách získáte na adrese www.lg.com
●
Ď
alšie informácie o inštalácii ovláda
č
a monitora nájdete v súbore „Inštalácia ovláda
č
a monitora a sprievodca“ na disku CD-ROM.
●
Informácie o produktoch a ovláda
č
och získate na adrese www.lg.com
●
Para obter mais informações sobre como instalar o driver do monitor, consulte o “Monitor Driver Installation & Guide”
(Guia e Instalação do driver do monitor) no CD-ROM.
●
Para informações e drivers do produto, visite www.lg.com
ENG
DEU
POL
Č
ES
SLO
POR
SRP
POR
ENG
FRA
ESP
DEU
POL
SRP
Č
ES
SLO
POR
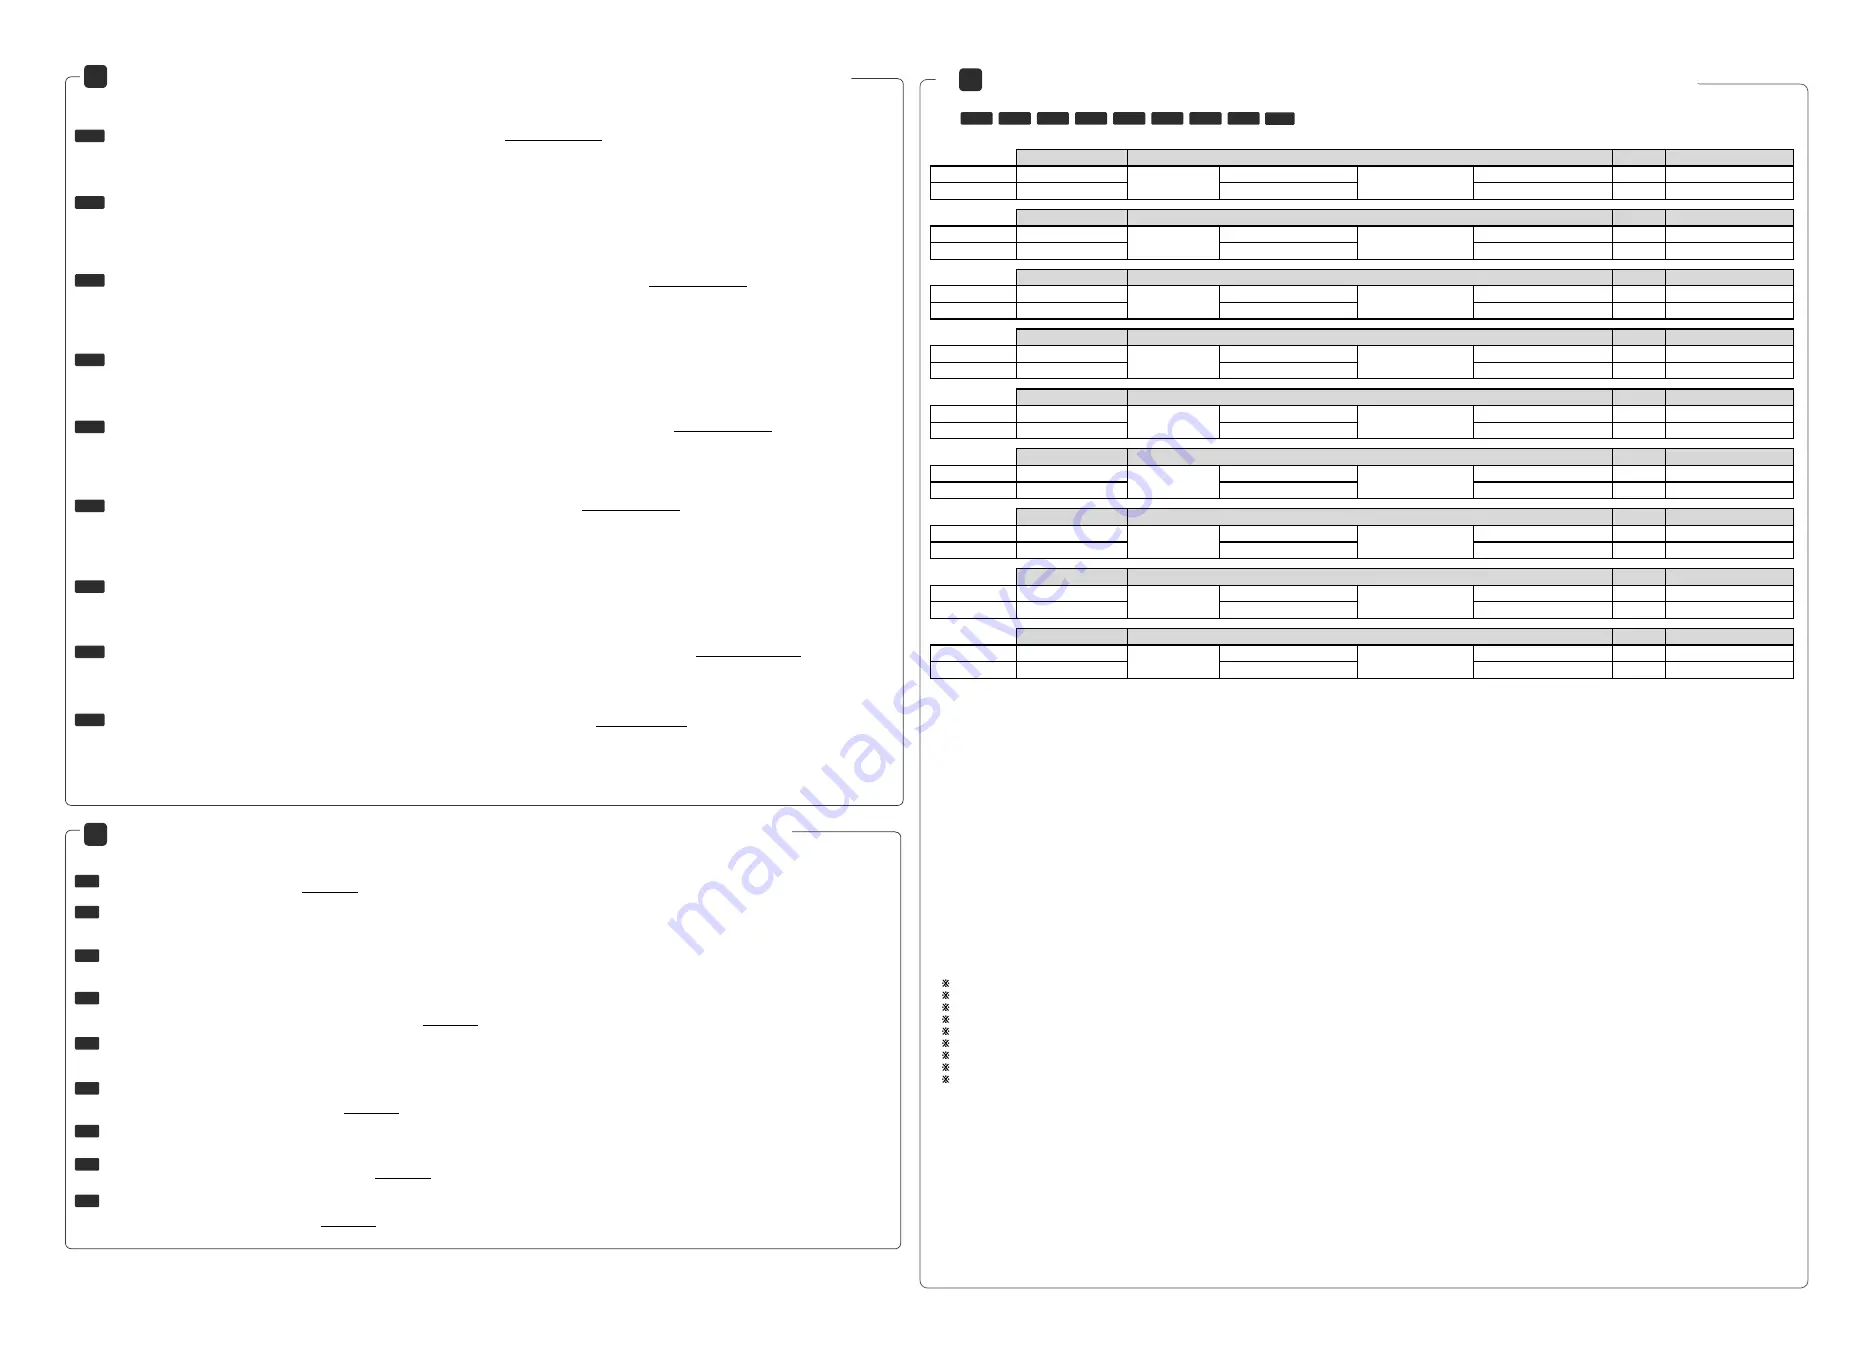
Screen Size
Weight
Recommend Resolution
22MB35PY
24MB35PY
22MB35PY
24MB35PY
22MB35PY
24MB35PY
22MB35PY
24MB35PY
22MB35PY
24MB35PY
22MB35PY
24MB35PY
22MB35PY
24MB35PY
22MB35PY
24MB35PY
22MB35PY
24MB35PY
54.6 cm (21.5 inch)
50.9 cm x 35.3 cm x 22.4 cm
50.9 cm x 30.4 cm x 14.4 cm
3.9 kg
1920 x 1080 @ 60 Hz
60.4 cm (23.8 inch)
56.9 cm x 43.2 cm x 27.1 cm
56.9 cm x 34.2 cm x 6.3 cm
5.1 kg
1920 x 1080 @ 60 Hz
Taille de l'écran
Poids
Résolution recommandée
54,6 cm (21,5 inch)
50,9 cm x 35,3 cm x 22,4 cm
50,9 cm x 30,4 cm x 14,4 cm
3,9 kg
1920 x 1080 @ 60 Hz
60,4 cm (23,8 inch)
56,9 cm x 43,2 cm x 27,1 cm
56,9 cm x 34,2 cm x 6,3 cm
5,1 kg
1920 x 1080 @ 60 Hz
Tamaño de la pantalla
Peso
Resolución recomendada
54,6 cm (21,5 pulg.)
50,9 cm x 35,3 cm x 22,4 cm
50,9 cm x 30,4 cm x 14,4 cm
3,9 kg
1920 x 1080 a 60 Hz
60,4 cm (23,8 pulg.)
56,9 cm x 43,2 cm x 27,1 cm
56,9 cm x 34,2 cm x 6,3 cm
5,1 kg
1920 x 1080 a 60 Hz
Bildschirmgröße
Gewicht
Empfohlene Auflösung
54,6 cm (21,5 Zoll)
50,9 cm x 35,3 cm x 22,4 cm
50,9 cm x 30,4 cm x 14,4 cm
3,9 kg
1920 x 1080 , 60 Hz
60,4 cm (23,8 Zoll)
56,9 cm x 43,2 cm x 27,1 cm
56,9 cm x 34,2 cm x 6,3 cm
5,1 kg
1920 x 1080 , 60 Hz
Rozmiar ekranu
Waga
Zalecana rozdzielczo
ść
54,6 cm (21,5 cala)
50,9 cm x 35,3 cm x 22,4 cm
50,9 cm x 30,4 cm x 14,4 cm
3,9 kg
1920 x 1080 , 60 Hz
60,4 cm (23,8 cala)
56,9 cm x 43,2 cm x 27,1 cm
56,9 cm x 34,2 cm x 6,3 cm
5,1 kg
1920 x 1080 , 60 Hz
ekrana
Težina
Preporu
č
ena rezolucija
54,6 cm (21,5 in
č
a)
50,9 cm x 35,3 cm x 22,4 cm
50,9 cm x 30,9 cm x 14,4 cm
3,9 kg
1920 x 1080 pri 60 Hz
60,4 cm (23,8 in
č
a)
56,9 cm x 43,2 cm x 27,1 cm
56,9 cm x 34,2 cm x 6,3 cm
5,1 kg
1920 x 1080 pri 60 Hz
Velikost obrazovky
Hmotnost
Doporuené rozlišení
54,6 cm (21,5 palc
ů
)
50,9 cm x 35,3 cm x 22,4 cm
50,9 cm x 30,9 cm x 14,4 cm
3,9 kg
1920 x 1080 p
ř
i 60 Hz
60,4 cm (23,8 palc
ů
)
56,9 cm x 43,2 cm x 27,1 cm
56,9 cm x 34,2 cm x 6,3 cm
5,1 kg
1920 x 1080 p
ř
i 60 Hz
Ve
ľ
kos
ť
obrazovky
Hmotnos
ť
Résolution recommandée
54,6 cm (21,5 -palcovy)
50,9 cm x 35,3 cm x 22,4 cm
50,9 cm x 30,9 cm x 14,4 cm
3,9 kg
1920 x 1080 @ 60 Hz
60,4 cm (23,8 -palcovy)
56,9 cm x 43,2 cm x 27,1 cm
56,9 cm x 34,2 cm x 6,3 cm
5,1 kg
1920 x 1080 @ 60 Hz
Tamanho da tela
Peso
Resolução recomendada
54,6 cm (21,5 pol.)
50,9 cm x 35,3 cm x 22,4 cm
50,9 cm x 30,9 cm x 14,4 cm
3,9 kg
1920 x 1080 @ 60 Hz
60,4 cm (23,8 pol.)
56,9 cm x 43,2 cm x 27,1 cm
56,9 cm x 34,2 cm x 6,3 cm
5,1 kg
1920 x 1080 @ 60 Hz
Dimensions (Width x Height x Depth)
Dimenzije (širina x visina x dubina)
Rozm
ě
ry (Ší
ř
ka × výška × hloubka)
Rozmery (Šírka x výška x h
ĺ
bka)
Dimensions (largeur x hauteur x profondeur)
Dimensiones (ancho x alto x profundo)
Abmessungen (Breite x Höhe x Tiefe)
Wymiary (szer. x wys. x g
łę
b.)
With Stand :
Without Stand :
Socle inclus :
Socle non inclus :
Pie incluido :
Pie no incluido :
Ständer enthalten :
Ständer nicht enthalten :
Z podstaw
ą
:
Bez podstawy :
Sa postoljem :
Bez postolja :
S postavcem :
Bez postavce :
Vrátane stojana :
Bez stojana :
Com a base :
Sem a base :
Dimensões (largura x altura x profundidade)


