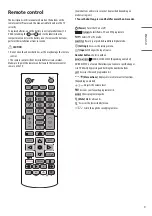
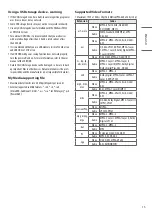
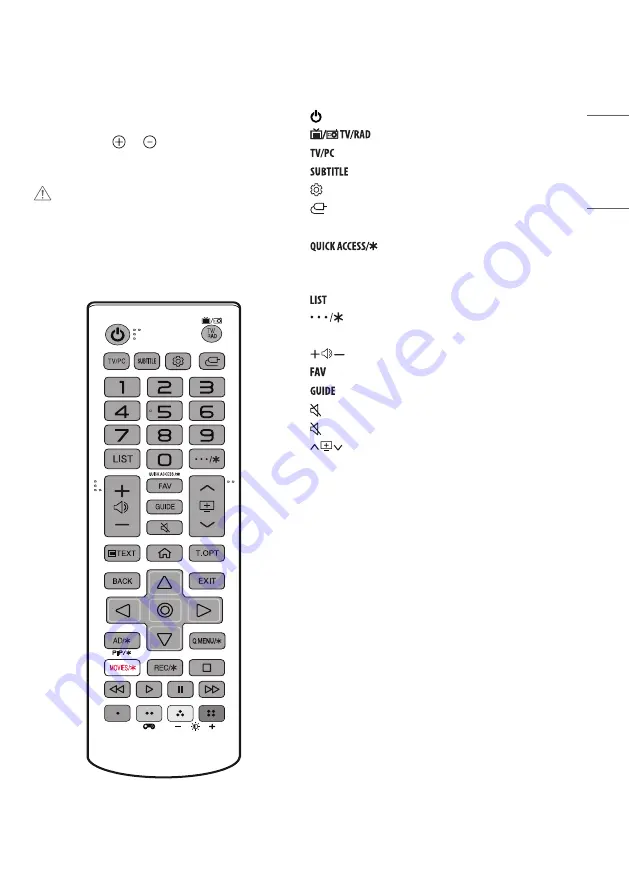
background image

9

ENGLISH

Remote control

The descriptions in this manual are based on the buttons on the 
remote control. Please read this manual carefully and use the TV 
correctly.
To replace batteries, open the battery cover, replace batteries (1.5 
V AAA) matching the   and   ends to the label inside the 
compartment, and close the battery cover. To remove the batteries, 
perform the installation actions in reverse.
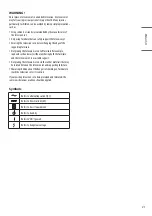
 CAUTION


y

Do not mix old and new batteries, as this may damage the remote 
control.


y

The remote control will not be included for all sales market.

Make sure to point the remote control toward the remote control 
sensor on the TV.

(Some buttons and services may not be provided depending on 
models or regions.)

1 To use the button, press and hold for more than 3 seconds.

 (Power)  

Turns the TV on or off.


Selects Radio, TV and DTV programme.

  Selects TV or PC mode.

  Recalls your preferred subtitle in digital mode.
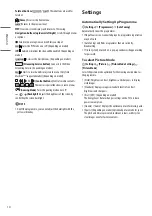
 

(Settings) 

 Accesses the settings menu.


(Inputs)

  Changes the input source.

Number buttons 

 Enters numbers. 

1

  Edits QUICK ACCESS. (Depending on model)

QUICK ACCESS is a feature that allows you to enter a specified app or 
Live TV directly by pressing and holding the number buttons.

  Accesses the saved programme list.

 (More actions)  

Displays more remote control functions. 

(Depending on model)

      Adjusts the volume level. 


Accesses your favourite programme list.


Shows programme guide.

 (Mute)

  Mutes all sounds.

1

  Accesses the [Accessibility] menu.


Scrolls through the saved programmes.

Summary of Contents for 24TL510V

Page 1: ...w lg com Copyright 2019 LG Electronics Inc All Rights Reserved Safety and Reference LED TV OWNER S MANUAL LG LED TV applies LCD screen with LED backlights Please read this manual carefully before operating your TV and retain it for future reference ...

Page 2: ...e information 3 Preparing 3 Lifting and moving the TV 4 Setting up the TV 4 Using the button 5 Mounting on a table 5 Mounting on a wall 6 Connections notifications 7 Remote control 9 Settings 10 To see web manual 16 Maintenance 17 Troubleshooting 17 Specifications 18 ...

Page 3: ...differ slightly from that shown in this manual y y The available menus and options may differ from the input source or product model that you are using y y New features may be added to thisTV in the future y y TheTV can be placed in standby mode in order to reduce the power consumption And theTV should be turned off if it will not be watched for some time as this will reduce energy consumption y y...

Page 4: ... apply excessive pressure to cause flexing bending of frame chassis as it may damage screen CAUTION y y Avoid touching the screen at all times as this may result in damage to the screen y y When handling theTV be careful not to damage the protruding joystick button Depending on model Setting up the TV CAUTION y y When attaching the stand to theTV set place the screen facing down on a cushioned tab...

Page 5: ...er adapter before connecting theTV s power plug to a wall power outlet Using the button y y You can operate yourTV by pressing the button y y Image shown may differ from yourTV Basic functions Power On Press Power Off Press and Hold Menu Control Press1 Menu Selection Press and Hold2 1 You can access and adjust the menu by pressing the button when TV is on 2 You can use the function when you access...

Page 6: ...from the wall Detailed installation instructions are available from your dealer see the optionalTiltWall Mounting Bracket Installation and Setup Guide 100 mm 100 mm 100 mm 100 mm 100 mm If you intend to mount theTV to a wall attachWall mounting interface optional parts to the back of theTV When you install theTV using the wall mounting interface optional parts attach it carefully so it will not dr...

Page 7: ...ot Provided y y Use a signal splitter to use more than 2TVs y y If the image quality is poor install a signal amplifier properly to improve the image quality y y If the image quality is poor with an antenna connected try to realign the antenna in the correct direction y y An antenna cable and converter are not supplied y y Supported DTV Audio MPEG Dolby Digital Dolby Digital Plus HE AAC CAUTION y ...

Page 8: ...t appear until theTV is reset You can change the set value in Home Inputs Input Label Satellite dish connection Only satellite models Connect theTV to a satellite dish to a satellite socket with a satellite RF cable 75 Ω CI module connection Depending on model View the encrypted pay services in digitalTV mode y y Check if the CI module is inserted into the PCMCIA card slot in the right direction I...

Page 9: ...Some buttons and services may not be provided depending on models or regions 1To use the button press and hold for more than 3 seconds Power Turns theTV on or off Selects Radio TV and DTV programme SelectsTV or PC mode Recalls your preferred subtitle in digital mode Settings Accesses the settings menu Inputs Changes the input source Number buttons Enters numbers 1 Edits QUICK ACCESS Depending on m...

Page 10: ...rogramme you cannot adjust the backlight with the yellow or blue key Settings Automatically Setting Up Programme Settings Programmes AutoTuning Automatically tunes the programmes y y If Input Source is not connected properly programme registration may not work y y AutoTuning only finds programmes that are currently broadcasting y y If Lock System is turned on a pop up window will appear asking for...

Page 11: ... y Tint Adjusts the colour balance between red and green displayed on the screen The closer to Red 50 the more red the colour will be The closer to Green 50 the more green the colour will be y y ColourTemperature Adjusts the colour temperature from cold to warm y y Depending on input signal or other picture settings the range of detailed items for adjustment may differ To set advanced control Sett...

Page 12: ...he time taken to display the video signal received from the input device to ensure faster gameplay The screen will flicker when turning DAS Mode On or Off DAS Dynamic Action Sync y y Black Stabilizer Objects can be seen more clearly on a dark screen by adjusting the black levels Increasing the Black Stabilizer value brightens the low gray levels on the screen You can easily distinguish objects on ...

Page 13: ...irectly y y Reset Reset the sound effect settings y y This is only available if Sound Mode is set to Standard To synchronize audio and video Settings Sound AV Sync Adjustment Depending on model Synchronizes video and audio directly when they do not match If you set AV Sync Adjustment to On you can adjust the sound output TV speakers to the screen image y y If you select the Bypass Outputs the broa...

Page 14: ...evices with theTV remote control Manages the multimedia device with theTV remote control y y Main Power Off If Auto Power Sync is set to on in the SIMPLINK settings and turn off yourTV the devices connected to yourTV via SIMPLINK will also be turned off y y Main Power On If Auto Power Sync is set to on in the SIMPLINK settings turning on a SIMPLINK linked device will turn theTV on Behavior may var...

Page 15: ...0 Mbps Mega bit per second y y External supported subtitle formats smi srt sub MicroDVD SubViewer1 0 2 0 ass ssa txt TMplayer psb PowerDivX Supported Video Formats y y Maximum 1920 x 1080 30p Only Motion JPEG 640 x 480 30p Extension Codec asf wmv Video MPEG 4 Part2 Xvid H 264 AVC VC1 WMV3 WVC1 Audio WMA Standard WMA9 Pro MP3 AAC AC3 avi Video MPEG 2 MPEG 4 Part2 Xvid H 264 AVC Audio HE AAC LPCM AD...

Page 16: ...LBR mode M1 up to 5 1 Channel 48 kHz M2 up to 5 1 Channel 96 kHz Support WMA 10 Pro OGG Bit rate 64 Kbps 320 Kbps Sample freq 8 kHz 48 kHz Support Vorbis Supported Photo Formats File Format Item Resolution jpeg jpg jpe Available File Type SOF0 Baseline SOF1 Extend Sequential SOF2 Progressive Photo Size Minimum 64 W x 64 H Maximum NormalType 15360 W x 8640 H Maximum ProgressiveType 1920 W x 1440 H ...

Page 17: ... and not covered by the warranty y y If the aspect ratio of theTV is set to 4 3 for a long period of time image burn may occur on the letterboxed area of the screen y y Avoid displaying a fixed image on theTV screen for a long period of time 2 or more hours for LCD to prevent image burn Troubleshooting Cannot control theTV with the remote control y y Check the remote control sensor on the product ...

Page 18: ...3 3 3 25 28W 19V 1 6 A 28TL520V 649 4 x 420 x 150 1 649 4 x 393 8 x 61 4 4 55 4 5 28W 19V 1 6 A 24TL510V 563 1 x 393 8 x 148 6 563 1 x 340 9 x 58 3 6 3 25 28W 19V 1 6 A 28TL510V 649 4 x 447 8 x 187 5 649 4 x 393 8 x 61 4 4 95 4 5 28W 19V 1 6 A AC DC Adapter Manufacturer Lien Chang Model LCAP16A E Manufacturer Honor Model ADS 40FSG 19 19032GPG In AC 100 240V 50 60 Hz Out DC 19V 1 7 A CI module Size...

Page 19: ...B S S2 DVB T DVB T2 DVB C PAL SECAM B G D K I SECAM L Programme coverage 950 2150 Mhz VHF III 174 230 Mhz UHF IV 470 606 Mhz UHFV 606 862 Mhz S Band II 230 300 Mhz S Band III 300 470 Mhz 46 890 Mhz 46 862 Mhz Maximum number of storable programmes 6000 2000 External antenna impedance 75 Ω Only DVB T2 C S2 support models ...

Page 20: ... 717 59 790 NOTE y y The optimal display resolution is 1366 x 768 60 Hz y y The optimal timing in each mode is vertical frequency 60 Hz HDMI DTV supported mode Resolution Horizontal frequency kHz Vertical frequency Hz 720 x 480 31 469 31 500 59 940 60 000 720 x 576 31 250 50 000 1280 x 720 37 500 44 960 45 000 50 000 59 940 60 000 1920 x 1080i 33 720 33 750 28 125 59 940 60 000 50 000 1920 x 1080p...

Page 21: ...cing the television set on tall furniture for example cupboards or bookcases without anchoring both the furniture and the television set to a suitable support y y Not placing the television set on cloth or other materials that may be located between the television set and supporting furniture y y Educating children about the dangers of climbing on furniture to reach the television set or its contr...

Page 22: ...The model and serial number of the product are located on the back and on one side of the product Record them below in case you ever need service Model Serial No ...

Reviews: