background image

ESP

AÑOL

37

ESPECIFICACIONES

Modo de componente admitido

Resolución

Frecuencia 

horizontal (kHz)

Frecuencia 

vertical (Hz)

720 x 480

15,730

59,940

720 x 480

15,750

60,000

720 x 576

15,625

50,000

720 x 480

31,470

59,940

720 x 480

31,500

60,000

720 x 576

31,250

50,000

1280 x 720

44,960

59,940

1280 x 720

45,000

60,000

1280 x 720

37,500

50,000

1920 x 1080

33,720

59,940

1920 x 1080

33,750

60,000

1920 x 1080

28,125

50,000

1920 x 1080

56,250

50,000

1920 x 1080

67,432

59,940

1920 x 1080

67,500

60,000

Información de conexión del puerto para componente

Puertos para componente 

en el televisor

Y

P

B

P

R

Puertos de salida de video 

del reproductor de DVD

Y

P

B

P

R

Y

B-Y

R-Y

Y

Cb

Cr

Y

Pb

Pr

Modo HDMI (DTV) admitido

Resolución

Frecuencia 

horizontal (kHz)

Frecuencia 

vertical (Hz)

720 x 480

31,469 

31,500

59,940 

60,000

720 x 576

31,250

50,000

1280 x 720

37,500

50,000

1280 x 720

44,960

45,000

59,940 

60,000

1920 x 1080

33,720

33,750

59,940 

60,000

1920 x 1080

28,125

50,000

1920 x 1080

27,000

24,000

1920 x 1080

33,750

30,000

1920 x 1080

56,250

50,000

1920 x 1080

67,430

67,500

59,940

60,000

Modo RGB (PC) / HDMI (PC) admitido

Resolución

Frecuencia 

horizontal (kHz)

Frecuencia 

vertical (Hz)

720 x 400

31,468

70,080

640 x 480

31,469

59,940

640 x 480

37,500

75,000

800 x 600

37,879

60,317

800 x 600

46,875

75,000

1024 x 768

48,363

60,004

1024 x 768

60,023

75,029

1280 x 800

49,702

59,810

1366 x 768

47,717

59,790

La resolución óptima de la pantalla es de 1366 
x 768 a 60Hz. El tiempo óptimo es la frecuen-
cia vertical de 60Hz en cada modo.

NOTA

Summary of Contents for 29LN300B

Page 1: ...OWNER S MANUAL LED TV LG LED TV applies LCD screen with LED backlights Please read this manual carefully before operating the your TV and retain it for future reference ENGLISH 29LN300B P NO MFL68008101 1309 REV00 ...

Page 2: ...asic cable 19 Connecting with a cable box 20 Connecting to a HD receiver DVD Player VCR or Gaming device 20 HDMI Connection 21 HDMI to DVI Connection 22 Component Connection 23 Composite Connection 24 Connecting a USB Device 25 Connecting to a PC 26 HDMI connection 27 HDMI to DVI connection 28 RGB connection 29 REMOTE CONTROL 31 CUSTOMIZING SETTINGS 31 Accessing the Main Menus 32 USING THE USER GU...

Page 3: ... official DivX Certified device that plays DivX video Visit divx com for more information and software tools to convert your files into DivX videos ABOUT DIVX VIDEO ON DEMAND This DivX Certified device must be registered in order to play purchased DivX Video on Demand VOD movies To obtain your registration code locate the DivX VOD section in your device setup menu Go to vod divx com for more infor...

Page 4: ... to the TV 3 Connect an external device to the TV y y Image shown may differ from your TV y y Your TV s OSD On Screen Display may differ slightly from that shown in this manual y y The available menus and options may differ from the input source or product model that you are using y y New features may be added to this TV in the future NOTE ...

Page 5: ...product functions NOTE y y Do not use any pirated items to ensure the safety and product life span y y Any damages or injuries by using unapproved or counterfeit parts or accessories are not covered by the warranty CAUTION y y The items supplied with your product may vary depending on the model y y Product specifications or contents of this manual may be changed without prior notice due to upgrade...

Page 6: ...ENGLISH 6 ASSEMBLING AND PREPARING Remote Control Batteries AAA See p 29 See p 30 Owner s Manual Card Stand Base See p 10 Power Cord See p 12 AC DC Adapter See p 12 ...

Page 7: ...rough the saved channels Adjusts the volume level OK Selects the highlighted menu option or confirms an input SETTINGS Accesses the main menus or saves your input and exits the menus INPUT Changes the input source I Turns the power on or off INPUT OK SETTINGS Remote Control Sensor Standby Light y y Lighting On When Power is turned off y y Lighting Off When Power is turned on Touch Buttons ...

Page 8: ...ENGLISH 8 ASSEMBLING AND PREPARING Connection panel See p 18 ...

Page 9: ...ting the TV read the following to prevent the TV from being scratched or damaged and for save transportation regardless of its type and size Avoid touching the screen at all times as this may result in damage to the screen or some of the pixels used to create images CAUTION y y It is recommended to move the TV in the box or packing material that the TV originally came in y y Before moving or lifti...

Page 10: ...TION y y Lay a foam mat or soft protective cloth on the surface to protect the screen from damage y y When attaching the stand to the TV set place the screen facing down on a cushioned table or flat surface to protect the screen from scratches CAUTION y y Lay a foam mat or soft protective cloth on the surface to protect the screen from damage y y When Detaching the stand to the TV set place the sc...

Page 11: ...ING CAUTION y y Do not carry the monitor upside down as this may cause it to fall off its stand resulting in damage or injury y y The illustration shows a general example of installation and may look different from the actual product ...

Page 12: ... of heat as this may result in fire or other damage CAUTION Mounting on a table 1 Lift and tilt the TV into its upright position on a table Leave a 10 cm minimum space from the wall for proper ventilation Disconnect the power cord first and then move or install the TV Otherwise electric shock may occur CAUTION 10 cm 10 cm 10 cm 10 cm ...

Page 13: ...tor is located at the back of the TV For more information of installation and using refer to the manual supplied with the Kensington security system or visit http www kensington com Connect the Kensington security system cable between the TV and a table The Kensington security system is optional You can obtain additional accessories from most electronics stores NOTE Not Provided ...

Page 14: ...V to a wall attach Wall mounting interface optional parts to the back of the TV When you install the TV using the wall mounting interface optional parts attach it carefully so it will not drop 1 Please Use the screw and wall mount interface in accordance with VESA Standards 2 If you use screw longer than standard the TV might be damaged internally 3 If you use improper screw the product might be d...

Page 15: ...arranty y y Use the screws and wall mounts that meet the VESA standard Any damages or injuries by misuse or using an improper accessory are not covered by the warranty CAUTION y y Use the screws that are listed on the VESA standard screw specifications y y The wall mount kit includes an installation manual and necessary parts y y The wall mount bracket is optional You can obtain additional accesso...

Page 16: ... Light turns amber NOTE If you do not operate the TV within 40 seconds when the setting menu screen appears the setting menus will disappear NOTE WATCHING TV 4 Follow the on screen instructions to customize your TV according to your preferences Language Mode Setting Power Indicator Time Zone User Guide and Tips for FAQ Utilization Auto Tuning Selects Home Use for the home environment Selects the t...

Page 17: ...iously customized settings will switch to the default settings of Store Demo mode in 5 minutes NOTE y y You can also switch the TV from PC mode to TV mode press TV PC y y You can also access Factory Reset by accessing OPTION in the main menus NOTE 5 When the basic settings are complete press OK 6 To turn the TV off press on the TV The Standby Light is turned on If you do not complete the initial s...

Page 18: ... The external device connection may differ from the model y y Connect external devices to the TV regardless of the order of the TV port MAKING CONNECTIONS NOTE Connecting an antenna Connect an antenna cable or cable box to watch TV referring to the following The illustrations may differ from the actual accessories and an RF cable is optional y y Use a signal splitter to use more than 2 TVs y y If ...

Page 19: ... Complete all connections instructions between devices and then connect the power cord to the power outlet to prevent damages to your TV CAUTION Copper wire Not Provided Connecting with a cable box Connect the TV to a cable box and the cable box to a wall antenna socket with 2 RF cables 75 Ω ...

Page 20: ...the digital video and audio signals from an external device to the TV Connect the external device and the TV with an HDMI cable as shown on the following illustration y y Use a High Speed HDMI Cable y y High Speed HDMI Cables are tested to carry an HD signal up to 1080p and higher y y Supported HDMI Audio format Dolby Digital PCM Up to 192 KHz 32k 44 1k 48k 88k 96k 176k 192k DTS Not supported NOTE...

Page 21: ...MI to DVI cable as shown in the following illustration To transmit an audio signal connect an optional audio cable y y If you do not use an optional external speaker connect the external device to the TV with an optional audio cable y y When using the HDMI DVI cable only Single link is supported NOTE Not Provided DVD Blu Ray HD Cable Box HD STB Gaming device Not Provided ...

Page 22: ...he following illustration Component connections support HD but some devices will not output HD on Component due to copyright issues DVD Blu Ray HD Cable Box HD STB Gaming device Not Provided Not Provided y y If cables are installed incorrectly it could case the image to display in black and white or with distorted color y y Check to ensure each cable is matched with the corresponding color connect...

Page 23: ...o signals from an external device to the TV Connect the external device and the TV with the composite cable as shown on the following illustration DVD Blu Ray HD Cable Box HD STB Gaming device Not Provided Check to ensure each cable is matched with the corresponding color connection NOTE ...

Page 24: ... Connecting a USB Device Connect a USB storage device such as s USB flash memory external hard drive MP3 player or a USB memory card reader to the TV and access the MY MEDIA menu to use various multimedia files or USB Not Provided ...

Page 25: ...ult in temporary distortion on the screen y y Avoid displaying a fixed image on the screen for a long period of time to prevent image burn Use a screensaver if possible y y If you do not use an optional external speaker connect the external device to the TV with an optional audio cable y y When using the HDMI DVI cable only Single link is supported NOTE y y If you select Yes the size and image qua...

Page 26: ...change the input label on the TV s HDMI port this can be done in the input menu PC Not Provided y y Use a High Speed HDMI Cable y y High Speed HDMI Cables are tested to carry an HD signal up to 1080p and higher y y If you want to use HDMI PC mode you must set the input label to PC or DVI mode y y Supported HDMI Audio format Dolby Digital PCM Up to 192 KHz 32k 44 1k 48k 88k 96k 176k 192k DTS Not su...

Page 27: ...wn the following illustrations To transmit an audio signal connect an optional audio cable y y If you want to use HDMI PC mode you must set the input label to DVI mode y y If you do not use an optional external speaker connect the PC to the TV with the optional audio cable y y When using the HDMI DVI cable only Single link is supported NOTE Not Provided PC Not Provided ...

Page 28: ... TV Connect the PC and the TV with a D sub 15 pin cable as shown the following illustrations To transmit an audio signal connect an optional audio cable NOTE If you do not use an optional external speaker connect the PC to the TV with the optional audio cable PC Not Provided Not Provided ...

Page 29: ...TV Image shown may differ from your TV CAUTION Do not mix old and new batteries as this may damage the remote control REMOTE CONTROL PAGE POWER Turns the TV on or off LIST Displays the channel table INPUT Selects the input mode TV PC Selects TV or PC mode Q VIEW Alternates between the two last channels selected pressing repeatedly User Guide Accesses the User Guide menu AV MODE Selects an AV Mode ...

Page 30: ... buttons Controls the SIMPLINK compatible devices USB SIMPLINK Colored buttons Red Green Yellow Blue These access special functions in some menus OK Selects menus or options and confirms your input Q MENU Accesses the quick menus SETTINGS Accesses the main menu Navigation buttons Scrolls through menus or options BACK Returns to the previous level INFO Views the information of the currently program...

Page 31: ... access the Customer Support menus y y Press GREEN Button to access the FAQ menus Customer Support Using Customer Support feature y y Software Update y y Picture Test y y Sound Test y y Product Service Info y y User Guide FAQ Shows answers to frequently asked questions about TV viewing and sets the related menus PICTURE LOCK CHANNEL INPUT AUDIO OPTION TIME MY MEDIA Adjusts the image size quality o...

Page 32: ...hows the description of the selected menu You can use ꕌ ꕍto move between pages Zooms in or out the screen User Guide OPTION CHANNEL Setting PICTURE SOUND Setting Advanced Function To use input device To use PIP Picture In Picture To set TV lock options To set language To set caption To set time options To set ODC Over Driving Circuit Information 2 3 1 User Guide OPTION To set language SETTING OPTI...

Page 33: ...ust or dirt on the power cord regularly y y Make sure to turn the power off and disconnect the power cord and all other cables first y y When the TV is left unattended and unused for a long time disconnect the power cord from the wall outlet to prevent possible damage from lightning or power surges CAUTION y y Do not push rub or hit the surface with your fingernail or a sharp object as this may re...

Page 34: ...This is image burn or burn in and not covered by the warranty y y If the aspect ratio of the TV is set to 4 3 for a long period of time image burn may occur on the letterboxed area of the screen y y Avoid displaying a fixed image on the TV screen for a long period of time 2 or more hours for LCD to prevent image burn Preventing Image burn or Burn in on your TV screen ...

Page 35: ...y installed to to No image display and no sound is produced y y Check if the product is turned on y y Check if the power cord is connected to a wall outlet y y Check if there is a problem in the wall outlet by connecting other products The TV turns off suddenly y y Check the power control settings The power supply may be interrupted y y Check if the Auto sleep feature is activated in the Time sett...

Page 36: ... TV D Sub Analog Component AV CVBS HDMI USB Power Rated Voltage 19 V 2 4 A Power Consumption On Mode 40 W typ Off Mode 0 4 W AC DC Adapter Manufacturer LG Innotek Model PSAB L101A Manufacturer Lite On Model PA 1650 64 Manufacturer APD Model DA 48G19 Dimensions Width x Depth x Height Weight With Stand 668 6 mm x 182 1 mm x 457 mm 5 7 kg Without Stand 668 6 mm x 81 9 mm x 405 5 mm 5 4 kg Environment...

Page 37: ...b Pr HDMI DTV supported mode Resolution Horizontal Frequency kHz Vertical Frequency Hz 720 x 480 31 469 31 500 59 940 60 000 720 x 576 31 250 50 000 1280 x 720 37 500 50 000 1280 x 720 44 960 45 000 59 940 60 000 1920 x 1080 33 720 33 750 59 940 60 000 1920 x 1080 28 125 50 000 1920 x 1080 27 000 24 000 1920 x 1080 33 750 30 000 1920 x 1080 56 250 50 000 1920 x 1080 67 430 67 500 59 940 60 000 RGB...

Page 38: ...le from the TV output port of the PC to the RGB IN PC port of the TV or the signal cable from the HDMI output port of the PC to the HDMI IN port on the TV y y Connect the audio cable from the PC to the Audio input on the TV Audio cables are not included with the TV y y If using a sound card adjust PC sound as required y y If the graphic card on the PC does not output analogue and digital RGB simul...

Page 39: ......

Page 40: ...The model and serial number of the TV is located on the back and or one side of the TV Record it below should you ever need service MODEL SERIAL ...

Page 41: ...UAL DEL USUARIO TV LED Los televisores con LED de LG tienen pantallas LCD con luces de fondo LED Lea este manual atentamente antes de hacer funcionar el televisor y consérvelo para futuras consultas ESPAÑOL 29LN300B ...

Page 42: ...icador 20 Conexión con un receptor de HD reproductor de DVD VCR o dispositivo de juego 20 Conexión HDMI 21 Conexión DVI a HDMI 22 Conexión por componente 23 Conexión compuesta 24 Conexión a un dispositivo USB 25 Connecting to a PC 26 Conexión HDMI 27 Conexión HDMI a DVI 28 Conexión RGB 29 CONTROL REMOTO 31 PERSONALIZACIÓN DE LOS AJUSTES 31 Acceso a los menús principales 32 CÓMO UTILIZAR LA GUÍA DE...

Page 43: ...ed que reproduce video DivX Visite www divx com para obtener más información y herramientas de software para convertir los archivos en videos DivX ACERCA DE LA FUNCIÓN DE VIDEO A PEDIDO DIVX este dispositivo con certificación DivX Certified debe registrarse para reproducir películas de video a pedido VOD DivX que se hayan adquirido Para obtener el código de registro busque la sección DivX VOD en e...

Page 44: ...TV puede ser ligeramente diferente de la que se muestra en este manual y y Los menús y las opciones disponibles pueden variar según la fuente de entrada o el modelo de producto que utilice y y Es posible que se agreguen nuevas funciones a este TV en el futuro NOTA 1 Abra el paquete y asegúrese de que todos los accesorios estén incluidos 2 Instale el soporte del TV 3 Conecte un dispositivo externo ...

Page 45: ...n variar según el modelo y y Es posible que cambien las especificaciones del producto o el contenido en el manual sin previo aviso debido a las actualizaciones de las funciones del producto y y Los artículos suministrados con el producto adquirido pueden variar según el modelo y y Es posible que cambien las especificaciones del producto o el contenido del manual sin previo aviso debido a las actua...

Page 46: ...REPARACIÓN Control remoto Baterías AAA Consulte la pág 29 Consulte la pág 30 Manual del propietario Tarjeta Base del soporte Consulte la pág 10 Cable de alimentación Consulte la pág 12 Adaptador de CA CC Consulte la pág 12 ...

Page 47: ...r los canales guardados Ajusta el nivel del volumen OK Selecciona la opción de menú resaltada o confirma una entrada SETTINGS Permite acceder a los menús principales o guardar las entradas y salir de los menús INPUT Cambia la fuente de entrada I Enciende o apaga el aparato INPUT OK SETTINGS Sensor del control remoto Luz de apagado y y Luz de encendido apagada y y Luz de apagado encendida Botón tác...

Page 48: ...ESPAÑOL 8 MONTAJE Y PREPARACIÓN Panel de conexión Consulte la pág 18 ...

Page 49: ...trucciones a continuación para no rayar ni dañar el TV y para transportarlo de forma segura independientemente del tamaño o tipo de aparato No toque la pantalla De lo contrario podría dañar la pantalla o algunos de los píxeles que se usan para generar las imágenes y y Se recomienda trasladar el TV en la caja o el material de embalaje en el que lo recibió al comprarlo y y Antes de mover o levantar ...

Page 50: ...e de espuma o tejido suave de protección en la superficie para que la pantalla no sufra daños y y Para instalar el soporte en la TV coloque la pantalla mirando hacia abajo sobre una mesa o una superficie plana amortiguadas para evitar que se raye la pantalla PRECAUCIÓN y y Coloque una base de espuma o tejido suave de protección en la superficie para que la pantalla no sufra daños y y Para instalar...

Page 51: ...EPARACIÓN PRECAUCIÓN y y No transporte el monitor al revés ya que se puede salir de su soporte y producir daños o lesiones y y La ilustración muestra un ejemplo general de instalación y puede lucir diferente del producto real ...

Page 52: ...incendios u otros daños PRECAUCIÓN Montaje sobre una mesa 1 Levante el TV y déjelo en ubicación vertical sobre la mesa Deje un espacio mínimo de 10 cm entre el TV y la pared para garantizar una ventilación adecuada Primero desconecte el cable de alimentación y luego mueva o instale el TV De lo contrario se pueden producir descarga eléctricas PRECAUCIÓN 10 cm 10 cm 10 cm 10 cm ...

Page 53: ...r más información sobre cómo instalarlo y utilizarlo consulte el manual suministrado con el sistema de seguridad Kensington o visite el sitio http www kensington com Conecte el cable del sistema de seguridad Kensington entre el TV y la mesa El sistema de seguridad Kensington es opcio nal Puede adquirir accesorios adicionales en la mayoría de las tiendas de electrónica NOTA Uso del sistema de segur...

Page 54: ...uración e instalación del soporte de montaje en paredes con inclinación Si desea montar el TV en una pared ponga la interfaz de soporte de pared componentes opcionales en la parte posterior del televisor Al instalar el TV con la interfaz de soporte de pared componentes opcionales póngala con cuidado para que no se caiga el televisor 1 Utilice una interfaz de soporte de pared con forme a los estánd...

Page 55: ... y Use tornillos y un soporte de pared que cumplan con estándar VESA La garantía no cubre daños ni lesiones provocados por el uso incorrecto del aparato o de accesorios no autorizados y y Utilice los tornillos indicados en las especificaciones del estándar VESA y y El conjunto del soporte de pared incluye un manual de instalación y las piezas necesarias y y El soporte de pared es opcional Puede ad...

Page 56: ...rimera vez al TV Cuando el TV esté en modo de ahorro de energía la luz de apagado cambia a color ámbar NOTA NOTA PARA MIRAR TV 4 Siga las instrucciones en pantalla para personalizar el TV según sus preferencias Lenguaje Configuración de modo Indicador de Poder Zona horaria Manual de Usuario y Consejos para el uso de las FAQ Sintonización automática Selecciona Home Use para el ambiente doméstico Se...

Page 57: ...o del hogar seleccione modo Usar en casa y y El modo Demo de tienda es la opción adecuada para las tiendas minoristas y y Si selecciona el modo Demo de tienda la configuración personalizada previa cambiará a la predeterminada del modo Demo de Tienda en dos minutos NOTA NOTA 5 Una vez finalizados los ajustes básicos presione OK 6 Para apagar el TV presione en el TV El indicador de poder se apaga Si...

Page 58: ...proporcionado con el dispositivo conectado y y La conexión del dispositivo externo puede variar según el modelo y y Conecte los dispositivos externos al TV independientemente del orden del puerto del TV ESTABLECIMIENTO DE CONEXIONES Conexión de una antena Para ver televisión conecte una antena cable TV o una caja de cable como se indica a continuación Las ilustraciones pueden diferir de los acceso...

Page 59: ...y realice todas las instrucciones de conexión entre dispositivos y luego conecte el cable de alimentación a la toma de corriente para evitar daños al TV PRECAUCIÓN Alambre de cobre Conexión con un decodificador Conecte el TV a un decodificador y este último a la toma de la antena con 2 cables RF 75 ohm No incluido ...

Page 60: ...te las señales de audio y video digitales desde un dispositivo externo al TV Conecte el dispositivo externo y el TV con el cable HDMI como se muestra en la siguiente figura y y Use un cable HDMI de alta velocidad y y Los cables HDMI de alta velocidad están probados para transportar señales de HD de hasta 1080progresivo y superiores y y Formato de audio HDMI compatible Dolby Digital PCM hasta 192 k...

Page 61: ...HDMI como se muestra en la siguiente figura Para transmitir una señal de audio conecte un cable opcional de audio NOTA y y Si no usa parlantes externos opcionales conecte el dispositivo externo con el TV mediante el cable opcional de audio y y Cuando se utiliza el cable HDMI DVI sólo enlace único es compatible No incluido DVD Blu Ray Caja de cable HD HD STB Dispositivo de juego No incluido ...

Page 62: ...uestra en la siguiente figura Para ver imágenes mediante la exploración progresiva asegúrese de usar el cable para componente NOTA y y Si la instalación de los cables no es la adecuada podría proyectarse una imagen en blanco y negro o con colores distorsionados y y Compruebe que los cables coincidan con las conexiones de color correspondientes DVD Blu Ray Caja de cable HD HD STB Dispositivo de jue...

Page 63: ...nálogas desde un dispositivo externo al TV Conecte el dispositivo externo y el TV con el cable compuesto como se muestra en la siguiente ilustración NOTA Compruebe que los cables coincidan con las conexiones de color correspondientes DVD Blu Ray Caja de cable HD HD STB Dispositivo de juego No incluido ...

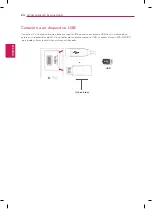
Page 64: ...vo USB Conecte al TV un dispositivo de almacenamiento USB como una memoria USB flash un disco duro externo un reproductor de MP3 o un lector de tarjeta de memoria USB y acceda al menú MIS MEDIOS para poder utilizar los distintos archivos multimedia o USB No incluido ...

Page 65: ...la pantalla con lo dedos por mucho tiempo ya que puede generar una distorsión temporal de la pantalla y y Evite mostrar una imagen fija en la pantalla por un período prolongado a fin de prevenir la degradación de la imagen por sobreexubicación Use un protector de pantalla si es posible y y Si se utiliza un cable HDMI DVI solo se admite un enlace NOTA NOTA y y Si selecciona Sí el tamaño y calidad d...

Page 66: ...na etiqueta de entrada para conectar la PC con el TV mediante una conexión HDMI y y Use un cable HDMI de alta velocidad y y Si no puede escuchar el sonido en el modo HDMI verifique el entorno de la PC y y Si desea utilizar el modo HDMI PC debe ajustar la etiqueta de entrada en el modo PC y y Formato de audio HDMI compatible Dolby Digital PCM hasta 192 kHz 32k 44 1k 48k 88k 96k 176 k 192k no compat...

Page 67: ... la PC con el TV mediante el cable opcional de audio y y Cuando se utiliza el cable HDMI DVI sólo enlace único es compatible Conexión HDMI a DVI Transmite la señal de video digital desde la PC al TV Conecte la PC y el televisor con el cable de HDMI a DVI como se muestra en las siguientes figuras Para transmitir una señal de audio conecte un cable opcional de audio No incluido PC No incluido ...

Page 68: ...cte la PC y el televisor con el cable de señal D sub de 15 clavijas como se muestra en las siguientes figuras Para transmitir una señal de audio conecte un cable opcional de audio NOTA Si no usa parlantes externos opcionales conecte la PC con el TV mediante el cable opcional de audio PC No incluido No incluido ...

Page 69: ...e diferir de su TV PRECAUCIÓN No use baterías nuevas junto con otras usadas ya que esto puede dañar el control remoto PAGE POWER Enciende o apaga el TV LIST Muestra la tabla de canales INPUT Selecciona el modo de entrada TV PC Selecciona el modo TV o PC Q VIEW Permite alternar entre los dos últimos canales seleccionados al presionar repetidamente Guía del usuario Permite acceder al menú Guía del u...

Page 70: ...s compatibles con SIMPLINK USB SIMPLINK Botones de color Rojo Verde Amarillo Azul Permiten acceder a funciones especiales en algunos menús OK Permite seleccionar menús u opciones y confirmar lo ingresado Q MENU Permite acceder a los menús rápidos SETTINGS Permite acceder a los menús principales Botones de navegación Permiten desplazarse por los menús o las opciones BACK Permite volver al nivel ant...

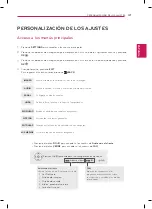
Page 71: ...sistencia al cliente y y Presione el botón VERDE para acceder a los menús de FAQ Asistencia al cliente Uso de la función de Asistencia al cliente y y Act Software y y Prueba de imagen y y Prueba de sonido y y Inform producto servicio y y Guía del Usuario FAQ Muestra las respuestas a las preguntas más frecuentes sobre ver televisión y establece los menús relacionados IMAGEN BLOQUEAR CANAL ENTRADAS ...

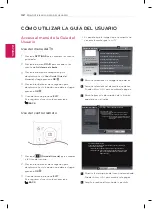
Page 72: ...iona el idioma que desea para ver transmisiones digitales que contengan varios idiomas de audio Cerrar Zoom In OPCIÓN Configuración CANAL Configuración IMAGEN AUDIO Función avanzada Información Cerrar Zoom Out Ajuste OPCIÓN Lenguaje Puede seleccionar el idioma del menú que se muestra en la pantalla y la transmisión de sonido digital yy Idioma del menú selecciona un idioma para el menú en pantalla yy...

Page 73: ...edad acumulados en el cable de alimentación y y En primer lugar asegúrese de apagar la energía y desconectar el cable de alimentación y todos los demás cables y y Cuando no utilice el TV durante mucho tiempo desconecte el cable de alimentación de la toma de corriente para evitar posibles daños por descargas o sobrecargas de energía y y No ejerza presión refriegue ni golpee la superficie con las uñ...

Page 74: ...ón o quemadura de pantalla y no está cubierto por la garantía y y Si la relación de aspecto del TV se establece durante mucho tiempo en 4 3 se puede producir una degradación de imagen en las zonas de bandas y y Evite emitir imágenes fijas en la pantalla del TV durante períodos prolongados dos horas o más para televisores LCD para impedir la degradación de la imagen Cómo evitar el efecto de degrada...

Page 75: ...tra ninguna imagen ni se emite sonido y y Revise si el producto está encendido y y Compruebe que el cable de alimentación esté conectado a la toma de la pared y y Conecte otros productos para revisar si hay un problema con la toma de la pared El TV se apaga repentinamente y y Revise la configuración del control de energía Es posible que el suministro eléctrico se interrumpa y y Compruebe si la fun...

Page 76: ...o de PC Componente AV CVBS HDMI USB Alimentación Voltaje nominal 19 V 2 4 A Consumo de energía Modo encendido 40 W típico Modo apagado 0 4 W Adaptador de CA CC Fabricante LG Innotek Modelo PSAB L101A Fabricante Lite On Modelo PA 1650 64 Fabricante APD Model DA 48G19 Dimensiones ancho x alto x profundidad Peso Con soporte 668 6 mm x 182 1 mm x 457 mm 5 7 kg Sin soporte 668 6 mm x 81 9 mm x 405 5 mm...

Page 77: ...Y R Y Y Cb Cr Y Pb Pr Modo HDMI DTV admitido Resolución Frecuencia horizontal kHz Frecuencia vertical Hz 720 x 480 31 469 31 500 59 940 60 000 720 x 576 31 250 50 000 1280 x 720 37 500 50 000 1280 x 720 44 960 45 000 59 940 60 000 1920 x 1080 33 720 33 750 59 940 60 000 1920 x 1080 28 125 50 000 1920 x 1080 27 000 24 000 1920 x 1080 33 750 30 000 1920 x 1080 56 250 50 000 1920 x 1080 67 430 67 500...

Page 78: ...te y y Conecte el cable de señal desde el puerto de salida para TV de la PC al puerto RGB PC del TV o bien conecte el cable de señal del puerto de salida HDMI de la PC al puerto HDMI IN del TV y y Conecte el cable de audio desde la PC a la entrada de audio del TV Los cables de audio no se incluyen con el TV y y Si utiliza una tarjeta de sonido ajuste el sonido de la PC según sea necesario y y Si l...

Page 79: ......

Page 80: ...lo y el número de serie del TV se encuentran en la parte posterior y en uno de los costados del TV Regístrelos en el espacio a continuación por si alguna vez necesita recurrir al servicio técnico MODELO SERIE ...

Reviews: