background image

P/NO: MFL32196504 (0705-REV06)

Printed in Korea

3

32

2LLC

C2

2R

RR

R

**

4

42

2P

PC

C1

1R

RR

R

**

3

37

7LLC

C2

2R

RR

R

**

5

50

0P

PB

B2

2R

RR

R

**

4

42

2LLC

C2

2R

RR

R

**

P

Plleeaassee  rreeaad

d  IIn

nffo

orrm

maattiio

on

n  

M

aan

nu

uaall  iin

nccllu

ud

deed

d

tto

og

geetth

heerr  b

beeffo

orree  rreeaad

diin

ng

g  tth

hiiss  m

maan

nu

uaall  aan

nd

d  o

op

peerr--

aattiin

ng

g  yyo

ou

urr  sseett..

Retain it for future reference.
Record model number and serial number of the set. 
See the label attached on the back cover and quote 
this  information to your dealer when you require service.

Model number

:

Serial number

:

LCD TV

LCD TV MODELS

PLASMA TV MODELS

PLASMA TV

OWNER’s MANUAL

MFL32196504en_070508_cover  5/8/07  11:36 AM  Page 1

Summary of Contents for 32LC2RR Series

Page 1: ...et th he er r b be ef fo or re e r re ea ad di in ng g t th hi is s m ma an nu ua al l a an nd d o op pe er r a at ti in ng g y yo ou ur r s se et t Retain it for future reference Record model number and serial number of the set See the label attached on the back cover and quote this information to your dealer when you require service Model number Serial number LCD TV LCD TV MODELS PLASMA TV MODEL...

Page 2: ......

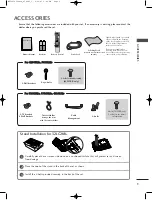
Page 3: ...W LIST TEXT OK VOL PR MULTIMEDIA POWER CABLE HOLD REVEAL TIME EXIT MARK LIVE TV TIME SHIFT TIME SHIFT TIME MACHINE Remote Control Power Cord Polishing Cloth Polish the screen with the cloth Option Slightly wipe stained spot on the exterior only with the cleansing cloths for the product exterior if there is stain or fingerprint on surface of the exterior Do not wipe roughly when removing stain Plea...

Page 4: ...hift function 30 31 Recording 32 33 Watching Record 34 Recorded TV 35 Recorded program Selection and Popup Menu 35 36 Playing recorded programs 36 Using the remote control 37 Manual Recording 38 Scheduled List 39 Video Quality 39 Format hard disk 40 PIP POP Twin Picture PIP Picture In Picture Feature 41 Watching PIP 41 Adjusting PIP Transparency PIP mode only 41 Programme Selection for Sub Picture...

Page 5: ...r 64 Adjusting Sound Control 65 TV Speaker 65 Stereo Dual Reception 66 NICAM Reception option 67 Sound Output Selection 67 Time Menu Options Setting the Clock 68 Setting the On Off Time 69 Auto Sleep 70 Sleep Timer 70 Special Menu Options Child Lock 71 ISM Method Image Sticking Minimization 72 Low Power 73 XD Demo 73 Index option 74 Screen Menu Options Auto Config 75 Manual Config 76 Selecting Wid...

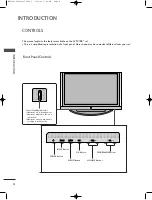
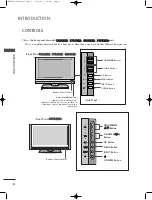
Page 6: ...erent from your set Front Panel Controls PR VOL OK MENU INPUT PROGRAMME Buttons VOLUME Buttons MENU Button OK Button INPUT Button POWER Button PR VOL OK MENU INPUT Power Standby Indicator illuminates red in standby mode illuminates white when the set is switched on illuminates orange when manual recording in stanby mode PR VOL OK MENU INPUT MFL32196504en_070209_1 2 12 07 3 02 PM Page 4 ...

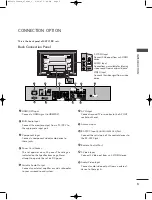
Page 7: ...TROL SERVICE Port Connect the serial port of the control devices to the RS 232C jack Remote Control Port S Video Input Connect S Video out from an S VIDEO device Audio Video Input Connect audio video output from an external device to these jacks 1 2 3 4 5 6 7 8 9 10 1 1 RGB IN AV IN 2 L MONO R AUDIO AUDIO VIDEO VIDEO RGB PC DTV PC DTV AUDIO RGB DVI CONTROLIN REMOTE S VIDEO S VIDEO AC IN HDMI DVI I...

Page 8: ... red in standby mode illuminates white when the set is switched on illuminates orange when manual recording in stanby mode PROGRAMME Buttons VOLUME Buttons OK Button MENU Button INPUT Button POWER Button Front Panel 3 32 2L LC C2 2R RR R 3 37 7L LC C2 2R RR R 4 42 2L LC C2 2R RR R Front Panel 5 50 0P PB B2 2R RR R Side Panel PR VOL OK MENU INPUT PR PR VOL VOL OK OK MENU MENU INPUT INPUT POWER Butt...

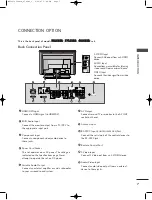
Page 9: ... set Antenna Input RS 232C Input CONTROL SERVICE Port Connect the serial port of the control devices to the RS 232C jack Remote Control Port S Video Input Connect S Video out from an S VIDEO device Audio Video Input Connect audio video output from an external device to these jacks 1 2 3 4 5 6 7 8 9 10 1 1 AC IN AV IN 2 AUDIO AUDIO VIDEO VIDEO S VIDEO S VIDEO L MONO R RGB IN RGB PC DTV PC DTV AUDIO...

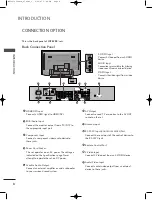
Page 10: ...S 232C Input CONTROL SERVICE Port Connect the serial port of the control devices to the RS 232C jack Remote Control Port S Video Input Connect S Video out from an S VIDEO device Audio Video Input Connect audio video output from an external device to these jacks 1 2 3 4 5 6 7 8 9 10 1 1 RGB IN RGB IN RGB PC DTV PC DTV AUDIO RGB DVI CONTROLIN REMOTE AC IN HDMI DVI IN RS 232C IN CONTROL SERVICE VIDEO...

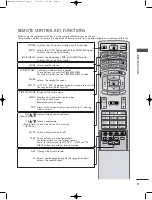
Page 11: ...ndby Selects the Component RGB or HDMI DVI modes switches the set on from standby Selects another device Controls a video cassette recorder These buttons are used for TIME MACHINE For further details see the TIME MACHINE section Selects the wanted functions In TV AV1 AV2 Component modes screen returns to the live programme Refer to p 37 Brings up the Home menu Displays on screen menus one by one E...

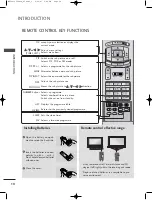
Page 12: ... programme for the sub picture Alternates between main and sub picture Selects the input mode for the sub picture Adjusts the sub picture size Moves the sub picture to D D E E or F F G G direction Selects a programme Selects numbered items in a menu Switchs the set on from standby Displays the programme table Returns to the previously viewed programme Sets the sleep timer Selects a favourite progr...

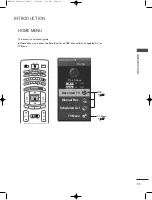
Page 13: ... Menu MODE INPUT TV DVD VCR AUDIO PIP PR PIP PR SWAP PIP INPUT STB MENU OK VOL PR MULTIMEDIA CABLE EXIT MARK LIVE TV TIME SHIFT TIME SHIFT POWER MUTE TEXT TIME MACHINE DVR p p 2 29 9 TV Menu p p 4 47 7 Home Free Space 3h 19m High Normal 5h 24m Manual Rec Recorded TV Scheduled List TV Menu TIME MACHINE MFL32196504en_070209_1 2 12 07 3 02 PM Page 11 ...

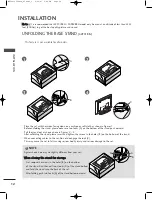
Page 14: ...the screen facing down on a cushion or soft cloth as shown in Figures 1 Before unfolding the stand please make sure two locks A on the bottom of the stand push outward Pull the stand out as shown above in Figures 2 3 After unfolding the stand please insert and tighten the screws in the holes B on the bottom of the stand When connecting cables to the set Do not disengage the lock C This may cause t...

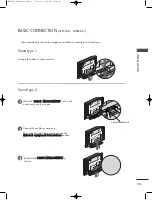
Page 15: ...es as necessary To connect an additional equipment see the E Ex xt te er rn na al l e eq qu ui ip pm me en nt t C Co on nn ne ec ct ti io on ns s section Reinstall the C CA AB BL LE E M MA AN NA AG GE EM ME EN NT T as shown 1 2 3 CABLE MANAGEMENT These models have two cable arrangement methods according to the stand type Stand type 1 Stand type 2 MFL32196504en_070209_1 2 12 07 3 02 PM Page 13 ...

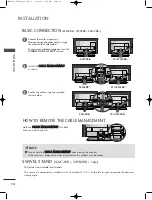
Page 16: ...ly swivelled on its stand about 20 30 to the left or right to provide the optimum viewing angle This feature is not available for all models BASIC CONNECTION 32LC2RR 37LC2RR 42LC2RR Connect the cables as necessary After connecting the cables neatly arrange the cables to the Cable Holder To connect an additional equipment see the CONNECTIONS SETUP section 1 Install the C CA AB BL LE E M MA AN NA AG...

Page 17: ...so it becomes horizontal between the wall and the set Use the eye bolts or set brackets bolts to fix the set to the wall as shown in the picture If your set has the bolts in the eye bolts position before inserting the eye bolts loosen the bolts Insert the eye bolts or set brackets bolts and tighten them securely in the upper holes Secure the wall brackets with the bolts not provided as parts of th...

Page 18: ...lation and Setup Guide G GR RO OU UN ND DI IN NG G Ensure that you connect the earth ground wire to prevent possible electric shock If grounding methods are not pos sible have a qualified electrician install a separate circuit breaker Do not try to ground the unit by connecting it to telephone wires lightening rods or gas pipes Power Supply Short circuit Breaker The set can be installed in various...

Page 19: ...ings Apartments Connect to wall antenna socket Single family Dwellings Houses Connect to wall jack for outdoor antenna Outdoor Antenna Wall Antenna Socket VHF Antenna UHF Antenna RF Coaxial Wire 75 ohm Turn clockwise to tighten ANTENNA IN ANTENNA IN In poor signal areas to get better picture quality install a signal amplifier to the antenna as shown to the right If signal needs to be split for two...

Page 20: ...the P PL LA AY Y button on the VCR and match the appropriate programme between the TV and VCR for viewing V VC CR R When connecting with a RCA cable S VIDEO OUT IN R AUDIO L VIDEO 3 4 OUTPUT SWITCH ANT OUT ANT IN ANTENNA IN ANTENNA IN MONO AUDIO VIDEO S VIDEO AV IN 1 AUDIO OUT VARIABLE AV OUT AUDIO VIDEO S VIDEO AV IN 1 V VC CR R Connect the A AU UD DI IO O V VI ID DE EO O jacks between TV and VCR...

Page 21: ...DE EO O input on the set The picture quality is improved compared to normal com posite RCA cable input Connect the audio outputs of the VCR to the A AU UD DI IO O input jacks on the set Insert a video tape into the VCR and press PLAY on the VCR Refer to the VCR owner s manual Select A AV V1 1 input source with using the I IN NP PU UT T button on the remote control NOTE G G If both S Video and VIDE...

Page 22: ...e corresponding external equipment Refer to external equipment operating guide 1 2 3 AUDIO OUT VARIABLE AV OUT MONO AUDIO VIDEO S VIDEO AV IN 1 EXTERNAL STEREO Use to connected either an external amplifier or add a sub woofer to your surround sound system Connect the input jack of the stereo s amplifier to the V VA AR RI IA AB BL LE E A AU UD DI IO O O OU UT T jacks on the set Set up your speakers...

Page 23: ...layer insert a DVD Select A AV V1 1 input source with using the I IN NP PU UT T button on the remote control Refer to the DVD player s manual for operating instructions 4 4 5 5 1 2 3 1 2 Connect the HDMI output of the DVD to the H HD DM MI I D DV VI I I IN N jack on the set Select H HD DM MI I D DV VI I input source with using the I IN NP PU UT T button on the remote control Refer to the DVD playe...

Page 24: ...ct Component1 or Component2 input source with using the I IN NP PU UT T button on the remote control Refer to the DVD player s manual for operating instructions D DV VD D 4 4 5 5 1 2 3 B R R AUDIO L RGB IN RGB PC DTV VIDEO COMPONENT IN AUDIO 2 1 1 2 NOTE G G C Co om mp po on ne en nt t I In np pu ut t p po or rt ts s To get better picture quality connect a DVD player to the component input ports a...

Page 25: ...ith a HDMI cable Connect the HDMI output of the digital set top box to the H HD DM MI I D DV VI I I IN N jack on the set Select H HD DM MI I D DV VI I input source with using the I IN NP PU UT T button on the remote control Turn on the digital set top box Refer to the owner s manual for the digital set top box D Di ig gi it ta al l S Se et t t to op p B Bo ox x G G Set can receive the video and au...

Page 26: ... Auto DVI function the output resolution of the digital set top box will be automatically set to 1280x720p G G If the digital set top box does not support Auto DVI you need to set the output resolution appropriately To get the best picture quality adjust the output resolution of the digital set top box to 1280x720p R AUDIO L DVI OUTPUT RGB IN RGB PC DTV HDMI DVI IN RS 232C IN CONTROL SERVICE RGB I...

Page 27: ...I I D DV VI I input source with using the I IN NP PU UT T button on the remote control G G If the PC has a DVI output and no HDMI output a separated audio connection is necessary G G If the PC does not support Auto DVI you need to set the output resolution appropriately To get the best picture quality adjust the output resolution of PC graphics card s output resolu tion to 1024x768 60Hz R AUDIO L ...

Page 28: ... cable from the monitor output port of the PC to the RGB PC DTV port of the set or the signal cable from the HDMI output port of the PC to the HDMI DVI port on the set G Connect the audio cable from the PC to the Audio input on the set Audio cables are not included with the set G If using a sound card adjust PC sound as required G This set uses a VESA Plug and Play Solution The set provides EDID d...

Page 29: ...equency KHz Frequency Hz 640x350 Supported Display Resolution RGB HDMI mode 42PC1RR 50PB2RR 720x400 640x480 848x480 800x600 852x480 832x624 1024x768 1360x768 1366x768 1 152x864 1280x768 Supported Display Resolution RGB HDMI mode 32LC2RR 37LC2RR 42LC2RR 31 468 31 469 37 684 37 879 46 875 49 725 48 363 56 47 60 123 47 776 47 720 47 720 70 8 59 94 75 00 60 31 75 00 74 55 60 00 70 00 75 029 59 870 59 ...

Page 30: ...he volume If you want to switch the sound off press the M MU UT TE E button You can cancel this function by pressing the M MU UT TE E V VO OL L D D E E or I I I II I button Volume Adjustment 1 1 2 3 Press the P PR R D D E E or NUMBER button to select a pro gramme number Programme selection 1 Press the E EX XI IT T button to return to normal TV viewing Press the M ME EN NU U button and then use D D...

Page 31: ... E E button to select the T Ti im me es sh hi if ft t Press the G G button and then use D D E E button to select O On n or O Of ff f Press the EXIT button to return to normal TV viewing 2 3 4 1 1 2 3 MODE TV DVD VCR AUDIO PIP PR PIP PR SWAP PIP INPUT STB MENU OK CABLE EXIT MARK LIVE TV TIME SHIFT TIME SHIFT TIME MACHINE Timeshift Recorded TV Manual Recording Scheduled List Video Quality Format Har...

Page 32: ...disk is 80 GB 4 GB minimum is reserved for Timeshift When turning power on it may take up to maximum 3 minutes to initialize the HDD The Recording function will not initiate for a copy protected program Because an analog broadcast is transfered to a digital signal video that contains rapid move ment may show cross stripes This happens when the analog signal is compressed and then restored in the d...

Page 33: ...uring playback press the P Pa au us se e button Still screen is displayed Repetedly press the P Pa au us se e button to advance frame by frame Press the P Pa au us se e button and then use the F FF F button for slow motion as showing the When using the F F or G G button during playback the cursor can be viewed on the screen Press the P PL LA AY Y button to return to normal playback If you want to ...

Page 34: ...s shown below RECORDING Instant Record Use this function to record the program you are watching on the main screen This function records the currently displayed programme 1 10 0m mi in n 2 20 0m mi in n 3 30 0m mi in n 4 40 0m mi in n 5 50 0m mi in n 6 60 0m mi in n 1 10 0m mi in n 2 20 0m mi in n 3 30 0m mi in n 4 40 0m mi in n 5 50 0m mi in n 6 60 0m mi in n N No o C Ch ha an ng ge e While recor...

Page 35: ...pe is recoreded this may cause dam age to the recording quality It will be stored separately the programme according to the colour system signal The extra recording time added to existing setting equals the final recording time After adjusting the recording time select O OK K The Status bar will be displayed Press the E EX XI IT T button to hide the Status bar Press the O OK K button to display th...

Page 36: ...rded in Watching Record When changed to the programme recorded in Watching Record the screen is changed to Instant Record state or Reserved Record state CAUTION If you turn the power off on recording this message is displayed as shown below If you selects No recording stops and then power is off If you selects Yes recording continues and the power is turned off If you press the EXIT button to disa...

Page 37: ...High Normal 5h 24m Manual Rec Recorded TV Scheduled List TV Menu Input TV 19 Date Sun Jan 1 2006 Duration 1 min Quality High Page 1 2 0 marked No Title TV 19 Sun Jan 1 02 47 No Title TV 19 Sun Jan 1 02 46 No Title TV 53 Sun Jan 1 00 23 No Title TV 53 Sun Jan 1 00 18 No Title TV 58 Sun Jan 1 00 04 Popup Menu Move page Mark Exit Free Space 3h 19m High Normal 5h 24m Input TV 19 Date Sun Jan 1 2006 Du...

Page 38: ...versified playback screen as shown below At first an icon showing current playback mode is displayed as marking Then press the O OK K button to display the progress bar To stop displaying the recorded programs icon press the E EX XI IT T button T Th he e P Pr ro og gr re es ss s B Ba ar r This function indicates a possible DVR reshowing section a current on screen and real on broadcasting position...

Page 39: ...us se e button Still screen is displayed Repetedly press the P Pa au us se e button to advance frame by frame Press the P Pa au us se e button and then use the F FF F button for slow motion as showing the When using the F F or G G button during playback the cursor can be viewed on the screen Press the P PL LA AY Y button to return to normal playback If you want to return to the current live broadc...

Page 40: ... ra at ti io on n F Fr re eq qu ue en nc cy y After setting the M Ma an nu ua al l R Re ec c press the O OK K button TIME MACHINE I In np pu ut t Select the input source from the TV AV1 AV2 Component1 Component2 P PR R Select either the current programme or a scanned programme D Da at te e You can select a date up to one month in the future T Ti im me e D Du ur ra at ti io on n Ensure you have set...

Page 41: ... Quality Press the G G button and then use D D E E button to select H Hi ig gh h or N No or rm ma al l Press the EXIT button to return to normal TV viewing 2 3 4 1 2 3 Timeshift Recorded TV Manual Recording Scheduled List Video Quality Format Hard Disk STATIONO PICTUREO SOUNDO TIMEO SPECIALO SCREENO PIP DWO DVR Menu MENU Move High Normal Timeshift Recorded TV Manual Recording Scheduled List Video ...

Page 42: ...D DISK 1 2 3 4 Timeshift Recorded TV Manual Recording Scheduled List Video Quality Format Hard Disk STATIONO PICTUREO SOUNDO TIMEO SPECIALO SCREENO PIP DWO DVR Menu MENU Move 1 if you press the G G button this message is displayed if you selects Yes this message is displayed When completing this message is displayed SPECIAL FUNCTIONS DVR Digital Video Recorder Hard disk formatting is in progress D...

Page 43: ...n at the same time One source will be large and the other source will show a smaller inset image It s not available to use this function in TELETEXT mode Twin Picture mode splits the screen into two images allowing two picture sources to be shown on the set screen at the same time Each source is given half the screen When recording or playing it s not available to use this function RGB AV1 10 30 R...

Page 44: ... button in PIP mode sub picture is adjusted MOVING THE PIP PIP MODE ONLY Press the P PO OS SI IT TI IO ON N button Repeatedly press the D D E E or F F G G button until desired position is achieved The sub picture moves up down or left right 1 1 1 RGB AV1 10 30 Win size F F G G Win position D D F F G G E E 1 1 PROGRAMME SELECTION FOR SUB PICTURE Press the P PI IP P P PR R button to select a program...

Page 45: ...rce remains the current programme The pictures of all the programmed channels are searched with the 3 POP screen 1 SWAPPING BETWEEN MAIN AND SUB PICTURES Press the S SW WA AP P button to exchange the main and sub pictures P PI IP P SWAP D DW W1 1 SWAP D DW W2 2 SWAP Main Picture Sub Picture Main Picture Sub Picture Main Picture Sub Picture 1 MFL32196504en_070209_2 2 12 07 3 03 PM Page 43 ...

Page 46: ...et can support the SIMPLE TOP and FASTEXT systems SIMPLE standard tele text consists of a number of pages which are selected by directly entering the corresponding page number TOP and FASTEXT are more modern methods allowing quick and easy selection of teletext information SWITCH ON OFF SPECIAL FUNCTIONS Teletext Press the M ME EN NU U button and then use D D E E button to select the SPECIAL menu ...

Page 47: ...by entering it as a three digit number using the NUMBER buttons in TOP mode FASTEXT The teletext pages are colour coded along the bottom of the screen and are selected by pressing the corre sponding coloured button A A P Pa ag ge e s se el le ec ct ti io on n Press the button to select the index page You can select the pages which are colour coded along the bottom line with the same coloured butto...

Page 48: ... page consists of 2 or more sub pages The number of sub pages and the sub page displayed is usually shown on the screen below the time When this button is pressed the stop symbol is displayed at the top left hand corner of the screen and the automatic page change is inhib ited To continue press this button again TIME This button has two functions a When viewing a TV programme press this button to ...

Page 49: ...D DW W m me en nu u D DV VR R m me en nu u S ST TA AT TI IO ON N m me en nu u Menu MENU Move PSM CSM ACM Contrast 100 Brightness 50 Colour 50 Sharpness 50 Tint 0 STATIONO PICTURE SOUNDO TIMEO SPECIALO SCREENO PIP DWO DVRO Menu MENU Move Clock Off time On time Auto sleep STATIONO PICTUREO SOUNDO TIME SPECIALO SCREENO PIP DWO DVRO Menu MENU Move Language Child lock ISM Method Low power Set ID Demo S...

Page 50: ...tons on the Storage from menu Press the E E button to select Start Press the G G button to begin auto programming All receivable stations are stored To stop auto programming press the M ME EN NU U button When auto programming is completed the Programme edit menu appears on the screen See the Programme edit section to edit the stored programme Press the EXIT button to return to normal TV viewing Sy...

Page 51: ...alia I PAL I II U K Ireland Hong Kong South Africa DK PAL D K SECAM D K East Europe China Africa CIS M USA Korea Philippines option Press the E E button to select Band Press the F F G G button to select V UHF or Cable as required Press the E E button to select Channel You can select the desired channel number with the F F G G button or NUMBER buttons If possible select the channel number directly ...

Page 52: ... EXIT button to return to normal TV viewing The finely tuned programme will be indicated by yellow number during programme selection Storage 5 System BG Band V UHF Channel 5 Fine FG Search Name C 05 Booster Off Store 1 2 3 4 5 6 2 3 4 5 1 Auto programme Manual programme Programme edit Favourite programme STATION PICTUREO SOUNDO TIMEO SPECIALO SCREENO PIP DWO DVRO Menu MENU Move Auto programme Manu...

Page 53: ...ion by pressing the G G button and then take your choice of the second character and so on Press the OK button in twice Press the EXIT button to return to normal TV viewing 1 2 3 4 5 6 7 1 Auto programme Manual programme Programme edit Favourite programme STATION PICTUREO SOUNDO TIMEO SPECIALO SCREENO PIP DWO DVRO Menu MENU Move Storage 5 System BG Band V UHF Channel 5 Fine Search Name G C 05 Boos...

Page 54: ... G G button and then use D D E E button to select Booster Press the F F G G button to select On or Off Press the OK button Press the EXIT button to return to normal TV viewing 1 2 3 4 5 6 2 3 1 4 5 Auto programme Manual programme Programme edit Favourite programme STATION PICTUREO SOUNDO TIMEO SPECIALO SCREENO PIP DWO DVRO Menu MENU Move Store Auto programme Manual programme Programme edit Favouri...

Page 55: ...tton 3 Move the programme to the desired programme number with the D D E E F F G G button 4 Press the YELLOW button again to release this function A A S Sk ki ip pp pi in ng g a a p pr ro og gr ra am mm me e n nu um mb be er r 1 Select a programme number to be skipped with the D D E E F F G G button 2 Press the BLUE button The skipped programme turns to blue 3 Press the BLUE button again to releas...

Page 56: ... programmes Press the OK button Press the EXIT button to return to normal TV viewing This function lets you select your favourite programmes directly Repeatedly press the F FA AV V button to select stored favourite pro grammes FAVOURITE PROGRAMME 1 2 3 4 5 6 7 8 1 Auto programme Manual programme Programme edit Favourite programme STATION PICTUREO SOUNDO TIMEO SPECIALO SCREENO PIP DWO DVRO Menu MEN...

Page 57: ...mber A A P Pa ag gi in ng g t th hr ro ou ug gh h a a p pr ro og gr ra am mm me e t ta ab bl le e There are 10 programme table pages in which contain 100 programmes Pressing the D D E E F F G G button repeatedly turns the pages Press the L LI IS ST T button to return to normal TV viewing NOTE a You may find some blue highlighted programmes shown They have been set up in the programme edit mode b S...

Page 58: ...trast brightness colour sharpness and tint NTSC input only manually PSM is automatically changed to User A A Picture options D Dy yn na am mi ic c S St ta an nd da ar rd d M Mi il ld d and U Us se er r are preset and programmed for good picture quality at the factory and cannot be changed 1 2 3 4 1 PSM CSM ACM Contrast 100 Brightness 50 Colour 50 Sharpness 50 Tint 0 STATIONO PICTURE SOUNDO TIMEO S...

Page 59: ...CTURE menu Press the G G button and then D D E E button to select CSM Press the G G button and then use D D E E button to select the desired colour temperature Press the EXIT button to return to normal TV viewing 1 2 3 4 2 3 1 PSM CSM ACM Contrast 100 Brightness 50 Colour 50 Sharpness 50 Tint 0 STATIONO PICTURE SOUNDO TIMEO SPECIALO SCREENO PIP DWO DVRO Menu MENU Move PSM CSM ACM Contrast 100 Brig...

Page 60: ...ton and then use D D E E F F G G button to make appropriate adjustments Press the EXIT button to return to normal TV viewing 1 2 3 4 5 2 3 1 4 PSM CSM ACM Contrast 100 Brightness 50 Colour 50 Sharpness 50 Tint 0 STATIONO PICTURE SOUNDO TIMEO SPECIALO SCREENO PIP DWO DVRO Menu MENU Move PSM CSM ACM Contrast 100 Brightness 50 Colour 50 Sharpness 50 Tint 0 CSM G G Cool Normal Warm User Red Green Blue...

Page 61: ...icture with LG s Excellent Digital Reality processor technology It s not available to use this function in RGB PC or HDMI PC modes When selecting picture options Dynamic Standard and Mild in PICTURE menu XD is automatically changed to On FUNCTION 1 2 3 4 1 PSM CSM ACM Contrast 100 Brightness 50 Colour 50 Sharpness 50 Tint 0 STATIONO PICTURE SOUNDO TIMEO SPECIALO SCREENO PIP DWO DVRO Menu MENU Move...

Page 62: ...ess the G G button and then D D E E button to select sRGB Press the G G button and then D D E E button to select On or Off Press the EXIT button to return to normal TV viewing 1 2 3 4 2 3 1 PSM CSM sRGB Contrast 100 Brightness 50 STATIONO PICTURE SOUNDO TIMEO SPECIALO SCREENO PIP DWO DVRO Menu MENU Move PSM CSM sRGB Contrast 100 Brightness 50 sRGB G G On Off AUDIO PIP PR PIP PR SWAP PIP INPUT STB ...

Page 63: ...Press the G G button and then use F F G G button to make appropriate adjustments Press the EXIT button to return to normal TV viewing 1 2 3 4 2 3 1 PSM CSM ACM Contrast 100 Brightness 50 Colour 50 Sharpness 50 Tint 0 STATIONO PICTURE SOUNDO TIMEO SPECIALO SCREENO PIP DWO DVRO Menu MENU Move PSM CSM ACM Contrast 100 Brightness 50 Colour 50 Sharpness 50 Tint 0 ACM G G Fleshtone Greentone Bluetone 0 ...

Page 64: ...tton to select the desired picture option Press the G G button and then use F F G G button to make appropriate adjustments Press the EXIT button to return to normal TV viewing 1 2 3 4 2 3 1 PSM CSM ACM Contrast 100 Brightness 50 Colour 50 Sharpness 50 Tint 0 STATIONO PICTURE SOUNDO TIMEO SPECIALO SCREENO PIP DWO DVRO Menu MENU Move PSM CSM ACM Contrast 100 Brightness 50 Colour 50 Sharpness 50 Tint...

Page 65: ...oduction at the factory and can not be changed Press the M ME EN NU U button and then D D E E button to select the SOUND menu Press the G G button and then D D E E button to select SSM Press the G G button and then D D E E button to select SRS TSXT Flat Music Movie Sports or User Press the E EX XI IT T button to return to normal TV viewing 1 2 3 4 1 2 3 SSM AVL Balance 0 Treble 50 Bass 50 TV Speak...

Page 66: ... button to select AVL Press the G G button and then D D E E button to select On or Off Press the E EX XI IT T button to return to normal TV viewing AVL automatically keeps on an equal volume level even if you change programmes AVL AUTO VOLUME LEVELER 1 2 3 4 2 3 SSM AVL Balance 0 Treble 50 Bass 50 TV Speaker AVL G G On Off 1 SSM AVL Balance 0 Treble 50 Bass 50 TV Speaker STATIONO PICTUREO SOUND TI...

Page 67: ...is no video signal If you want to use your external hi fi stereo system turn off the internal speakers of the set TV SPEAKER 1 2 3 4 Press the M ME EN NU U button and then D D E E button to select the SOUND menu Press the G G button and then use D D E E button to select the desired sound item Press the G G button and then use F F G G button to make appropriate adjustments Press the E EX XI IT T bu...

Page 68: ...anguage you can switch to DUAL I DUAL II or DUAL I II by pressing the I II button repeatedly DUAL I sends the primary broadcast language to the loudspeakers DUAL II sends the secondary broadcast language to the loudspeakers DUAL I II sends a separate language to each loudspeaker STEREO DUAL RECEPTION When a programme is selected the sound information for the station appears after the programme num...

Page 69: ...io Multiplex digital sound can be received Sound output can be selected according to the type of received broadcast as follows by press ing the I I I II I button repeatedly SOUND OUTPUT SELECTION In AV Component RGB or HDMI DVI mode you can select output sound for the left and right loudspeakers Repeatedly press the I II button to select the sound output L R Audio signal from audio L input is sent...

Page 70: ...n use D D E E button to adjust the hour Press the G G button and then use D D E E button to adjust the minute Press the E EX XI IT T button to return to normal TV viewing If current time setting is erased by a power failure or the set is unplugged reset the clock SETTING THE CLOCK 1 2 3 4 5 1 2 3 4 Clock Off time On time Auto sleep Clock G G Clock Off time On time Auto sleep STATIONO PICTUREO SOUN...

Page 71: ...olume level Press the E EX XI IT T button to return to normal TV viewing Time function operates only if current time has been already set Off Time function overrides On Time function if they are set to the same time The set must be in standby mode for the On Time to work SETTING THE ON OFF TIME 1 2 3 4 5 6 7 1 3 2 4 5 6 Clock Off time On time Auto sleep On time G G Clock Off time On time Auto slee...

Page 72: ...own from the number of minutes selected SLEEP TIMER 1 2 3 Press the MENU button and then use D D E E button to select the TIME menu Press the G G button and then use D D E E button to select Auto sleep Press the G G button and then use D D E E button to select On or Off Press the E EX XI IT T button to return to normal TV viewing If set to on and there is no input signal the set turns off automati...

Page 73: ...UNDO TIMEO SPECIAL SCREENO PIP DWO DVRO Menu MENU Move Language Child lock ISM Method Low power Set ID Demo Child lock G G MODE INPUT TV DVD VCR AUDIO STB MENU OK MULTIMEDIA CABLE EXIT MARK LIVE TV TIME SHIFT TIME SHIFT POWER TIME MACHINE PR PIP PR SWAP PIP IN SIZE POSITION INDEX Q VIEW LIST VOL PR TIME MUTE TEXT The set is programmed to remember which option it was last set to even if you turn th...

Page 74: ...y 2 minutes Inversion This is the function to invert the panel colour of the screen The panel colour is automatically inverted every 30 minutes Normal When input signal is constantly static or temperature is high brightnest level will be decrase automatically for image sticking minimalization Press the E EX XI IT T button to return to normal TV viewing A frozen of still picture from a PC video gam...

Page 75: ...e between XD Demo on and XD Demo off It s not available to use this function in RGB PC HDMI PC mode Press the MENU button and then use D D E E button to select the SPECIAL menu Press the G G button and then use D D E E button to select XD Demo Press the G G button to begin XD Demo To stop XD Demo press the MENU or EXIT button 2 3 1 2 3 4 1 2 3 4 1 2 3 Language Child lock ISM Method Low power Set I...

Page 76: ...on to select Index Press the G G button and then use D D E E button to select On or Off When you select On mode The FRONT DISPLAY illuminates brightly Press the E EX XI IT T button to return to normal TV viewing INDEX OPTION 1 2 3 4 Language Child lock ISM Method Low power Set ID Demo Index STATIONO PICTUREO SOUNDO TIMEO SPECIAL SCREENO PIP DWO DVRO Menu MENU Move Language Child lock ISM Method Lo...

Page 77: ... EX XI IT T button to return to normal TV viewing Automatically adjusts picture position and minimizes image shaking Although the image is still not correct your set is functioning properly but needs further adjustment The Auto config functions don t need to be run for HDMI DVI mode This function works in the following mode RGB PC This function is for the automatic adjustment of the screen positio...

Page 78: ... the screen background And the horizontal screen size will also change P Ph ha as se e This function allows you to remove any horizontal noise and clear or sharpen the image of characters Press the MENU button and then D D E E button to select the SCREEN menu Press the G G button and then D D E E button to select Manual config Press the G G button and then D D E E button to select Phase Clock H Po...

Page 79: ... to select the SCREEN menu Press the G G button and then use D D E E button to select XGA Mode VGA Mode Press the G G button and then use D D E E button to select the desired XGA VGA resolution Press the E EX XI IT T button to return to normal TV viewing SELECTING WIDE XGA VGA MODE 1 2 3 4 1 2 3 Auto config Manual config XGA Mode ARC Cinema NR Reset STATIONO PICTUREO SOUNDO TIMEO SPECIALO SCREEN P...

Page 80: ...aspect ratio with gray bars appearing at both the left and right sides 16 9 Wide Following selection will lead you to adjust the picture horizontally in a linear proportion to fill the entire screen useful for viewing 4 3 formatted DVDs 14 9 You can enjoy the picture format of 14 9 or general set programme through the 14 9 mode The screen 14 9 is viewed just like that the screen 4 3 is magnified t...

Page 81: ... in the following mode TV AV1 AV2 or COMPONENT 480i 576i Press the MENU button and then D D E E button to select the SCREEN menu Press the G G button and then use D D E E button to select Cinema Press the G G button and then use D D E E button to select On or Off Press the E EX XI IT T button to return to normal TV viewing CINEMA 1 2 3 4 1 Auto config Manual config XGA Mode ARC Cinema NR Reset STA...

Page 82: ...make appropriate adjustments Press the E EX XI IT T button to return to normal TV viewing NR NOISE REDUCTION 1 2 3 4 5 This function operates in current mode To initialize the adjusted values Press the MENU button and then use D D E E button to select the SCREEN menu Press the G G button and then D D E E button to select Reset Press the G G button You can initialize Phase Clock H Position V Positi...

Page 83: ...l controls except main power will not be functional if the Monitor is controlled by a PC computer or other external device AUDIO RGB DVI RGB PC DTV RGB IN REMOTE CONTROLIN DVI IN HDMI CONTROL SERVICE RS 232CIN EXTERNAL CONTROL DEVICE SETUP Type of Connector D Sub 9 Pin Male REMOTE AUDIO IN RGB IN RGB IN PC DTV HDMI DVI IN UPGRADE MODULE AUDIO OUT VARIABLE RS 232C IN CONTROL SERVICE No Pin Name 1 N...

Page 84: ...ID number Refer to Real Data Mapping 1 See page 86 Press the MENU button and then use the D D E E button to select the SPECIAL menu Press the G G button and then use D D E E button to select Set ID Press the G G button and then use F F G G button to adjust Set ID to choose the desired monitor ID number The adjustment range of Set ID is 1 99 Press the EXIT button to return to normal TV viewing 1 2 ...

Page 85: ... nd d1 1 C Co om mm ma an nd d2 2 S Se et t I ID D D Da at ta a C Cr r C Co om mm ma an nd d2 2 S Se et t I ID D O OK K D Da at ta a x x C Co om mm ma an nd d2 2 S Se et t I ID D N NG G D Da at ta a x x C CO OM MM MA AN ND D1 1 C CO OM MM MA AN ND D2 2 DATA Hexadecimal C CO OM MM MA AN ND D1 1 C CO OM MM MA AN ND D2 2 18 Balance k t 0 64 19 Colour Temperature CSM k u 0 3 20 Red Adjustment k v 0 50...

Page 86: ...he INPUT SELECT button on the set s remote control Date 0 TV Date 1 AV1 Date 2 AV2 Date 3 Component1 Date 4 Component2 Date 5 RGB Date 6 HDMI DVI Transmission k b Set ID Data Cr Acknowledgement b Set ID OK Data x 0 06 6 V Vo ollu um me e C Co on nt tr ro oll C Co om mm ma an nd d2 2 f f To adjust volume You can also adjust volume with the volume buttons on remote control Data Min 0 Max 64 Refer to...

Page 87: ... s To adjust bass You can also adjust bass in the SOUND menu Data Min 0 Max 64 Refer to Real data mapping 1 See page 86 Transmission k s Set ID Data Cr Acknowledgement s Set ID OK Data x 1 18 8 B Ba alla an nc ce e C Co om mm ma an nd d2 2 t t To adjust balance You can also adjust balance in the SOUND menu Data Min 0 Max 64 Refer to Real data mapping 1 See page 86 Transmission k t Set ID Data Cr A...

Page 88: ... Cr Acknowledgement q Set ID OK Data x 2 27 7 O Or rb biit te er r T Tiim me e S Se et tt tiin ng g C Co om mm ma an nd d1 1 jj C Co om mm ma an nd d2 2 r r o op pt tiio on n To adjust orbiter operation time term This feature is not available for all models Data Min 1 Max FE Refer to Real data mapping 1 Transmission j r Set ID Data Cr Acknowledgement r Set ID OK Data x 3 30 0 A Au ut to o C Co on ...

Page 89: ...I In np pu ut t s se elle ec ct t C Co om mm ma an nd d1 1 x x C Co om mm ma an nd d2 2 b b M Ma aiin n P Piic ct tu ur re e I In np pu ut t To select input source for set Data Structure Transmission x b Set ID Data Cr 3 34 4 I In np pu ut t s se elle ec ct t C Co om mm ma an nd d1 1 x x C Co om mm ma an nd d2 2 y y To adjust input source for sub picture in PIP mode Data Structure Transmission x y...

Page 90: ...D0 D1 D2 D3 D4 D5 D6 D7 Lead code Low custom code High custom code Data code Data code Repeat code Tf 4 5 ms 9 ms 2 25 ms 9 ms 0 55 ms 0 56ms 1 12ms Tf Tf Tf 108ms 455KHz 0 56ms 2 24ms Bit 0 Bit 1 1 How to Connect Connect your wired remote control to the Remote Control port on the set 2 Remote Control IR Codes NEC Format Output waveform Single pulse modulated with 37 917KHz signal at 455KHz T1 Tc ...

Page 91: ...Discrete IR Code Input HDMI Selection D5 RGB Discrete IR Code Input RGB Selection D6 TV Discrete IR Code Input TV Selection 5A AV1 Discrete IR Code Input AV1 Selection D0 AV2 Discrete IR Code Input AV2 Selection 1E FAV Favorite R C Button 1A Q VIEW R C Button 0A I II R C Button 0E SLEEP R C Button 43 MENU R C Button 44 OK R C Button 4D PSM R C Button 52 SSM R C Button 53 LIST R C Button 20 TEXT R ...

Page 92: ...be illuminated If you don t press any button for 20 seconds the light on the mode button will be turned off In that case you have to repeat from step 2 Enter code numbers using the number button on the remote by referring the code table on the following pages When pressing the button the light blinks at a time If the device turned off the programming is successful Press the MENU button to store th...

Page 93: ...3 020 MITSUBISHI 013 020 045 046 049 051 059 061 151 MTC 034 040 MULTITECH 024 034 NEC 012 023 039 043 048 NORDMENDE 043 OPTONICA 053 054 PANASONIC 066 070 074 083 133 140 145 PENTAX 013 020 031 033 063 PHILCO 031 034 067 PHILIPS 031 033 034 054 067 071 101 PILOT 101 PIONEER 013 021 048 PORTLAND 108 PULSAR 072 QUARTZ 01 1 014 QUASAR 033 066 075 145 RCA 013 020 033 034 040 041 062 063 107 109 140 1...

Page 94: ...012 064 079 MEMOREX 100 MOVIE TIME 028 032 NSC 015 028 038 071 073 OAK 016 031 037 053 PANASONIC 044 047 PARAGON 100 PHILIPS 006 012 013 020 065 085 090 PIONEER 034 051 052 063 076 POST NEWS WEEK 016 PRUCER 059 PTS 01 1 048 071 072 073 074 PULSAR 100 RCA 047 REGAL 049 050 REGENCY 057 REMBRANT 025 SAMSUNG 102 107 030 068 SCIENTIFIC ATLANTA 003 01 1 041 042 043 045 046 SHERITECH 022 SIGNAL 030 SIGNA...

Page 95: ...7 098 099 100 122 ELECTRO HOME 089 EUROPLUS 1 14 FUJITSU 017 021 022 027 133 134 GENERALINSTRUMENT 003 004 01 6 029 031 059 101 HITACHI 139 140 HOUSTON TRACKER 033 037 039 051 057 104 HUGHES 068 JANIEL 060 147 JERROLD 061 KATHREIN 108 LEGEND 057 LG 001 LUTRON 132 LUXOR 062 144 MACOM 010 059 063 064 065 MEMOREX 057 NEXTWAVE 028 124 125 NORSAT 069 070 PACE SKY SATELLITE 143 PANASONIC 060 142 PANSAT ...

Page 96: ...79 180 181 183 201 202 208 213 214 219 223 232 238 240 LXI 103 MAGNAVOX 1 1 1 MARANTZ 002 018 020 025 034 041 081 090 097 1 12 MCINTOSH 049 MCS 104 MEMOREX 107 NAD 046 ONKYO 013 040 041 047 048 056 057 132 133 140 OPTIMUS 158 PANASONIC 007 033 064 1 13 142 220 241 251 PENNEY 104 PHILIPS 026 1 12 143 PIONEER 039 042 043 063 065 091 093 094 1 15 123 127 250 QUASAR 1 13 RCA 080 RCX 092 REALISTIC 103 ...

Page 97: ...k whether the set is turned on Try another programme The problem may be with the broadcast Is the power cord inserted into wall power outlet Check your antenna direction and or location Test the wall power outlet plug another set s power cord into the outlet where the set s power cord was plugged in This is normal the image is muted during the set startup process Please contact your service center...

Page 98: ... output from one of the speakers T Th he er re e i is s a a p pr ro ob bl le em m i in n P PC C m mo od de e O On nl ly y P PC C m mo od de e a ap pp pl li ie ed d Adjust resolution horizontal frequency or vertical frequency Check the input source Work the Auto configure or adjust clock phase or H V position Option Check the signal cable Reinstall the PC video card The signal is out of range Scree...

Page 99: ...er or dish washing detergent Wring the cloth until it s almost dry and then use it to wipe the screen Make sure the excess water is off the screen and then let it air dry before you turn on your set Cleaning the Cabinet To remove dirt or dust wipe the cabinet with a soft dry and lint free cloth Please be sure not to use a wet cloth Extended Absence If you expect to leave your set dormant for a lon...

Page 100: ...xternal Antenna Impedance Environment condition with stand without stand including stand excluding stand Operating Temperature Operating Humidity Storage Temperature Storage Humidity 1 129 0 x 748 5 x 380 0 mm 44 5 x 29 5 x 15 0 inches 1 129 0 x 695 0 x 108 9 mm 44 5 x 27 4 x 4 3 inches 29 1kg 64 2 lbs 25 6kg 56 5 lbs 1382 x 913 x 377 mm 54 4 x 36 0 x 14 9 inches 1382 x 848 5x 125 mm 54 4 x 33 4 x...

Page 101: ...thout stand including stand excluding stand Operating Temperature Operating Humidity Storage Temperature Storage Humidity 81 1 0 x 630 0 x 235 0 mm 31 9 x 24 8 x 9 3 inches 81 1 x 566 8 x 123 5 mm 32 0 x 22 4 x 4 9 inches 22 7 kg 50 1 lbs 19 3 kg 42 6 lbs 1054 x 81 3 x286 mm 41 4 x 32x 1 1 2 inches 1054 x 746 x 1 36 8mm 41 4 x 29 3 x 5 3 inches 42 3kg 93 2 lbs 35 7kg 78 7 lbs MODELS 32LC2RR 32LC2R...

Page 102: ...MFL32196504en_070209_4 2 12 07 3 06 PM Page 100 ...

Page 103: ...MFL32196504en_070209_4 2 12 07 3 06 PM Page 101 ...

Reviews: