background image

TIME 

SETTING

67

ENTER 

EXIT

VOL

CH

CC

MENU

1

2

3

MUTE

TIMER

SAP

RATIO

PAGE

1

2

3

4

5

6

7

8

9

0

CH

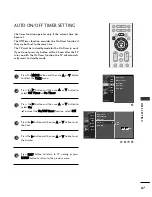
AUTO ON/OFF TIMER SETTING

Press the M

M E

E N

N U

U button and then use

D


or 

E


button

to select the T

T II M

M E

E menu.

Press  the 

G


button  and  then  use

D


or 

E


button  to

select O

Offff   T

Tiim

meerr or O

On

n   T

Tiim

meerr. 

Press  the 

G


button  and  then  use

D


or 

E


button  to

select O

O n

n.

To cancel the O

On

n//O

Offff ttiim

meerr function, select O

O ff ff.

Press the 

G


button and then use

D


or 

E


button to set

the hour.

Press the 

G


button and then use

D


or 

E


button to set

the minutes.

Press  E

E X

X II T

T button  to  return  to  TV  viewing  or  press

M

M E

E N

N U

U button to return to the previous menu.

Auto Clock

Manual Clock

Off Timer

On Timer

G

Auto Off

2

3

4

5

6

1

The  timer  function  operates  only  if  the  current  time  has
been set.

The  Off-Timer  function  overrides  the  On-Timer  function  if
they are both set to the same time.
The TV must be in standby mode for the On-Timer to work.
If you do not press any button within 2 hours after the TV
turns on with the On Timer function, the TV will automati-
cally revert to standby mode.

1

3

2

5

4

Off

On

6   :   30   AM

Auto Clock

Manual Clock

Off Timer

On Timer

Auto Off

SCREEN

LOCK

OPTION

TIME

AUDIO

VIDEO

SETUP

SCREEN

LOCK

OPTION

TIME

AUDIO

VIDEO

SETUP

Summary of Contents for 32LC5DC

Page 1: ...model number and serial number of the set See the label attached on the back cover and quote this information to your dealer when you require service LCD TV OWNER S MANUAL LCD TV MODELS 32LC5DC 32LC5DCS 37LC5DC 37LC5DC1 42LC5DC 32LX5DC 32LX5DCS www lgcommercial com PLASMA TV MODELS 42PX8DC PLASMA TV ...

Page 2: ...m composed of roughly a million or more pixels 16 9 aspect ratio screens and AC3 digital audio A subset of digital television HDTV formats include 1080i and 720p resolutions Manufactured under license from Dolby Laboratories Dolby and the double D symbol are trademarks of Dolby Laboratories It has 2 HDMI ports that connect audio and video devices with one cable and produces the highest quality dig...

Page 3: ...ications not expressly approved by the party responsible for compliance could void the user s authority to operate the equipment CAUTION Do not attempt to modify this product in any way without written authorization from LG Electronics Unauthorized modification could void the user s authority to operate this product The lightning flash with arrowhead symbol within an equilateral triangle is intend...

Page 4: ...ratus Only use attachments accessories specified by the manufacturer Unplug this apparatus when unused for long periods of time Important safety instructions shall be provided with each apparatus This information shall be given in a separate booklet or sheet or be located before any operating instructions in an instruction for installation for use and supplied with the apparatus This information s...

Page 5: ...sulation are dangerous Any of these conditions could result in electric shock or fire Periodically examine the cord of your appliance and if its appearance indicates dam age or deterioration unplug it discontinue use of the appliance and have the cord replaced with an exact replacement part by an authorized servicer Protect the power cord from physical or mechanical abuse such as being twisted kin...

Page 6: ...uto Scan EZ Scan 36 Add Delete Channel Manual Scan 37 Channel Editing 38 DTV Signal Strength 39 Channel Label 40 PICTURE CONTROL Watching DW Double Window 41 Picture Size Aspect Ratio Control 43 Preset Picture Settings EZ Picture Preset 45 Color Tone Preset 46 Manual Picture Adjustment EZ Picture User Mode 47 Color Tone User Mode 48 XD Picture Improvement Technology 49 Advanced Cinema Mode 50 Adva...

Page 7: ...electing XGA Mode 72 Initializing Reset to Original Factory Settings 73 PARENTAL CONTROL RATINGS Set Password Lock System 74 Setting up Your Password 74 Set Password 75 Lock System 75 Channel Blocking 76 External Input Blocking 77 Movie TV Rating 78 Movie Rating MPAA 78 TV Rating Children General 79 APPENDIX Troubleshooting 80 Maintenance 82 Product Specifications 83 Proogramming the Remote Contro...

Page 8: ...ells A few cell defects will normally occur in the Plasma TV manufacturing process Several tiny minute colored dots visible on the screen should be acceptable This also occurs in other Plasma TV manufacturers products The tiny dots appearing does not mean that this Plasma TV is defective Thus a few cell defects are not sufficient cause for the Plasma TV to be exchanged or returned Our pro duction ...

Page 9: ...o on n E Ex xt tr ra as s 2 TV Bracket Bolts 2 TV Brackets 2 Wall Brackets Twist Holder Arrange the wires with the twist holder 4 Bolts for stand assembly Slightly wipe stained spot on the exterior only with the polishing cloth for the product exterior if there is stain or fingerprint on surface of the exterior Do not wipe roughly when removing stain Please be cautions of that excessive pressure m...

Page 10: ...ipe the product with a polishing cloth CH CH VOL OL ENTER ENTER MENU MENU INPUT INPUT Remote Control Sensor Power Standby Indicator Illuminates red in standby mode When the TV is turned on the indicator blinks green and then illuminates green before the picture is displayed CHANNEL Buttons VOLUME Buttons ENTER Button MENU Button INPUT Button ON OFF Button 32 37 42LC5DC ...

Page 11: ...ER INPUT INPUT MENU MENU I VOLUME Buttons Remote Control Sensor Power Standby Indicator Illuminates red when the TV is in standby mode illuminates green when the TV is switched on CHANNEL Buttons ENTER Button ON OFF Button INPUT Button MENU Button ...

Page 12: ...R INPUT INPUT ENTER ENTER INPUT ENTER VOLUME Buttons CHANNEL Buttons ENTER Button ON OFF Button INPUT Button MENU Button Remote Control Sensor Power Standby Indicator Illuminates red when the TV is in standby mode illuminates green when the TV is switched on ...

Page 13: ...onnects the video signal from a video device 1 1 32 37 42LC5DC 32LX5DC R S VIDEO Input Provides better picture quality than the video input VIDEO Input AUDIO Input Connects the video signal from a video device AV IN 2 VIDEO S VIDEO L MONO R AUDIO 42PX8DC S VIDEO Input Provides better picture quality than the video input VIDEO Input Connects the video signal from a video device AUDIO Input 1 1 11 A...

Page 14: ... Video IN 1 Connect audio video output from an external device to these jacks S VIDEO Connect S Video out from an S VIDEO device COMPONENT IN Connect a component video audio device to these jacks RJP INTERFACE Power Cord Socket For operation with AC power Caution Never attempt to operate the TV on DC power ANTENNA IN Connect over the air signals to this jack 1 8 9 10 1 1 12 2 3 4 5 6 7 VIDEO AUDIO...

Page 15: ...MANAGEMENT G G Hold the CABLE MANAGEMENT with both hands and pull it backward CABLE MANAGEMENT TWISTER HOLDER G G Do not hold the CABLE MANAGEMENT when moving the product If the product is dropped you may be injured or the product may be broken NOTE 1 2 Bundle the cables using the supplied twister holder 3 32 37 42LC5DC Install the CABLE HOLDER as shown CABLE HOLDER 2 BOLT Here shown may be somewh...

Page 16: ...o connect an additional equipment see the External equipment Connections section TWISTER HOLDER 2 Bundle the cables using the supplied twister holder 4 Install the CABLE HOLDER as shown CABLE HOLDER 3 BOLT To separate the CABLE HOLDER loosen the bolt installed the set 1 ...

Page 17: ... Hold the CABLE MANAGEMENT with both hands and pull it as shown Connect the cables as necessary To connect an additional equipment see the External equipment Connections section 1 2 Install the CABLE MANAGEMENT as shown 3 45 ...

Page 18: ...position before inserting the eye bolts loosen the bolts Secure the wall brackets with the bolts not provided as parts of the product must purchase separately on the wall Match the height of the bracket that is mounted on the wall to the holes in the product Ensure the eye bolts or brackets are tightened securely Use a sturdy rope not provided as parts of the product must pur chase separately to t...

Page 19: ...ng the product B Bo ol lt ts s M M5 5 x x L L t ta ab bl le e d de ep pt th h 8 8 1 10 0 m mm m ex table depth 15mm Bolts M5 x 25 WARNING G G This apparatus must be securely attached to the floor wall per installation instructions Tipping shaking or rocking the machine may cause injury death 4 Bolts Stand Desk 32 37 42LC5DC 32LX5DC 42PX8DC 4 Bolts Stand Desk 2 Bolts Stand Desk ...

Page 20: ...TION Only 32 37LC5DC models Carefully place the product screen side down on a cushioned surface that will protect prod uct and screen from damage Assemble the product stand with the product as shown Securely install the 4 bolts provided 1 2 3 ...

Page 21: ...nting interface pad optional There 4 threaded holes are available for attaching the bracket G G Screw length needed depends on the wall mount used For further information refer to the VESA Wall Mounting Instruction Guide NOTE R 100 mm 200 mm ANTENNA IN M P I 400mm 32LC5DC 100mm 600 mm 32LC5DC 200mm 32 37 42LC5DC 32LX5DC 400 mm 600 mm 42PX8DC 4 inches 32 37 42LC5DC 32LX5DC 42PX8DC INPUT INPUT ENTER...

Page 22: ...na Be careful not to bend the bronze wire when connecting the antenna Copper Wire ANTENNA IN M P I ANTENNA IN M P I ANTENNA IN M P I G G The TV will let you know when the analog cable and digital channel scans are complete NOTE To improve the picture quality in a poor signal area please purchase a signal amplifier and install properly If the antenna needs to be split for two TV s install a 2 Way S...

Page 23: ...PB PR of the digital set top box to the C CO OM MP PO ON NE EN NT T I IN N V VI ID DE EO O jacks on the set Match the jack colors Y green PB blue and PR red Connect the audio output of the digital set top box to the C CO OM MP PO ON NE EN NT T I IN N A AU UD DI IO O jacks on the set 2 1 2 How to use Turn on the digital set top box Refer to the owner s manual for the digital set top box Select C Co...

Page 24: ... top box Select H HD DM MI I1 1 D DV VI I or H HD DM MI I2 2 input source with using the I IN NP PU UT T button on the remote control 2 1 VIDEO AUDIO M P I 1 DVI RJP INTERFACE 2 HDMI DVI IN COMPONENT IN DIGITAL AUDIO OUT OPTICAL HDMI DTV OUTPUT 1 G G When connected the TV will tell a connected device what resolution it supports and the resolution it prefers If the device supports this Auto HDMI fu...

Page 25: ...al set top box to the H HD DM MI I D DV VI I I IN N 1 1 D DV VI I or 2 2 jack on the set Connect the audio output of the digital set top box to the A AU UD DI IO O I IN N R RG GB B D DV VI I jack on the set 1 How to connect Turn on the digital set top box Refer to the owner s manual for the digital set top box Select H HD DM MI I1 1 D DV VI I or H HD DM MI I2 2 input source with using the I IN NP ...

Page 26: ...s on DVD player Y Y Y Y PB B Y Cb Pb PR R Y Cr Pr Connect the video outputs Y PB PR of the DVD to the C CO OM MP PO ON NE EN NT T I IN N V VI ID DE EO O jacks on the set Match the jack colors Y green PB blue and PR red Connect the audio outputs of the DVD to the C CO OM MP PO ON NE EN NT T I IN N A AU UD DI IO O jacks on the set 1 How to connect 2 How to use Turn on the DVD player insert a DVD Sel...

Page 27: ...r to the DVD player s manual for operating instructions When connecting HDMI cable Connect the HDMI output of the DVD to the H HD DM MI I D DV VI I I IN N 1 1 D DV VI I or 2 2 jack on the set No separated audio connection is necessary HDMI supports both audio and video 1 How to connect 2 How to use Select H HD DM MI I1 1 D DV VI I or H HD DM MI I2 2 input source with using the I IN NP PU UT T butt...

Page 28: ...visible on the screen This phenomenon is common to all manufactures and in conse quence the manufactures warranty does not cover the product bearing this phenomenon ANTENNA IN M P I L R S VIDEO VIDEO OUTPUT SWITCH ANT IN ANT OUT Wall Jack Antenna 1 2 Connect the RF antenna out socket of the VCR to the A An nt te en nn na a socket on the set Connect the antenna cable to the RF antenna in socket of ...

Page 29: ... colors Video yellow Audio Left white and Audio Right red 1 How to connect 2 How to use Insert a video tape into the VCR and press PLAY on the VCR Refer to the VCR owner s manual Select A AV V1 1 input source with using the I IN NP PU UT T button on the remote control If connected to A AV V I IN N2 2 select A AV V2 2 input source When connecting with an S Video cable Connect the S VIDEO output of ...

Page 30: ...I ID DE EO O jacks between TV and external equipment Match the jack colors Video yellow Audio Left white and Audio Right red 1 How to connect 2 How to use Select A AV V2 2 input source with using the I IN NP PU UT T button on the remote control If connected to A AV V I IN N1 1 input select A AV V1 1 input source Operate the corresponding external equipment 1 1 i e 32 37 42LC5DC ...

Page 31: ...s or speakers please turn the TV speakers off G G p p 5 58 8 NOTE G G Do not look into the optical output port Looking at the laser beam may damage your vision CAUTION Connect one end of an optical cable to the TV Digital Audio Optical Output port Connect the other end of the optical cable to the digital audio optical input on the audio equipment Set the TV Speaker option Off in the AUDIO menu G G...

Page 32: ...Plug and Play capability meaning that the PC adjusts automatically to the TV s settings When connecting D sub 15pin cable Connect the RGB output of the PC to the R RG GB B I IN N jack on the set Connect the PC audio output to the A AU UD DI IO O I IN N R RG GB B D DV VI I jack on the set 1 How to connect 2 How to use Turn on the PC and the set Select R RG GB B P PC C input source with using the I ...

Page 33: ...and Vertical frequencies is separate NOTES Supported Display Specifications RGB HDMI1 PC Horizontal Vertical Frequency KHz Frequency Hz 31 469 70 08 31 469 59 94 37 861 72 80 37 500 75 00 35 156 56 25 37 879 60 31 48 077 72 18 46 875 75 00 48 363 60 00 56 476 70 06 60 023 75 02 47 700 60 00 47 720 59 799 47 130 59 658 Resolution 640x350 RGB DOS mode only 640x350 640x480 800x600 1024x768 Supported ...

Page 34: ...the last TV channel External input modes rotate in regular sequence TV AV1 2 Component RGB HDMI1 DVI and HDMI2 AV 1 2 Component RGB HDMI1 DVI and HDMI2 input sources are linked automatically only if a device is connected Selects RGB HDMI1 DVI HDMI2 and Component input sources Adjusts brightness on screen Control video cassette recorders or DVD players Navigate the on screen menus and adjust the sy...

Page 35: ...sub picture G G p p 4 41 1 Selects the factory preset picture depend on the viewing environment G G p p 4 45 5 Selects the factory preset sound for type of program G G p p 5 55 5 Exchange the main sub images G G p p 4 42 2 Display information at the top of the screen Clears all on screen displays and returns to TV viewing from any menu Select a closed caption G G p p 6 62 2 In DTV CADTV mode G G p...

Page 36: ...out When finished using the TV press the P PO OW WE ER R button on the remote con trol The TV reverts to standby mode ENTER TV TV INPUT INPUT MODE DVD MULTI EXIT CC MENU VCR POWER EZ SOUND INFO SWAP EZ PIC SAP RATIO PIP PIP CH PIP CH PIPINPUT 1 2 3 4 5 6 7 8 9 0 CH 1 2 3 VOL 1 2 4 5 6 7 8 9 0 MUTE TIMER 1 2 3 4 5 6 7 8 9 0 FLASH BACK CH CH PAGE Press the C CH H or N NU UM MB BE ER R buttons to sel...

Page 37: ... Advanced Reset Audio Language EZ SoundRite EZ Sound Balance 0 TV Speakers Auto Clock Manual Clock Off Timer On Timer Auto Off Auto config Manual config XGA Mode Reset SCREEN LOCK OPTION TIME AUDIO VIDEO SETUP SCREEN LOCK OPTION TIME AUDIO VIDEO SETUP LOCK Lock System Set Password Block Channel Movie Rating TV Rating Children TV Rating General Aux Block SCREEN LOCK OPTION TIME AUDIO VIDEO SETUP SC...

Page 38: ... channel list Run EZ Scan again after any Antenna Cable connection changes A password is required to gain access to EZ Scan menu if the Lock System is turned on EZ Scan G Manual Scan Channel Edit DTV Signal Channel Label Selection G or leads you to the EZ scan screen EZ Scan G Manual Scan Channel Edit DTV Signal Channel Label 2 3 1 1 2 3 ENTER EXIT VOL CH CC MENU 1 2 3 MUTE TIMER SAP RATIO PAGE 1 ...

Page 39: ...delete Press the E EN NT TE ER R button to add or delete the channel Press the E EX XI IT T button to return to TV viewing or press M ME EN NU U button to return to the previous menu ENTER EXIT VOL CH CC MENU 1 2 3 MUTE TIMER SAP RATIO PAGE 1 2 3 4 5 6 7 8 9 0 CH EZ Scan Manual Scan G Channel Edit DTV Signal Channel Label Channel Type Number ANALOG 2 EZ Scan Manual Scan Channel Edit DTV Signal Cha...

Page 40: ... el l E Ed di it t Press the G G button and then use D D or E E button to select channel and then use the E EN NT TE ER R button to add or delete it Press E EX XI IT T button to return to TV viewing or press M ME EN NU U button to return to the previous menu ENTER EXIT VOL CH CC MENU 1 2 3 MUTE TIMER SAP RATIO PAGE 1 2 3 4 5 6 7 8 9 0 CH EZ Scan Manual Scan Channel Edit DTV Signal Channel Label 2 ...

Page 41: ... the S SE ET TU UP P menu Press the G G button and then use D D or E E button to select D DT TV V S Si ig gn na al l View the on screen signal strength monitor to see the quality of the signal being received Press E EX XI IT T button to return to TV viewing or press M ME EN NU U button to return to the previous menu ENTER EXIT VOL CH CC MENU 1 2 3 MUTE TIMER SAP RATIO PAGE 1 2 3 4 5 6 7 8 9 0 CH E...

Page 42: ... an nn ne el l L La ab be el l Press the G G button and then use D D or E E button to select a channel to label Press the G G button and then use D D or E E button to select the appropriate label for the channel Press E EX XI IT T button to return to TV viewing or press M ME EN NU U button to return to the previous menu EZ Scan Manual Scan Channel Edit DTV Signal Channel Label G 2 3 4 5 1 1 2 3 EN...

Page 43: ...ndow Press the P PI IP P button to access the sub picture DW Mode Selecting an Input Signal Source for Double Window Use the P PI IP P I IN NP PU UT T button to select the input source for the sub picture Each press of P PI IP P I IN NP PU UT T button changes the PIP source PIP Off Use the P PI IP P I IN NP PU UT T button to select the input source for the sub picture Each press of P PI IP P I IN ...

Page 44: ...GB HDMI1 DVI HDMI2 input sources for the main picture can t be used to swap the main and sub pictures Swapping the PIP Double Window 1 TV Program Selection for PIP Use the P PI IP P C CH H button to select a channel for the sub picture The selected channel number is displayed just below the input source of main picture 1 ...

Page 45: ...ow the picture is to be displayed RGB PC DVI PC input source use 4 3 or 16 9 aspect ratio Set by program Selects the proper picture proportion to match the source s image 4 3 Choose 4 3 when you want to view a picture with an original 4 3 aspect ratio 16 9 Adjust the picture horizontally in a linear proportion to fill the entire screen Press the R RA AT TI IO O button repeatedly to select the desi...

Page 46: ...se Zoom 1 when you want to view the picture without any alteration However the top and bottom portions of the picture will be cropped Zoom 2 Choose Zoom 2 when you want the picture to be altered both vertically extended and cropped The pic ture taking a halfway trade off between alteration and screen coverage Horizon Zoom 1 Zoom 2 ...

Page 47: ... for the best picture appearance Select the preset value in the EZ Picture menu based on the program category D Da ay yl li ig gh ht t N No or rm ma al l N Ni ig gh ht t T Ti im me e Settings are preset for the opti mum picture quality at the factory and are not adjustable In the U Us se er r1 1 and U Us se er r2 2 modes only user can directly adjust the contrast brightness color sharpness tint Yo...

Page 48: ...and then use D D or E E button to select the V VI ID DE EO O menu Press the G G button and then use D D or E E button to select C Co ol lo or r T Te em mp pe er ra at tu ur re e Press the G G button and then use D D or E E button to select either C Co oo ol l N No or rm ma al l W Wa ar rm m or U Us se er r Press E EX XI IT T button to return to TV viewing or press M ME EN NU U button to return to ...

Page 49: ...G G button and then use D D or E E button to select E EZ Z P Pi ic ct tu ur re e Press the G G button and then use D D or E E button to select U Us se er r 1 1 or U Us se er r 2 2 Press the G G button and then use D D or E E button to select the desired picture option C Co on nt tr ra as st t B Br ri ig gh ht tn ne es ss s C Co ol lo or r S Sh ha ar rp pn ne es ss s or T Ti in nt t Press the G G b...

Page 50: ...select U Us se er r Press the G G button and then use D D or E E button to select R Re ed d G Gr re ee en n or B Bl lu ue e Press the G G button and then use F F or G G button to make appropriate adjustments The adjustment range of R Re ed d G Gr re ee en n or B Bl lu ue e is 40 40 Press E EX XI IT T button to return to TV viewing or press M ME EN NU U button to return to the previous menu EZ Pict...

Page 51: ... you can adjust the XD Contrast XD color and XD Noise EZ Picture Color Temperature XD G Advanced Reset 2 3 4 1 S Se el le ec ct ti in ng g t th he e M Ma an nu ua al l 1 Press the G G button and then use D D or E E button to select X XD D C Co on nt tr ra as st t X XD D C Co ol lo or r or X XD D N NR R N No oi is se e M MP PE EG G N NR R X XD D C Co on nt tr ra as st t Optimizing the contrast auto...

Page 52: ... button to select O On n or O Of ff f Press E EX XI IT T button to return to TV viewing or press M ME EN NU U button to return to the previous menu Set up the TV for the best picture appearance for viewing movies When you operate Cinema 3 2 Pull Down Mode or Cinema Correction Mode the TV will adjust 24 fps video from movies to 30 fps video for display This feature operates only in Analog AV1 AV2 a...

Page 53: ...n and then use D D or E E button to select L Lo ow w or H Hi ig gh h L Lo ow w The screen gets darker H Hi ig gh h The screen gets brighter Press E EX XI IT T button to return to TV viewing or press M ME EN NU U button to return to the previous menu Adjusting the contrast and the brightness of the screen using the black level of the screen This feature operates only in AV1 AV2 HDMI1 DVI or HDMI2mo...

Page 54: ...s the G G button and then use D D or E E button to select R Re es se et t Press the G G button to reset the Video menu options to original values Use to quickly reset all the Video menu options to their original factory preset values EZ Picture Color Temperature XD Advanced Reset G To set 2 3 1 2 3 1 EZ Picture Color Temperature XD Advanced Reset SCREEN LOCK OPTION TIME AUDIO VIDEO SETUP SCREEN LO...

Page 55: ... will move once per 2 minutes Left Right Upside Downside Right Left Downside Upside I In nv ve er rs si io on n Inversion will automatically invert the plasma display panel color every 30 minutes Press E EX XI IT T button to return to TV viewing or press M ME EN NU U button to return to the previous menu ENTER EXIT VOL CH CC MENU 1 2 3 MUTE TIMER SAP RATIO PAGE 1 2 3 4 5 6 7 8 9 0 CH A frozen stil...

Page 56: ...tton to select O On n or O Of ff f Press E EX XI IT T button to return to TV viewing or press M ME EN NU U button to return to the previous menu Scans for changes in sound levels during commercials then adjusts the sound to match the specified audio level SoundRite makes sure that the volume level remains consis tent whether you are watching a commercial or a regular TV program 2 3 4 1 Audio Langu...

Page 57: ...ry and are not adjustable Press the E EZ Z S SO OU UN ND D button repeatedly to select the appropriate sound setup as below N No or rm ma al l S St ta ad di iu um m N Ne ew ws s M Mu us si ic c T Th he ea at te er r and U Us se er r your own settings Press E EX XI IT T button to return to TV viewing You can also adjust E EZ Z S So ou un nd d in the A AU UD DI IO O menu 2 1 Audio Language EZ SoundR...

Page 58: ... sound option T Tr re eb bl le e B Ba as ss s or F Fr ro on nt t S Su ur rr ro ou un nd d Press the G G button and then use F F or G G button to make appropriate adjustments S Se el le ec ct ti in ng g t th he e F Fr ro on nt t s su ur rr ro ou un nd d Press the G G button and then use F F or G G button to select O Of ff f or 3 3D D E Ec ch ho oS So ou un nd d S Sy ys st te em m Press E EX XI IT T...

Page 59: ...ton to make appropriate adjustments Press E EX XI IT T button to return to TV viewing or press M ME EN NU U button to return to the previous menu Adjust the left right sound of speaker to suit your taste and room situations 2 3 4 1 1 2 3 Audio Language EZ SoundRite EZ Sound Balance 0 G TV Speakers L R Audio Language EZ SoundRite EZ Sound Balance 0 TV Speakers F F G L R Audio Language EZ SoundRite ...

Page 60: ...k ke er rs s Press the G G button and then use D D or E E button to select O On n or O Of ff f Press E EX XI IT T button to return to TV viewing or press M ME EN NU U button to return to the previous menu Turn the TV speakers off if using external audio equipment Feature turns the TV Speakers option On or Off Audio Language EZ SoundRite EZ Sound Balance TV Speakers G Off On 2 3 4 1 2 3 1 Audio Lan...

Page 61: ...n the remote control Mono sound is automatically received if the broadcast is only in Mono even though Stereo or SAP has been selected Select Mono if you want to listen to the mono sound in remote areas during stereo SAP broadcasting Stereo or SAP can be received in Analog channel Use the S SA AP P button to select your desired MTS mode in analog signal Each time you press the S SA AP P button M M...

Page 62: ...enu Press the G G button and then use D D or E E button to select A Au ud di io o L La an ng gu ua ag ge e Press the G G button and then use D D or E E button to select E En ng gl li is sh h E Es sp pa añ ño ol l or F Fr ra an nç ça ai is s Press E EX XI IT T button to return to TV viewing or press M ME EN NU U button to return to the previous menu Audio Language G EZ Sound Balance TV Speakers Eng...

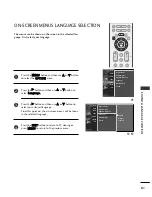
Page 63: ... or E E button to select the O OP PT TI IO ON N menu Press the G G button and then use D D or E E button to select L La an ng gu ua ag ge e Press the G G button and then use D D or E E button to select your desired language From this point on the on screen menus will be shown in the selected language Press the E EX XI IT T button to return to TV viewing or press M ME EN NU U to return to the previ...

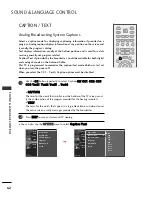
Page 64: ... Captions Select a caption mode for displaying captioning information if provided on a program Analog caption displays information at any position on the screen and is usually the program s dialog Text displays information usually at the bottom position and is used for a data service generally not program related Caption Text if provided by the broadcaster would be available for both digital and a...

Page 65: ... Es sp pa añ ño ol l or F Fr ra an nç ça ai is s Press E EX XI IT T button to return to TV viewing or press M ME EN NU U button to return to the previous menu Choose the language you want the DTV CADTV Captions to appear in Other Languages can be chosen for digital sources only if they are included on the program Aspect Ratio Caption Text G Caption Options Language ISM Method Set ID Off English Es...

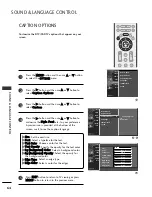
Page 66: ...aption language Press E EX XI IT T button to return to TV viewing or press M ME EN NU U button to return to the previous menu 2 3 4 5 1 G G S Si iz ze e Set the word size G G F Fo on nt t Select a typeface for the text G G T Te ex xt t C Co ol lo or r Choose a color for the text G G T Te ex xt t O Op pa ac ci it ty y Specify the opacity for the text color G G B Bg g B Ba ac ck kg gr ro ou un nd d ...

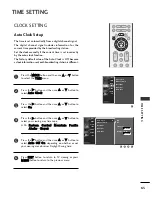
Page 67: ...select A Au ut to o C Cl lo oc ck k Press the G G button and then use D D or E E button to select O On n Press the G G button and then use D D or E E button to select your viewing area time zone U S A E Ea as st te er rn n C Ce en nt tr ra al l M Mo ou un nt ta ai in n P Pa ac ci if fi ic c A Al la as sk ka a or H Ha aw wa ai ii i Press the G G button and then use D D or E E button to select A Au ...

Page 68: ...l l C Cl lo oc ck k Press the G G button and then use F F or G G to select either the year date or time option Press E EX XI IT T button to return to TV viewing or press M ME EN NU U button to return to the previous menu If the current time setting is wrong reset the clock manually Auto Clock Manual Clock G Off Timer On Timer Auto Off Year Date Time 2 3 4 1 1 3 2 Auto Clock Manual Clock Off Timer ...

Page 69: ... button and then use D D or E E button to set the minutes Press E EX XI IT T button to return to TV viewing or press M ME EN NU U button to return to the previous menu Auto Clock Manual Clock Off Timer On Timer G Auto Off 2 3 4 5 6 1 The timer function operates only if the current time has been set The Off Timer function overrides the On Timer function if they are both set to the same time The TV ...

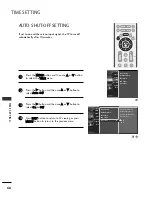
Page 70: ...se D D or E E button to select A Au ut to o O Of ff f Press the G G button and then use D D or E E button to select O On n or O Of ff f Press E EX XI IT T button to return to TV viewing or press M ME EN NU U button to return to the previous menu Auto Clock Manual Clock Off Timer On Timer Auto Off G Off On If set to On and there is no input signal the TV turned off automatically after 10 minutes 2 ...

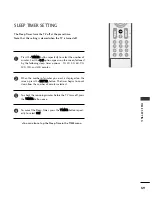
Page 71: ... number of minutes you want is displayed on the screen press the E EN NT TE ER R button The timer begins to count down from the number of minutes selected To check the remaining minutes before the TV turns off press the T TI IM ME ER R button once To cancel the Sleep Timer press the T TI IM ME ER R button repeat edly to select O Of ff f The Sleep Timer turns the TV off at the preset time Note that...

Page 72: ...en If the position of the image is still not correct try Auto adjustment again If the picture needs to be adjusted more after Auto adjustment in RGB PC you can adjust the M Ma an nu ua al l c co on nf fi ig g Press the E EX XI IT T button to return to TV viewing or press the M ME EN NU U button to return to the previous menu Automatically adjusts picture position and minimizes image shaking Althou...

Page 73: ...e C Cl lo oc ck k H H p po os si it ti io on n or V V p po os si it ti io on n P Ph ha as se e This function allows you to remove any horizontal noise and clear or sharpen the image of characters C Cl lo oc ck k This function is to minimize any vertical bars or stripes visible on the screen background And the horizontal screen size will also change H H p po os si it ti io on n V V p po os si it ti...

Page 74: ...elect the S SC CR RE EE EN N menu Press the G G button and then use D D or E E button to select X XG GA A m mo od de e Press the G G button and then use D D or E E button to select the desired XGA resolution Press E EX XI IT T button to return to TV viewing or press M ME EN NU U button to return to the previous menu 2 3 4 1 1 2 3 Auto config Manual config XGA Mode G Reset 1024 x 768 1280 x 768 136...

Page 75: ... the adjusted value Press the M ME EN NU U button and then use D D or E E button to select the S SC CR RE EE EN N menu Press the G G button and then use D D or E E button to select R Re es se et t Press the G G button 1 2 3 1 2 3 Auto config Manual config XGA Mode Reset G To set Auto config Manual config XGA Mode Reset SCREEN LOCK OPTION TIME AUDIO VIDEO SETUP SCREEN LOCK OPTION TIME AUDIO VIDEO S...

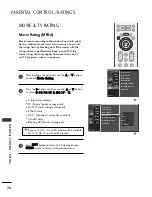
Page 76: ... television movies can be blocked by TV Rating and or Individual Categories Movies that have been shown at the theaters or direct to video movies use the Movie Rating System MPAA only Ratings for Television programs including made for TV movies TV G General audience TV PG Parental guidance suggested TV 14 Parents strongly cautioned TV MA Mature audience only TV Y All children TV Y7 Children 7 year...

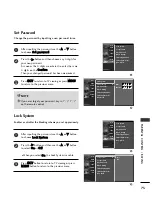
Page 77: ...ting the password use the D D or E E button to choose L Lo oc ck k S Sy ys st te em m Press the G G button and then use the D D or E E button to select O On n or O Of ff f When you select O On n the Lock System is enable Press E EX XI IT T button to return to TV viewing or press M ME EN NU U button to return to the previous menu Enables or disables the blocking scheme you set up previously Lock Sy...

Page 78: ...s the G G button You will now see a screen filled with channel numbers and a preview picture Use D D E E F F G G button to select a channel and then use the E EN NT TE ER R button to block or unblock it Press E EX XI IT T button to return to TV viewing or press M ME EN NU U button to return to the previous menu Lock System Set Password Block Channel G Movie Rating TV Rating Children TV Rating Gene...

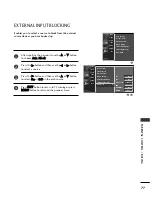
Page 79: ...use the D D or E E button to select O On n or O Of ff f on the each source Press E EX XI IT T button to return to TV viewing or press M ME EN NU U button to return to the previous menu Lock System Set Password Block Channel Movie Rating TV Rating Children TV Rating General Aux Block G AV1 On AV2 On Component Off RGB Off HDMI1 DVI On HDMI2 Off 2 3 4 1 1 3 2 Lock System Set Password Block Channel Mo...

Page 80: ...n and then use the D D or E E button to select G G P PG G P PG G 1 13 3 R R N NC C 1 17 7 or X X G General audiences PG Parental guidance suggested PG 13 Parents strongly cautioned R Restricted NC 17 No one 17 and under admitted X Adult only Blocking Off Permits all programs Press E EX XI IT T button to return to TV viewing or press M ME EN NU U button to return to the previous menu G G If you set...

Page 81: ...a al lo og gu ue e L La an ng gu ua ag ge e S Se ex x or V Vi io ol le en nc ce e Press the G G button and then use the D D or E E button to select block options Age applies to TV G TV PG TV 14 TV MA Dialogue sexual dialogue applies to TV PG TV 14 Language adult language applies to TV PG TV 1 4 TV MA Sex sexual situations applies to TV PG TV 14 TV MA Violence applies to TV PG TV 14 TV MA Press E E...

Page 82: ...o broadcast on station tuned with Auto off activated Check whether the product is turned on Try another channel The problem may be with the broadcast Is the power cord inserted into wall power outlet Check your antenna direction and or location Test the wall power outlet plug another product s power cord into the outlet where the product s power cord was plugged in This is normal the image is mute...

Page 83: ...he product No output from one of the speakers T Th he er re e i is s a a p pr ro ob bl le em m i in n P PC C m mo od de e O On nl ly y P PC C m mo od de e a ap pp pl li ie ed d Adjust resolution horizontal frequency or vertical frequency Check the input source Work the Auto configure or adjust clock phase or H V position Option Check the signal cable Reinstall the PC video card The signal is out o...

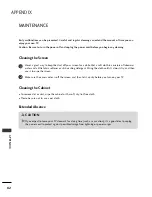
Page 84: ...water and a little fabric softener or dish washing detergent Wring the cloth until it s almost dry and then use it to wipe the screen Make sure the excess water is off the screen and then let it air dry before you turn on your TV Cleaning the Cabinet To remove dirt or dust wipe the cabinet with a soft dry lint free cloth Please be sure not to use a wet cloth Extended Absence G G If you expect to l...

Page 85: ...F 0 40 C Less than 80 4 140 F 20 60 C Less than 85 36 5 x 27 4 x 10 4 inches 926 8 x 695 8 x 264 6 mm 36 5 x24 8 x 4 2 inches 926 8 x 629 8 x 10⁷ 4 mm 47 2 pounds 21 4 kg 36 8 pounds 16 7 kg 31 8 x 23 9 x 9 8 inches 806 6 x 607 5 x 249 0 mm 31 8 x 21 7 x 3 8 inches 806 6 x 552 3 x 97 2 mm 33 7 pounds 15 3kg 27 6 pounds 12 5 kg 42LC5DC 42LC5DC UA 40 7 x 29 6 x 1 1 6 inches 1 033 1x750 7x294 2mm 40 ...

Page 86: ... two seconds the currently selected device button is illuminated If you don t press any button for 20 seconds the light on the mode button will be turned off In that case you have to repeat from step 2 Enter the appropriate code from the code table on the following pages When pressing the button the light blinks at a time If the device turned off the programming is successful Press the M ME EN NU ...

Page 87: ...MINOLTA 013 020 MITSUBISHI 013 020 045 046 049 051 059 061 151 MTC 034 040 MULTITECH 024 034 NEC 012 023 039 043 048 NORDMENDE 043 OPTONICA 053 054 PANASONIC 066 070 074 083 133 140 145 PENTAX 013 020 031 033 063 PHILCO 031 034 067 PHILIPS 031 033 034 054 067 071 101 PILOT 101 PIONEER 013 021 048 PORTLAND 108 PULSAR 072 QUARTZ 01 1 014 QUASAR 033 066 075 145 RCA 013 020 033 034 040 041 062 063 107...

Page 88: ...use D D or E E button to adjust S Se et t I ID D to choose the desired TV ID number The adjustment range of Set ID is 1 99 Press E EX XI IT T button to return to TV viewing or press M ME EN NU U button to return to the previous menu Use this function to specify a TV ID number 2 3 4 1 Aspect Ratio Caption Text Caption Options Language ISM Method Set ID SCREEN LOCK OPTION TIME AUDIO VIDEO SETUP Aspe...

Page 89: ...n 52 EZ SOUND Remote control Button 4D EZ PIC Remote control Button 5B EXIT Remote control Button 0A SAP Remote control Button E1 Remote control Button E0 Remote control Button AA INFO Remote control Button 60 PIP Remote control Button 72 PIP CH Remote control Button 71 PIP CH Remote control Button 61 PIP INPUT Remote control Button 63 SWAP Remote control Button D6 TV Discrete IR Code TV Input Sel...

Page 90: ......
Reviews: