background image

18

ENG

ENGLISH

MAKING CONNECTIONS

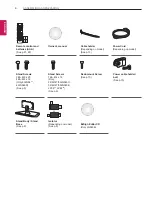
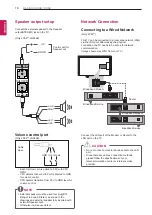
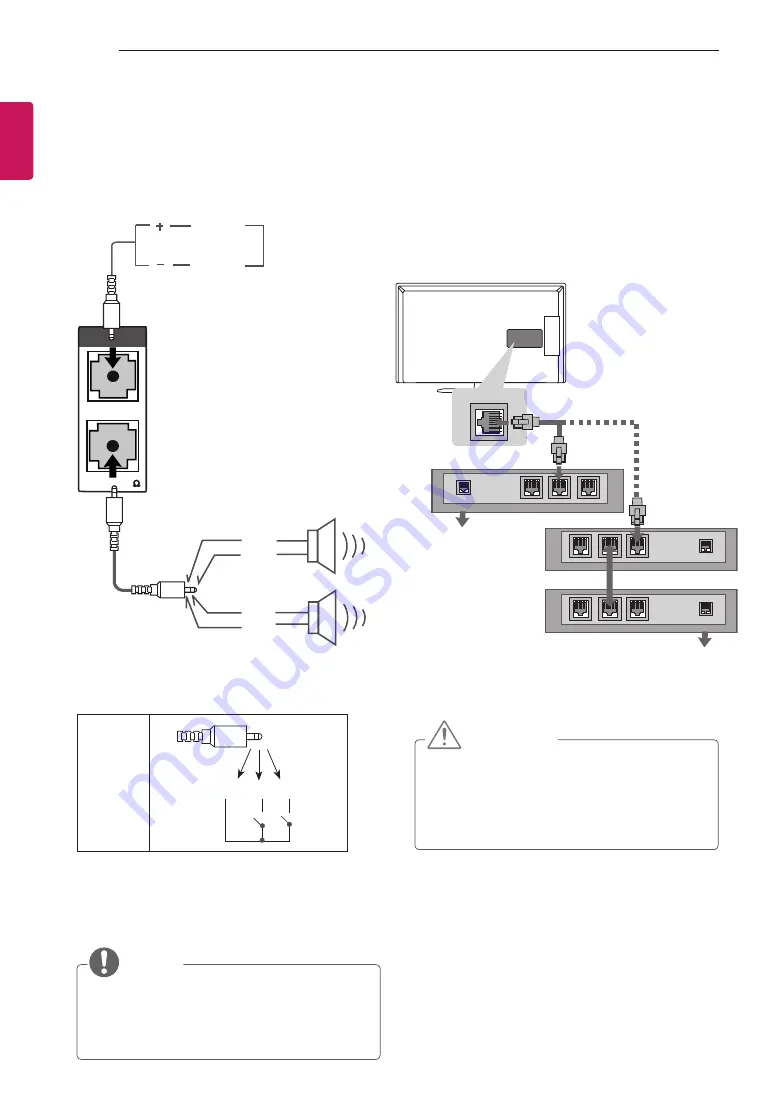
Speaker output setup

Connect the external speaker to the Speaker 

output(STEREO) jack on the TV.

(Only LP62**, LN549E)

VOLUME CONTROL 

SPEAKER OUT

STEREO

(8    )

GND

RIGHT

GND

LEFT

UP

DOWN

Control port for 

Speaker out

Volume control port

(Only LP62**, LN549E)

    GND / Up / Down

Cable

Spec.


y

Each Up/ Down pin is pulled to 3.3V with CPU 

GPIO.


y

CPU detects that vol. crtl. Port is shorted to GND 

for volume control.


y

CPU detects transition from 3.3V to GND level for 

volume control.

 NOTE


y

External speaker must be used four plug(BTL: 

Bridge Tied Load, Stereo) as shown in the 

drawings and external speaker fully inserted with 

external Speaker Jack.


y

Otherwise it will cause defect.

Network Connection

Connecting to a Wired Network

(Only LP62**)

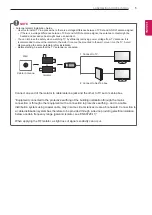
This TV can be connected to a local area network (LAN) 

via the LAN port. After making the physical

connection, the TV needs to be set up for network 

communication.

(Image shown may differ from your TV.)

LAN

Broadband Service

Broadband Modem

Broadband Modem

Broadband Service

Router

Connect the LAN port of the Modem or Router to the 

LAN port on the TV.

  CAUTION


y

Do not connect a modular phone cable to the LAN 

port.


y

Since there are various connection methods, 

please follow the specifications of your 

telecommunication carrier or internet service 

provider.

VOLUME

CONTROL

STEREO

SPEAKER

OUT

(8    )

Summary of Contents for 32LN549C.AFB

Page 1: ...OWNER S MANUAL LED TV Please read this manual carefully before operating your set and retain it for future reference LN54 LP36 LP62 Disclaimer LG LED TV applies LCD screen with LED backlights www lg com ...

Page 2: ...13 MAKING CONNECTIONS 14 Antenna connection 14 HDMI connection 15 DVI to HDMI connection 15 Component connection 16 Composite connection 16 RGB PC connection 17 Audio connection 17 Digital optical audio connection 17 External speaker out 18 Speaker output setup 18 Volume control port 18 Network Connection 18 Connecting to a Wired Network 19 Wireless network connection 19 Headphone connection 20 US...

Page 3: ...ions only when the network connection is made Only LP62 ASSEMBLING AND PREPARING Unpacking Check your product box for the following items If there are any missing accessories contact the local dealer where you purchased your product The illustrations in this manual may differ from the actual product and item CAUTION y y Do not use any unapproved items to ensure the safety and product life span y y...

Page 4: ...13 Power Cord Depending on model Stand Screws 3EA M5 x 25 4EA M4 x 14 Only 60LN54 42LN549D See p 9 Stand Screws 7EA M4 x 14 Only 32 42 47 55LN549C 32 42 47 55LN549E LP36 LP62 See p 9 Desk mount Screw See p 10 Power cable holder bolt See p 13 or Stand Body Stand Base See p 9 Isolator Depending on model See p 5 EzSign Editor CD Only LN549E ...

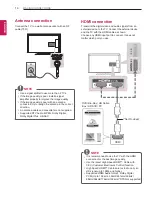
Page 5: ... after installation Before starting be sure that the TV antenna is connected ANTENNA CABLE IN Cable Antenna Wall Isolator 1 Connect to TV 2 Connect to Set Top box or Connect one end of the isolator to cable antenna jack and the other to TV set or set top box Equipment connected to the protective earthing of the building installation through the mains connection or through other equipment with a co...

Page 6: ...tification Contact your dealer to buy these items These devices only work with certain models LG Audio device Wireless Dongle AN WF100 Compatibility LN549C LN549D LP36 LP62 LN549E LG Audio device Wireless Dongle AN WF100 The model name or design may be changed depending on the upgrade of product functions manufacturer s circumstances or policies ...

Page 7: ...saved programmes H Adjusts the volume level H Selects the highlighted menu option or confirms an input S Accesses the main menu or saves your input and exits the menus H Changes the input source Turns the power on or off SETTINGS INPUT OK Buttons Screen Remote control sensor Power indicator Speakers ...

Page 8: ...nd all cables y y When holding the TV the screen should face away from you to avoid damage y y Hold the top and bottom of the TV frame firmly Make sure not to hold the transparent part speaker or speaker grill area y y When transporting a large TV there should be at least 2 people y y When transporting the TV by hand hold the TV as shown in the following illustration y y When transporting the TV d...

Page 9: ...ectly and fastened securely If they are not fastened securely enough the TV may tilt forward after being installed Do not use too much force and over tighten the screws otherwise screw may be damaged and not tighten correctly NOTE y y Remove the stand before installing the TV on a wall mount by performing the stand attachment in reverse Mounting on a table 1 Lift and tilt the TV into its upright p...

Page 10: ...and tighten the supplied screw on the rear of the stand WARNING y y To prevent TV from falling over the TV should be securely attached to the floor wall per installation instructions Tipping shaking or rocking the TV may cause injury Adjusting the angle of the TV to suit view Only 32LN54 32LP36 32LP62 Swivel 15 degrees to the left or right and adjust the angle of the TV to suit your view 90 90 15 ...

Page 11: ...be potentially hazardous due to falling Many injuries particularly to children can be avoided by taking simple precautions such as Using cabinets or stands recommended by the manufacturer of the television Only using furniture that can safely support the television Ensuring the television is not overhanging the edge of the supporting furniture Not placing the television on tall furniture for examp...

Page 12: ...Number of screws 4 Wall mount bracket LSW430B CAUTION y y Disconnect the power first and then move or install the TV Otherwise electric shock may occur y y If you install the TV on a ceiling or slanted wall it may fall and result in severe injury Use an authorized LG wall mount and contact the local dealer or qualified personnel y y Do not over tighten the screws as this may cause damage to the TV...

Page 13: ...s and other external devices NOTE y y The external device connection may differ from the model y y Connect external devices to the TV regardless of the order of the TV port y y If you record a TV programme on a DVD recorder or VCR make sure to connect the TV signal input cable to the TV through a DVD recorder or VCR For more information of recording refer to the manual provided with the connected ...

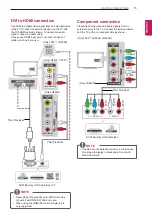
Page 14: ... AAC HDMI connection Transmits the digital video and audio signals from an external device to the TV Connect the external device and the TV with the HDMI cable as shown Choose any HDMI input port to connect It does not matter which port you use HDMI DVI IN 1 2 IN 3 USB IN DVD Blu Ray HD Cable Box HD STB PC Not Provided NOTE y y It is recommended to use the TV with the HDMI connection for the best ...

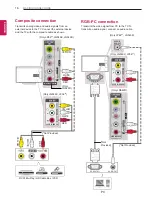
Page 15: ...nnection Transmits analog video and audio signals from an external device to the TV Connect the external device and the TV with a component cable as shown Only LP62 LN549E LN549D VIDEO AUDIO VIDEO L MONO AUDIO R VIDEO AUDIO AV IN AUDIO IN RGB DVI GREEN RED WHITE RED BLUE GREEN RED WHITE RED BLUE Not Provided Only LN549D NOTE y y If cables are not installed correctly it could cause this image to di...

Page 16: ...AUDIO IN RGB DVI Not Provided PC Only LN549C LP36 Only LN549D Only LN549D Not Provided AUDIO IN RGB DVI L R R L MONO VIDEO AUDIO VIDEO L MONO AUDIO R AV IN AUDIO IN RGB DVI YELLOW WHITE RED YELLOW WHITE RED RED WHITE YELLOW DVD Blu Ray HD Cable Box VCR Only LN549C LP36 Not Provided Composite connection Transmits analog video and audio signals from an external device to the TV Connect the external ...

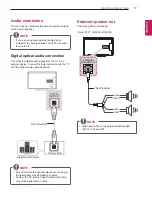
Page 17: ...ternal device Connect the external device and the TV with the optical audio cable as shown Digital Audio System OPTICAL AUDIO OUT OPTICAL AUDIO IN Not Provided NOTE y y Do not look into the optical output port Looking at the laser beam may damage your vision y y Audio with ACP Audio Copy Protection function may block digital audio output External speaker out Connecting External Speaker Only LP36 L...

Page 18: ... Tied Load Stereo as shown in the drawings and external speaker fully inserted with external Speaker Jack y y Otherwise it will cause defect Network Connection Connecting to a Wired Network Only LP62 This TV can be connected to a local area network LAN via the LAN port After making the physical connection the TV needs to be set up for network communication Image shown may differ from your TV LAN B...

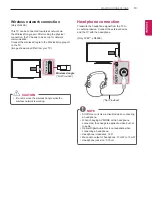
Page 19: ...l Audio Out is not available when connecting a headphone y y Headphone impedance 16 Ω y y Max audio output of headphone 10 mW to 15 mW y y Headphone jack size 0 35 cm Wireless network connection Only LN549E This TV can be connected to wireless network via the Wireless Dongle port After making the physical connection the TV needs to be set up for network communication Connect the wireless dongle to...

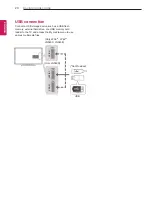
Page 20: ...t a USB storage device such as a USB flash memory external hard drive or a USB memory card reader to the TV and access the My media menu to use various multimedia files Only LN549D Only LP36 LP62 LN549C LN549E Not Provided IN 3 USB IN USB IN 2 USB IN 1 USB ...

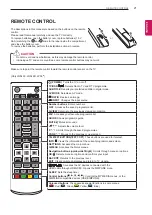
Page 21: ... in digital mode AV MODE Selects an AV mode RATIO Resizes an image INPUT Changes the input source Number buttons Enters numbers LIST Accesses the saved programme list Q VIEW Returns to the previously viewed programme FAV Accesses your favourite programme list GUIDE Shows programme guide MUTE Mutes all sounds Adjusts the volume level P Scrolls through the saved programmes PAGE Moves to the previous...

Page 22: ... in EzSign mode Only LN549E PORTAL Displays and removes hotel interactive menu INFO Views the information of the current programme and screen Only LP62 Shows or hides the information on TV remote control buttons in EzSign mode Only LN549E Navigation buttons up down left right Scrolls through menus or options OK Selects menus or options and confirms your input SETTINGS Accesses the main menus BACK ...

Page 23: ...n Power cord Remove the accumulated dust or dirt on the power cord regularly TROUBLESHOOTING The software version can be updated to improve performance of product Customer needs to ensure that LGE software is compatible with Customer Product Model If needed please consult with LGE Customer Service for guidance on procedure Problem Solution Cannot control the TV with the remote control y y Check th...

Page 24: ...y for some region In that case set the time manually y y It is recommended that you copy files to the TV memory before playing them as playing directly from the USB memory for an extended period of time may cause the device to overheat y y In EzSign TV mode some remote control keys may not work y y EzSign TV dose not support the USB HUB It is recommended that you connect a USB device directly to t...

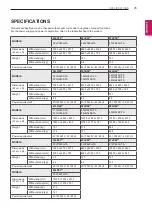
Page 25: ...7 Without stand kg 6 4 8 6 9 6 Power requirement AC 100 240 V 50 60 Hz AC 100 240 V 50 60 Hz AC 100 240 V 50 60 Hz MODELS 47LN54 55LN54 60LN54 47LN549C TA 47LN549E TA 55LN549C TA 55LN549E TA 60LN549E TA Dimensions W x H x D With stand mm 1080 0 x 694 0 x 264 0 1250 0 x 790 0 x 297 0 1359 0 x 852 0 x 297 0 Without stand mm 1080 0 x 642 0 x 80 5 1250 0 x 737 0 x 79 1 1359 0 x 799 0 x 67 2 Weight Wit...

Page 26: ... to 78 CATV 01 to 71 Vietnam Malaysia Television System DVB T PAL SECAM B G D K PAL I NTSC M Programme Coverage VHF 6 to 12 UHF 21 to 69 BG VHF UHF 1 to 69 CATV 01 to 47 I VHF UHF 1 to 69 CATV 01 to 47 DK VHF UHF 1 to 69 CATV 01 to 47 M VHF UHF 2 to 78 CATV 01 to 71 Iran Algeria Tunisia Digital model Television System DVB T PAL SECAM B G D K PAL I NTSC M Programme Coverage VHF 5 to 12 UHF 21 to 69...

Page 27: ... 67 5 60 00 Only LP62 LN549E HDMI DVI DTV supported mode Resolution Horizontal Frequency kHz Vertical Frequency Hz 720x480 31 47 31 5 59 94 60 1280x720 44 96 45 59 94 60 1920x1080 33 75 33 72 26 97 27 33 75 67 432 67 5 60 59 94 23 976 24 30 00 59 94 60 RGB PC HDMI DVI PC supported mode Resolution Horizontal Frequency kHz Vertical Frequency Hz 640x350 31 468 70 09 720x400 31 469 70 08 640x480 31 46...

Page 28: ... your registration code locate the DivX VOD section in your device setup menu Go to vod divx com for more infor mation on how to complete your registration DivX Certified to play DivX video up to HD 1080p including premium content DivX DivX Certified and associated logos are trademarks of Rovi Corporation or its subsidiaries and are used under license Covered by one or more of the following U S pa...

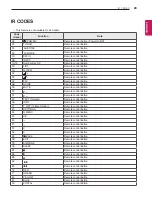
Page 29: ...emote control Button 01 P ꕍ Remote control Button 20 TEXT Teletext Remote control Button AA INFO Remote control Button 21 T OPT Teletext Option Remote control Button 43 SETTINGS Remote control Button 45 Q MENU Remote control Button 44 OK Remote control Button 40 ꕌ Remote control Button 41 ꕍ Remote control Button 07 Remote control Button 06 Remote control Button 28 BACK Remote control Button 5B EXI...

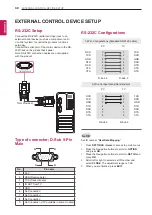
Page 30: ...6 No Connection 7 No Connection 8 No Connection 9 No Connection 12V available in some models RS 232C Configurations Set ID Set ID number Real Data Mapping 1 Press SETTINGS Home to access the main menus 2 Press the Navigation buttons to scroll to OPTION and press OK 3 Press the Navigation buttons to scroll to SET ID and press OK 4 Scroll left or right to select a set ID number and select CLOSE The ...

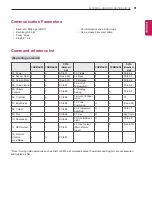
Page 31: ...to 01 13 Treble k r 00 to 64 02 Aspect Ratio k c See p 33 14 Bass k s 00 to 64 03 Screen Mute k d See p 33 15 Balance k t 00 to 64 04 Volume Mute k e 00 to 01 16 Colour Temperature x u 00 to 64 05 Volume Control k f 00 to 64 17 Energy Saving j q 00 to 05 06 Contrast k g 00 to 64 18 Auto Configu ration j u 01 07 Brightness k h 00 to 64 19 Tune Command m a See p 35 08 Colour k i 00 to 64 20 Programm...

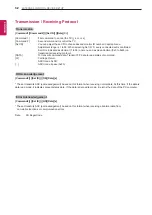
Page 32: ...0x0 to 0x63 on transmission receiving protocol DATA To transmit command data Transmit FF data to read status of command Cr Carriage Return ASCII code 0x0D ASCII code space 0x20 OK Acknowledgement Command2 Set ID OK Data x The set transmits ACK acknowledgement based on this format when receiving normal data At this time if the data is data read mode it indicates present status data If the data is d...

Page 33: ...Data Cr Ack d Set ID OK NG Data x 05 Volume Control Command k f To adjust volume You can also adjust volume with the volume buttons on remote control Data Min 00 to Max 64 Refer to Real data mapping See p 35 Transmission k f Set ID Data Cr Ack f Set ID OK NG Data x 06 Contrast Command k g To adjust screen contrast You can also adjust contrast in the PICTURE menu Data Min 00 to Max 64 Refer to Real...

Page 34: ...To reduce the power consumption of the TV You can also adjust Energy Saving in PICTURE menu Transmission j q Set ID Data Cr Ack q Set ID OK NG Data x Power Saving Function Level Description 7 6 5 4 3 2 1 0 0 0 0 0 Low Power 0 0 0 0 Off 0 0 0 0 Low Power 0 0 0 1 Minimum 0 0 0 0 Low Power 0 0 1 0 Medium 0 0 0 0 Low Power 0 0 1 1 Maximum 0 0 0 0 Low Power 0 1 0 1 Screen Off 0 0 0 0 Low Power 0 1 0 0 ...

Page 35: ...ata Cr Ack c Set ID OK NG Data x 22 Control Back Light Command m g To control the back light Data Min 00 to Max 64 Transmission m g Set ID Data Cr Ack g Set ID OK NG Data x Real data mapping 00 Step 0 A Step 10 Set ID 10 F Step 15 Set ID 15 10 Step 16 Set ID 16 64 Step 100 6E Step 110 73 Step 115 74 Step 116 CF Step 199 FE Step 254 FF Step 255 23 Input select Command x b Main Picture Input To sele...

Page 36: ...ur dealer when requiring any service MODEL SERIAL Only DTV This product qualifies for ENERGY STAR in the factory default Home Use setting Changing the factory default settings or enabling other features may increase power consumption that could exceed the limits necessary to quality for ENERGY STAR Only 42LN549D for India ...

Reviews: