background image

LCD TV

Please read 

I

nformation 

M

anual

included together

before reading this manual and operating your set. 

Retain it for future reference.
Record model number and serial number of the set. 
See the label attached on the back cover and quote 
this  information to your dealer when you require service.

P/NO : 3828TUL313C(0508-REV01)

Printed in Korea

OWNER’S MANUAL

MODEL: 32LP1R** 37LP1R**

42LP1R**

Summary of Contents for 32LP1R Series

Page 1: ...erating your set Retain it for future reference Record model number and serial number of the set See the label attached on the back cover and quote this information to your dealer when you require service P NO 3828TUL313C 0508 REV01 Printed in Korea OWNER S MANUAL MODEL 32LP1R 37LP1R 42LP1R ...

Page 2: ...I II ME NU AR C VC R DV D M OD E OK PO SI TI ON TI M E RE VE AL M OD E M M IX SI ZE HO LD IN DE X i IN PU T TV PI P PR PI P PR SW AP PIP INP UT VO L PR MU TE LI ST EX IT Remote Control Batteries Ensure that the following accessories are included with your TV If any accessory is missing please contact the dealer from where you purchased the product Accessories DVI D cable PC DVI to D Sub cable PC A...

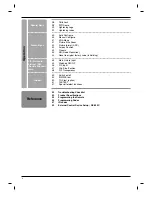
Page 3: ...ection 21 Turning On Off the TV 21 Volume Adjustment 21 Programme selection 21 On screen language selection 22 How to adjust the OSD screen 23 Auto programme tuning 24 Manual programme tuning 25 Fine tuning 26 Assigning a station name 27 Programme edit 28 Favourite programme 28 Calling the programme table 29 PSM Picture Status Memory 29 CSM Colour Status Memory 30 Function 30 ACM Active Colour Man...

Page 4: ... factory value Initializing 45 Main Picture Input 45 Watching DW PIP 46 PIP Input 47 Win Size Position 48 PIP Transparency 50 Switch on off 50 SIMPLE text 50 TOP text option 51 FASTEXT 51 Special teletext functions Special Menu Screen Menu PIP Picture In Picture DW Double Window Menu Teletext 52 Troubleshooting Checklist 53 Product Specifications 54 Programming the Remote 55 Programming Codes 57 I...

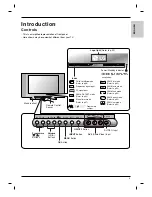
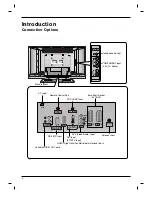
Page 5: ...d option S VIDEO Input AV4 Audio Video Input Logo light Refer to p 39 Child Lock On mode Refer to p 38 Progressive signal input PC signal input SSM SRS TSXT mode Refer to p 32 Sleep timer mode Refer to p 37 SSM Flat mode Refer to p 32 SSM Movie mode Refer to p 32 SSM Music mode Refer to p 32 SSM Sports mode Refer to p 32 SSM User mode Refer to p 32 Programme number Power Standby Indicator r r illu...

Page 6: ...IO OUT Antenna AC IN COMPONENT input Y PB PR Audio Headphone Socket PC SOUND Input Remote Control Port Euro Scart Socket AV1 AV2 HDMI High Definition Multimedia Interface input RS 232C Input Variable AUDIO OUT ports DVI Input PC DTV Input AV3 Video Audio Input Antenna Input AC Input Connection Options Connection Options Introduction Introduction Stand option ...

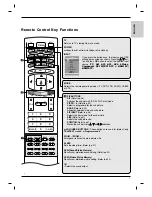
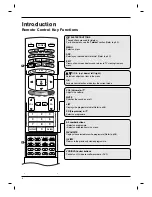
Page 7: ...ure to D D E E or F F G G direction COLOURED BUTTONS These buttons are used for teletext only TELETEXT models or Programme edit ZOOM ZOOM Enlarges or reduces the main picture size SLEEP Sets the sleep timer Refer to p 37 SSM Sound Status Memory Recalls your preferred sound setting Refer to p 32 PSM Picture Status Memory Recalls your preferred picture setting Refer to p 29 I II Selects the sound ou...

Page 8: ...ects your desired picture format Refer to p 42 EXIT Clears all on screen displays and returns to TV viewing from any menu D D E E F G up down left right Selects or adjusts an item in the menu OK Accepts your selection or displays the current mode VOL Volume D E Adjusts the volume MUTE Switches the sound on or off LIST Displays the programme table Refer to p 28 PR Programme D E Selects a programme ...

Page 9: ...se a remote control 7 meter dis tance and 30 degree left right with in the receiving unit scope Dispose of used batteries in the recycle bin to prevent environment TV POWER AUDIO PIP CABLE ZOOM ZOOM STB SLEEP VCR DVD MODE INPUT TV 1 2 3 The TV can be conveniently swiveled on its stand 30 to the left or right to provide the optimum viewing angle Swivel Stand option LIGHT Illuminates the remote cont...

Page 10: ...n Align the holes on the TV back panel with the protuberances on the back cover and insert Pull the cables through the hole on the set and bundle the cables using the supplied twister holder 1 2 3 VIDEO AUDIO HDMI AV1 AV2 AV3 PC SOUND RS 232C INPUT CONTROL SERVICE REMOTE CONTROL DVI INPUT PC DTV INPUT L R L R VARIABLE AUDIO OUT Antenna Antenna LOOPTHROUGH UPGRADE PORT HDMI MONITOR OUT REMOTE CONTR...

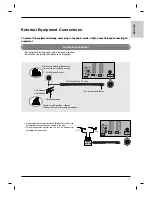
Page 11: ...ntenna as shown to the right If signal needs to be split for two TVs use an antenna sig nal splitter for connection Signal Amplifier UHF VHF Multi family Dwellings Apartments Connect to wall antenna socket Single family Dwellings Houses Connect to wall jack for outdoor antenna Outdoor Antenna Wall Antenna Socket VHF Antenna UHF Antenna RF Coaxial Wire 75 ohm Turn clockwise to tighten VIDEO AUDIO A...

Page 12: ...s You can also record programmes received by the TV on video tape The signal type RGB the signals red green and blue can only be selected for the AV1 scart socket and the AV1 input source can be received These signals are transmitted for example by a pay TV decoder game machine or photo CD unit etc and that digital signal can be recorded via AV1 scart socket If the AV1 AV2 scart sockets have been ...

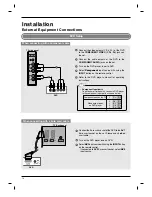
Page 13: ...nt select AV4 input source If you have a mono VCR connect the audio cable from the VCR to the AUDIO L MONO jack of the set When connecting with an S Video cable S VIDEO OUT IN R AUDIO L VIDEO ANT OUT ANT IN R R AUDIO AUDIO VIDEO VIDEO S VIDEO S VIDEO L MONO L MONO AV4 VCR TV front 1 1 2 2 3 4 Connect the S VIDEO output of the VCR to the S VIDEO input on the set The picture quality is improved comp...

Page 14: ... connecting with a component cable R L COMPONENT AUDIO VIDEO B R R AUDIO L DVD TV side panel 1 1 2 2 3 4 5 Connect the video outputs Y PB PR of the DVD to the COMPONENT VIDEO Y PB PR jacks on the set Connect the audio outputs of the DVD to the COMPONENT AUDIO jacks on the set Turn on the DVD player insert a DVD Select Component input source with using the INPUT button on the remote control Refer t...

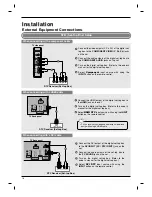
Page 15: ... AUDIO OUT DVD 1 1 2 3 Connect the HDMI output of the DVD to the HDMI jack on the set Select HDMI DTV input source with using the INPUT button on the remote control Refer to the DVD player s manual for operating instructions TV can receive the video and audio signal simultane ously with using a HDMI cable TV Back panel ...

Page 16: ...ct the HDMI output of the digital set top box to the HDMI jack on the set Turn on the digital set top box Refer to the owner s manual for the digital set top box Select HDMI DTV input source with using the INPUT button on the remote control DTV Receiver Set top Box DTV Receiver Set top Box STB Set Top Box Setup When connecting with a DVI cable 1 1 2 2 3 4 Connect the DVI output of the digital set ...

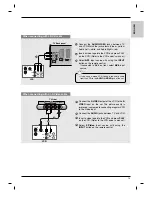
Page 17: ...e and Audio Right red Select AV3 input source with using the INPUT button on the remote control If connected to AV4 on front select A V4 input source Select programmes with the cable box remote control When connecting with an S Video cable TV VCR R AUDIO L VIDEO S VIDEO R R AUDIO AUDIO VIDEO VIDEO S VIDEO S VIDEO L MONO L MONO AV4 TV front 1 1 2 2 3 4 Connect the S VIDEO output of the Cable Box to...

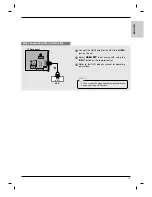
Page 18: ...deo input source Operate the corresponding external equipment Refer to external equipment operating guide External AV Source Setup Headphone Socket 1 2 Plug the headphone into the headphone socket To adjust the headphone volume press the VOL D D E E button If you press the MUTE button the sound from the headphone is switched off R L COMPONENT AUDIO VIDEO You can listen to the sound through the hea...

Page 19: ...E CONTROL DVI INPUT PC DTV INPUT RIABLE IO OUT NOTE Connect the signal cable DVI D cable Not DVI to D Sub cable from the DVI output socket of the PC to the DVI input socket of the set when using a PC with DVI output In some video cards DVI Analog output may not be sup ported When connecting with a HDMI to DVI cable When connecting with a DVI D cable or a DVI to D Sub cable 1 2 3 4 DVI OUTPUT AUDIO...

Page 20: ... formats VGA SVGA etc or refresh rates may result in reduced picture quality To change the computer video output format please refer to the operating manual for the computer you are using b If the message No signal appears on the screen adjust the PC output to a format listed in the Monitor Display Specifications table c The synchronization input form for Horizontal and Vertical frequencies is sep...

Page 21: ...tion Operation Operation First make all equipment connections Connect the AC power cord into the TV then plug the power cord into a wall outlet Press the POWER button located on the TV to turn on the TV The power indicator will light In the standby mode press the POWER PR D D E E TV INPUT or number but tons on the remote control to turn on the TV If you want to turn the TV off press the POWER butt...

Page 22: ...OUND TIME SPECIAL SCREEN PIP DW G Input DW PIP PIP Input Win size Win position PIP Transparency Press the MENU button and then D D E E button to display each menu Press the G G button and then D D E E button to select a menu item Change the setting of an item in the sub or pull down menu with F G button You can move to the higher level menu by pressing the OK or MENU button 1 2 3 How to adjust the...

Page 23: ...ber under 10 is entered with a numeric 0 in front of it i e 05 for 5 Press the D D E E button to select Start Press the G G button to begin auto programming All receivable stations are stored The station name is stored for stations which broadcast VPS Video Programme Service PDC Programme Delivery Control or TELETEXT data If no station name can be assigned to a station the channel number is assign...

Page 24: ... select System Press the F F G G button to select a TV system menu BG PAL B G SECAM B G Europe East Europe I PAL I II U K Ireland DK PAL D K SECAM D K East Europe L SECAM L L France Press the D D E E button to select Band Press the F F G G button to select V UHF or Cable Press the D D E E button to select Channel You can select the desired programme number with the F F G G button or number buttons...

Page 25: ...ton and then D D E E button to select the STATION menu Press the G G button and then D D E E button to select Manual programme Press the G G button and then D D E E button to select Fine Press the F F G G button to to fine tune for the best picture and sound Press the OK button to store it Press the EXIT button to return to normal TV viewing 1 2 3 4 5 6 Manual programme G G STATION G PICTURE SOUND...

Page 26: ...the STATION menu Press the G G button and then D D E E button to select Manual programme Press the G G button and then D D E E button to select Name Press the G G button and then D D E E button You can use a blank the number 0 to 9 and the alphabet A to Z Press the F F G G button to select the position and make your choice of the second character and so on Press the OK button to store it Press the...

Page 27: ...mme 1 Select a programme to be copied with the D D E E F F G G button 2 Press the GREEN button All the following programmes are shifted down one position A A Moving a programme 1 Select a programme to be moved with the D D E E F F G G button 2 Press the YELLOW button 3 Move the programme to the desired programme number with the D D E E F F G G button 4 Press the YELLOW button again to release this...

Page 28: ... to select stored favourite pro grammes FAVOURITE Q VIEW 1 2 3 4 5 6 7 8 0 9 POSITION SIZE HOLD INDEX FA VOURITE A A Displaying programme table Press the LIST button to display the Programme table menu The programme table appears on the screen One programme table con tains ten programmes as below A A Selecting a programme in the programme table Select a programme with the D D E E F F G G button Th...

Page 29: ...ton and then D D E E button to select CSM Press the G G button and then D D E E button to select Cool Normal Warm or User Cool To see less intense colors with more blue Normal To initialize values reset to default settings Warm To enhance hotter colors such as red User To adjust red green blue to any colour temperature you prefer 1 Press the D D E E button to select User 2 Press the G G button and...

Page 30: ...ff Press the EXIT button to return to normal TV viewing 1 2 3 4 G G STATION PICTURE G SOUND TIME SPECIAL SCREEN PIP DW PSM CSM ACM Contrast 90 Brightness 55 Colour 55 Sharpness 60 Adjust the ACM to select the desired skin colour option ACM function is available in all modes except DVI PC HDMI PC mode ACM Active Colour Management STATION PICTURE SOUND TIME SPECIAL SCREEN PIP DW Prev Menu PSM CSM AC...

Page 31: ... in PC mode 1 2 3 4 Contrast 90 G G STATION PICTURE G SOUND TIME SPECIAL SCREEN PIP DW PSM CSM ACM Contrast 90 Brightness 55 Colour 55 Sharpness 60 When the set was connected to external equipment with sRGB function it s adjusted a colour difference to display the equal image each other sRGB function is available in DVI PC HDMI PC mode sRGB STATION PICTURE SOUND TIME SPECIAL SCREEN PIP DW Prev Men...

Page 32: ... under license from BBE Sound Inc R TruSurround XT 1 2 3 4 SSM lets you enjoy the best sound without any special adjustment because the TV sets the appropriate sound options based on the program content When adjusting sound equalizer manually SSM automatically switches User SRS TSXT Flat Music Movie and Sports are preset for good sound quality at the factory and are not adjustable If SRS TSXT is s...

Page 33: ... G G button and then D D E E button to select AVL Press the G G button and then D D E E button to select On or Off Press the EXIT button to return to normal TV viewing Press the MENU button and then D D E E button to select the SOUND menu Press the G G button and then D D E E button to select the desired sound option Balance Treble or Bass Press the G G button and then F F G G button to make desir...

Page 34: ... Bass 50 TV speaker Press the MENU button and then D D E E button to select the SOUND menu Press the G G button and then D D E E button to select TV Speaker Press the G G button and then D D E E button to select On or Off Press the EXIT button to return to normal TV viewing 1 2 3 4 TV Speaker G G On Off Sound adjustment Sound adjustment STATION PICTURE SOUND G TIME SPECIAL SCREEN PIP DW SSM BBE AV...

Page 35: ...plex digital sound can be received Sound output can be selected according to the type of received broadcast as follows by pressing the I II button repeatedly 1 When NICAM mono is received you can select NICAM MONO or FM MONO 2 When NICAM stereo is received you can select NICAM STEREO or FM MONO If the stereo signal is weak switch to FM mono 3 When NICAM dual is received you can select NICAM DUAL I...

Page 36: ... to select Off time or On time Press the G G button and then D D E E button to select On To cancel On Off time function press the D D E E button to select Off Press the G G button and then D D E E button to set the hour Press the G G button and then D D E E button to set the minutes Only On time function Press the G G button and then D D E E button to adjust volume level and programme number Press...

Page 37: ...utes First the option appears on the screen followed by the following sleep timer options 10 20 30 60 90 120 180 and 240 minutes The timer begins to count down from the number of minutes selected To view the remaining sleep time press the SLEEP button once To cancel the sleep time repeatedly press the SLEEP button until the display appears 1 2 3 4 1 2 3 4 Auto sleep G G TV POWER AUDIO TEXT PIP CAB...

Page 38: ...used to prevent unauthorized viewing Press the MENU button and then D D E E button to select the SPECIAL menu Press the G G button and then D D E E button to select Child lock Press the G G button and then D D E E button to select On or Off Press the EXIT button to return to normal TV viewing 1 2 3 4 Demo G G TM Off TM On STATION PICTURE SOUND TIME SPECIAL G SCREEN PIP DW Language Child lock Set I...

Page 39: ...ght G G If you select on Index logo of TV front panel turns the lamp on Lightening Index STATION PICTURE SOUND TIME SPECIAL SCREEN PIP DW Prev Menu Language Child lock Set ID Demo Logo light Index On Off Press the MENU button and then D D E E button to select the SPECIAL menu Press the G G button and then D D E E button to select Index Press the G G button and then D D E E button to select On or O...

Page 40: ...nema NR Reset To set Press the MENU button and then use D D E E button to select the SCREEN menu Press the G G button and then use D D E E button to select Auto config Press the G G button to start Auto configure If the position of the image is still not correct try Auto adjustment again Press the MENU button and then use D D E E button to select theSCREENmenu Press the G G button and then use D D...

Page 41: ...n Cinema NR Reset Zoom G G TV POWER AUDIO TEXT PIP CABLE ZOOM ZOOM PSM SSM STB SLEEP I II ARC VCR DVD MODE INPUT TV ZOOM ZOOM STATION PICTURE SOUND TIME SPECIAL SCREEN G PIP DW Auto config Manual config XGA Mode ARC Zoom Position Cinema NR Reset XGA Mode function is available in DVI PC RGB mode and XGA WXGA mode only For more improved or better pic ture quality select the same mode corresponding t...

Page 42: ...iginal When your TV receives the wide screen signal it will be automatically changed to the picture format to be sent 4 3 This picture format is 4 to 3 of general TV 16 9 You can enjoy the cinema the picture format of 16 9 or general TV programme through the 16 9 mode The screen 16 9 is viewed just like that but the screen 4 3 is magnified to the left and right so that the screen 16 9 is full 14 9...

Page 43: ...PICTURE SOUND TIME SPECIAL SCREEN G PIP DW Auto config Manual config XGA Mode ARC Zoom Position Cinema NR Reset When screen is enlarged you can change the position of the picture Position function is not available in DVI PC mode Screen Position STATION PICTURE SOUND TIME SPECIAL SCREEN PIP DW Prev Menu Press the MENU button and then use D D E E button to select theSCREENmenu Press the G G button a...

Page 44: ...to reduce the picture noise which may appear on the screen during watching the TV This function is not available for use in DVI PC HDMI PC mode 3D NR is not available for use in Component DVI DTV HDMI DTV mode NR Noise Reduction STATION PICTURE SOUND TIME SPECIAL SCREEN PIP DW Prev Menu Press the MENU button and then use D D E E button to select the SCREEN menu Press the G G button and then use D ...

Page 45: ... AV1 AV2 AV3 AV4 S Video Component DVI PC HDMI PC PIP lets you view 2 different inputs sources on your TV screen at the same time One source will be large and the other source will show a smaller inset image DW Double Window mode splits the screen into 2 allowing 2 pic ture sources to be shown on the TV screen at the same time Each source is given half the screen You can also select the DW PIP wit...

Page 46: ... PIP DW G Input DW PIP PIP Input Win size Win position PIP Transparency TV AV1 AV2 AV3 AV4 S Video Component DVI HDMI TV POWER 1 2 3 4 5 6 7 8 9 AUDIO TEXT PIP CABLE ZOOM ZOOM PSM SSM STB SLEEP I II MENU ARC VCR DVD MODE OK INPUT TV PIP PR PIP PR SWAP PIP INPUT VOL PR MUTE LIST EXIT PIP PIP Mode DW1 Mode DW2 Mode POP Mode PIP Off TEXT PIP ZOOM ZOOM PSM SSM SLEEP I II MENU ARC OK PIP PR PIP PR SWAP...

Page 47: ...LD INDEX i POSITION SIZE STATION PICTURE SOUND TIME SPECIAL SCREEN PIP DW Prev Menu Input DW PIP PIP Input Win size Win position PIP Transparency Press the MENU button and then use D D E E button to select the PIP DW menu Press the G G button and then use D D E E button to select Win size or Win position Win size Press the F F G G button to adjust the sub picture size Win position Press the D D E ...

Page 48: ...ansparency 0 Press the MENU button and then use D D E E button to select the PIP DW menu Press the G G button and then use D D E E button to select PIP Transparency Press the G G button and then use F F G G button to make appropriate adjustments The adjustment range of is 0 10 Press the EXIT button to return to normal TV viewing PIP Transparency G G 1 2 3 4 STATION PICTURE SOUND TIME SPECIAL SCREE...

Page 49: ...wapping between main and sub pictures Press the SWAP button to exchange the main and sub pictures TV FAVOURITE Q VIEW POWER 1 2 3 4 5 6 7 8 0 9 AUDIO TEXT PIP CABLE ZOOM ZOOM PSM SSM STB SLEEP I II MENU ARC VCR DVD MODE OK POSITION TIME REVEAL MODE M MIX SIZE HOLD INDEX i INPUT TV PIP PR PIP PR SWAP PIP INPUT VOL PR MUTE LIST EXIT PIP PR PIP PR SWAP Note a In some case of PIP DW mode picture quali...

Page 50: ... following page A A Programming a colour button in LIST mode If the TV is in SIMPLE text TOP text or FASTEXT mode press the button to switch to LIST mode Four teletext page numbers of your choice can be colour coded and easily selected by pressing the corresponding coloured button on the remote control handset 1 Press a coloured button 2 Using the NUMBER buttons select the page you wish to program...

Page 51: ...g for the new teletext page The display will appear at the top left hand corner of the screen When the updated page is available then display will change to the page number Press this button to view the updated teletext page HOLD Stops the automatic page change which will occur if a teletext page consists of 2 or more sub pages The number of sub pages and the sub page displayed is usually shown on...

Page 52: ...eriencing problems tune to another station Station signal is weak reorient antenna to receive weaker station Check for sources of possible interference Lines or streaks in pictures Check antenna Change the direction of the antenna Check whether the product is turned on Try another channel The problem may be with the broadcast Is the power cord inserted into wall power outlet Check your antenna dir...

Page 53: ...deo card The signal is out of range There is a problem in PC mode Only PC mode applied Adjust resolution horizontal frequency or vertical frequency Check it whether the signal cable is connected or loose Check the input source Vertical bar or stripe on back ground Horizontal Noise Incorrect position Work the Auto configure or adjust clock phase or H V position The specifications shown above may be...

Page 54: ...press the corresponding mode button such as a DVD or VCR on the remote control The remote control button of desired device is lighted 3 Press the MENU and MUTE buttons simultaneously the remote control is ready to be programmed for the code 4 Enter a code number using the number buttons on the remote control Programming code numbers for the corresponding component can be found on the following pag...

Page 55: ...13 SYLVANIA 031 033 034 059 067 SYMPHONIC 034 TANDY 010 034 TATUNG 039 043 TEAC 034 039 043 TECHNICS 031 033 070 TEKNIKA 019 031 033 034 101 THOMAS 034 TMK 006 TOSHIBA 008 013 042 047 059 082 112 131 TOTEVISION 040 101 UNITECH 040 VECTOR RESEARCH 012 VICTOR 048 VIDEO CONCEPTS 012 034 046 VIDEOSONIC 040 WARDS 003 013 017 024 031 033 034 040 053 054 131 YAMAHA 012 034 039 043 ZENITH 034 048 056 058 ...

Page 56: ...RE 052 SL MARX 030 SPRUCER 047 078 STARCOM 002 004 008 009 STARGATE 008 030 TADIRAN 030 TAEKWANG 110 TAIHAN 105 TANDY 017 TEXSCAN 029 TOCOM 039 040 056 TOSHIBA 100 UNIKA 007 014 024 UNITED CABLE 004 053 UNIVERSAL 005 007 014 024 026 027 032 035 VIEWSTAR 012 015 018 086 087 088 089 ZENITH 100 114 060 093 Brand Codes Brand Codes Brand Codes Brand Codes A A CABLE ALPHASTAR DSR 123 AMPLICA 050 BIRDVIE...

Page 57: ...e Data code Data code TC Tf T1 C0 Carrier frequency FCAR 1 TC fOSC 12 Duty ratio T1 TC 1 3 Repeat frame C1 C2 C3 C4 C5 C6 C7 C0 C1 C2 C3 C4 C5 C6 C7 D0 D1 D2 D3 D4 D5 D6 D7 D0 D1 D2 D3 D4 D5 D6 D7 Repeat code 9 ms 4 5 ms 0 55 ms 9 ms 2 25 ms G Bit description G Frame interval Tf The waveform is transmitted as long as a key is depressed Bit 0 Tf Tf Tf 108ms 455KHz 0 56 ms 0 56 ms 1 12 ms Bit 1 2 24...

Page 58: ... Remote Control Button PIP INPUT Remote Control Button RED Remote Control Button GREEN Remote Control Button YELLOW Remote Control Button BLUE Remote Control Button VOL D Remote Control Button VOL E Remote Control Button PR D Remote Control Button PR E Remote Control Button MUTE Remote Control Button LIST Remote Control Button Number Key 0 9 Remote Control Button FAVOURITE Remote Control Button Q ...

Page 59: ...INPUT CONTROL SERVICE PC No Pin name 1 No connection 2 RXD Receive data 3 TXD Transmit data 4 DTR DTE side ready 5 GND 6 DSR DCE side ready 7 RTS Ready to send 8 CTS Clear to send 9 No Connection 1 5 6 9 2 3 5 4 6 7 8 RXD TXD GND DTR DSR RTS CTS TXD RXD GND DSR DTR CTS RTS PC 7 Wire Configurations Standard RS 232C cable D Sub 9 3 2 5 6 4 8 7 TV D Sub 9 2 3 5 4 6 7 8 RXD TXD GND DTR DSR RTS CTS TXD...

Page 60: ...3 Input Select Sub Picture x y 04 Aspect Ratio k c 0 6 05 Screen Mute k d 0 1 06 Volume Mute k e 0 1 07 Volume Control k f 0 64 08 Contrast k g 0 64 09 Brightness k h 0 64 10 Colour k i 0 64 11 Tint k j 0 64 12 Sharpness k k 0 64 13 OSD Select k l 0 1 14 Key Lock k m 0 1 15 Balance k t 0 64 16 Programme Select Main TV Input m a 0 63 17 Programme Select Sub TV Input m b 0 1 18 Key m c Key Code COMM...

Page 61: ...on Volume off 1 Volume mute off Volume on k e Set ID Data Cr Acknowledgement e Set ID OK Data x 04 Aspect Ratio Command c Main picture format G To adjust the screen format You can also adjust the screen format using the ARC Aspect Ratio Control button on remote control or in the Screen menu Transmission Data 0 Normal screen 4 3 1 Wide screen 16 9 2 14 9 3 Zoom 4 Spectacle 5 Full 6 Original k c Set...

Page 62: ...Min 0 Max 64 transmit by Hexadecimal code Refer to Real data mapping 1 See page 61 k k Set ID Data Cr Acknowledgement k Set ID OK Data x 13 OSD Select Command l G To select OSD On Screen Display mute on off Transmission k l Set ID Data Cr Acknowledgement Data 0 OSD mute on 1 OSD mute off l Set ID OK Data x Data0 Programme Number Min 0 Max 63 transmit by Hexadecimal code 18 Key Command m c G To sen...

Page 63: ...63 ENGLISH ...

Page 64: ......

Reviews: