background image

ENGLISH

30

UseR seTTInGs

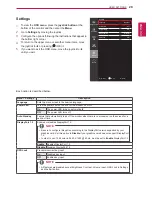
Reset

1  

To view the 

osD menu

, press the 

joystick button

 at the 

bottom of the monitor and then enter the 

Menu

.

2  

Go to 

Reset

 by moving the joystick.

3  

Configure the options following the instructions that appear in 
the bottom right corner.

4  

To return to the upper menu or set other menu items, move 

the joystick to ◄ or pressing (

 / OK) it.

5  

If you want to exit the OSD menu, move the joystick to ◄ 

until you exit.

Each option is described below.

Menu > Reset

Description

Do you want to reset your settings? 
Reset

Restores the default settings.

Cancel

Cancel the reset.

Reset

easy control

Do you want to reset your settings?

Reset

function

Cancel

PbP

screen

settings

Reset

▲/▼: Move

/ ►: OK

◄: Back

Summary of Contents for 34UM95-PD

Page 1: ...www lg com Owner s Manual IPS LED MONITOR LED MONITOR 34UM95 PD 34UM95 PE Please read the safety information carefully before using the product IPS LED Monitor LED Monitor Model List ...

Page 2: ... USING THE MONITOR 15 Connecting to a PC 15 HDMI Connection 16 DisplayPort Connection 16 Thunderbolt Connection 17 Connecting AV Devices 17 HDMI Connection 17 Connecting Peripherals 17 USB Cable connection PC 18 Connecting Headphones 19 INSTALLING THE LG MONITOR SOFTWARE 22 USER SETTINGS 22 Activating the Main Menu 22 Main Menu Features 23 User Settings 23 Menu Settings 24 Ratio 25 Function 26 PBP...

Page 3: ...High Definition Multimedia Interface and the HDMI logo are trademarks or registered trademarks of HDMI Licensing LLC in the United States and other countries VESA VESA logo DisplayPort compliance logo and DisplayPort compliance logo for dual mode source devices are all registered trademarks of the Video Electronics Standards Association ...

Page 4: ...ry Clear sheet y y Always use genuine LG components to ensure safety and product performance y y The product warranty will not cover damage or injury caused by the use of unauthorized components y y It is recommend that use the supplied components CAUTION y y The components may look different from those illustrated here y y Without prior notice all product information and specifications contained ...

Page 5: ...ith your finger Basic Functions Power on Press the joystick button once with your finger to turn on the monitor Power off Press and hold the joystick button once with your finger to turn off the monitor Volume Control You can control the volume by moving the joystick button left right y y The joystick button is located at the bottom of the monitor y y Before turning on the monitor please make sure...

Page 6: ...PE 34UM95 PD DC IN 19 V DP IN HDMI IN 1 H P USB UP USB IN 1 5 V 1 1 A USB IN 2 5 V 0 5 A USB IN 3 5 V 0 5 A HDMI IN 2 HDMI IN 2 HDMI IN 2 HDMI IN 2 DC IN 19 V DP IN HDMI IN 1 H P USB UP USB IN 1 5 V 1 1 A USB IN 2 5 V 0 5 A USB IN 3 5 V 0 5 A ON OFF DC Switch ...

Page 7: ...the panel itself y y When holding the monitor the screen should face toward you to prevent it from being scratched y y When transporting the monitor do not expose the monitor to shock or excessive vibration y y When moving the monitor keep it upright and never turn the monitor on its side or tilt it side ways y y Avoid touching the monitor screen as much as possible This may result in damage to th...

Page 8: ...e screws after mounting the stand base onto the stand hinge be sure to hold the stand base with your hand Other wise the product may fall causing personal injury or damage to the product y y Be careful not to hurt your hand on the edges of the screw covers y y Applying excessive force when tightening screws may cause damage to the monitor Damage caused in this way will not be cov ered by the produ...

Page 9: ...side down by just holding the base This may cause the monitor to fall off the stand and could result in personal injury y y When lifting or moving the monitor do not touch the monitor screen The force applied to the monitor screen may cause damage to it y y If you use the monitor panel without the stand base its joystick button may cause the moni tor to become unstable and fall resulting in damage...

Page 10: ...k button on the bottom of the monitor to turn on the monitor y y Unplug the power cord before moving or installing the monitor There is risk of electric shock y y Before turning on the monitor please make sure that the DC switch on the rear side of product is On Only 34UM95 PE CAUTION Cautions When Connecting Power Cord 220 V 110 V y y Make sure to use the power cord that is pro vided in the produ...

Page 11: ...nce 5 15 Front Rear y y When you adjust the angle do not hold the stand as shown on the following illustration You may injure your fingers 5 15 y y Be careful not to touch or press the screen area when adjusting the angle of the monitor 5 15 WARNING Tidying up Cables Tidy up cables using the cable holder on the stand base as shown in the illustration y y Cables can get caught in the hinge area as ...

Page 12: ...e only with respect to screw mounting interface dimensions and mounting screw specifications 5 Use the wall mount plate and fixing screws that conform to VESA standards as specified below y y 784 8 mm or less Thickness of the wall mount plate 2 6 mm Fixing screw Diameter 4 0 mm x Pitch 0 7 mm x Length 10 mm y y 787 4 mm or more Use the wall mount plate and screws that conform to VESA standards Ins...

Page 13: ...use or misuse of inappropriate components will not be covered by the product warranty y y To prevent injury this apparatus must be securely attached to the wall in accordance with the instrallation instructions This only pertains to Australia and New Zealand y y When measured from the back of the monitor the length of each installed screw must be 8 mm or less Wall Mount Plate Back of the Monitor S...

Page 14: ...e monitor For more information on installation and usage refer to the Kensington lock owner s manual or visit the website at http www kensington com Connect the monitor to a table using the Kensing ton security system cable y y The Kensington security system is optional You can obtain optional accessories from most electronics stores NOTE ...

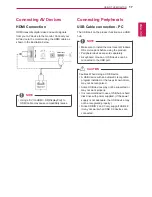
Page 15: ...emperature is low This is normal y y Sometimes red green or blue spots may ap pear on the screen This is normal NOTE Connecting to a PC y y This monitor supports the Plug and Play fea ture Plug and Play A feature that allows you to add a device to your computer without having to recon figure anything or install any manual drivers HDMI Connection Transmits digital video and audio signals from your ...

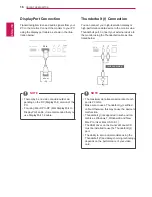
Page 16: ...For using Mini DP to DP Mini DisplayPort to DisplayPort cable it is recommended that you use DisplayPort 1 2 cable Thunderbolt Connection You can connect your high resolution display or high performance data device to the monitor via a Thunderbolt port Connect your external device to the monitor using the Thunderbolt cable as illus trated below DC IN 19 V DP IN HDMI IN 1 USB UP HDMI IN 2 USB IN 1 ...

Page 17: ...the product functions as a USB hub y y Make sure to install the most recent Windows OS service pack before using the product y y Peripheral devices are sold separately y y A keyboard mouse or USB device can be connected to the USB port NOTE Cautions When Using a USB Device y y A USB device with an automatic recognition program installed or that uses its own driver may not be recognized y y Some US...

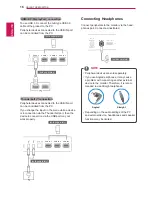
Page 18: ... in connection via the USB port may not work properly 5 V 0 9 A AUDIO IN PC 5 V 0 5 A H P USB IN 1 USB IN 2 USB IN 3 USB UP DVI D IN DP IN 5 V 0 9 A HDMI 1 MHL HDMI 2 DP IN HDMI IN 1 USB UP USB IN 1 5 V 1 1 A USB IN 2 5 V 0 5 A USB IN 3 5 V 0 5 A sold separately sold separately Connecting Headphones Connect peripherals to the monitor via the head phones port Connect as illustrated DC IN 19 V HDMI ...

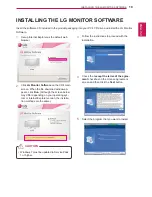
Page 19: ...main screen When the file download window ap pears click Run Although the screen below may differ depending on your operating sys tem or Internet Explorer version the installa tion methods are the same y y Windows 7 must be updated to Service Pack 1 or higher CAUTION 3 Follow the instructions to proceed with the installation 4 Check the I accept the terms of the agree ment checkbox on the License ...

Page 20: ...ware starts the installation as shown below 7 If the ASM driver has not been installed the driver will be installed automatically 8 If the TUSB3410 driver has not been installed the driver will be installed automatically Select Install this driver software anyway I if the Windows security message is displayed as be low 9 The program you selected on the Select Fea tures page will install automatica...

Page 21: ... store it in an environment with too low high temperature and high humidity y y If any third party calibration application is al ready installed on your PC the image quality may be affected by a conflict between the two applications For the best performance it is recommended to uninstall the other calibration application CAUTION y y To use the True Color Finder function you must purchase the suppo...

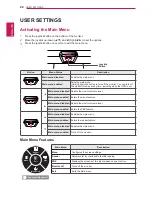
Page 22: ...when the OSD is on Main menu disabled Adjusts the monitor volume level Main menu enabled Enters the menu features Main menu disabled Adjusts the monitor volume level Main menu enabled Enters the PBP feature Main menu disabled Enables the main menu Main menu enabled Enters the reader feature Main menu disabled Enables the main menu Main menu enabled Turns off the monitor Main Menu Features Reader M...

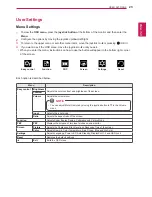
Page 23: ...set Each option is described below Menu Description Easy control Brightness Adjusts the color contrast and brightness of the screen Contrast Volume Adjusts the volume level y y You can adjust Mute Unmute by moving the joystick button to in the Volume menu NOTE Input Selects the input mode Ratio Adjusts the aspect ratio of the screen Function Adjusts Super Energy Saving Calibration and Picture Mode...

Page 24: ...ption Wide Displays the video in widescreen regardless of the video signal input Original Displays video according to the aspect ratio of the video signal input Cinema 1 Enlarges the screen with an aspect ratio of 21 9 at 1080p Cinema 2 Enlarges the screen with an aspect ratio of 21 9 including the black box at the bottom for subtitles at 1080p 1 1 The aspect ratio is not adjusted from the origina...

Page 25: ...nergy using the high efficiency Super Energy Saving feature Low Saves energy using the low efficiency Super Energy Saving feature Off Disables the Super Energy Saving feature Calibration On Enables the calibration applied to the monitor Off If it is set to Off the monitor reverts back to the picture quality set before calibra tion y y Run the True Color Finder program NOTE Picture Mode Custom Allo...

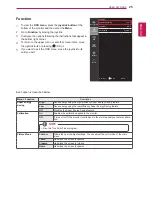
Page 26: ...reen Sub Selects the video signal input of the sub screen Audio Changes the audio output in PBP mode Swap Toggles between the main screen and sub screen in PBP mode Sub Full Converts the sub screen in PBP mode to wide screen Ratio Adjusts the aspect ratio of the main screen or sub screen Main Wide Displays the video to fit the PBP screen regardless of the video signal input Original Displays the v...

Page 27: ...screen Black Level Sets the offset level for HDMI only Offset as a reference for a video signal this is the darkest color the monitor can dis play High The picture of the screen gets brighter Low The picture of the screen gets darker Response Time Sets a response time for displayed pictures based on the speed of the screen For a nor mal environment it is recommended that you use Middle For a fast ...

Page 28: ...nd vice versa Color Temp Custom Selects the factory default picture color Warm Sets the screen color to a reddish tone Medium Sets the screen color to between a red and blue tone Cool Sets the screen color to a bluish tone Red You can customize the picture color using Red Green and Blue colors Green Blue Six Colors Meets the user requirements for colors by adjusting the tone and saturation of the ...

Page 29: ...f Auto Standby Feature that automatically turns off the monitor when there is no movement on the screen for a period of time DisplayPort 1 2 Enables or disables DisplayPort 1 2 y y Be sure to configure this option according to the DisplayPort version supported by your graphics card Set this option to Disable if your graphics card does not support DisplayPort 1 2 y y In order to use 10 bit color in...

Page 30: ...tom right corner 4 To return to the upper menu or set other menu items move the joystick to or pressing OK it 5 If you want to exit the OSD menu move the joystick to until you exit Each option is described below Menu Reset Description Do you want to reset your settings Reset Restores the default settings Cancel Cancel the reset Reset Easy control Do you want to reset your settings Reset Function C...

Page 31: ...ctions that appear in the bottom right corner Each option is described below Reader Mode Description Reader 1 Optimizes the screen for browsing newspapers You can brighten the screen in the OSD menu Reader 2 Optimizes the screen for looking at cartoons You can brighten the screen in the OSD menu Reader Off Reader Mode is off Reader Mode Reader 1 Reader 2 Reader Off Change Mode OK ...

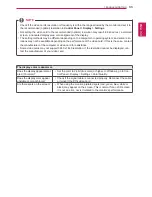
Page 32: ...age is being displayed Are some functions not avail able when you press the Menu button y y The OSD is locked Go to Menu Settings and set OSD Lock to Off The screen retains an image Does image sticking occur even when the monitor is turned off y y Displaying a still image for a prolonged time may cause damage to the screen resulting in the retention of the image y y To extend the lifetime of the m...

Page 33: ...the manufacturer of the computer or video card for assistance y y Some video cards may not support 3440 x 1440 resolution If the resolution cannot be displayed con tact the manufacturer of your video card NOTE The display color is abnormal Does the display appear discol ored 16 colors y y Set the color to 24 bit true color or higher In Windows go to Con trol Panel Display Settings Color Quality Do...

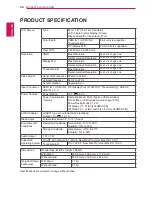
Page 34: ...UT Thunderbolt USB UP USB IN 1 2 3 Power Sources Power Rating 19 V 6 5 A Power Consumption Typical Operating Mode 80 W Typical USB excluded 100 W Max USB included Audio Output 50 Power Saving Mode 1 2 W Off Mode 0 5 W Only 34UM95 PD Off Mode 0 3 W DC switch is off Only 34UM95 PE AC DC Adapter LCAP31 type manufactured by Lienchang Output 19 V 7 37 A Stand Angle Forward Backward 5 to 15 Head Environ...

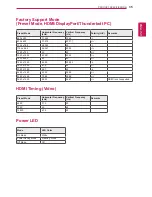
Page 35: ...152 x 864 54 347 60 05 1280 x 720 45 60 1280 x 1024 63 981 60 02 1600 x 900 60 60 1680 x 1050 65 29 59 954 1920 x 1080 67 5 60 2560 x 1080 66 7 60 3440 x 1440 43 82 29 99 3440 x 1440 73 68 49 99 3440 x 1440 88 82 59 97 HDMI is not supported HDMI Timing Video Preset Mode Horizontal Frequency kHz Vertical Frequency Hz Remarks 480P 31 5 60 720P 45 60 1080P 67 5 60 Power LED Mode LED Color On Mode Whi...

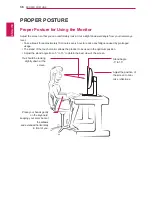
Page 36: ...ce any fatigue caused by prolonged usage y y The stand of the touch monitor allows the product to be used in the optimum position y y Adjust the stand angle from 5 to 15 to obtain the best view of the screen You should be looking slightly down at the screen Place your hands gently on the keyboard keeping your arms bent at the elbows and extended horizontally in front of you Stand Angle 5 to 15 Adj...

Page 37: ......

Page 38: ...ote that the label attached to the product provides information for technical support Model Serial No ENERGY STAR is a set of power saving guidelines issued by the U S Environmental Protection Agency EPA Refer to ENERGY STAR gov for more information on the ENERGY STAR program As an ENERGY STAR Partner LGE U S A Inc has determined that this product meets the ENERGY STAR guidelines for energy effici...

Reviews: