background image

- 3 -

LGE Internal Use Only

Copyright © 

 LG Electronics. Inc. All rights reserved.

Only for training and service purposes

Many electrical and mechanical parts in this chassis have special safety-related characteristics. These parts are identified by      in the 

Schematic Diagram and Exploded View.

It is essential that these special safety parts should be replaced with the same components as recommended in this manual to prevent 

Shock, Fire, or other Hazards. 

Do not modify the original design without permission of manufacturer.

General Guidance

An 

isolation  Transformer  should  always  be  used

  during  the 

servicing of a receiver whose chassis is not isolated from the AC 

power  line.  Use  a  transformer  of  adequate  power  rating  as  this 

protects  the  technician  from  accidents  resulting  in  personal  injury 

from electrical shocks.

It  will  also  protect  the  receiver  and  it's  components  from  being 

damaged  by  accidental  shorts  of  the  circuitry  that  may  be 

inadvertently introduced during the service operation.

If  any  fuse  (or  Fusible  Resistor)  in  this  TV  receiver  is  blown, 

replace it with the specified.

When replacing a high wattage resistor (Oxide Metal Film Resistor, 

over 1 W), keep the resistor 10 mm away from PCB.

Keep wires away from high voltage or high temperature parts.

Before returning the receiver to the customer,


always  perform  an 

AC  leakage  current  check

  on  the  exposed 

metallic parts of the cabinet, such as antennas, terminals, etc., to 

be  sure  the  set  is  safe  to  operate  without  damage  of  electrical 

shock. 

Leakage Current Cold Check(Antenna Cold Check)

With the instrument AC plug removed from AC source, connect an 

electrical  jumper  across  the  two AC  plug  prongs.  Place  the AC 

switch in the on position, connect one lead of ohm-meter to the AC 

plug prongs tied together and touch other ohm-meter lead in turn to 

each  exposed  metallic  parts  such  as  antenna  terminals,  phone 

jacks, etc. 

If  the  exposed  metallic  part  has  a  return  path  to  the  chassis,  the 

measured resistance should be between 1 M

Ω

 and 5.2 M

Ω

When  the  exposed  metal  has  no  return  path  to  the  chassis  the 

reading must be infinite.

An  other  abnormality  exists  that  must  be  corrected  before  the 

receiver is returned to the customer.

Leakage Current Hot Check


(See below Figure) 

Plug the AC cord directly into the AC outlet.

Do not use a line Isolation Transformer during this check.


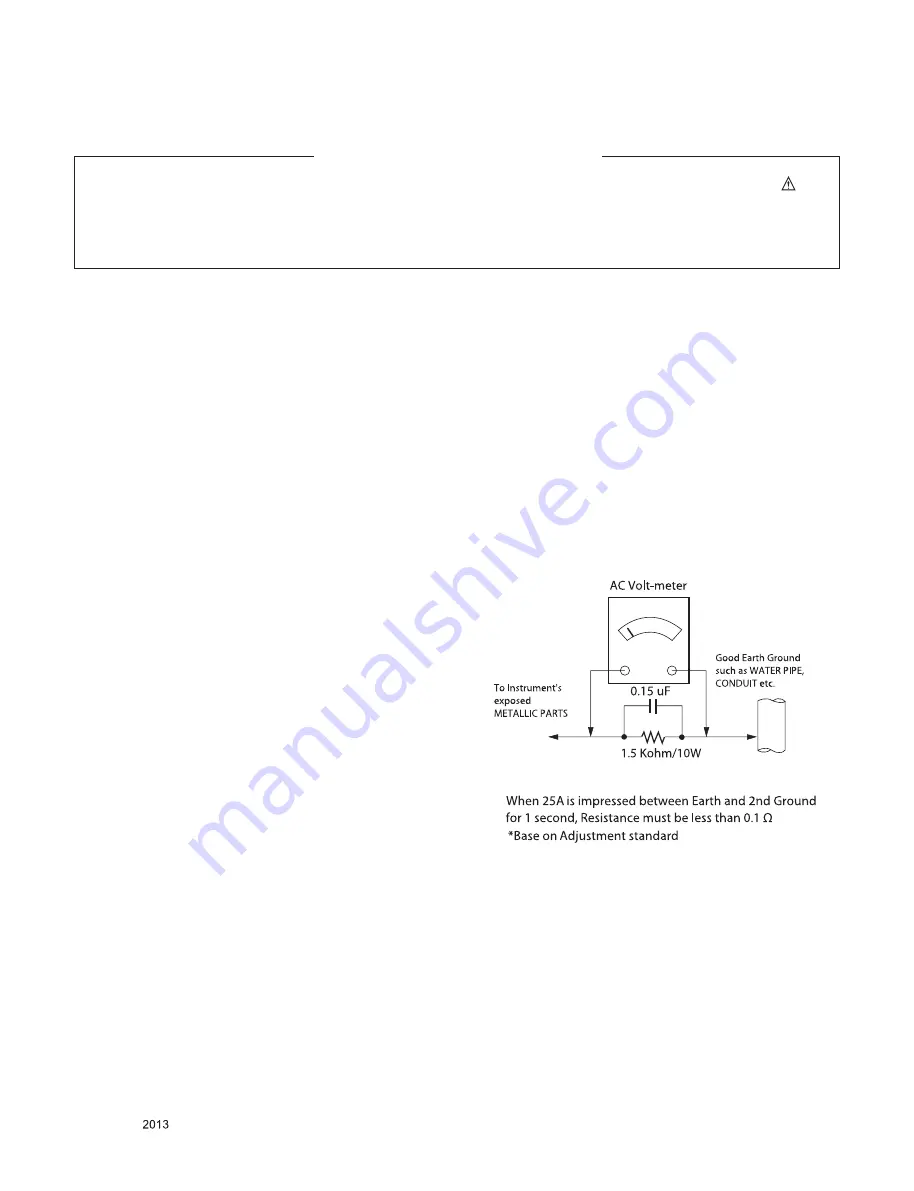
Connect 1.5 K / 10 watt resistor in parallel with a 0.15 uF capacitor 

between  a  known  good  earth  ground  (Water  Pipe,  Conduit,  etc.) 

and the exposed metallic parts.

Measure  the AC  voltage  across  the  resistor  using AC  voltmeter 

with 1000 ohms/volt or more sensitivity.

Reverse plug the AC cord into the AC outlet and repeat AC voltage 

measurements  for  each  exposed  metallic  part.  Any  voltage 

measured must not exceed 0.75 volt RMS which is corresponds to 

0.5 mA.

In  case  any  measurement  is  out  of  the  limits  specified,  there  is 

possibility  of  shock  hazard  and  the  set  must  be  checked  and 

repaired before it is returned to the customer.

Leakage Current Hot Check circuit 

IMPORTANT SAFETY NOTICE

SAFETY PRECAUTIONS

Summary of Contents for 42LT777H-UA

Page 1: ...EL 42LT777H 42LT777H UA CAUTION BEFORE SERVICING THE CHASSIS READ THE SAFETY PRECAUTIONS IN THIS MANUAL LED LCD TV SERVICE MANUAL North Latin America http aic lgservice com Europe Africa http eic lgservice com Asia Oceania http biz lgservice com Internal Use Only ...

Page 2: ... LG Electronics Inc All rights reserved Only for training and service purposes CONTENTS CONTENTS 2 PRODUCT SAFETY 3 SPECIFICATION 4 ADJUSTMENT INSTRUCTION 9 TROUBLESHOOTING 25 BLOCK DIAGRAM 26 EXPLODED VIEW 27 SCHEMATIC CIRCUIT DIAGRAM ...

Page 3: ...inals etc to be sure the set is safe to operate without damage of electrical shock Leakage Current Cold Check Antenna Cold Check With the instrument AC plug removed from AC source connect an electrical jumper across the two AC plug prongs Place the AC switch in the on position connect one lead of ohm meter to the AC plug prongs tied together and touch other ohm meter lead in turn to each exposed m...

Page 4: ...stment 3 Test method 1 Performance LGE TV test method followed 2 Demanded other specification Safety CE IEC specification EMC CE IEC specification 4 General Specification No Item Specification Remark 1 Receiving System 1 ATSC NTSC M 64 256 QAM 2 Available Channel 1 VHF 02 13 2 UHF 14 69 3 DTV 02 69 4 CATV 01 135 5 CADTV 01 135 3 Input Voltage 1 AC 100 240V 50 60Hz Mark 110V 60Hz N America 4 Market...

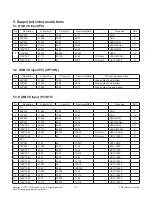
Page 5: ... 31 469 59 94 25 17 Side by Side Top and Bottom 5 3 HDMI 2D Input PC DTV No Resolution H freq kHz V freq Hz Pixel clock MHz Proposed DDC PC 1 640 350 31 468 70 09 25 17 EGA X 2 720 400 31 469 70 08 28 32 DOS O 3 640 480 31 469 59 94 25 17 VESA VGA O 4 800 600 37 879 60 31 40 00 VESA SVGA O 5 1024 768 48 363 60 00 65 00 VESA XGA O 6 1360 768 47 712 60 015 85 50 VESA WXGA X 7 1280 1024 63 981 60 020...

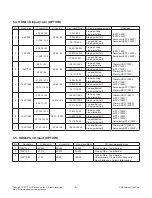
Page 6: ...rame packing Field alternative Primary HDTV 1080I HDTV 1080I HDTV 1080I Secondary HDTV 1080I Primary HDTV 1080I 33 72 33 75 148 35 148 5 Side by side Full 74 17 74 25 Top and Bottom Side by side half 5 1920 1080 53 946 54 23 976 24 148 351 148 5 Frame packing Line alternative Primary HDTV 1080P HDTV 1080P HDTV 1080P Primary HDTV 1080P Primary HDTV 1080P 26 973 27 148 351 148 5 Side by side Full 74...

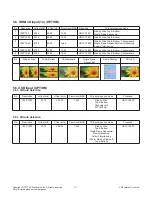
Page 7: ...1080 27 00 24 00 74 25 HDTV 1080P Side by Side Top Bottom Checkerboard 5 1920 1080 33 75 30 00 74 25 HDTV 1080P Side by Side Top Bottom Checkerboard No Side by Side Top Bottom Checkerboard Single Frame Sequential Frame Packing 2D to 3D 1 5 6 USB Input OPTION 5 6 1 3D Auto detection No Resolution H freq kHz V freq kHz Pixel clock MHz 3D input proposed mode Proposed 1 1920 1080 33 75 30 000 74 25 Si...

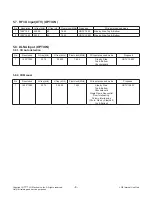
Page 8: ...V 1080I Side by Side Top Bottom 5 8 DLNA Input OPTION 5 8 1 3D Auto detection No Resolution H freq kHz V freq kHz Pixel clock MHz 3D input proposed mode Proposed 1 1920 1080 33 75 30 000 74 25 Side by Side Top Bottom Checkerboard HDTV 1080P 5 8 2 3D Manual No Resolution H freq kHz V freq kHz Pixel clock MHz 3D input proposed mode Proposed 1 1920 1080 33 75 30 000 74 25 Side by Side Top Bottom Chec...

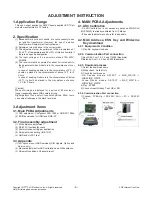
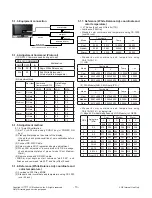
Page 9: ...cale is strong Digital pattern 13ch and or Cross hatch pattern 09ch there can some afterimage in the black level area 3 Adjustment items 3 1 Main PCBA Adjustments 1 ADC adjustment Component 480i 1080p RGB PC 1080p 2 EDID downloads for HDMI and RGB PC 3 2 Final assembly adjustment 1 White Balance adjustment 2 RS 232C functionality check 3 Factory Option setting per destination 4 Shipment mode setti...

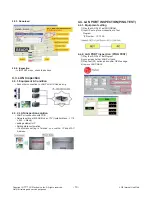
Page 10: ...ection with PCB Network setting at MENU Mode of TV Installer Menu 119 253 Menu setting automatic IP Setting state confirmation If automatic setting is finished you confirm IP and MAC Address 4 4 LAN PORT INSPECTION PING TEST 4 4 1 Equipment setting 1 Play the LAN Port Test PROGRAM 2 Input IP set up for an inspection to Test Program IP Number 12 12 2 2 4 4 2 LAN PORT inspection PING TEST 1 Play the...

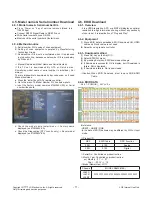
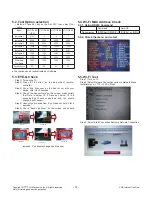
Page 11: ... d Check the model name Instart menu Factory name displayed ex 47LM960V ZA e Check the Diagnostics DTV country only Buyer model displayed ex 47LM960V ZA 4 6 EDID Download 4 6 1 Overview It is a VESA regulation A PC or a MNT will display an optimal resolution through information sharing without any necessity of user input It is a realization of Plug and Play 4 6 2 Equipment 1 Since EDID data is emb...

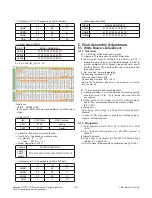
Page 12: ...lance Adjustment 5 1 1 Overview 5 1 1 1 W B adj Objective How it works 1 Objective To reduce each Panel s W B deviation 2 How it works When R G B gain in the OSD is at 192 it means the panel is at its Full Dynamic Range In order to prevent saturation of Full Dynamic range and data one of R G B is fixed at 192 and the other two is lowered to find the desired value 3 Adj condition normal temperature...

Page 13: ...04 Gray 80IRE 2 Standard color coordinate and temperature using CS 1000 over 26 inch 5 1 7 Reference White Balance Adj coordinate and color temperature LT Series don t use G Gain fix 172 Luminance 204 Gray Standard color coordinate and temperature using CS 1000 over 26 inch Mode Coordinate Temp uv X Y Cool 0 269 0 273 13 000K 0 0000 Medium 0 285 0 293 9 300K 0 0000 Warm 0 313 0 329 6 500K 0 0000 S...

Page 14: ...he TV Step 2 Press EYE button on the adjustment remote controller Step 3 Cover Eye Q sensor on the front of set with your hands hold it for 6 seconds Step 4 Check the Sensor Data on the screen make certain that Data is below 10 If Data isn t below 10 in 6 seconds Eye Q sensor would be bad You should change Eye Q sensor Step 5 Uncover your hands from Eye Q sensor hold it for 6 seconds Step 6 Check ...

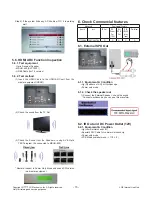
Page 15: ... TEST program It s connected to MSHG 600 Remark Inspect in Power Only Mode and check SW version in a master equipment 6 Check Commercial features Model info Commercial Feature Name inch IR Out DC Power Out 12V Ext SPK Out RJP RJ 45 inter face Pro Idiom LT770H UA 32 37 42 47 55 O O O O O 6 1 External SPK Out 6 1 1 Equipment Condition Jig Speaker out JIG or Oscilloscope Power only mode 6 1 2 Check t...

Page 16: ...ssage automatically scan pause 2 Adjust the remote control Press any Key IR Out Make sure that only Nomal LED blinks 3 ETC Key red Pressing the Info Key i 5V Out Output 3 seconds ii 5V output OFF iii 12V Out Output 3 seconds iv 12V output OFF Given the ST output time adjustable 4 Nomal LED 5V LED 12V LED flicker worker using the PASS 5 After the check is complete automatic test is initiated 6 3 RJ...

Page 17: ...e left picture 2 Working procedure i Connection UTC 1000 LAN PC LAN Port UTC 1000 TOP1 Game port RJ21 TV LINK CFG Phone Jack UTC 1000 RF1 b LAN RF IN ii Power on JIG Switch on front of the JIG iii Test Start UTC 1000 TOP2 JIG 11pin Connection iv Checking b LAN MAC Address Check whether it is same their address numbers or not between b LAN Label and on the pc address numbers Checking JIG contents 1...

Page 18: ...atically 8 3 Checkpoint 1 Test voltage GND 1 5KV min at 100mA SIGNAL 3KV min at 100mA 2 TEST time 1 second 3 TEST POINT GND Test POWER CORD GND and SIGNAL CABLE GND Hi pot Test POWER CORD GND and LIVE NEUTRAL 4 LEAKAGE CURRENT At 0 5mArms 9 USB S W Download Optional Service only 1 Put the USB Stick to the USB socket 2 Automatically detecting update file in USB Stick If your downloaded program vers...

Page 19: ...ation is successful ADC RGB Success is displayed If ADC calibration is failure ADC RGB Fail is displayed 12 If ADC calibration is failure after recheck ADC pattern or condition retry calibration 10 2 Manual White balance Adjustment 10 2 1 Adj condition and cautionary items 1 Lighting condition in surrounding area surrounding lighting should be lower 10 lux Try to isolate adj area into dark surroun...

Page 20: ...ck power connector and RL_ON signal OK N Replace Power Board Check Q2407 application circuit Or replace Q2407 N Replace Cable N Check P2401All Voltage Level 3 5V 12V 24V Y N Check IC8701 RESETand UPDATE pin Y Check X8700 Clock 32 768KHz Y Check IC8701 IIC Communication status Y Check IR input state of IC8701 57pin Y Re download PTC Micom Check power connector and RL_ON signal OK N Replace Power Bo...

Page 21: ...nalog RF Video Trouble Shooting guide Check RF cable signal Y Check TU8900 Pin5 Video output Y Check tuner 5V power R8953 Y Check tuner 3 3V power L8904 Y Check tuner 1 8V power IC8900 2pin 1 8V Y Check MTK LVDS output Replace Tuner N Check IC2404 Replace L8904 Replace IC8900 N N N Replace IC105 N Replace IC2404 N Y ...

Page 22: ...rvice purposes Digital RF Trouble Shooting guide Check RF cable signal Check tuner 5V power R8953 Y Check IIC Signal TU8900 Pin 4 12 Y Check DIF Signal TU8900 Pin 6 14 Y Check X100 and application circuit Check IC2404 Replace TU8900 Replace TU8900 N N N Replace IC105 N Replace IC2404 N Y Replace X100 ...

Page 23: ...in chip MTK have some troubles After checking thoroughly all path once again You should decide to replace MTK or not Replace JK3800 N Check input signal format Is it supported Y CheckAC cable for damage For damage or open conductor Y Check JK3301 JK3302 JK3303 Can you see the normal waveform Y Check HDCP key NVRAM IC100 Power I2C signal Y Check the input of MTK IC105 Measure waveform at R3314 R331...

Page 24: ...form Y Check the input of MTK IC105 Measure waveform at R323 R324 because it s more easy to check Can you see the normal waveform Y This board has big problem because Main chip MTK have some troubles After checking thoroughly all path once again You should decide to replace MTK or not Replace JK3603 N Check RF cable signal Check TU8900 Pin2 SIF output Y CheckAudioAMP output L5402 L5403 L5404 L5405...

Page 25: ... Y This board has big problem because Main chip MTK have some troubles After checking thoroughly all path once again You should decide to replace MTK or not Replace JK3800 N CheckAudioAMP output L5402 L5403 L5404 L5405 Replace L5402 L5403 L5404 L5405 N Y Check input signal format Is it supported Y CheckAC cable for damage For damage or open conductor Y Check JK3301 JK3302 JK3303 Can you see the no...

Page 26: ... Ethernet RX TX CVBS SYSTEM EEPROM X 1 256Kb HDMI S W TS_S P LVDS 8bit 30P 51P S M ART b L AN Ethernet HUB IC Dmod IC RF M ain A V SIF Pro idiom RS 232C DEBUG PTC MICOM S W A V1 Demod MPI SPI Ext SPK AMP FHD HD HDMI1 CVBS Video Audio Video Audio Wi Fi Speaker I2S Out Audio AMP RJP RJ12 HDCP EEPROM PHY Chip IR Key LAN2 37 42 47 32 L R MDC MDIO MDC MDIO Rear Inteligent S ensor RX TX I2C I2C I2C Loca...

Page 27: ...rts are identified by in the Schematic Diagram and EXPLODED VIEW It is essential that these special safety parts should be replaced with the same components as recommended in this manual to prevent X RADIATION Shock Fire or other Hazards Do not modify the original design without permission of manufacturer IMPORTANT SAFETY NOTICE LV1 300 200 540 521 530 800 550 810 120 500 501 510 400 900 910 A2 A2...

Page 28: ... ADIN4_SRV AU23 ADIN5_SRV AT23 ADIN6_SRV AM24 ADIN7_SRV AM23 U0TX AR18 U0RX AP18 U1RX AU16 U1TX AT16 POWE A35 POOE C33 POCE1 B34 POCE0 D33 PDD7 D29 PDD6 C30 PDD5 D30 PDD4 B31 PDD3 A31 PDD2 B32 PDD1 A32 PDD0 C32 PARB D32 PACLE A34 PAALE C34 EMMC_CLK C29 OPWRSB AM20 ORESET AM22 OIRI AU21 FSRC_WR D27 STB_SCL AT21 STB_SDA AR21 DEMOD_RST T34 DEMOD_TSCLK T32 DEMOD_TSDATA0 T36 DEMOD_TSDATA1 U36 DEMOD_TSD...

Page 29: ... HDMI_0_RX_0 AG35 HDMI_0_RX_0B AG34 HDMI_0_RX_1 AG37 HDMI_0_RX_1B AG36 HDMI_0_RX_2 AF35 HDMI_0_RX_2B AF34 HDMI_0_RX_C AH35 HDMI_0_RX_CB AH34 HDMI_1_RX_0 AE37 HDMI_1_RX_0B AE36 HDMI_1_RX_1 AD35 HDMI_1_RX_1B AD34 HDMI_1_RX_2 AC35 HDMI_1_RX_2B AC34 HDMI_1_RX_C AE35 HDMI_1_RX_CB AE34 HDMI_2_RX_0 AB35 HDMI_2_RX_0B AB34 HDMI_2_RX_1 AA35 HDMI_2_RX_1B AA34 HDMI_2_RX_2 AA37 HDMI_2_RX_2B AA36 HDMI_2_RX_C AC...

Page 30: ...DVSS_62 R20 DVSS_73 T20 DVSS_83 U20 DVSS_92 V20 DVSS_104 W20 DVSS_117 Y20 DVSS_127 AA20 DVSS_137 AB20 DVSS_29 G16 DVSS_63 R21 DVSS_74 T21 DVSS_84 U21 DVSS_93 V21 DVSS_105 W21 DVSS_118 Y21 DVSS_128 AA21 DVSS_138 AB21 DVSS_64 R22 DVSS_75 T22 DVSS_85 U22 DVSS_94 V22 DVSS_106 W22 DVSS_119 Y22 DVSS_129 AA22 DVSS_139 AB22 DVSS_65 R23 DVSS_76 T23 DVSS_86 U23 DVSS_140 AB23 DVSS_96 W6 DVSS_30 G17 DVSS_27 F...

Page 31: ..._5 K8 VDD_6 N1 VDD_7 N9 VDD_8 R1 VDD_9 R9 VDDQ_1 A1 VDDQ_2 A8 VDDQ_3 C1 VDDQ_4 C9 VDDQ_5 D2 VDDQ_6 E9 VDDQ_7 F1 VDDQ_8 H2 VDDQ_9 H9 NC_1 J1 NC_2 J9 NC_3 L1 NC_4 L9 NC_7 T7 VSS_1 A9 VSS_2 B3 VSS_3 E1 VSS_4 G8 VSS_5 J2 VSS_6 J8 VSS_7 M1 VSS_8 M9 VSS_9 P1 VSS_10 P9 VSS_11 T1 VSS_12 T9 VSSQ_1 B1 VSSQ_2 B9 VSSQ_3 D1 VSSQ_4 D8 VSSQ_5 E2 VSSQ_6 E8 VSSQ_7 F9 VSSQ_8 G1 VSSQ_9 G9 C716 0 1uF C714 0 1uF C715 ...

Page 32: ... 2uH C2400 10uF 16V POWER_ON OFF1 R2406 10K 1 C2403 0 1uF 16V OPT C2404 0 1uF 16V IC2400 AOZ1038PI 3 AGND 2 VIN 4 FB 1 PGND 5 COMP 6 EN 7 NC_1 8 NC_2 9 EP LX 12V C2414 10uF 10V C2409 10uF 10V C2408 10uF 10V C2407 10uF 10V 1 2V_MTK_CORE L2400 BLM18PG121SN1D C2445 22pF 50V C2434 0 1uF 50V 12V 3 3V_NORMAL C2431 10uF 16V R2428 10K 1 C2438 1uF 10V C2437 0 1uF C2442 22uF 10V C2439 3300pF 50V R2414 10K C...

Page 33: ...3 CEC 5 TMDS_DATA1_SHIELD 20 BODY_SHIELD 12 TMDS_CLK 11 TMDS_CLK_SHIELD 2 TMDS_DATA2_SHIELD 19 HOT_PLUG_DETECT 18 VDD 5V 10 TMDS_CLK 4 TMDS_DATA1 1 TMDS_DATA2 17 DDC CEC_GND 9 TMDS_DATA0 8 TMDS_DATA0_SHIELD 3 TMDS_DATA2 16 SDA 7 TMDS_DATA0 6 TMDS_DATA1 15 SCL D3302 MMBD6100 A2 C A1 D3301 MMBD6100 A2 C A1 D3303 MMBD6100 A2 C A1 HDMI_ARC R3300 0 R3341 0 D1 _HDMI4_JACK D2 _HDMI4_JACK CK _HDMI4_JACK D...

Page 34: ... E0 5 SDA 6 SCL 7 WC 8 VCC D3620 MMBD6100 A2 C A1 D3623 5 6V D3622 5 5V ADUC 5S 02 0R5L OPT D3621 5 5V ADUC 5S 02 0R5L OPT D3613 5 5V ADUC 5S 02 0R5L OPT JK3603 SPG09 DB 010 1 RED 2 GREEN 3 BLUE 4 GND_1 5 DDC_GND 6 RED_GND 7 GREEN_GND 8 BLUE_GND 9 NC 10 SYNC_GND 11 GND_2 12 DDC_DATA 13 H_SYNC 14 V_SYNC 15 DDC_CLOCK 16 SHILED JK3602 2F01TC1 CLM97 4F 3 VIN 2 VCC 1 GND 4 SHIELD D3625 5 6V Diode_OLD P...

Page 35: ...100 3 5V_ST EXT_12V 3 5V_ST RS232_RX RS232_TX D3804 20V OPT D3805 20V OPT L3802 EXT_5V L3801 SS_OLD L3800 OPT EXT_5V R3806 1K AV1_CVBS_IN R3803 2 7K JK3800 PPJ233 01 4A YL O SPRING 5A YL E LUG 3A YL CONTACT 4B WH C LUG 5C RD E LUG 4C RD O SPRING 3C RD CONTACT AV1_L_IN 3 3V_NORMAL AV1_R_IN AV1_CVBS_DET C3804 0 1uF D3803 50V BAP70 02 R3834 1K D3800 5 6V D3801 5 6V D3802 5 6V JP3800 JP3801 JP3802 JP3...

Page 36: ... 47K OPT C4102 0 1uF C4100 0 1uF R4114 100 P4102 12507WR 10L 1 2 3 4 5 6 7 8 9 10 11 D4101 5 6V AMOTECH R4125 1 5K OPT D4100 5 6V AMOTECH R4126 1 5K L4100 BLM18PG121SN1D C4107 100pF 50V D4106 5 6V CDS3C05HDMI1 C4101 0 1uF 16V D4104 5 6V AMOTECH R4124 100 C4103 0 1uF 16V OPT LED_W LG_LOGO D4105 5 6V CDS3C05HDMI1 KEY2 R4123 100 KEY1 R4113 100 I2C_SDA2 I2C_SCL2 3 5V_ST C4104 1000pF 50V LED_R C4108 10...

Page 37: ..._REMOTE C4313 0 1uF 16V M_REMOTE R4310 10K M_REMOTE C4312 0 1uF 16V M_REMOTE C4310 0 01uF 25V M_REMOTE C4311 0 1uF 16V M_REMOTE JK4303 3AU04S 345 ZC H LG 1 2 3 4 5 R4329 10K C4328 0 1uF C4327 1uF 10V C4333 22uF 10V C4326 0 1uF 50V C4334 22uF 10V C4329 3300pF 50V R4328 100K L4305 BLM18PG121SN1D C4332 22pF 50V R4344 10K IC4305 TPS54425PWPR 3 VREG5 2 VFB 4 SS 1 VO 6 PG 5 GND 7 EN 8 PGND1 9 PGND2 10 S...

Page 38: ...HEMETIC M_RFModule_ISP M_REMOTE_RX M_REMOTE_TX 3 3V_NORMAL L4800 120 ohm M_REMOTE M_RFModule_RESET C4800 0 1uF P4800 12507WR 08L M_REMOTE 1 3 3V 2 GND 3 RX 4 TX 5 RESET 6 DC 7 DD 8 GND 9 AR4800 100 1 16W M_REMOTE 3D_SYNC_RF 3D_SYNC_RF M_REMOTE_TX M_REMOTE_RX ZigBee_Radio Pulse M_REMOTE OPTION ALL M_REMOTE OPTION 48 MOTION REMOTE 2011 06 04 Only For PDP xxLT760H UA Copyright ⓒ 2013 LG Electronics I...

Page 39: ...1D 24V_AMP SPK_R C5431 390pF 50V 24V_AMP D5403 100V 1N4148W OPT C5414 10uF 10V OPT R5408 12 C5433 1uF 25V L5404 NRS6045T100MMGK 10 0uH SPK_L C5435 0 47uF 50V C5428 1uF 25V I2C_SCL1 C5409 10uF 10V SPK_L P5400 WAFER ANGLE 1 2 3 4 AMP_MUTE 0 1uF C5439 50V C5417 22000pF 50V R5400 10K R5410 12 SPK_R 0 1uF C5412 16V 24V C5410 10uF 10V OPT 0 1uF C5420 50V SPK_L C5424 0 01uF 50V OPT L5400 CIS21J121 SS_OLD...

Page 40: ...2N 17 RA2P 18 GND 19 RACLKN 20 RACLKP 21 GND 22 RA3N 23 RA3P 24 RA4N 25 RA4P 26 GND 27 BIT_SEL 28 RB0N 29 RB0P 30 RB1N 31 RB1P 32 RB2N 33 RB2P 34 GND 35 RBCLKN 36 RBCLKP 37 GND 38 RB3N 39 RB3P 40 RB4N 41 RB4P 42 GND 43 GND 44 GND 45 GND 46 GND 47 NC 48 VLCD 49 VLCD 50 VLCD 51 VLCD 52 GND TXA0N TXACLKN TXA1P TXACLKP TXA2N P7101 FF10001 30 LVDS_30PIN 1 2 3 4 5 6 7 8 9 10 11 12 13 14 15 16 17 18 19 2...

Page 41: ...NENTS IN THE SYMBOL MARK OF THE SCHEMETIC I2C_SCL1 L DIM0_SCLK R7601 10K LOCAL_DIM 3 3V_NORMAL L DIM0_MOSI R7607 4 7K LOCAL_DIM R7606 33 LOCAL_DIM P7600 12507WR 08L LOCAL_DIM 1 2 3 4 5 6 7 8 9 I2C_SDA1 L DIM0_VS R7600 10K OPT AR7600 33 1 16W LOCAL_DIM JP7605 JP7606 LOCAL DIMMING To LED DRIVER 76 LOCAL DIMMING 2011 04 30 xxLT760H UA Copyright ⓒ 2013 LG Electronics Inc All right reserved Only for tr...

Page 42: ...N10 NC_110 N11 NC_111 N12 NC_112 N13 NC_113 N14 NC_114 P1 NC_115 P2 NC_117 P8 NC_118 P9 NC_120 P11 NC_121 P12 NC_122 P13 NC_123 P14 DUMMY_1 DU1 DUMMY_2 DU2 DUMMY_3 DU3 DUMMY_4 DU4 DUMMY_5 DU5 DUMMY_6 DU6 DUMMY_7 DU7 DUMMY_8 DU8 DUMMY_9 DU9 DUMMY_10 DU10 DUMMY_11 DU11 DUMMY_12 DU12 DUMMY_13 DU13 DUMMY_14 DU14 DUMMY_15 DU15 DUMMY_16 DU16 IC8100 2 KLM2G1HE3F B001 SAMSUNG_EMMC_2GB DAT0 A3 DAT1 A4 DAT2...

Page 43: ...n I2C_SDA4_blan R8205 100 OPT R8206 100 OPT LD8200 3 3V_3305 C8211 0 22uF R8208 470 R8217 OPT R8207 100 3305_IF_AGC C8206 0 01uF IC8200 LGDT3305 1 NC_1 2 VINA2 3 VINA1 4 INCAP 5 VSSAAD10A 6 I2CSEL 7 ANTCON 8 VDD_1 9 I2CRPT_SCL 10 I2CRPT_SDA 11 IFOUT 12 RFOUT 13 TPERR 14 VDD33_1 15 TPVALID 16 TPDATA 0 17 VSS33_1 18 TPDATA 1 19 TPDATA 2 20 TPDATA 3 21 TPDATA 4 22 TPDATA 5 23 TPDATA 6 24 TPDATA 7 25 ...

Page 44: ...ER 91 LED_ADD 4 DISTAGPRI 92 LED_ACT 4 DISHOMEPLUG 93 LED_SPD 4 DISVLAN 94 DGND_5 95 LED_DUP 4 SETGROUP 96 LED_ADD 3 MODESET1 97 LED_ACT 3 EN48PASS1 98 LED_SPD 3 DISARP 99 LED_DUP 3 MODESET0 100 DVDD18_4 101 LED_ADD 2 DISLEAKY 102 DGND_6 103 LED_ACT 2 P4ANEG 104 LED_SPD 2 GXANEG 105 LED_DUP 2 GYANEG 106 DVDD33_3 107 LED_ADD 1 GXSPD100 108 LED_ACT 1 GYSPD100 109 LED_SPD 1 GXFULL 110 LED_DUP 1 GYFUL...

Page 45: ...P_L_IN C8609 0 1uF C8608 22uF 16V R8611 1K 5V_SUB_AMP Q8601 MMBT3904 NXP E B C IC8601 TPA6011A4PWPRG4 3 PVDD_1 2 ROUT 4 RHPIN 1 PGND_1 6 RIN 5 RLINEIN 7 VDD 8 LIN 9 LLINEIN 10 LHPIN 11 PVDD_2 12 LOUT 13 PGND_2 14 LOUT 15 SHUTDOWN 16 FADE 17 BYPASS 18 AGND 19 SEMAX 20 SEDIFF 21 VOLUME 22 HP LINE 23 SE BTL 24 ROUT 5V_SUB_AMP C8612 1uF 25V L8605 BLM18PG121SN1D EXT_AMP_R_IN 5V_SUB_AMP R8609 100 OPT EX...

Page 46: ...707 2SC3875S ALY E B C Q8717 2SC3875S ALY E B C P8700 YFDW254 14S JTAG_PTC 1 2 3 4 5 6 7 8 9 10 11 12 13 14 ZD8702 5 1V ZD8701 5 1V KEY1 R8733 0 C8705 0 01uF ZD8706 3 6V R87010 0 Q8701 2SC3875S ALY E B C R87032 10 R8786 0 OPT 3 5V_ST D8701 BAT54C A2 C A1 Q8713 2SC3875S ALY E B C C8706 0 01uF R87030 470 R8715 100 R8730 5 1K RJP_CTRL2_buffer R8701 1K R87082 10K R87044 330 C8712 20pF OPT R8773 100 C8...

Page 47: ..._5 0T MDS62110210 M11 1 GASKET_5 0T MDS62110210 M10 1 GASKET_5 0T MDS62110210 M9 1 GASKET_5 0T MDS62110210 M12 1 GASKET_5 0T MDS62110206 M2 3 GASKET_6 5T MDS62110206 M4 3 GASKET_6 5T MDS62110206 M3 3 GASKET_6 5T MDS62110206 M8 3 GASKET_6 5T MDS62110206 M7 3 GASKET_6 5T MDS62110206 M6 3 GASKET_6 5T MDS62110206 M5 3 GASKET_6 5T MDS62110206 M12 3 GASKET_6 5T MDS62110206 M11 3 GASKET_6 5T MDS62110206 ...

Page 48: ...2C_SDA4_blan R8916 100 OPT 12V D8912 MBRA340T3G SMART_b LAN 12V_ST D8911 MBRA340T3G SMART_b LAN 12V_C C8918 1uF 25V SMART_b LAN C8920 0 1uF OPT TU_RESET_1 R8942 100K OPT R8941 100 OPT 3 3V_TU TU_RESET C8926 0 1uF 3 3V_TU R8949 100K R8950 100 3 3V_TU R8945 4 7K TUNER_SIF Q8906 MMBT3906 NXP E B C 5V_TU R8943 470 R8944 82 C8921 0 1uF 16V C8923 0 1uF 16V C8924 0 1uF 16V 1 8V_TU L8903 BLM18PG121SN1D C8...

Page 49: ...R9049 0 NON_LAN2_HUB R9050 0 NON_LAN2_HUB R9047 0 NON_LAN2_HUB C9024 0 1uF LAN2_HUB R9051 49 9 1 LAN2_HUB R9052 49 9 1 LAN2_HUB R9053 49 9 1 LAN2_HUB C9025 0 1uF LAN2_HUB R9054 49 9 1 LAN2_HUB ETNHUB_AVDD18 L9003 BLM18PG121SN1D LAN2_HUB LAN_LINK3 LAN_ACT3 R9055 0 LAN2_HUB R9056 0 LAN2_HUB R9057 0 NON_LAN2_HUB R9058 0 NON_LAN2_HUB ETNHUB_EPHY_RXIN1 ETNHUB_EPHY_TXOP1 ETNHUB_EPHY_RXIP1 ETNHUB_EPHY_TX...

Page 50: ...9100 APX803D29 EXT_PWR_DET 1 GND 3 VCC 2 RESET C9110 0 1uF 50V R9116 12K 1 EXT_5V D9101 EXT_PWR_DET A2 C A1 R9114 20K 1 16W 1 C9113 0 1uF 50V R9112 11K 1 EXT_5V IC9102 MP4460DQ LF Z 3 EN 2 SW_2 4 COMP 1 SW_1 5 FB 6 GND 7 FREQ 8 VIN_1 9 VIN_2 10 BST 11 EP_GND C9112 100pF EXT_5V L9104 3 6uH NR8040T3R6N EXT_5V EXT_12V C9105 470pF 50V R9108 200 EXT_PWR_DET EXT5V_CTRL R9107 150K R9110 100K C9104 0 1uF ...

Page 51: ...4 IO3_16 L15 IO3_17 L16 IO3_18 K16 IO3_19 K15 IO3_20 J16 IO3_21 H16 CLK3 G16 CLK2 H12 IO3_22 G14 IO3_23 G13 IO3_24 G15 IO3_25 F16 IO3_26 F14 IO3_27 F13 IO3_28 F15 IO3_29 E16 IO3_30 E15 IO3_31 D16 IO3_32 D15 IO3_33 F12 IO3_35 E13 IO3_36 H13 IO3_38 G12 IO3_39 B16 IO3_40 C15 IO3_41 C14 IO3_42 D13 IO3_43 B15 IO2_1 A15 IO2_2 B14 IO2_3 C13 IO2_4 B13 IO2_5 A13 IO2_6 B12 IO2_7 A2 IO2_47 E12 IO2_9 E11 IO2_...

Page 52: ......

Reviews: