background image

24 Plasma TV

Installation

AUDIO 

R

L

VIDEO 

COMPONENT INPUT 1

R

L

(MONO)

CABLE 

ANTENNA 

AC  INPUT

DVD  
/DTV
INPUT

COMPONENT INPUT 2

MONITOR OUTPUT

A/V INPUT 1

VIDEO 

AUDIO 

Cable

S-VIDEO

OUT

IN

(R) AUDIO (L)

VIDEO

3

4

OUTPUT
SWITCH

RF

TV

VCR

Cable

 (R) AUDIO (L)

VIDEO

3

4

OUTPUT
SWITCH

ANT OUT

ANT IN

S-VIDEO

REMOTE
CONTROL

AUDIO 

R

L

VIDEO 

COMPONENT INPUT 1

R

L

(MONO)

CABLE 

ANTENNA 

AC  INPUT

DVD  
/DTV
INPUT

COMPONENT INPUT 2

MONITOR OUTPUT

A/V INPUT 1

VIDEO 

AUDIO 

Cable

S-VIDEO

OUT

IN

(R) AUDIO (L)

VIDEO

3

4

OUTPUT
SWITCH

ANT IN

ANT OUT

S-VIDEO

REMOTE
CONTROL

AUDIO 

R

L

VIDEO 

COMPONENT INPUT 1

R

L

(MONO)

CABLE 

ANTENNA 

AC  INPUT

DVD  
/DTV
INPUT

COMPONENT INPUT 2

MONITOR OUTPUT

A/V INPUT 1

VIDEO 

AUDIO 

Cable

S-VIDEO

OUT

IN

(R) AUDIO (L)

VIDEO

3

4

OUTPUT
SWITCH

RF

TV

VCR

Cable

 (R) AUDIO (L)

VIDEO

3

4

OUTPUT
SWITCH

ANT OUT

ANT IN

S-VIDEO

REMOTE
CONTROL

Cable Box Rear

VCR Rear

VCR Front

Cable Box Front

or

VCR Rear

VCR  Front

Cable Box Rear

VCR Rear

VCR Front

Cable Box Front

or

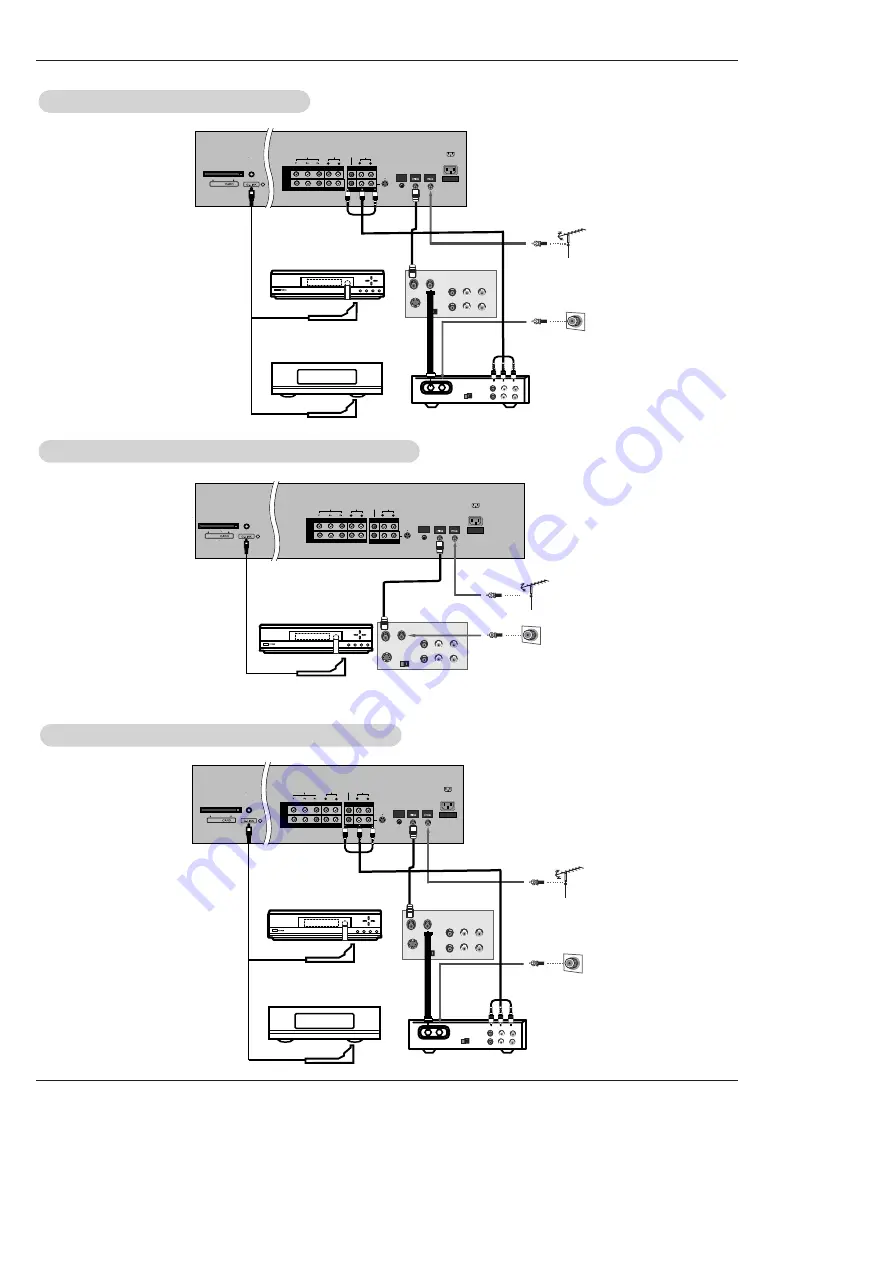
Cable Service with a Cable Box

Cable Service with a Cable Box

Antenna and Cable Service without a Cable Box

Antenna and Cable Service without a Cable Box

Antenna and Cable Service with a Cable Box

Antenna and Cable Service with a Cable Box

Summary of Contents for 42PX4D

Page 1: ...ord model number and serial number of the TV in the spaces provided below See the label attached on the back cover and relate this information to your dealer if you require service Model Number Serial Number MODELS 42PX4D 42PX5D 42PX4D UB 42PX5D UB LG Electronics U S A Inc TM R TruSurround XT PLASMA TV OWNER S MANUAL ...

Page 2: ...tions may cause harmful interference to radio communications However there is no guarantee that interference will not occur in a particular installation If this equipment does cause harmful interference to radio or television reception which can be determined by turning the equipment off and on the user is encouraged to try to correct the interference by one or more of the following measures Reori...

Page 3: ... providing such programming A security card provided by your cable operator is required to view encrypted digital programming Cable operator enhanced program For example electronic program guide provided by the cable operator and data enhanced television service may require the use of a set top box For more information con tact your local cable operator Use of the CableCARDTM TradeMark CableCARDTM...

Page 4: ...low all instructions 5 Do not use this apparatus near water 6 Clean only with dry cloth 7 Do not block any ventilation openings Install in accordance with the manufacturer s instructions 8 Do not install near any heat sources such as radiators heat registers stoves or other apparatus including ampli fiers that produce heat 9 Do not defeat the safety purpose of the polarized or grounding type plug ...

Page 5: ...ll outlets Overloaded wall outlets loose or damaged wall outlets extension cords frayed power cords or damaged or cracked wire insulation are dangerous Any of these conditions could result in electric shock or fire Periodically examine the cord of your appliance and if its appearance indicates damage or deterioration unplug it discontinue use of the appliance and have the cord replaced with an exa...

Page 6: ...Option Menu Features Aspect Ratio Control 71 Cinema 3 2 Mode Setup 71 Caption 72 Caption Text 72 Caption Option 73 ISM Method 74 Low Power 75 Auto Demo 75 Lock Menu Options Lock Menu Options 76 Parental Lock Setup 77 CableCARDTM Function Cable menu options 78 Scrambled channel 78 Cable Channel List 79 Emergency Alert Message 79 80 85 Remote Control PIP Picture in Picture POP Twin Picture 86 Watchi...

Page 7: ...screen offers an exceptionally broad viewing angle over 160 degrees This means that the display is clear and visible to viewers anywhere in the room who can see the screen Wide Screen The screen of the Plasma Display is so wide that your viewing experience is as if you are in a theater Multimedia Connect your plasma display to a PC and you can use it for conferencing games and Internet browsing Th...

Page 8: ...VIDEO Button VOLUME F G Buttons CHANNEL E D Buttons INDEX Switches LED Display on or off TV GUIDE Button Remote Control Sensor Power Standby Indicator Illuminates orange in standby mode When the TV is turned on the indicator will blink green for 3 4 seconds before the picture is seen POWER Button Controls Controls Front Panel Controls Front Panel Controls 42PX5D 42PX4D ...

Page 9: ...Audio DVI Digital Visual Interface Component2 Input Digital Audio Output Connect digital audio from various types of equipment Note In standby mode these ports will not work DVD DTV Input Component 1 2 Connect a component video audio device to these jacks Monitor Output Connect a second TV or Monitor Remote Control Port Connect your wired remote control here S Video Input Connect S Video out from ...

Page 10: ... PIP channel PIP INPUT Selects the input source for the sub pic ture in PIP Twin picture mode SWAP Exchanges the main sub images in PIP Twin picture mode EZ PIC Selects a factory preset picture mode depending on the viewing environment ADJUST Adjusts screen position size and phase in PC mode FREEZE Freezes the currently viewed picture Main picture is frozen in PIP Twin picture mode TV VIDEO Extern...

Page 11: ...o lan guage in DTV mode EZ SOUND Selects the sound appropriate for the program s character APM Adaptive Picture Mode Concurrently compare with the Daylight Normal Night Time and Custom on the screen Refer to p 88 VOLUME UP DOWN Increases decreases the sound level INFO Channel information is displayed on top of the screen But not available in Component 1 2 RGB HDMI1 DVI and HDMI2 mode Refer to p 89...

Page 12: ... shown Install the wall brackets on the wall with 2 bolts not supplied with the product as shown Match the height of the eye bolts and the wall brack ets Check to be sure the eye bolts and the brackets are tightened securely Secure the TV assembly to the wall with strong strings or wire cables not supplied with the product as shown 2 Wall brackets 2 eye bolts G LINK Cable Remote Control Installati...

Page 13: ...tion GROUNDING Ensure that you connect the earth ground wire to prevent possible electric shock If grounding methods are not possible have a qualified electrician install a separate circuit breaker Do not try to ground the unit by connecting it to telephone wires lightening rods or gas pipes The TV can be installed in various ways such as on a wall or on a desktop etc The TV is designed to be moun...

Page 14: ...f needed 2 Analog and Digital TV signals provided on cable CABLE ANTENNA AC INPUT Multi family Dwellings Apartments Connect to wall antenna socket Single family Dwellings Houses Connect to wall jack for outdoor antenna Outdoor Antenna Wall Antenna Socket VHF Antenna UHF Antenna RF Coaxial Wire 75 ohm Bronze Wire Turn clockwise to tighten Bronze Wire Be careful not to bend the bronze wire when conn...

Page 15: ...ner s manual 3 Select the input source with using the TV VIDEO button on the remote control Note that this TV finds the connected input sources automatically for Video Front Video and Component 1 2 It is presumed that RGB HDMI1 DVI and HDMI2 sources are connected Do not connect to both Video and S Video at the same time VCR Setup VCR Setup E AUDIO R L PTICAL RGB INPUT VIDEO COMPONENT INPUT 1 R L M...

Page 16: ...nect the DVD audio outputs to the AUDIO INPUT jacks on the TV as shown in the figure Note If your DVD player does not provide component video output use S Video output How to use 1 Turn on the DVD player and then insert a DVD 2 Use the TV VIDEO button on the remote control to select Component 1 or Component 2 If connected to S VIDEO select the Video or Front Video external input source 3 Refer to ...

Page 17: ... HDMI 2 HDMI1 DVI COMPONENT INPUT 1 R L MONO CABLE ANTENNA AC INPUT DVD DTV INPUT IEEE 1394 COMPONENT INPUT 2 MONITOR OUTPUT A V INPUT VIDEO AUDIO Cable R AUDIO L RGB DTV OUTPUT B R R AUDIO L DIGITAL AUDIO OPTICAL R AUDIO L DVI DTV OUTPUT DIGITAL AUDIO OPTICAL HDMI DTV OUTPUT AUDIO INPUT S VIDEO REMOTE CONTROL Digital Set top Box or or or Signal 480i 480p 720p 1080i Component 1 2 Yes Yes Yes Yes R...

Page 18: ...supplied with this product 2 If the PC or the sound card of the PC has an analog audio output connector connect the PC s audio output to AUDIO INPUT port located on the right side of RGB INPUT port How To Use 1 To get the best picture quality adjust the PC graphics card to 1024x768 60 Hz 2 Select RGB PC input source in main input option of SETUP menu Refer to P 64 Once you select RGB PC in main in...

Page 19: ...ch allows you to hook up the second TV or monitor Connect the second TV or monitor to the TV s MONITOR OUTPUT See the Operating Manual of the second TV or monitor for further details regarding the device s input settings Notes Component 1 2 RGB PC RGB DTV HDMI1 DVI HDMI2 DTV input sources cannot be used for Monitor out When connecting with external audio equipments such as amplif ers or speakers p...

Page 20: ... necessary How To Use If the source device supports Auto HDMI function the output resolution of the source device will be automatically set to 1280x720p If the source device does not support Auto HDMI you need to set the output resolution appropriately To get the best picture quality adjust the output resolution of the source device to 1280x720p Select HDMI1 DVI or HDMI2 input source in main input...

Page 21: ...ith the product HDMI to DVI Cable not supplied with the product Fiber Optic Digital Audio Cable not supplied with the product Analog Audio Cable RCA type not supplied with the product Analog Audio Cable Stereo to RCA type not supplied with the product Reference Reference ...

Page 22: ...connected with HDMI1 DVI Input output PC Resolution VGA SVGA XGA Position and Size may not fit to Screen As shown the picture below press the ADJUST button to adjust the screen Position of TV SET and contact an PC graphics card service center When Source Devices connected with HDMI1 DVI Input output TV SET Resolution 480p 720p 1080i and TV SET Display fit EIA CEA 861 B Specification to Screen If n...

Page 23: ...ox and digital cable services as well as over the air broadcast It does not provide listings for satellite services You may use to connect directly without Cable Box RS 232C INPUT CONTROL SERVICE DIGITAL AUDIO OPTICAL DVI INPUT COMPONENT2 INPUT OUTPUT RGB INPUT HDMI 2 HDMI DVI CABLE ANTENNA AC INPUT IEEE 1394 Cable S VIDEO OUT IN R AUDIO L VIDEO 3 4 OUTPUT SWITCH ANT IN ANT OUT AUDIO INPUT S VIDEO...

Page 24: ...T SWITCH ANT IN ANT OUT S VIDEO REMOTE CONTROL AUDIO R L VIDEO COMPONENT INPUT 1 R L MONO CABLE ANTENNA AC INPUT DVD DTV INPUT COMPONENT INPUT 2 MONITOR OUTPUT A V INPUT 1 VIDEO AUDIO Cable S VIDEO OUT IN R AUDIO L VIDEO 3 4 OUTPUT SWITCH RF TV VCR Cable R AUDIO L VIDEO 3 4 OUTPUT SWITCH ANT OUT ANT IN S VIDEO REMOTE CONTROL Cable Box Rear VCR Rear VCR Front Cable Box Front or VCR Rear VCR Front C...

Page 25: ...to use 1 Screen 1 Country This screen asks you the location of your TV Use the D E button to highlight a country Press ENTER to display Screen 2 The TV Guide On Screen system s Reminder Screen appears after initial TV set up if you power Off the TV and then power it back On To make a selection use the D E button to highlight an option and press ENTER Set up TV Guide On Screen now displays the Welc...

Page 26: ...ve to another field Press ENTER to display Screen 3 Option 2 If you selected Canada in Screen 1 you see the Postal Code screen You input characters by using the D E button and then the F G button to move to another field Press ENTER to display Screen 3 3 Screen 3 Do you have Cable Service connected If you select Yes you see Screen 4 If you select No you see Screen 12 4 Screen 4 Do you have a Cable...

Page 27: ...le Box Configuration Diagram The diagram shows the correct way to install the G LINK Cable from the back of the device to the cable box Make sure the G LINKTM Cable is properly installed Press ENTER to display Screen 8 5 Screen 5 Which TV input is the cable box plugged into If you select Cable you see Screen 6 If you make any other choice you see Screen 7 ...

Page 28: ...ions and press ENTER to display Screen 10 10 Screen 10 Cable Box Code Testing When testing is done Screen 11 displays automatically 11 Screen 11 Cable Box Tuned to Channel 9 If you select Yes you see Screen 12 If you select No a different code is tested in Screen 10 Note Many Cable Boxes require testing more than one code If you select Test this code again the same code is tested again in Screen 1...

Page 29: ... settings correct If you select Yes you see Screen 14 If you select No you see Screen 1 12 Screen 12 Do you have an antenna connected If you select Yes you see Screen 13 Note If you selected No in Screen 3 then you must select Yes in this screen to receive a channel lineup and listings If you select No you see Screen 13 ...

Page 30: ...een 18 16 Screen 16 VCR Configuration Diagram This screen shows the correct way to install the G LINKTM Cable from the back of the TV to the Recording device Make sure the G LINKTM Cable is properly installed Press ENTER and you see Screen 17 15 Screen 15 Is a VCR Connected If you select Yes you see Screen 16 If you select No you see Screen 21 ...

Page 31: ...creen 19 VCR Code Testing When testing is done Screen 20 displays automatically 20 Screen 20 VCR Tuned to Channel 9 If you select Yes you see Screen 21 If you select No a different code is tested in Screen 19 Notes Many VCRs require testing more than one code If you select Test this code again the same code is tested again in Screen 19 ...

Page 32: ...your cable or over the air video signal In order to receive regular program listings please remember to do the following 1 Turn OFF your TV when it is not in use Do not unplug the power cord 2 If you have a Cable box connected leave the cable box On but turn the TV Off 3 If you have a VCR connected turn it OFF when not in use Do not unplug the power cord 4 If you have more than one Cable system in...

Page 33: ...able as shown below 1 When connecting the DVHS or the MicroMV Camcorder as shown in the a or b figure press the button to show the control panel IEEE 1394 Functions IEEE 1394 Functions 1394 Note When connecting the DVHS and the MicroMV Camcorder in case of showing input error on the MicroMV Camcorder window it s okay a TV DVHS Connect the IEEE1394 Cable Connect the IEEE1394 Cable b TV MicroMV Camc...

Page 34: ...ngement of connected device 2 When connecting the DVHS and the MicroMV Camcorder as shown in the c or d figure press the button to show the control panel and then select the DVHS or the MicroMV Camcorder 1394 c TV DVHS MicroMV Camcorder Connect the IEEE1394 Cable TV DVHS MicroMV Camcorder Connect the IEEE1394 Cable d Daisy Chain Connection TV DVHS MicroMV Camcorder Generic Connect the IEEE1394 Cab...

Page 35: ...tatus Tape shape Icon Tape in or not Lock shape Icon Writable or not 8 Initializing Play Time 9 DVHS Play Pause Stop Search Skip Notes Skip This function is for a fast search It searches the program s start Skip point On skipping Search FF GG Pause II and Play G are dis Skip played on the Control Panel In some models it s not available to Skip operate the Skipping IFF GGI function Supported DVHS L...

Page 36: ... 1 Connect the IEEE 1394 jack at the TV to the IEEE 1394 jack at the MicroMV Camcorder with IEEE 1394 Cable TV MicroMV Camcorder 2 When watching the TV press the button 1394 Show the control panel of MicroMV Camcorder Show the control panel of CAM Connect the IEEE1394 Cable In camera mode of MicroMV Camcorder this control panel is showed ...

Page 37: ...ating Status 5 MicroMV Camcorder Play Time 6 Tape Status Tape shape Icon Tape in or not 7 MicroMV Camcorder Play Search Pause or Stop 8 Initializing Play Time 3 4 6 5 7 8 1 2 Notes In memory mode of MicroMV Camcorder it doesn t apply to connect the IEEE1394 Regardless of a mode of MicroMV Camcorder if the tape is ejected it doesn t apply to connect the IEEE1394 Supported MicroMV Camcorder List SON...

Page 38: ...HS MicroMV Camcorder and DVHS MicroMV Camcorder and DVHS 1 Synchronously connect the IEEE 1394 jack of the TV to the IEEE 1394 jack of the DVHS and the MicroMV Camcorder with IEEE 1394 Cable 2 Press the D E button to select device then press ENTER button to play it And then selected device will be showed OSD ...

Page 39: ... of a remote control by using a con nection of IEEE1394 Connect the IEEE1394 Cable 2 When watching the TV press the 1394 TV 3 Press the TV INPUT button to stop the IEEE1394 function Notes On a condition of connecting the IEEE 1394 you can control the DTV Link device while watching the OSD through DTV and DTV remote control ex change of channel play record a show of recording list etc Analog channe...

Page 40: ...y a LOOP Connection Connect the IEEE1394 Cable TV DVHS MicroMV Camcorder Connect the IEEE1394 Cable Connect the IEEE1394 Cable b When connecting the 4 devices and over the 1394 will not work properly Note When the same devices connect with 2 devices and over it s undesirable IEEE 1394 Functions IEEE 1394 Functions ...

Page 41: ...ing features Eight days of show listings today plus seven days Icons that indicate show rating stereo HDTV new episode etc Intuitive up down left right navigation using your remote control Set shows to Record Schedule show Reminders Search shows by category e g Movies Sports Children etc Search for shows based on keywords or alphabetically by title Direct tuning to a channel Show information while...

Page 42: ...e Highlight indicates an active tile INFO Box provides information for a highlighted item INFO Button indicates you can cycle through the various Info Box sizes Channel Logo identifies network Record Remind Icons indicates a show is set to Record or set as a Reminder Panel Ad location where show or product specific information appears and also where Panel Menu appears Screen Components The screens...

Page 43: ...e to adjacent options unless the highlight is on an odometer where these arrows change the odometer choice Pressing ENTER from an odometer or number entry box moves the highlight to the default command button of that Panel Menu for example Schedule Reminder Pressing ENTER from a highlighted command button executes the action and closes the Panel Menu e g Schedule Reminder Cancel Select Cancel to c...

Page 44: ...o Remind Set a show to Record Lock and unlock the Video Window Access Panel and Channel Ads Use the D E F G buttons to move the highlight within Listings to Notes There may be times when the TV Guide On Screen system could display partial or no program listings The reasons for this include 1 Program schedule information was not provided to TV Guide On Screen 2 The transmission of the program listi...

Page 45: ...ies Sports Children Educational News Variety Series HDTV or by Keyword With Search highlighted press the INFO button to display a Help screen Press the INFO button again to close the screen Category Search Example Movies 1 From Search use the E button to highlight Movies Search Search ...

Page 46: ...ervice Bar closes the menu changes no infor mation and returns to the Search Service Bar Tune to Channel exits the TV Guide On Screen system and tunes to the channel of the highlighted show show airs in the future Note This option reads Watch Now if the show is cur rently airing Set Recording displays the Record Options menu from which you can set frequency start and end time etc Set Reminder disp...

Page 47: ...e Keyword Search menu 2 Highlight New Search and press ENTER button 3 The Search Options menu is displayed 4 Highlight Category and use the F G button to select a category to search e g All HDTV Children Sports etc When finished use the E button to highlight Enter Keyword 5 Highlight Enter Keyword and press ENTER 6 Use the D E F G button to highlight a character and press ENTER to display it When ...

Page 48: ...oard where you can change the keyword Delete Search A Confirm menu is displayed Yes deletes the Search No closes the panel menu Cancel closes the menu changes no information and returns to the highlighted show 7 A list of all matching shows for that keyword is dis played You can highlight a show and press ENTER to dis play all airings You can then highlight a specific list ing and press ENTER to w...

Page 49: ...show reminder every time the show airs on the same channel and starts at the same time W Weekly sets a show reminder each time the show airs on the same day of the week on the same channel and starts at the same time W Off keeps the show in the list but will not remind until the frequency is changed Highlight an event and press the Menu key for options Go to Service Bar closes the menu changes no ...

Page 50: ...ight a choice press ENTER and follow the on screen instruc tions Change System Settings This option appears after you have completed the initial Guide Setup process Press ENTER to display the Confirming Your Settings screen You see your current settings Choose one of the options press ENTER and follow the on screen instructions With Setup highlighted press the INFO button to display a Help screen ...

Page 51: ...e menu and accept the changes Highlight Cancel to close the menu change no information and return to the highlighted channel Change Channel Display Change Channel Display lets you edit channel information that appears in Listings With Change Channel Display you can Change the position number to indicate where in the Listings the channel displays Change the tune channel number Switch a channel W On...

Page 52: ...Auto Guide when the TV is powered On Choices are On and Off Default On Highlight General Default Options and press the Menu key to dis play the General Default Options menu Highlight Go to Service Bar to close the menu change no infor mation and return to the Setup Service Bar When finished press ENTER to highlight Done Press ENTER again to close the menu and accept the changes Highlight Cancel to...

Page 53: ...Bar Remind Defaults Remind Default Options lets you set defaults for the following Power On the TV if Off when a Reminder is scheduled Choices are Yes and No Default No Automatically tune the TV to the channel TV must be On when a Reminder is scheduled Choices are Yes and No Default No When to display the reminder screen Choices are 30 seconds to 15 minutes early to 30 seconds to 15 minutes late t...

Page 54: ...d use the left and right arrows to choose among Once Regularly Weekly and Off as previously described Recorder choice Please choose the VCR only This TV does not support other devices with a recording feature Note Video Window Lock is switched to on or off using PIP button in Listings mode You can set a show to Record in Listings Search and Schedule or change Record settings for a show in Schedule...

Page 55: ...l Recording Highlight the Schedule Service label and press Menu to display the Schedule Options menu Use the D E F G buttons to move through the options Use the number or the D E F G buttons to change the informa tion as necessary Highlight New Manual Recording and press ENTER to display the Record Options menu Current information i e date start and end times channel input is displayed Recorder ch...

Page 56: ...r show pre viously set to Record a show set to Record overlaps with a show previously set to auto tune Select one of these options W record anyway this show will override an existing show set to Record or auto tune W don t record this show cancel the Recording Before a recording begins a notification screen appears if your TV is On At that time you can choose to start or cancel recording If the TV...

Page 57: ...ach time the show airs on the same day of the week on the same channel and starts at the same time W Off keeps the show in the list but will not remind until the frequency is changed Power On the TV if Off when a Reminder is scheduled Choices are Yes and No Default No Automatically tune the TV to the channel TV must be On when a Reminder is scheduled Choices are Yes and No Default No When to displ...

Page 58: ...ut combination one time W Daily reminds for the time channel and input combi nation Monday through Friday W Weekly sets a show reminder for the time channel and input combination once a week on this selected day of the week W Off not cancel keeps the time channel input destina tion combination in the list without reminding until the frequency is changed Power On the TV if Off when a Reminder is sc...

Page 59: ... other Reminders you set Note If more than 2 reminders are set for the same time arrows appear on the Reminder screen Use the D E buttons to view the shows Remind Conflict A conflict message appears for the following reasons a show set with an Auto Tune Reminder has the same start time as an existing Auto Tune Reminder If you are using a cable box a show set with an Auto Tune Reminder overlaps wit...

Page 60: ...is turned on the indicator will blink green for 3 4 seconds before the picture is seen When the TV is turned On the TV Guide On Screen system is automatically displayed The screen may be slightly delayed if the TV was unplugged and then powered On 2 Select the viewing source by using TV VIDEO TV INPUT button on the remote control This TV is programmed to remember which mode it was last set to even...

Page 61: ...ss the G button and then use D E button to select Language 3 Press the G button and then use D E button to select your desired language From this point on the on screen menus will be shown in the selected language 4 Press EXIT button to return to TV viewing or press MENU button to return to the previous menu TV Setup TV Setup On screen Menus Language Selection On screen Menus Language Selection ...

Page 62: ... 4 Press the G button and then use D E button to select channel number you want to add or delete 5 Press the ENTER button to add or delete for the channel number 6 Press EXIT button to return to TV viewing or press MENU button to return to the previous menu Notes This channel number is a physical channel number which is different from the normal channel number shown in Channel Edit When a cable bo...

Page 63: ...tton and then use D E button to select the SETUP menu 2 Press the G button and then use D E button to select Channel Edit 3 Press the G button You will now see a screen filled with channel numbers and a preview picture 4 Use D E F G button to select a channel and then use the ENTER button to add or delete it Press FAV button to add the channel to the Favorite List 5 Press EXIT button to return to ...

Page 64: ...B HDMI1 DVI or HDMI2 4 Press the F G button to select the label 5 Press EXIT button to return to TV viewing or press MENU button to return to the previous menu Input Label Input Label Choose preset labels for your channels If a channel label is provided on the signal from the broadcasting station the TV displays a short name for a channel even if you didn t preset a label for the channel 1 Press t...

Page 65: ...to adjust EZ Picture 2 Press the EXIT button to save and return to TV viewing or press MENU button to return to the previous menu EZ Picture EZ Picture Manual Picture Control Manual Picture Control Custom option option Choose one of three automatic color adjustments Set to warm to enhance hotter colors such as red or set to cool to see less intense colors with more blue 1 Press the MENU button and...

Page 66: ...on and then use D E button to select English Spanish or French 4 Press EXIT button to return to TV viewing or press MENU button to return to the previous menu EZ Sound lets you enjoy the best sound without any special adjustment because the TV sets the appropriate sound options based on the program content When adjusting sound options treble bass and front surround manually EZ Sound automatically ...

Page 67: ...o select Off 3D EchoSound System or SRS Sound Retrieval System TruSurround XT 3D EchoSound System Creates a stunning simulated stereo effects from any mono sound and a real istic three dimensional sound with a very wide and deep sound stage into stereo sound SRS TruSurround XT Takes advantage of any multi channel format without needing to add extra speakers or equipment Dialog clarity bass enrichm...

Page 68: ... signal when the TV station transmits the proper signals Mono sound is automatically received if the broadcast is only in Mono even though Stereo or SAP has been selected Select Mono if you want to listen to mono sound during stereo SAP broadcasting Stereo or SAP can be received in a Analog channel 1 Press the MENU button and then use D E button to select the AUDIO menu 2 Press the G button and th...

Page 69: ...l channel signal includes information for the current time provided by the broadcasting station Set the clock manually if the current time is set incorrectly by the auto clock function When you set up the TV Guide On Screen system Auto Clock menu is not selected 01 Press the MENU button and then use D E button to select the TIME menu 2 Press the G button and then use D E button to select Auto Cloc...

Page 70: ...off at the preset time Note that this setting is cleared when the TV is turned off You can also set up the Sleep Timer in the TIME menu 1 Press the TIMER button repeatedly to select the number of minutes First the Off option appears on the screen followed by the following sleep timer options 10 20 30 60 90 120 180 and 240 minutes 2 When the number of minutes you want is displayed on the screen pre...

Page 71: ...enlarged at both sides to create a spectacular view Zoom 1 Choose Zoom 1 when you want to view the picture without any alteration However the top and bottom portions of the picture will be cropped Zoom 2 Choose Zoom 2 when you want the picture to be altered both vertically extended and cropped The picture tak ing a halfway trade off between alteration and screen coverage Cinema Zoom Choose Cinema ...

Page 72: ...d TEXT The term for the words that appear in a large black frame and almost cover the entire screen usually messages provided by the broadcaster 4 Press EXIT button to return to TV viewing or press MENU button to return to the previous menu 1 Press the MENU button and then use D E button to select the OPTION menu 2 Press the G button and then use D E button to select Caption Text 3 Press the G but...

Page 73: ...tyle Font etc to your preference A pre view icon is provided at the bottom of the screen use it to see the caption lan guage Size Set the size of the words Font Select a typeface for the words Text Color Choose a color for the text Text Opacity Specify the opacity for the text color Bg Background Color Select a background color Bg Background Opacity Select the opacity for the background color Edge...

Page 74: ...White Wash White Wash removes permanent images from the screen Note An excessive permanent image may be impossible to clear entirely with White Wash To return to normal viewing press the any button Orbiter Orbiter may help prevent ghost images However it is best not to allow any fixed image to remain on the screen To avoid a permanent image on the screen the image will move once per 2 minutes Left...

Page 75: ...on to select On or Off When you select On the screen darkens 4 Press EXIT button to return to TV viewing or press MENU button to return to the previous menu Displays the slide show to explain the main features of this TV 1 Press the MENU button and then use D E button to select the OPTION menu 2 Press the G button and then use D E button to select Auto Demo 3 Press EXIT button to stop Auto Demo No...

Page 76: ...se the Movie Rating System MPAA only Ratings for Movies previously shown in theaters Movie Ratings Blocking Off Permits all programs G General audience PG Parental guidance suggested PG 13 Parents strongly cautioned R Restricted NC 17 No one 17 and under admitted X Adult only If you set PG 13 G and PG movies will be available PG 13 R NC 17 and X will be blocked Ratings for Television programs incl...

Page 77: ...s with the ratings above a specified level Keep in mind that the movie ratings limit only applies to movies shown on TV not TV programs such as soap operas TV Rating Children Prevents children from watching certain children s TV programs according to the ratings limit set The children rating does not apply to other TV programs Unless you block certain TV programs intend ed for mature audiences in ...

Page 78: ...se of Scientific Atlanta CableCARD i e CableCARD Host ID Screen 1 Press the MENU button and then use D E button to select the CABLE menu 2 Press the G button and then use D E button to select your desired item 3 Press the G button 4 Press EXIT button to return to TV viewing SETUP VIDEO AUDIO TIME OPTION LOCK CABLE SA CableCARD Diag Screen G SA CableCARD Host ID Screen MENU Exit In order to start s...

Page 79: ...fter some time and return to the last channel Emergency Action Notification Hurricane will be coming Cable Channel List Cable Channel List Emergency Emergency Alert Message Alert Message 1 If you enter the Channel Edit after running the EZ Scan without CableCARDTM you can see the cable channel list as the picture 3 above 2 Insert the CableCARDTM Then the TV receive a new cable channel list which i...

Page 80: ... lost as a result of misuse static electricity Do not turn the power off while the memory card is in operation Don t eject the memory card while in use Otherwise it may cause a data loss or card damage Insert only one card to each slot To prevent a change or loss for stored data don t misuse the TV or don t let static electricity or electrical noise for TV This Company takes no responsibility for ...

Page 81: ...y card with greater than the specified capacity Unsupported or damaged JPEG or MP3 files can cause errors Do not try to change the file extension of unsupported file types to the file extension of supported file types mp3 Memory card capacity Unsupported or damaged file CF CompactFlash 4GB MD Microdrive 4GB CF MagicStor 2 2GB SD Secure Digital 1GB MMC MultiMedia Card 1GB MS Memory Stick 128MB MS P...

Page 82: ... Card 1 or Memory Card 2 2 Press ENTER button to view Photo List or Music List of each slot 3 Press EXIT button or button to return to TV viewing Note In 30 seconds later Loading message is disappeared B B C C When you plug the Memory Card this screen is displayed automatically Select the Photo or Music Select the Photo or Music Notes on Memory Card Notes on Memory Card ...

Page 83: ...tate by pressing the Pause button Before starting a slide show you can choose the slide show interval 3 6 or 9 seconds Note 4 hours later Slide Show is ended automatically Mark All Mark all photos on the screen Unmark All Unmark all marked photos Cancel Hide the pop up menu 4 Repeatedly press EXIT button to return to TV viewing or press button to return to the entry menu E E When you select Photo ...

Page 84: ... may not be sup ported by this model Music List Music List Screen Components Screen Components Usable Card memory Folder List Current page Total page Marked music title number Direct Buttons Card type Current playing time Total playing time E E D D 4394 KB 1 Kbps In this manual the OSD On Screen Display may be different from your TV s because it is just an example to help you with the TV operation...

Page 85: ...y Play With Photo Start playing the selected music by turns and then move to the Photo List Mark All Mark all music titles in the folder Unmark All Unmark all marked music Cancel Hide the pop up menu 4 Repeatedly press EXIT button to return to TV viewing or press button to return to the entry menu If you don t press any button for 40 seconds the play information box as shown in the below will floa...

Page 86: ...an t select DTV for main and sub picture simultaneously Repeatedly press the SWAP button to switch the main and sub pictures Component 1 Component 2 RGB PC or RGB DTV HDMI DVI input sources for the main picture can t be used to swap the main and sub pictures Use the PIP INPUT button to select the input source for the sub picture Each press of PIP INPUT button changes the PIP source You can also se...

Page 87: ... on Sub pictures are in channel scanning However when watching DTV on Main picture only TV on Sub picture is in channel scanning 2 Press the EXIT button to cancel POP mode Use POP to search the programs of all the memorized channels one by one on the 3 PIP screen displays while the main picture source remains the current channel The pictures of all the programmed channels are searched with the 3 P...

Page 88: ...utton to navigate 4 EZ Pictures By press ing the ENTER button you can select the desired mode 2 Press the APM button again As shown below the 4 same screens are displayed You can easily compare with 4 modes 3 Use the D E F G button to navigate 4 EZ Pictures By press ing the ENTER button you can select the desired mode 4 Press EXIT button to return to TV viewing Note While operating the 4 split any...

Page 89: ...iolence 480i 480p 720p 1080i CC Operation Watching TV DTV CATV CADTV Watching Video Front Video Watching IEEE 1394 In Component1 Component2 RGB HDMI DVI modes INFO button is not working Function Show the present screen information On Watching with the upper Input signal press the INFO button Press the INFO button or EXIT button to exit A Banner information B Program title C Day of week Month Year ...

Page 90: ... mute mode to activate the closed caption auto matically EZ Mute Mute Off Sound is enabled 1 Press the FREEZE button in 720p or 1080i mode 2 Use the D E F G buttons to select the screen section to be magnified 3 To return to normal viewing press the FREEZE button again Note The Magnify feature is available only in 720p or 1080i mode but the FREEZE button works in all video formats Enlarges the pic...

Page 91: ...I to PC input and checking the screen quality Display PC Adjust Menu using Adjust button Position Adjust the screen position After displaying the Adjust select the screen position Size Adjust the screen size Phase Adjust the phase of Pixel clock In HDMI DVI PC mode PHASE is not available Reset Initializating Size Position Phase adjustment Operation Operation Adjustment for screen Position Size Pha...

Page 92: ... an external control device such as a computer or an A V control system and control the TV s functions externally Connect the serial port of the control device to the RS 232C jack on the TV back panel RS 232C connection cables are not supplied with the TV T Type of Connector D Sub 9 Pin Male ype of Connector D Sub 9 Pin Male RS 232C Configurations RS 232C Configurations External Control Device Set...

Page 93: ...ion Receiving Protocol OK Acknowledgement The TVr transmits ACK acknowledgement based on this format when receiving normal data At this time if the data is data read mode it indicates present status data If the data is data write mode it returns the data of the PC com puter Command2 Set ID OK Data x Error Acknowledgement The TV transmits ACK acknowledgement based on this format when receiving abno...

Page 94: ...n Volume off 2 Volume mute on Caption on k e Set ID Data Cr Acknowledgement e Set ID OK Data x 03 Aspect Ratio Command2 c Main picture format G To adjust the screen format You can also adjust the screen format using the RATIO button on remote control or in the Option menu Transmission k c Set ID Data Cr Acknowledgement c Set ID OK Data x 04 Screen Mute Command2 d G To select screen mute on off Tra...

Page 95: ...s You can also adjust sharpness in the Video menu Transmission 11 Sharpness Command2 k Data Min 0 Max 64 Refer to Real data mapping See page 94 k k Set ID Data Cr Acknowledgement k Set ID OK Data x 12 OSD Select Command2 l G To select OSD On Screen Display on off Transmission k l Set ID Data Cr Acknowledgement Data 0 OSD off 1 OSD on l Set ID OK Data x 15 PIP Position Command2 q G To select sub pi...

Page 96: ...annel band is ATSC digital cable it can be used In case of using one part chan nel number minor channel does not need Data3 Data 4 Minor Channel Number Data3 High byte Data4 Low byte Data 5 m a Set ID Data0 Data1 Data2 Data3 Data4 Data5 Cr 20 PIP Input Select Command2 y G To select input source for sub picture in PIP Twin pic ture mode Transmission Data 0 DTV 1 Analog 2 Video 3 Front Video k y Set...

Page 97: ...r in case analog channel tuning 2 Digital channel ATSC air channel number don t know phys ical channel major 30 minor 3 sub picture Command ma 00 xx 00 1E 00 03 A2 attribute 0xA2 sub pic ture two part not using physical channel ATSC air xx data don t care analog channel number in case digital channel tun ing 3 Digital channel ATSC air channel number physical 20 major 20 minor 3 sub picture Command...

Page 98: ...ta code TC Tf T1 C0 Carrier frequency FCAR 1 TC fOSC 12 Duty ratio T1 TC 1 3 Repeat frame C1 C2 C3 C4 C5 C6 C7 C0 C1 C2 C3 C4 C5 C6 C7 D0 D1 D2 D3 D4 D5 D6 D7 D0 D1 D2 D3 D4 D5 D6 D7 Repeat code 9 ms 4 5 ms 0 55 ms 9 ms 2 25 ms G Bit description G Frame interval Tf The waveform is transmitted as long as a key is depressed Bit 0 Tf Tf Tf 108ms 455KHz 0 56 ms 0 56 ms 1 12 ms Bit 1 2 24 ms How to Con...

Page 99: ...screte IR Code Component1 Input Selection Discrete IR Code Component2 Input Selection Discrete IR Code RGB PC Input Selection Discrete IR Code RGB DTV Input Selection Discrete IR Code HDMI DVI Input Selection Discrete IR Code HDMI2 Input Selection Discrete IR Code Only 4 3 Mode Discrete IR Code Only 16 9 Mode Discrete IR Code Only Zoom1 Mode Discrete IR Code Channel Search R C Button R C Button R ...

Page 100: ...ly and the remote need not to be pro grammed If not the remote should be programmed to operate the device The programming procedures are explained below 2 Press the MENU and MUTE button continuously at the same time for 2 seconds the current selected device button will be illu minated If you don t press any button for 20 seconds the light on the mode button will be turned off In that case you have...

Page 101: ...134 SCOTT 017 037 112 129 131 SEARS 003 008 009 010 013 014 017 020 031 042 073 081 101 SHARP 031 054 149 SHINTOM 024 SONY 003 009 031 052 056 057 058 076 077 078 149 SOUNDESIGN 034 STS 013 SYLVANIA 031 033 034 059 067 SYMPHONIC 034 TANDY 010 034 TATUNG 039 043 TEAC 034 039 043 TECHNICS 031 033 070 TEKNIKA 019 031 033 034 101 THOMAS 034 TMK 006 TOSHIBA 008 013 042 047 059 082 112 131 TOTEVISION 04...

Page 102: ...82 083 084 091 120 HDSTB HDSTB Brand Codes Brand Codes Brand Codes Brand Codes Brand Codes Brand Codes Brand Codes Brand Codes AIWA 014 028 070 096 125 129 139 229 230 AKAI 163 ANAM 003 014 017 023 059 106 189 216 217 235 236 BURMECTER 252 CARVER 086 CLARION 199 DAEWOO 027 053 060 084 102 148 198 221 DENON 015 075 130 143 FANTASIA 071 FINEARTS 022 FISHER 089 099 LG GOLDSTAR 001 021 024 029 087 107...

Page 103: ...etween the TV and the VCR Activate any function to restore the brightness of the picture If still picture is on the screen for more than 5 minutes the screen gets dark The remote control doesn t work Check to see if there is any object between the TV and the remote control causing obstruction Are batteries installed with correct polarity to to Refer to p 11 Correct remote operating mode set TV VCR...

Page 104: ...inet with a soft dry lint free cloth Please be sure not to use a wet cloth If you expect to leave your TV dormant for a long time such as a vacation it s a good idea to unplug the power cord to protect against possible damage from lightning or power surges Early malfunctions can be prevented Careful and regular cleaning can extend the amount of time you will have your new TV Be sure to turn the po...

Page 105: ...Hz NTSC M ATSC 64 256 QAM VHF 2 13 UHF 14 69 DTV 2 69 CATV 1 135 CADTV 1 135 75 Ω 32 104 F 0 40 C Less than 80 49 3 1252 27 8 705 5 11 3 286 7 85 3 38 7 1024x768 Dot Width inches mm Height inches mm Depth inches mm Weight pounds kg Resolution Power requirement Television System Program Coverage External Antenna Impedance Operating Temperature Range Operating Humidity Range 42PX4D UB 42PX5D UB ...

Page 106: ...106 Plasma TV Notes Notes ...

Page 107: ...OR OTHERWISE Some states do not allow the exclusion or limitation of incidental or consequential damages or limitations on how long an implied warranty lasts so the above exclusion or limitation may not apply to you This warranty gives you specific legal rights and you may also have other rights that vary from state to state WARRANTY PERIOD LABOR and PARTS 2 YEARS from the Date of Purchase Your un...

Page 108: ...rning any product to the LGE Service Center Contact the Customer Interactive Center for details CUSTOMER INTERACTIVE CENTER NUMBERS To obtain customer assistance product information or Dealer or Service locations Call 1 800 243 0000 24 hours a day 365 days per year THIS LIMITED WARRANTY DOES NOT APPLY TO The cost of repair or replacement under these excluded circumstances shall be borne by the con...

Reviews: