21
206-4324
EZ-Manager Wizard (Cont.)
EZ-Manager Wizard (Cont.)
Note:
Zoning features are only applicable for TVs that will be configured using a “.tlx” file (local or
remote configuration).
ZONES, LABEL, AND ROOM NUMBER
SAVE
.
If creating Wi-Fi Zones for AP settings, select the appropriate Wi-Fi
Zone # (1-99) based on the Wi-Fi Zone in which this TV is installed.
.
If creating Zones for Installer Menu settings and/or Channel Mapping,
select the appropriate TV Zone # (0-8) based on the Zone in which
this TV is installed. (See Commercial Mode Setup Guide for more
information.)
.
Select a Label and/or input the Room Number, as required.
.
When done, select SAVE to continue.
BACK
Wi-Fi Zone
<
0
>
TV Zone
<
0
>
Label
<
-----
>
Room Number
Room Number
SAVE
BACK
02
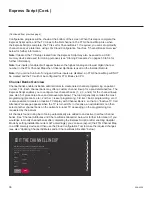
1. Complete the appropriate field(s) as described below.
Use the Up/Down arrow keys on the
Installer Remote to navigate between each of the fields.
• Wi-Fi Zone:
Enables you to set a Wi-Fi Zone # so that the TV can be configured with a
particular access point’s login data for wireless networking. Login data (i.e., SSID, security type,
and security key) may be provided in a Clone/Configuration (
.tlx)
file.
To assign a Wi-Fi Zone, navigate to the Wi-Fi Zone field at the top left of the screen, and use
the Left/Right arrow keys to specify the desired Wi-Fi Zone # (1–99).
•
TV Zone: Enables you to set a TV Zone # so that the TV can be configured with Installer Menu
and/or Setup Menu settings intended only for the assigned Zone. The Installer Menu and/
or Setup Menu settings may be provided in a
Clone/Configuration (.tlx) file
. If the TV is being
configured for FTG Mode
via CPU, the TV Zone # setting also allows the TV to omit channels
that have been restricted in the FTG Channel Map.
To change the TV Zone from its default value (0), navigate to the TV Zone field, and use the
Left/Right arrow keys to specify the desired TV Zone # (1–8).
• Label: Allows you to select a North, South, East, or West text label for this TV. In the Label
field, use the Left/Right arrow keys to select the applicable label.
• Room Number: Allows you to specify the number of the room—up to 16 characters—in
which the TV is located. To enter a room number, navigate to the Room Number field and
press
OK
.
You can then use the number keys on the Installer Remote to direct enter a room
number, or you can use the arrow keys to select the appropriate alphanumeric character(s)
from the pop-up virtual keyboard at the bottom of the screen. When you are done, select
Enter
from the virtual keyboard, and then press
OK
on the Installer Remote.
Note:
The TV name (default: TV’s serial number) will be changed to the room number specified
here. See “Media Share Setup” on pages 79 to 80 for further information on the TV name.
2. When you are ready to continue, use the arrow keys to select
SAVE
, and then press
OK
on the
Installer Remote to return to the TV Configuration Options screen. Then, proceed as required;
i.e., select
NEXT
to configure Pro:Centric settings or select
USB CONFIGURATION
to use a
USB memory device to complete the configuration.

