background image

ENGLISH

24

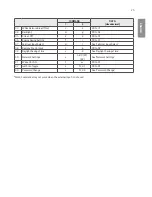
Command Reference List

COMMAND

DATA

(Hexadecimal)

1

 2

01 

Power

k

a

00 to 01

02 

Select input

x

b

See 'Input Select'

03 

Aspect Ratio

k

c

See 'Aspect ratio'

04 

Energy saving

j

q

See 'Energy saving'

05

Picture Mode

d

x

See 'Picture Mode'

06 

Contrast

k

g

00 to 64

07 

Brightness

k

h

00 to 64

08 

Sharpness

k

k

00 to 32

09 

Color

k

i

00 to 64

10 

Tint

k

j

00 to 64

11 

Color Temperature

x

u

00 to 64

12

Time 1 (year/month/day)

f

a

See 'Time 1'

13

Time 2 (hour/minute/second)

f

x

See 'Time 2'

14

Off time schedule

f

c

00 to 01

15

On time schedule

f

b

00 to 01

16

Off Timer (repeat mode/time)

f

e

See 'Off Timer'

17

On Timer (repeat mode/time)

f

d

See 'On Timer'

18

On Timer Input

f

u

See 'On Timer Input'

19

No Signal Power Off (15 Min)

f

g

00 to 01

20

Auto Off

m

n

00 to 01

21

Language

f

i

See 'Language'

22

Reset

f

k

00 to 02

23

Current temperature

d

n

FF

24

Key

m

c

See 'Key'

25

Time elapsed

d

l

FF

26

Product serial number

f

y

FF

27

Software version

f

z

FF

28

White balance red gain

j

m

00 to FE

29

White balance green gain

j

n

00 to FE

30

White balance blue gain

j

o

00 to FE

31

White Balance Red Offset

s

x

00 to 7F

32

White Balance Green Offset

s

y

00 to 7F

Summary of Contents for 98UH1C

Page 1: ...www lg com Please read this manual carefully before operating your set and retain it for future reference 98UH1C USER GUIDE LG Digital Signage MONITOR SIGNAGE ...

Page 2: ...on Parameter 23 Command Reference List 24 Transmission Reception Protocol 26 To obtain the source code under GPL LGPL MPL and other open source licenses that is contained in this product please visit http opensource lge com In addition to the source code all referred license terms warranty disclaimers and copyright notices are available for download LG Electronics will also provide open source cod...

Page 3: ...the video image for watching sports Even fast actions such as kicking or throwing a ball are rendered clearly on the screen Game Optimizes the video image for playing videogames Photo Optimizes the screen for viewing photos HDR Effect This option lets you enjoy a more dynamic intense image by correcting the light and dark areas of the display It provides a realistic image even when the source imag...

Page 4: ...h or coolness Advanced Controls Expert Control customizes the advanced options Dynamic Contrast Optimizes the difference between the light and dark parts of the screen according to the brightness of the image Super Resolution Sharpens the blurry or indistinguishable parts of the picture Color Gamut Selects the range of colors to display Bypass Display the input by the panel native color gamut with...

Page 5: ...sfigurement on the screen This image burn or burn in is not covered by the warranty If the aspect ratio is set to 4 3 for a long period of time image burn may occur on the letterboxed area of the screen Depending on the input signal the available aspect ratio may differ When you adjust Vertical Zoom or All Direction Zoom the screen may flicker for some input signals To use the Energy Saving functi...

Page 6: ...output becomes and the closer the value is to the slower the sound output becomes Bypass Audio coming from external devices without delay Audio may be outputted earlier than video due to the processing time for video that is inputted into the monitor Setting Digital Sound Out Sound Digital Sound Out Digital Sound Out Configures related settings for the Digital Sound Out Sound Input Digital Sound O...

Page 7: ...e may be limited by the applicable terms of service For details contact your ISP LG is not responsible for any malfunction of the display and or the Internet connection feature due to communication errors malfunctions associated with your Internet connection or other connected equipment LG is not responsible for problems with your Internet connection You may experience undesired results if the net...

Page 8: ...ou can select the language to be displayed on the keyboard Keyboard Language Sets the keyboard language Configuring the Time and Date General Time Date You can view and change the time and date Set Automatically Sets the time and date Daylight Savings Time DST Sets when daylight savings time will start and end The DST start end times function only when set at least one day apart Time Zone Configur...

Page 9: ... minute 5 min 5 minute 10 min 10 minute If this feature is not set to Off the monitor will enter Power Saving Mode when there is no input signal If set to Off the DPM feature is disabled NOTE Off On Times can be saved in up to seven schedules and the monitor will turn on or off at these preset times saved in the schedule list If multiple preset times are saved in the schedule list the schedule nea...

Page 10: ...Input Priority General Input Priority The input source with the highest priority will automatically be selected The input mode changes according to the order specified by the user When several input signals are detected the input source with the highest priority will be selected You can set priorities from Priority1 to Priority3 Using Input Switching Override Input Priority Input Switching Overrid...

Page 11: ... the network connection with the server The default port number is 41794 IP ID This menu sets a unique ID for synchronizing with the application Using Lock Out Control General Lock Out Control Set whether the password is required before changing the settings On Password required to change the settings Off Password not required to change the settings Setting No Signal Image General No Signal Image ...

Page 12: ...evice itself may be damaged Please do not connect a USB storage device which was modified to work on a PC The device may cause the monitor to malfunction or the content fail to be played Use only a USB storage device which contains normal music image or video files A USB storage device formatted as a utility program not supported by Windows may not be recognized A USB storage device over 0 5 A whi...

Page 13: ...aded when the display is turned on The recommended capacity is 1 TB or less for a USB external hard drive and 32 GB or less for USB memory stick Any device with more than the recommended capacity may not work properly If a USB external hard drive with an Energy Saving function does not work try turning the hard drive off and on again USB storage devices below USB 2 0 are also supported but may not...

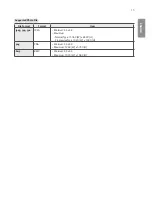
Page 14: ...EG 4 Audio MPEG 1 Layer I II MPEG 1 Layer III MP3 Dolby Digital LPCM ADPCM DTS mp4 m4v mov Video H 264 AVC MPEG 4 HEVC Audio Dolby Digital Dolby Digital Plus AAC MPEG 1 Layer III MP3 3gp 3g2 Video H 264 AVC MPEG 4 Audio AAC AMR NB AMR WB mkv Video MPEG 2 MPEG 4 H 264 AVC VP8 VP9 HEVC Audio Dolby Digital Dolby Digital Plus AAC PCM DTS MPEG 1 Layer I II MPEG 1 Layer III MP3 ts trp tp mts Video H 264...

Page 15: ...File File Format Format Item jpeg jpg jpe JPEG Minimum 64 x 64 Maximum Normal Type 15360 W x 8640 H Progressive Type 1920 W x 1440 H png PNG Minimum 64 x 64 Maximum 5760 W x 5760 H bmp BMP Minimum 64 x 64 Maximum 1920 W x 1080 H ...

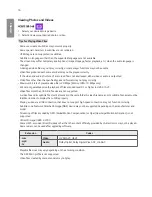
Page 16: ...nly We cannot guarantee smooth playback of files encoded level 4 1 or higher in H 264 AVC Video files more than 30 GB in file size are not supported A video file and its subtitle file must be located in the same folder A video file name and its subtitle file name must be identical in order to display the subtitle properly Playing a video via a USB connection that does not support high speed connec...

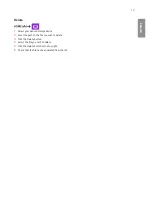
Page 17: ...r desired storage device 2 Enter the path to the file you wish to delete 3 Click the Delete button 4 Select the file you wish to delete 5 Click the Delete button at the top right 6 Check that the file has been deleted from the list ...

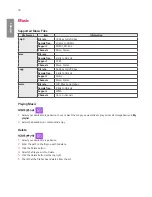
Page 18: ...reo wma Bit rate 128 Kbps to 320 Kbps Sample freq 8 kHz to 48 kHz Support WMA Channels Up to 6 channels Playing Music 1 Select your desired storage device You can select the songs you would like to play across all storage devices in My playlist 2 Select the desired music content and enjoy Delete 1 Select your desired storage device 2 Enter the path to the file you wish to delete 3 Click the Delete...

Page 19: ...nd Set ID can be controlled remotely 1 Press the red ON button on the remote control to assign the PICTURE ID 2 Assign the Set ID to the selection of your choice A set with a different Set ID from the PICTURE ID cannot be controlled by IR signals NOTE If PICTURE ID is set to 2 only the upper right monitor which has a Set ID of 2 can be controlled by IR signals If you press the green OFF button for...

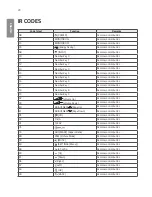
Page 20: ... 18 Number Key 8 Remote control button 19 Number Key 9 Remote control button 02 Volume Up Remote control button 03 Volume Down Remote control button E0 BRIGHTNESS Page Up Remote control button E1 BRIGHTNESS Page Down Remote control button DC 3D Remote control button 32 1 a A Remote control button 2F CLEAR Remote control button 7E Remote control button 79 ARC MARK Aspect Ratio Remote control button...

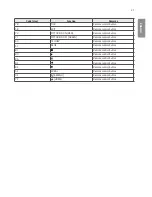
Page 21: ... button 71 PICTURE ID OFF GREEN Remote control button 63 YELLOW Remote control Button 61 BLUE Remote control button B1 Remote control button B0 Remote control button BA Remote control button 8F Remote control button 8E Remote control button 5F W BAL Remote control button 3F S MENU Remote control button 7C HOME Remote control button ...

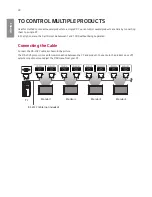
Page 22: ... Option menu the Set ID must be between 1 and 1000 without being duplicated Connecting the Cable Connect the RS 232C cable as shown in the picture The RS 232C protocol is used for communication between the PC and product You can turn the product on or off select an input source or adjust the OSD menu from your PC Monitor 1 Monitor 2 Monitor 3 Monitor 4 PC RS 232C Cable not included ...

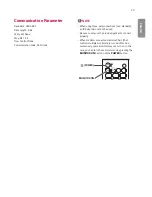
Page 23: ...ons non standard an IR daisy chain cannot be used Be sure to only use the provided gender to connect properly When monitors connected via Daisy Chain that controls multiple monitors are turned off and on successively some monitors may not turn on In this case you can turn those monitors on by pressing the MONITOR ON button not the POWER button ID BACK TILE ON OFF EXIT POWER MONITOR ON ...

Page 24: ...ee Time 2 14 Off time schedule f c 00 to 01 15 On time schedule f b 00 to 01 16 Off Timer repeat mode time f e See Off Timer 17 On Timer repeat mode time f d See On Timer 18 On Timer Input f u See On Timer Input 19 No Signal Power Off 15 Min f g 00 to 01 20 Auto Off m n 00 to 01 21 Language f i See Language 22 Reset f k 00 to 02 23 Current temperature d n FF 24 Key m c See Key 25 Time elapsed d l ...

Page 25: ... 37 Fail Over Input Select m j See Fail Over Input Select 38 Remote Control Lock t p 00 to 02 39 Daylight Savings Time s d See Daylight Savings Time 40 Network Settings s n 80 81 82 See Network Settings 41 Wake On LAN f w 00 to 01 42 JustScan Toggle s N 91 00 to 01 43 Password Change s N 94 See Password Change Note Commands may not work when the external input is not used ...

Page 26: ...count may increase depending on the command Cr Carriage Return Corresponds to 0x0D in ASCII code White Space Corresponds to 0x20 in ASCII code Acknowledgment Command2 Set ID OK NG Data x The Product transmits an ACK acknowledgment based on this format when receiving normal data At this time if the data is FF it indicates the present status data If the data is in data write mode it returns the data...

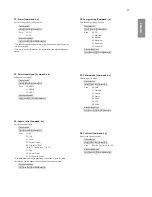
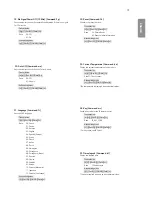
Page 27: ...ram 09 Original 720p 10 to 1F Cinema zoom 1 to 16 21 58 9 30 Vertical Zoom 31 All Direction Zoom Available data types differ depending on the input signal For more information see the aspect ratio section of the owner s manual Acknowledgment c Set ID OK NG Data x 04 Energy saving Command j q Sets the energy saving function Transmission j q Set ID Data Cr Data 00 Off 01 Minimum 02 Medium 03 Maximum...

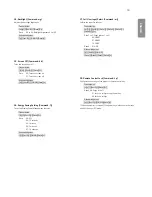
Page 28: ...D OK NG Data x 12 Time 1 year month day Command f a Sets the values of the Time 1 year month day or sets the Auto time Transmission 1 f a Set ID Data1 Data2 Data3 Cr 2 f a Set ID 0 0 Data1 Cr 1 Setting the Time 1 year month day Data1 06 1B Years 2016 2037 Data2 01 to 0C January to December Data3 01 to 1F 1st to 31st Enter fa Set ID ff to view the Time 1 year month day settings 2 Setting the Auto t...

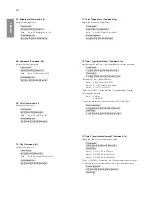
Page 29: ...ndexes E0 Erases all Off Timer settings E1 Erases the 1st Off Timer setting E2 Erases the 2nd Off Timer setting E3 Erases the 3rd Off Timer setting E4 Erases the 4th Off Timer setting E5 Erases the 5th Off Timer setting E6 Erases the 6th Off Timer setting E7 Erases the 7th Off Timer setting 3 01h to 0ch Sets weekday for Off Timer 01 Once 02 Daily 03 Mon Fri 04 Mon Sat 05 Sat Sun 06 Every Sunday 07...

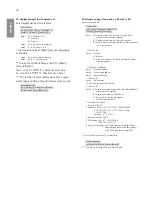
Page 30: ...On Timer to 02 03 for Monday Saturday This function is only available when Time 1 year month day and Time 2 hour minute second are set This feature works properly when the values for 22 On Timer inputs are entered Acknowledgment d Set ID OK NG Data1 Data2 Data3 x 18 On Timer input Command f u Adds a new schedule entry by selecting input for the current On Timer setting Transmission f u Set ID Data...

Page 31: ...Korean 10 Chinese Mandarin 11 Japanese 12 Chinese Cantonese Acknowledgment i Set ID OK NG Data x 22 Reset Command f k Performs the reset function Transmission f k Set ID Data Cr Data 00 Picture Reset 02 Reset to Initial information Acknowledgment k Set ID OK NG Data x 23 Current Temperature Command d n Checks the current temperature of the product Transmission d n Set ID Data Cr Data FF Check stat...

Page 32: ...value Transmission s z Set ID Data Cr Data 00 to 7F Blue offset 0 to 127 FF Confirms blue offset value Acknowledgment z Set ID OK NG Data x 26 Product serial number Command f y Checks the serial number of the product Transmission f y Set ID Data Cr Data FF Check product serial number Acknowledgment y Set ID OK NG Data x Data is in ASCII code 27 Software version Command f z Checks the software vers...

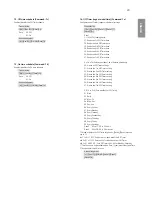
Page 33: ...3 15 seconds 04 1 minute 06 5 minutes 07 10 minutes Acknowledgment j Set ID OK NG Data x 37 Fail Over Input Select Command m j Selects the input for fail over Transmission m j Set ID Data1 Data2 Data3 Data4 Cr Data 1 to 3 Input priority 1 to 3 90 HDMI1 91 HDMI2 C5 USB C Data 4 E1 USB Acknowledgment j SetID OK NG Data1 Data2 Data3 Data4 x 38 Remote Control Lock Command t p Configures the settings o...

Page 34: ...teway 81 Configures views the temporary DNS address 82 Saves temporary settings and views information about the current network If Data1 is 80 Data2 00 Auto 01 Manual FF Views the temporary IP mode Auto Manual subnet mask and gateway If Data2 is 01 Manual Data3 Manual IP address Data4 Subnet mask address Data5 Gateway address If Data1 is 81 Data2 DNS address FF Views the temporary DNS address If D...

Page 35: ...w Set ID OK NG Data x 42 JustScan Toggle Command s n 91 Sets JustScan Transmission s n Set ID 9 1 Data Cr Data 00 Off 01 On Acknowledgment n Set ID OK NG 9 1 Data x 43 Password Change Command s n 94 Changes password Transmission s n Set ID 9 4 Data1 Data2 Data3 Data4 Cr Data1 to 4 0 to 9 Acknowledgment n Set ID OK NG Data1 Data2 Data3 Data4 x ...

Page 36: ......

Reviews: