REMOTE CONTROLLER INSTALLATION
ENGLISH
15
3
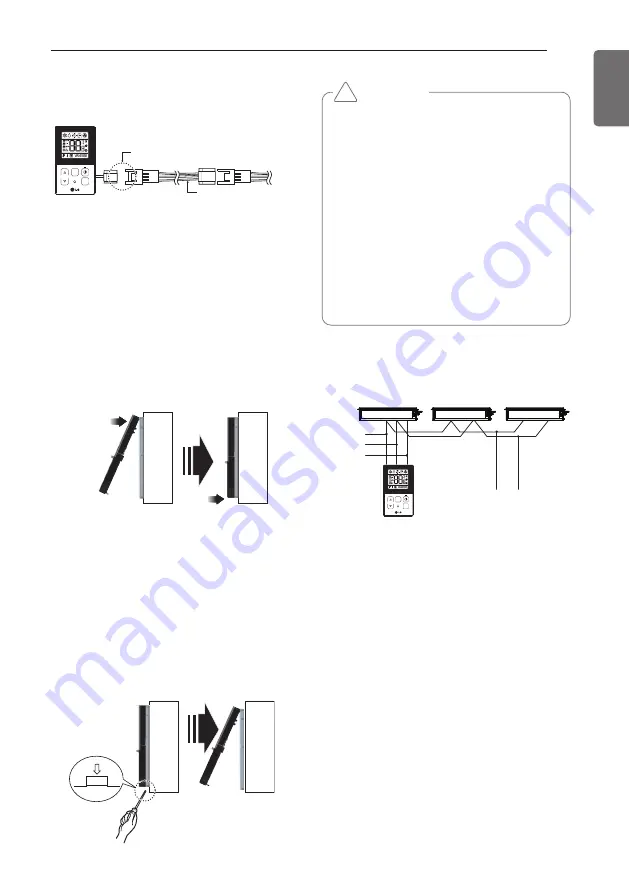
Please connect indoor unit and remote
controller using connection wiring.
4
Please use extension wiring if the distance
between wired remote controller and in-
door unit is more than 10 m.
5
Please fix remote controller upper part into
the setup board attached to the surface of
the wall, as the picture below, and then,
connect with setup board by pressing
lower part.
- Please connect not to make a gap at the
remote controller and setup board’s
upper and lower, right and left part.
When separating remote controller from
setup board, as the picture below, after in-
serting into the lower separating hole
using screw driver and then, spinning
clockwise, remote controller is separated.
- There are two separating holes. Please in-
dividually separate one at a time.
- Please be careful not to damage the in-
side
components when separating.
Group control
1
When installing more than 2 units of air
conditioner to one wired remote controller,
please connect as the right figure.
- If it is not event communication indoor
unit, set the unit as slave.
- Check for event communication through
the product manual.
2 When controlling multiple indoor units with
event communication function with one
remote controller, you must change the
master/slave setting from the indoor unit.
- Indoor units, the master/slave
configuration of the product after
completion of indoor unit power ‘OFF’
and then ‘ON’ the power after 1 minutes
elapsed sign up.
Please check if connector
is normally connected.
Connecting
wiring
Indoor
unit
side
TEMP
FAN
SPEED
OPER
MODE
Wall
Side
Wall
Side
<Connecting order>
Wall
Side
Wall
Side
<Separating order>
CAUTION
When installing the wired remote controller,
do not bury it in the wall. (It can cause dam-
age in the temperature sensor.)
Do not install the wiring to be 50m or
above. (It can cause communication error.)
• When installing the extension wiring,
check the connecting direction of the con-
nector of the remote controller side and
the product side for correct installation.
• If you install the extension wiring in the
opposite direction, the connector will not
be connected.
• Specification of extension wiring: 2547
1007 22# 2 core 3 shield 5 or above.
!
GND
GND
12V
Signal wire
Signal wire
TEMP
FAN
SPEED
OPER
MODE
Summary of Contents for ABNQ18GM1A0
Page 26: ......


