


96
Due to our policy of continuous product innovation, some specifications may change without notification.
©LG Electronics U.S.A., Inc., Englewood Cliffs, NJ. All rights reserved. “LG” is a registered trademark of LG Corp.
LG
Air-Cooled Cooling Only Inverter Scroll Chiller Installation and Owners Manual
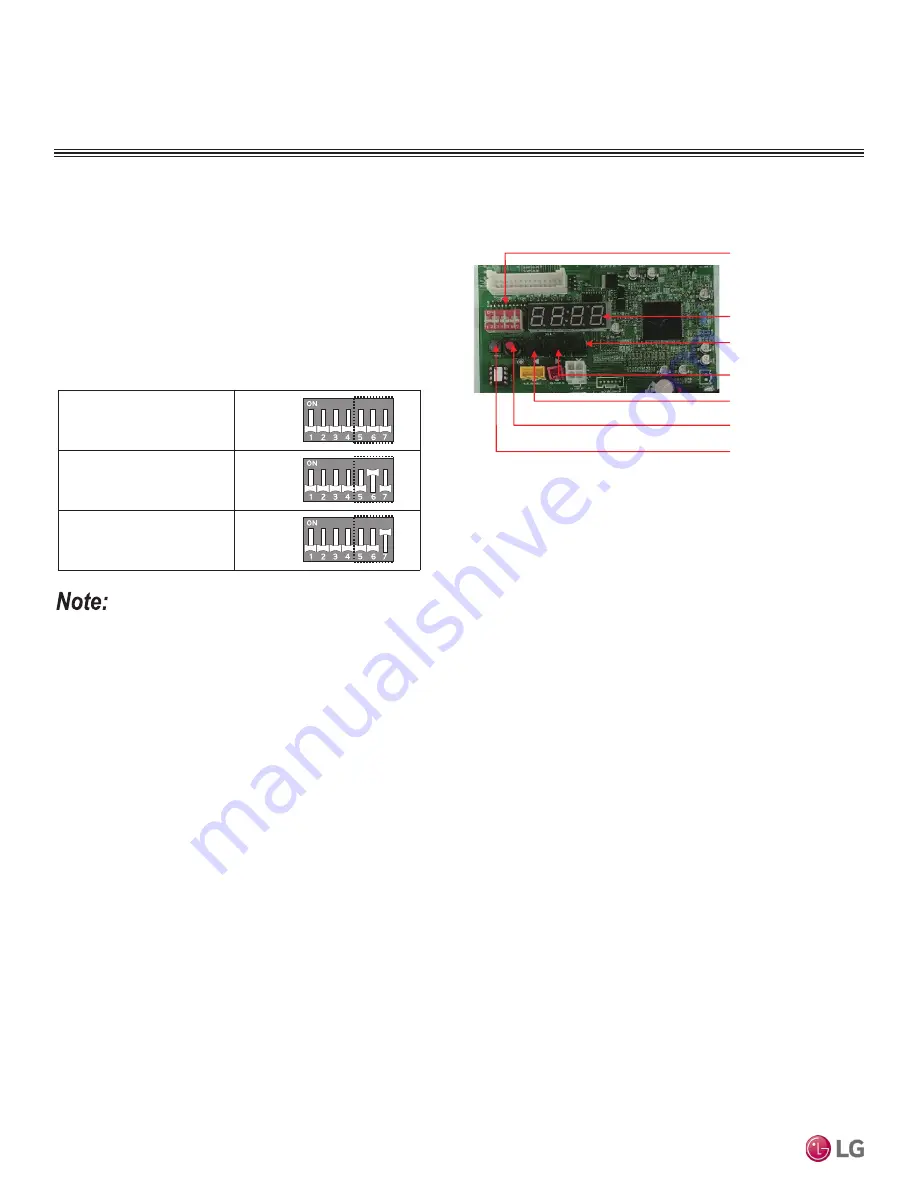
Setting the Control Box Address (Set Cycle PCB Address)
1. Select the address by turning DIP switches Nos. 5, 6, and / or 7
on SW01B at the top right corner of the PCB to ON / OFF.
• If there is only one (1) cycle PCB connected to the chiller‘s main
controller, use only Cycle Address No. 1 (see table below).
2. After selecting the cycle address using the DIP switches, always
press the Reset button to complete the setting.
DIP-SW01
SSD
SW04C (X : Cancel)
SW03C (► : Forward)
SW02C (◄ : Backward)
SW01C (
●
: Confirm)
SW01D (Reset)
• If there is only one (1) cycle PCB connected to the chiller‘s main controller, Cycle Address No. 1 must be used or the chiller will not operate.
• When replacing the cycle PCB, always run the automatic address setting procedure again. Automatic address setting procedure must be
performed with all connected cycle PCBs and HMI PCB connected. If it is not performed, it will result in operation error.
• When setting the address, check and change other control box PCB address within the chiller. PCB address for replacements is set to 1. If
the control box PCB address is duplicated, the chiller will not operate.
• Control box PCB addresses are set to 1 as factory default.
Figure 39: Cycle PCB (Appearances May Differ).
ELECTRICAL
Setting the Control Box Address (Set Cycle PCB Address)
Table 17: Setting the Control Box Address.
Cycle address: 1
(DIP switch: #6, #7 OFF)
Cycle address: 2
(DIP switch: #6 ON / #7 OFF)
Cycle address: 3
(DIP switch: #7 ON / #6 OFF)
SW01B
SW01B
SW01B


